Elektroda.com
Elektroda.com
X
This content has been translated flag-pl » flag-en View the original version here.
  • DIY electrolytic polisher
    I have a very useful device to present in the laboratory of dental prosthetics for the final processing of metal structures ("flash").
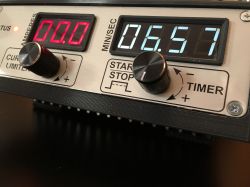
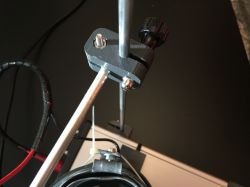
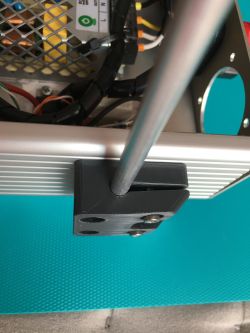
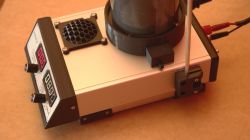
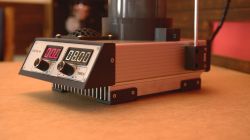
    3D printing made it possible to produce the most closely matched, necessary elements of a magnetic stirrer, adjustable rod clamps, ventilation ducts and a front panel frame inclined at an angle of 60 ° to the base plane for easy reading of displays. I made the projects using FreeCAD. The slicer is a SuperSlicer. I used PLA filament from Plast-Spaw. The layer height is 0.2mm.
    The whole thing is closed in a Hammond housing made of extruded aluminum.
    Smooth regulation of current intensity and step (encoder with button) regulation of working time in steps of 30 seconds, pause function, status LED indicator and sound signaling of the end of the process.

    Current regulation:
    https://leon-instruments.blogspot.com/2010/03/zasilacz-regulowany-20v-5a.html

    Ammeter:
    http://danyk.cz/avr_adc_en.html

    Timer:
    https://arduinoplusplus.wordpress.com/2016/02/27/led-display-relay-timer/

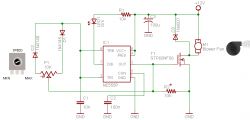
    Stirrer PWM controller:
    DIY electrolytic polisher

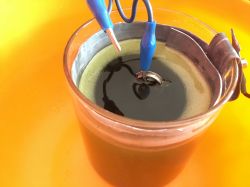
    The electrolyte I use is ELEKTROL by Chema (composition: ethylene glycol, sulfuric acid, hydrochloric acid).
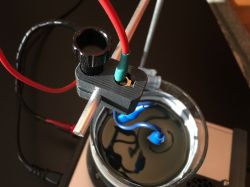
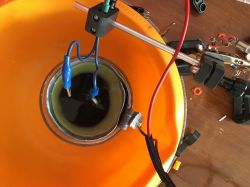
    The anode is a polished piece and the cathode is a lead sheet formed into a cylinder. It can also be a copper sheet.
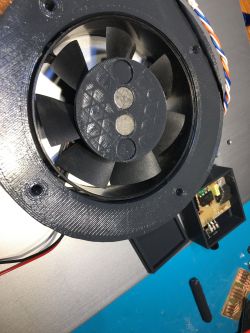
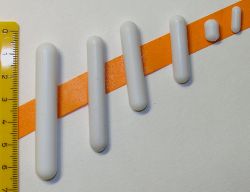
    An 80 mm fan works as a stirrer. 10x3 mm magnets. The "jumping" stirrer in the jar contains 3 pcs. 4x4 mm cylindrical magnets.
    The pendant with alligator clips is connected to the power cord by means of a connector from an electric cube hidden in a printed clamp.
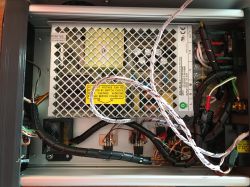
    Instead of a mains transformer, I used a 24V 6A modular power supply.
    The working voltage is approx. 16V.

    STL files:
    https://www.thingiverse.com/thing:4869317
    DIY electrolytic polisher DIY electrolytic polisher DIY electrolytic polisher DIY electrolytic polisher DIY electrolytic polisher DIY electrolytic polisher
    DIY electrolytic polisher DIY electrolytic polisher DIY electrolytic polisher


    Cool? Ranking DIY
    Do you have a problem with Arduino? Ask question. Visit our forum Arduino.
    About Author
    Bobo[PL]
    Level 14  
    Offline 
    Bobo[PL] wrote 150 posts with rating 343, helped 2 times. Live in city Zabrze. Been with us since 2006 year.
  • #2
    adversus
    Level 32  
    A stirrer with these 3 neodymium mates does the same? Is it for sale? If so, how did he sink the magnets and in what material?
  • #3
    mycodename47
    Level 15  
    Nice made, but I have concerns about the air vent at the top of the case. I know that if you work carefully, you shouldn't spill anything, but there is a risk, and there is power inside.
  • #4
    Bobo[PL]
    Level 14  
    adversus wrote:
    A stirrer with these 3 neodymium mates does the same? Is it for sale? If so, how did he sink the magnets and in what material?

    Alone. An element with magnets, printed with PLA filament, fitted to the fan "press-fit" and glued with poxipol. Then I heated the places for the magnets with a propane-butane burner and flooded them. The magnets cannot be heated because they stop being magnetized.

    mycodename47 wrote:
    Nice made, but I have concerns about the air vent at the top of the case. I know that if you work carefully, you shouldn't spill anything, but there is a risk, and there is power inside.

    Facts. The grille has space for a filter, for example one for kitchen hoods, but this has not yet been seen in the film and photos.
  • #5
    adversus
    Level 32  
    Bobo[PL] wrote:
    adversus wrote:
    A stirrer with these 3 neodymium mates does the same? Is it for sale? If so, how did he sink the magnets and in what material?


    Alone. Element with magnets, printed with PLA filament, fitted to the fan "press-fit" and glued with poxipol. Then I heated the places for the magnets with a propane-butane burner and flooded them. The magnets cannot be heated because they stop being magnetized.


    My colleague did not understand the question, or I asked incorrectly, so I will clarify it. I mean the stirrer in the vessel, as my colleague called it "jumping in the jar" made of 3 cylindrical 4x4 mm neodymium. Is it a ready-made solution or a proprietary solution, and if it's your own, is it something more about it?
  • #6
    Bobo[PL]
    Level 14  
    adversus wrote:
    My friend did not understand the question, or I asked incorrectly [...]

    forgive :)
    Printed two halves of a cylinder with a cylindrical recess inside for magnets. Both halves stuck together with poxipol.
  • #7
    adversus
    Level 32  
    Bobo[PL] wrote:
    Printed two halves of a cylinder with a cylindrical recess inside for magnets. Both halves glued with poxipol.

    And that's what I meant :) I have been playing with 3D printing for some time, but I am wondering, firstly, whether such a printout will be tight (with you a magnet can corrode) and secondly, whether printing materials, e.g. PLA, which is allegedly biodegradable or PET-G, are resistant for this type of baths?
  • #8
    Bobo[PL]
    Level 14  
    Good question, but I must clarify that the stirrer element, in which the cylindrical magnets are closed, is made of PET-G. And I did so that first I pressed glue into the printed halves of the stirrer, and then I pressed magnets into the glue. I believe magnets are safe that way :)
  • #9
    indianka
    Level 15  
    Where did the idea for such a useful device come from? In my opinion, it will be useful not only in dental prosthetics, but wherever you need to polish something irregularly shaped. Are you professionally involved in the prosthetics and dentistry industry, or did you make this device just for someone? Very nice workmanship. I already wanted to write that there is no final polishing effect, but you can see everything in the film. As for the principle of operation, are there any rules-tables what alloy with what current and voltage should be treated during this process? BTW. congratulations on the project.
  • #10
    Bobo[PL]
    Level 14  
    Thank you for your words of appreciation.
    I am a dental technician by profession. I used to make a few such devices, but back then I had no idea about 3D printing and they didn't have a stirrer. A "professional" colleague asked me to do such a polishing. You have to be aware that everything in the name "dental" or "prosthetic" costs way too much, and this way I just wanted to help in starting a one-man business. Of course, it is possible to polish the element with polishing paste and a spinning felt disc, but reaching the nooks and crannies of complicated shapes is sometimes impossible, and the perfectly polished surface of the frame denture makes it much easier to keep clean.
    In dentistry, chromo-cobalt (Cr-Co) alloys are used to make skeletal dentures and crowns or bridges, but nickel-containing alloys are being abandoned due to frequent allergies. This device is applicable to such alloys. Other metals need different voltage values and a different chemical composition of the electrolyte for the polishing process.
  • #11
    janek_wro
    Level 29  
    Bobo[PL] wrote:
    Good question, but I must clarify that the element of the stirrer, in which the cylindrical magnets are enclosed, is made of PET-G. And I did so that first I pressed glue into the printed stirrer halves, and then pressed the magnets into the glue.

    Why such combinations? Ready-made laboratory Teflon stirrers are available. They don't cost a fortune, chemically resistant Teflon.
    DIY electrolytic polisher
  • #12
    ArturAVS
    Moderator HP/Truck/Electric
    Cool equipment, tell what metals / alloys this electrolyte is suitable for, because on the manufacturer's website there is a note:
    Quote:
    Preparation for electrolytic polishing of Cr-Co-Mo dental alloys

    And I would have a few details to polish, where the main alloy components are copper and tin.
  • #13
    Bobo[PL]
    Level 14  
    Different metal alloys require different electrolytes and bath parameters. For copper, the electrolyte component is phosphoric acid, chromic anhydride and thiourea. Unfortunately, I have no experience with alloys other than Cr-Co.
  • #14
    jacki99
    Level 11  
    The current is shown on the display, what is the voltage?
  • #15
    Bobo[PL]
    Level 14  
    jacki99 wrote:
    The current is shown on the display, what is the voltage?

    For chromocobalt around 15 ... 16V, so I took 15.8V.
  • #16
    jacki99
    Level 11  
    Thanks for the answer, and what current should not be exceeded?
  • #17
    Bobo[PL]
    Level 14  
    jacki99 wrote:
    Thanks for the answer, and what current should not be exceeded?


    For dental technology purposes, 3.5A is ideal, but the current depends on the polished surface. You can experiment with the value of the current and the time.
  • #18
    janek_wro
    Level 29  
    In all electrochemical processes of this type, the current density per unit area of the electrode is important.
    So the ampere alone is not enough ;)