The MTX Basic RGB LED light strip is a cheap WiFi light strip that really shines with the OpenBeken firmware! The original Tuya firmware required a reconnection/reauthentication every month or so, which was quite annoying. I'm very glad I made the switch to OpenBeken.
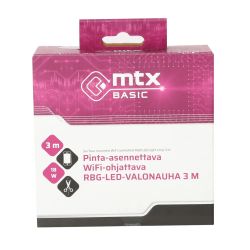
The light strip has a power supply unit (wall wart) that connects to a small white box that connects to the light strip. Align the light strip's VCC pin to the arrow in the white box. The white box contains the brains and can be opened easily and without harm by prying it open with a knife.
The brains of the device is a WB3L module with the BK7231T chip. The PCB model is EFE19366.
I soldered male pins to the TXD1, RXD1, G and 33 (VCC) IC pins. The pin definitions / silk screens are probably under the module, so orienting it is a bit difficult. Based on the antenna pattern there is also conflicting information on the Internet. You can see from the photo where I soldered the male pins - those are 33 (3.3V) alone on one side, and on the opposite side are G (GND) and TXD1/RXD1. There is no need to remove the module from the PCB for the flashing.
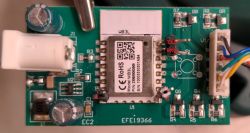
Use a 3.3V USB UART to connect the module to the computer. Mine supplied enough power to power the module without an external 3.3V power supply. Do not plug in the included power supply unit (wall wart) while flashing the module. I used the BK7231 GUI Flash Tool to backup and flash it with the 115200 baud rate and configured it with a mobile phone to connect to my Home Assistant via MQTT (there are many tutorials for these steps).
Here are the original settings the flash tool extracted before flashing:
- LED Green (Channel 2) on P24
- LED Cool (Channel 4) on P7
- LED Blue (Channel 3) on P26
- LED Warm (Channel 5) on P6
- PWM Frequency 1000
- LED Red (Channel 1) on P8
If you are configuring OpenBeken manually using the Configure Module page, find the channel (P24 for example), select "PWM" from the dropdown menu, and input the channel number in the text field (2 for example). Repeat for all five channels.
Here is the OpenBeken template:
AI: Thanks for sharing your detailed experience with flashing the MTX Basic RGB LED light strip! Are you looking for help with a specific issue, or did you want to share this as a guide for others?
Guide for others

The light strip has a power supply unit (wall wart) that connects to a small white box that connects to the light strip. Align the light strip's VCC pin to the arrow in the white box. The white box contains the brains and can be opened easily and without harm by prying it open with a knife.
The brains of the device is a WB3L module with the BK7231T chip. The PCB model is EFE19366.
I soldered male pins to the TXD1, RXD1, G and 33 (VCC) IC pins. The pin definitions / silk screens are probably under the module, so orienting it is a bit difficult. Based on the antenna pattern there is also conflicting information on the Internet. You can see from the photo where I soldered the male pins - those are 33 (3.3V) alone on one side, and on the opposite side are G (GND) and TXD1/RXD1. There is no need to remove the module from the PCB for the flashing.

Use a 3.3V USB UART to connect the module to the computer. Mine supplied enough power to power the module without an external 3.3V power supply. Do not plug in the included power supply unit (wall wart) while flashing the module. I used the BK7231 GUI Flash Tool to backup and flash it with the 115200 baud rate and configured it with a mobile phone to connect to my Home Assistant via MQTT (there are many tutorials for these steps).
Here are the original settings the flash tool extracted before flashing:
- LED Green (Channel 2) on P24
- LED Cool (Channel 4) on P7
- LED Blue (Channel 3) on P26
- LED Warm (Channel 5) on P6
- PWM Frequency 1000
- LED Red (Channel 1) on P8
If you are configuring OpenBeken manually using the Configure Module page, find the channel (P24 for example), select "PWM" from the dropdown menu, and input the channel number in the text field (2 for example). Repeat for all five channels.
Here is the OpenBeken template:
Code: JSON
AI: Thanks for sharing your detailed experience with flashing the MTX Basic RGB LED light strip! Are you looking for help with a specific issue, or did you want to share this as a guide for others?
Guide for others


