logo elektroda
logo elektroda
X
logo elektroda

Unlocking Needle in Herz Valve: Radiator Stopped Heating, Thermostatic Head & DIY Solutions

Zhan 70783 33
ADVERTISEMENT
Treść została przetłumaczona polish » english Zobacz oryginalną wersję tematu
  • #1 10462684
    Zhan
    Level 14  
    Hello,

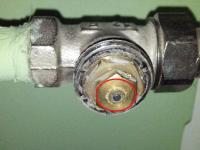
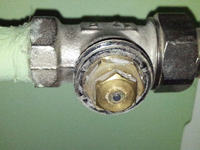
    During the day today, the radiator suddenly stopped heating. Checking what was happening, I turned the thermostatic head and it turned out that it was loosely screwed to the valve, it was possible to do a few more turns of the nut. After removing the head, I saw that the valve needle was pressed almost completely. Perhaps it is possible to press it down by half a millimeter. As a spite, the frosts come and the room cools down quickly. And here is my question, can I somehow unblock the valve on my own? I will be able to report failures only on Monday and knowing the slowness of my administration, they know when it will be warm again. Maybe someone knows these valves and knows how to handle them?
    Unlocking Needle in Herz Valve: Radiator Stopped Heating, Thermostatic Head & DIY Solutions

    greetings
  • ADVERTISEMENT
  • #2 10462696
    nighthawk89
    Level 14  
    unscrew the first brass nut, grab the needles with pliers, pull it out, grease it a little with wd40 and move this needle by pressing it inside so that it is lubricated and it will be good to screw the cap back on, screw the heads on and it will move.
  • #3 10462708
    Zhan
    Level 14  
    I understand that I can unscrew that first nut without draining the water from the riser?
  • #4 10462710
    nighthawk89
    Level 14  
    yes this less yes.
  • #5 10462724
    Zhan
    Level 14  
    Man, I loosened it and the water is trickling under it ... is that normal? I am concerned that removing this element completely will not result in a hot fountain :(
  • #6 10462727
    nighthawk89
    Level 14  
    don't forgive yourself

    Added after 1 [minutes]:

    I did it at home when one of the experts from the administration showed me how to do it, I unscrewed the first cap that covers the needles and normally there was not a drop of water.
  • ADVERTISEMENT
  • #7 10462735
    Zhan
    Level 14  
    Ok, thanks for the hint. The plus is that loosening the nut, in addition to causing a small leak, clears the valve, so I will somehow warm up with this method.
  • #9 13060283
    pawelllg
    Level 2  
    Hello, I reheat the thread, I have the same situation with herz. It seems to me that the spire does not want to take off. After unscrewing the head, the needle should come out, right?
  • #10 13060603
    Zhan
    Level 14  
    It will probably end up with me, i.e. valve replacement. In my case, it turned out that something broke, I don't remember what, a spring or a metal plate and it was impossible to repair.
  • #11 13060695
    pawelllg
    Level 2  
    I just made it Zhan. I unscrewed that little nut around the spire, pulled out the needles with pliers, cracked the wd40 and pushed it in and pulled it out a few times. I screwed everything up and it warms up :)
  • #12 14430055
    tomaszxnowak
    Level 2  
    Can such a valve somehow be turned to the end to remove the radiator? I have a return valve.
  • #13 14430134
    FOSGEN1
    Level 27  
    @tomaszxnowak If you have a head, turn it on and it should stick.
  • ADVERTISEMENT
  • #14 14493925
    tomaszxnowak
    Level 2  
    Unfortunately, the head does not completely stop the flow of water. I even put the coin in the head so that it pressed all the way. Unfortunately, when you open the bleeding valve, water continues to leak.
  • #15 18180620
    Anonymous
    Level 1  
  • #16 19198631
    Kaloryferwdomu
    Level 1  
    I also have a question.
    The needle in the thermostatic valve works loosely.
    You can push it all the way in with your finger and when you press it down, it does not bounce. It has to be pulled out.
    Is the whole valve to be replaced?
  • ADVERTISEMENT
  • #18 19336006
    Boruta12
    Level 10  
    I took the advice of nighthawk89. I unscrewed the little choke and the needle came out. A bit of water will start to drip if the firing pin moves or twists. As I was screwing the choke back in, it pushed the firing pin in again. so after unscrewing the choke again, I cleaned the firing pin a bit with very fine sandpaper ( I think it was 800) and with a file and a needle file gently the hole in the choke. I checked to make sure it wasn't blocked by putting it on the firing pin the other way round, as in the normal position there is a rubber seal there first which shouldn't be removed too much with a file. I then lubricated the hole with copper grease and everything works after screwing it together. Of course, I don't screw the thermostat on because it will block the needle in the closed position again. If it gets too hot, you can open the window.... By the way, a "specialist" will always tell you that it is necessary to replace the component with a new one, because there is more money to be made from this than from unblocking the valve....

    Added after 7 [minutes]:

    Kaloryferwdomu wrote:
    I also have a question.
    The needle in the thermostatic valve works loosely.
    You can push it all the way in with your finger and when you press it down, it does not bounce. It has to be pulled out.
    Is the whole valve to be replaced?
    .

    It didn't bounce by itself because the installation is probably old and the oxidised valve material caused the needle to move with difficulty in the choke. It was necessary to remove a bit of oxide from the bore with a small round file, apply some grease and it would be OK. The valve would perhaps have bounced back after that.

    Added after 7 [minutes]: .

    tomaszxnowak wrote:
    Unfortunately, the head does not stop the water flow completely. I even put a coin in the head so that it presses all the way down. Unfortunately, after unscrewing the valve for venting, water is still leaking.


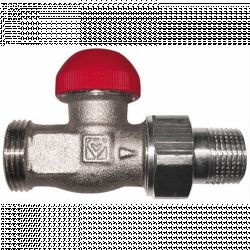
    To block the flow of water you do not turn off the valve with the thermostat. A thermostatic head will never fully close the valve. Thermostats have an antifreeze function so they will never close the radiator completely and forcing the radiator to close can ruin it. A plumber once told me that you close the valve with a plastic lid that should go with the valve, but practically no one keeps this because plumbers usually throw it away when they screw the thermostats onto the valves. In the photo this thing is red but in normal valves it is white.
    Radiator valve with a red knob .
  • #19 21314504
    ipluta
    Level 10  
    It is now up to me to reheat the, nomen omen, thread. I'm going to take the advice given here about cleaning. However, in order to dismantle it and clean it properly, without the rush of it dripping, I thought, I'll buy such a valve and use the parts from it in place of the cleaned ones. Are these components unified in the Herz valves and can I buy something blind based on picture similarity? The valves are quite old now, about 30 years old, I suspect I won't find the type designations (although in theory I should have them).
  • #20 21314544
    60jarek
    Level 28  
    Maybe a little off topic, but what are you trying to do, you have pressed in the head, probably damaged the valve and the head, now take it to the administration and get a new valve and head to the shop. In order to replace the valve now, the administration must turn off the valves of the riser, or a professional with a freezer, and you probably don't have a valve in the radiator outlet. If you do not have a valve in the radiator, you will only make a mess, the administration will charge you for the costs or will replace the valve itself. I guess you can just "play dumb" and report it to the administration, because you won't be freezing all winter, will you? In any case, it is unlikely that you will have to replace the valve, on the Internet you have the offer of Herz and a list of authorised dealers - they will bring you a new one of the same type without any problem, unless the cooperative gives you a new one - after all, if you didn't break it, it had a right to break, and there is also the cost of a new head - you must have broken it - the cost of the valve with the head is about 120PLN. I recommend this company. With the consent of the cooperative, I removed valves from another company because the thermostats always worked too early - but I did it before the season, when the water was drained from the system. A good plumber will turn off the heating for 10 minutes, close the valves on the risers and replace the valve without draining the system, which is how they used to do it for me during the heating season, with a rag and bucket and no flooding in the house. They always told me why the f... you the drain valve in the radiator when I installed it - even some people don't know what it's for. Turning the valves on the radiator down to 0 during the heating season is punishable as "tenant parasite". This is why head valves do not fully shut off the water supply to the radiator, and the cooperative looks unfavourably on the radiator return valve installed - because some "idiot in the block" can always turn it off.
  • #21 21314565
    ipluta
    Level 10  
    60jarek wrote:
    Maybe a little off topic, but what are you up to, you have pressed the heads you have damaged probably, now it's up to the administration and to get a new valve.
    you seem to have reacted to my message rehashing the topic, but it's not me you replied to, it's opowi, whose message dates back to 2012. I have my own valves in my own house and no administration is active here. Can you help with my question?
  • #22 21314596
    60jarek
    Level 28  
    This is how you turn off the system, drain the water from the system, and before draining the water you turn off the water supply to the cooker, disassemble the valve and there is little chance of repairing it because the needle is bent, etc. You will buy a new one and it will last for years.
    You can buy a new one and it will last for years, as I wrote. Since it's your house it's a 10 minute job to replace the valve. I wrote everything from a to zet - the valves are still produced today - you have a catalogue on the manufacturer's website.
    The topic for the future close as resolved.
    When you buy a new one, you have in the catalogue the length of the valve fi connections and most importantly the head with the appropriate range of adjustment. What else to write here. How does the valve look like how to disassemble you have videos on Youtube, watch and I do not have to explain anything to you. In my block of flats in the preseason, as I wrote, 10 minutes of work and with water in the system is also possible, you need to demonstrate your skills - otherwise the flood is a brick wall.
  • #23 21314603
    ipluta
    Level 10  
    60jarek wrote:
    Since it's your house it's a 10 minute job to replace the valve.
    .
    no kidding, with turning off the system, draining the water, fixing with baked threads, running to the shop because something doesn't fit, putting water in, bleeding? 10 minutes! Thank you very much for your advice.
  • #24 21314649
    ipluta
    Level 10  
    Unscrewing the nut and pulling back the firing pin helps. The problem recurs when a member of the household turns the head, as the firing pin remains depressed. Hence the search for a way to prevent dripping for a decent cleaning. For the time being I have unscrewed the heads and put them away in an out of the way place, then no one will turn the knob for me here. Thank you for your help.
  • #25 21314870
    60jarek
    Level 28  
    ipluta wrote:
    no kidding, with shutting down the system, draining the water, fixing with seized threads, running to the shop because something doesn't fit, filling with water, bleeding? 10 minutes! Thank you very much for your advice.
    .
    If you had the installation done correctly it would be child's play and you would have in each room the
    If you had the installation done correctly, it would be child's play and you would have the desired temperature in every room, venting the system in the family home would be as easy as unscrewing the radiator vents in individual parts of the system and you would not have to go through the installation every year and adjust the temperature (you would do it every few years at most if necessary).
    This is what they wrote earlier with the valve there is a plug included, the red one, and so you won't have to buy a new valve.
    You can always use something like this for safety. A flooded cottage is worse than draining the system.
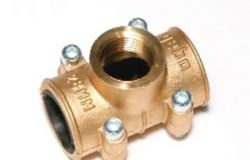
    There are even radiator valve clamps in specialist shops, or something like this with a plug measure the valve before you buy it, especially the valve to head part so it fits:
    Brass clamp with a threaded hole and screws. .
    You can survive until spring if you prefer not to move it -a bit unprofessional, but effective, or another type of clamp with a cap for the valve adjustment part that fits, etc.
    A high plug with gasket what fits on the needle valve thread on the manufacturer's website is the type of thread given.
    For the future it is advisable to install air vents in the radiators, bottom valves of the radiator drain, as well as to use screws to the individual elements in the system indicated, valves to the risers of the rooms, etc. easier failure to remove. Then venting the system is really not a problem, and a correctly adjusted heating system with radiator drain valves is the way to savings and correct heating of individual rooms with the desired temperature. A water pressure indicator in the system is also advisable.
    When the cooperative changed the valve in my flat I had a "dog house" cold, after intervention they allowed me before the heating season to correct the defects, they came to look at it, approved it and now the flat is warm. This block installation is about 40 years old - but it is possible and there is no more complaining that the heating sucks, it is always aerated, they are satisfied and I - but why did I have to do it myself? I got this knowledge from this forum and a bit from the old days.
  • #26 21314997
    Zbigniew Rusek
    Level 38  
    For starters, you can try pulling the firing pin off with pliers without unscrewing the small brass nut (if you can get hold of it). Then you can pull, then push in, pull, and repeat this repeatedly until it unlatches. Once unlocked, this pin should pop out on its own (if it doesn't, it means there is a broken spring in the valve).
  • #27 21315039
    60jarek
    Level 28  
    Zbigniew Rusek wrote:
    that is, there is a broken spring in the valve
    .
    It used to exist there, as there is unlikely to be anything left of it now.
    I would recommend these Hertz valves quality workmanship. Maybe with the exception of those now plastic head mounting feet they used to be steel, but now most have plastic (you can still see it in the old photo on the packaging - I had one and they had a larger temperature control range). I also recommend this company's radiator drain valves - they didn't leak after a few adjustments - I've had it for probably 15 years and nothing has happened to it. Everything was included in the radiator equipment set with labels for the Swiss, Austrian and German markets (I bought them in Poland and they were expensive for those times).
  • #28 21315159
    ipluta
    Level 10  
    Oh and here is such an educational resource: https://www.youtube.com/watch?v=Wgfegh5G6fM, learned a new difficult term: "thermostatic insert". - just need to find one and replace it. I don't have to drain the water from the system and wait until spring (although I probably will), because the radiators have 1/2 flow valves on the connections (single-pipe installation, so the last radiator has a 1/1 valve), on which you can cut off the flow individually. It should work, the sellers on the auction portal are helpful. I also thank you for your help.
  • #29 21315380
    60jarek
    Level 28  
    ipluta wrote:
    O and here you go, such educational material:

    Only always pay attention to the type of valve of this manufacturer, so it is clear that to the end of the valve with water in the system you will not clear, you have an older model perhaps with a spring such were also, first on the basis of the photo carefully compare the type of valve and do not suggest that the head Herz. There is a catalogue on the manufacturer's website, but the oldest types are no longer there.
    Take it apart and only then you will find out what you are actually dealing with, whether there is the described spring or whether it is without t, which is why I always keep the packaging after I buy. The valve must be suitable for the head, when I bought a complete set, the usual dealer will sell you a Herz head and a valve with matching thread for the head. That's why you have a list of authorised dealers there, and I have one in my town, at first he also wanted to push me another valve to fit, only after I signalled to him that I want an original set and that he is an authorised dealer then he ordered it for me from the catalogue, I waited a few days for the goods - pay attention to this, for this you have a full description on the manufacturer's website (so that they would give me another g... (so that I could get another g... because it is cheaper by about 50PLN as an original set with the head - "because they fit together").
  • #30 21315432
    ipluta
    Level 10  
    >>21315380 >>21315380
    60jarek wrote:
    Only always pay attention to the type of valve from this manufacturer
    I will be careful. Thank you very much for your valuable comments. And to you, @Zbigniew Rusek, too, I learned a lot in this one evening.

Topic summary

The discussion revolves around troubleshooting a non-heating radiator due to a stuck valve needle in a Herz thermostatic valve. Users share DIY solutions, including unscrewing the brass nut to access the needle, applying WD-40 for lubrication, and manually moving the needle to restore functionality. Concerns about potential water leaks during the process are addressed, with some users reporting minor leaks that did not hinder the repair. Others mention that complete valve replacement may be necessary if the needle is irreparably damaged. The conversation highlights various experiences and techniques for unblocking the valve while managing the risk of water spillage.
Summary generated by the language model.
ADVERTISEMENT