logo elektroda
logo elektroda
X
logo elektroda

Renault Master II 2.5DCI 120 2006 - Setting Timing After Belt Breakage

patik1994 149145 30
ADVERTISEMENT
Treść została przetłumaczona polish » english Zobacz oryginalną wersję tematu
  • #1 13136550
    patik1994
    Level 11  
    Hello gentlemen!

    I have a problem with setting the timing in Renault Master II 2.5DCI 120 2006. The timing belt was broken, everything has been done but I can`t set it. Can someone give me some photos/tips on how to set it up? I can`t find any points. I set the small notch up on the shafts and the piston in the upper position, nothing sticks, but the car won`t start. You can hear it turning slower.

    Please help.
  • ADVERTISEMENT
  • #2 13136937
    Anonymous
    Anonymous  
  • #3 13136970
    Majeran123
    Level 11  
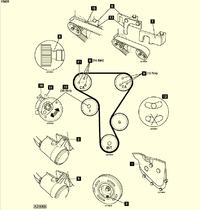
    Here is the replacement diagram.
    Renault Master II 2.5DCI 120 2006 - Setting Timing After Belt Breakage
  • #4 13137470
    Przemo9826
    VIP Meritorious for electroda.pl
    It has been described several times on the forum.

    patik1994 wrote:
    I set the small notch on the rollers to the top and the piston to the top position, nothing sticks, but the car won`t start.

    Well, you can now disassemble the head.
  • #5 13140497
    mati_1233
    Level 11  
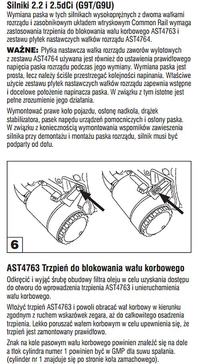
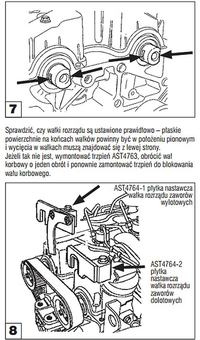
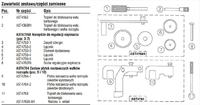
    Buddy, it`s best to buy locks, I paid about PLN 200 for all of them and you have a dci for each. As for the setting: you can make the shaft lock yourself, because it is an ordinary pin (you screw in the screw from the block near the base of the oil filter and insert it into the block, thus locking the flywheel. The timing gears have notches (on the timing side, right behind the wheel, there is a notch like using a flat spanner), the cuts should be vertical. If necessary, I can send you the locks with dimensions and you can make them yourself, as I don`t have such an engine in my workshop.
  • ADVERTISEMENT
  • #7 13141163
    Doktorr
    Level 35  
    The manual does not cover the correct setting of the high pressure pump wheel sensor.
    With the usual timing replacement, it's not important, but when the engine has lost synchro, it's a key issue because you have a 50 percent chance that the engine will start.
  • #8 13141792
    Melepeta36
    Level 14  
    Exactly! And 50% that it won't fire. And the timing will be set correctly.
  • #9 13142373
    Przemo9826
    VIP Meritorious for electroda.pl
    patik1994 wrote:
    On the rollers I set this small notch up and the piston in the upper position,


    patik1994 wrote:
    I hear it spins slower.


    Did you read the author at all??
  • Helpful post
    #10 13142461
    Megawe
    Level 34  
    Renault Master II 2.5DCI 120 2006 - Setting Timing After Belt Breakage

    Renault Master II 2.5DCI 120 2006 - Setting Timing After Belt Breakage

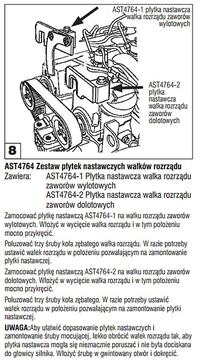
    Renault Master II 2.5DCI 120 2006 - Setting Timing After Belt Breakage

    Renault Master II 2.5DCI 120 2006 - Setting Timing After Belt Breakage
  • #11 13142478
    Przemo9826
    VIP Meritorious for electroda.pl
    Well, we already have three instructions for setting the timing (belt), but no one knows why three :D
  • #12 13143152
    patik1994
    Level 11  
    Thank you gentlemen for your help! The timing is set and the car fires right up! :)
  • #13 18449835
    majki23
    Level 12  
    hello, I bought a lock, unfortunately, not a set without a shaft lock, what are the dimensions of the diameter of this lock??
  • ADVERTISEMENT
  • #14 19528855
    Wafer
    Level 20  
    majki23 wrote:
    Hello, I bought the locks, unfortunately not a set without a shaft lock. What are the dimensions of this lock?

    7mm
  • #15 20385882
    andrzejjakubas20
    Level 1  
    What can be if the upper timing on the belt is standing and the one on the gears is spinning tan is there a wedge on the gear?
    Ps: the problem was a broken clinic going from the shaft.


    Acropolis of timing settings or these upper rollers should be set with a large withdrawal from the cabin or from the radiator. Because I've already seen a video of how they set them up anyway?
  • #16 20942313
    techlock
    Level 28  

    Can anyone tell me how to properly set the crankshaft? If you cannot unscrew the screw to insert the lock, the screw head is so loose that the socket wrench 13 slips off, and there is no access to do anything with it. The shaft is set more or less correctly, there is no mark on the pulley, how to check if it is perfect? Maybe the crankshaft position sensor can be used somehow.
  • ADVERTISEMENT
  • #17 20942348
    milejow

    Level 43  
    techlock wrote:
    if you cannot unscrew the screw to insert the lock, the screw head is so loose that the socket wrench 13 slips and access is impossible

    Access is difficult, but it is there, from the bottom, you need to weld on the nut and unscrew the screw. However, if there is not enough space, it remains to dismantle the front of the car, then the gap becomes exemplary
  • #18 20942371
    techlock
    Level 28  

    If there was access, you could insert a 12-gauge socket or a star, but there is no room to use a hammer or anything, so you can forget about welding. There is no point in dismantling the entire front, air conditioning radiator, etc., it's too much work. I asked about another way bypassing this block.
  • #19 20942494
    milejow

    Level 43  
    techlock wrote:
    you can forget about welding.

    Don`t tell me fairy tales because I`m too old

    Added after 43 [seconds]:

    techlock wrote:
    There is no point in dismantling the entire front, air conditioning radiator, etc., it`s too much work.

    Take it to a workshop, they`ll fix it there
  • #20 20942591
    techlock
    Level 28  

    Image of the engine mechanism interior with a clear marker.
    milejow wrote:
    Don`t tell me fairy tales, because I`m too old

    I was counting on a constructive answer. The engine in Espace 3, there is no room there, it is not Master. You had to ask what car.
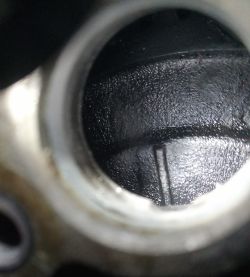
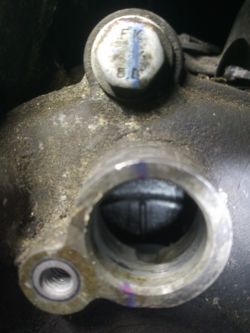
    After removing the injection pump sensor, you can see a mark (a sprue, a short line), but there is no reference point where the TDC is (in the middle of the sensor?). It`s faster to unscrew the sensor than to disassemble the entire front.
  • #21 20942704
    milejow

    Level 43  
    [/quote]
    techlock wrote:
    You had to ask what car.


    [quote="techlock"]The engine in Espace 3, there is no room there, it is not Master.
    Well... sorry, I`ll ask next time :)
  • #22 20942796
    techlock
    Level 28  

    milejow wrote:
    Well... sorry, I'll ask next time

    Sarcasm is unnecessary. Specifics or better not to write anything. I have already determined that the mark in the injection pump sensor hole should be exactly in the center of the hole, in line with the upper cover bolt. This is exactly TDC and you don't have to mess with the shaft lock screw. And here I will use sarcasm: Some old people prefer to weld or dismantle the entire front, and it doesn't hurt to think about it

    Added after 5 [hours] 4 [minutes]:

    If anyone needs it
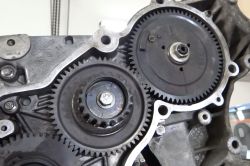
    Close-up of engine injection pump gears with visible alignment markings.
    TDC based on the injection pump gear mark.
    View of the injection pump sensor opening with a visible marker.
  • #23 20961530
    andytom
    Level 9  

    I have a similar problem. Nissan Interstar 2.5 DCI 145 HP. The engine was removed and thoroughly rebuilt. After putting it in the car and connecting everything together, it won't start. It starts for maybe 1 second and then turns off. If I hold the starter for longer, the sine wave tries to start and then turns off alternately. The timing was moved 180 to check - it didn't work at all, so I returned it to its original setting, the injection pump gear had a small line up as in the photo in this post. There is fuel, the pear is hard, the pressure on the rail is probably 300 bar, the speed sensor shows, the immo goes out, the 1 W bulb connected to the injector harness is glowing, so the signal for injection goes, the injectors worked until the end, but they were verified and cleaned at the Bosch service, bled. The SERV light and glow plugs are on. The glow plugs are good, they heat for 9 seconds but the indicator does not go off. Maybe any of you have any suggestions?
  • #24 20961665
    techlock
    Level 28  
    Here you can watch a video of setting the timing gears, maybe a mistake was made somewhere while assembling.


    These engines start even when all the glow plugs are burned out.
  • #25 20962305
    andytom
    Level 9  

    Thanks for the link, nice video, I've seen it before.
  • #26 20962395
    techlock
    Level 28  

    The inscription SERV can mean anything, even if there is fuel in reserve, SERV will also be displayed. It is possible that there is a short circuit somewhere in the glow plug power supply, it is worth checking whether the cables have a short circuit to ground. Check the crankshaft position sensor. It would be good to connect it to a computer dedicated to this model, the data is read via CAN, preferably CLIP, universal ones may not support this protocol.
  • #27 20962462
    andytom
    Level 9  

    Thanks for the tip. The crankshaft position sensor is actually new, there is 12V on the glow plugs when they are hot, so there is probably no short circuit on each of them. However, it probably won't be possible without a dedicated computer.
  • #28 20967029
    andytom
    Level 9  

    The engine started. Everything was set up well, but it needed more cutting, now it takes several hours a day. When it heats up, it may turn off suddenly. When it's warm, it doesn't want to start, so you have to think about something.
  • #29 20970848
    techlock
    Level 28  

    Generally, you need to load the engine, i.e. drive it and increase the revs. There may be a lack of power at first. The combustion computer will automatically set the valve timing and fuel doses until it is optimal. And this start-up is probably due to lack of fuel, 0.5 liters go into the filter itself. Even when replacing the filter, you need to turn the ignition key to position 2 several times before starting, until the tank feeding pump turns off, it works in this position for about 30 seconds. You can hear her work. This is how fuel lines are filled. Only then will the high pressure pump prime.
  • #30 20970861
    andytom
    Level 9  

    Thanks thanks. When it stops raining and there will be some time, I would like to take a look at the high pressure pump gear. Yes, I'm not 100% sure if it's out of position by some tooth. I placed the short mark in the axis of the cover screw hole and did not pay attention to the mark at the bottom.

Topic summary

The discussion revolves around setting the timing for a Renault Master II 2.5DCI 120 (2006) after a timing belt breakage. The original poster faced difficulties in aligning the timing correctly despite following initial steps, such as positioning the small notch on the shafts and ensuring the piston was at the top position. Forum members suggested purchasing timing locks, provided diagrams, and shared tips on creating a DIY shaft lock. They emphasized the importance of correctly setting the high-pressure pump wheel sensor, as incorrect timing could lead to a 50% chance of the engine starting. Several users shared images and instructions, ultimately leading to the original poster successfully setting the timing and starting the vehicle. Additional discussions included troubleshooting related issues with other models like the Nissan Interstar and Renault Trafic, focusing on timing settings and sensor checks.
Summary generated by the language model.
ADVERTISEMENT