logo elektroda
logo elektroda
X
logo elektroda

Identifying a Non-Heating Radiator Valve Type in a Rented Apartment

stanley274 22662 31
ADVERTISEMENT
Treść zostaÅ‚a przetÅ‚umaczona polish » english Zobacz oryginalnÄ… wersjÄ™ tematu
  • #1 16705858
    stanley274
    Level 10  
    Hello.

    First of all, I apologize for what may be a stupid question, but I`m new to this topic.

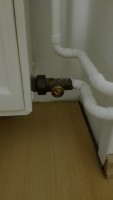
    I live abroad and I have a problem in my rented apartment. One of the radiators does not heat at all. I checked and there is no air. The water supply pipe is warm to the place shown in the photo of the valve (the closer to the valve, the colder the pipe is). All other radiators are working. Should I unscrew it? I am afraid of problems that cost money abroad and not at home. Yesterday I loosened it slightly and a few drops of water came out. Thank you all very much for any answers.
  • ADVERTISEMENT
  • #2 16705876
    Anonymous
    Level 1  
  • #3 16705883
    stanley274
    Level 10  
    The normal world here looks like this: up to 50 euros you can repair it yourself, above it is the owner and you wait for the plumber like a priest with a Christmas carol. He has the same big eyes for this valve as I do. I`m asking on the forum because maybe there is some trivial thing that someone can make some good money for.
  • #4 16705902
    arelektroda
    Level 23  
    In my opinion, it is the most ordinary valve at the outlet of the radiator. Take a screwdriver and try to turn it (to the right) counting full turns. If it is not closed, you will be able to turn it on, which means that everything is OK with it. If it cannot be closed to the right, it means that it is closed or choked. As much as you can, you can try to unscrew it so that its shaft and the screw do not protrude beyond the housing, as it may "pop out". There should be no more than a few turns from the closed to the open position. If it is closed, when opening it by turning it to the left after two or three turns, you should hear the sound of the heating medium flowing. Regards.

    Added after 2 [minutes]:

    and after a while the valve should be warm.
  • #5 16705906
    E8600
    Level 41  
    You have the solution here: Link
    Identifying a Non-Heating Radiator Valve Type in a Rented Apartment
    A valve that regulates the flow rate so that the radiators heat up evenly.
  • #6 16705907
    stanley274
    Level 10  
    Cool. Thank you very much for your specific answer. The valve is turned all the way to the right, yesterday when I turned it one turn to the left, two or three drops of water leaked out. Should I be afraid of this or is it normal?
  • Helpful post
    #7 16705910
    E8600
    Level 41  
    stanley274 wrote:
    The valve is turned all the way to the right, yesterday when I turned it one turn to the left, two or three drops of water leaked out. Should I be afraid of this or is it normal?

    Rather normal O-ring is old and that`s it.
  • ADVERTISEMENT
  • Helpful post
    #8 16705911
    arelektroda
    Level 23  
    The attached photo shows that the valve is closed or strongly choked because its stem is "hidden". Normally, this valve should also have a cap with a gasket. Test it on another radiator.
  • ADVERTISEMENT
  • #9 16705919
    stanley274
    Level 10  
    Yes, I just unscrewed it for the photo. I have another identical radiator next to it and this valve actually sticks out much more than the one in question. Thank you all for your help. I`ll do some experiments right after work.
  • #10 16705932
    arelektroda
    Level 23  
    This cap is there to avoid leaks.
  • #11 16705956
    stanley274
    Level 10  
    After 4 p.m. I will let you know what I managed to do. For now, many thanks

    Added after 3 [hours] 34 [minutes]:

    Gentlemen, the radiator is still cold. I unscrewed this thing all the way to the left. He didn`t even move. I raise the white flag and call a plumber. Many thanks for your help.
  • #12 16706390
    BUCKS
    Level 39  
    Was the thermostatic head twisted? If so, the valve may be blocked and does not allow water to flow through, the same may happen with the return valve. If it was twisted, the gasket could "stick" and block the flow.
    Generally, there are no miracles, pipes and valves have to be unobstructed so that the water flows and that`s the whole philosophy. ;) Make sure there are no other valves along the way that could shut off this radiator and block the flow.
    Alternatively, if it is not a problem, you can drain the water from the installation and unscrew the screw all the way and check if everything is clear.
    In the worst case scenario, you will have to replace the return or supply valve or both with new ones.
  • #13 16706394
    stanley274
    Level 10  
    Well, if this gasket is blocking the entire job, can it be repaired without a plumber? Are there any ways to do this? I`m sure it`s this valve because the hot water in the pipe is right in front of it.

    Added after 3 [minutes]:

    The head was still unscrewed. I will never drain the water myself because it is too expensive in an old German installation.
  • Helpful post
    #14 16706405
    BUCKS
    Level 39  
    the valve in the photo is a return valve, i.e. this is where the water leaves the radiator, and if there is hot water right behind it, it means that there is hot water returning from the other radiator.

    You won`t be able to check anything without draining the water, because if you unscrew the screw all the way, it will unscrew it and water will spray out of the pipes.

    If you have thermostatic valves, unscrew the thermostatic head (knob with numbers from 1 to 5), I use e.g. a 32 open-end wrench and see if the pin (pin) can be pressed in and whether it presses out on its own, returning to its starting position. You unscrew the head without interfering with the installation, so nothing will leak.

    The pin from the thermostatic valve presses in with great resistance, so use e.g. a coin to avoid imprinting the pin on your finger. ;)
  • Helpful post
    #15 16706553
    E8600
    Level 41  
    BUCKS wrote:
    If you have thermostatic valves, unscrew the thermostatic head (knob with numbers from 1 to 5), I use e.g. a 32 open-end wrench and see if the pin (pin) can be pressed in and whether it presses out on its own, returning to its starting position. You unscrew the head without interfering with the installation, so nothing will leak.

    The pin from the thermostatic valve presses in with great resistance, so use e.g. a coin to avoid imprinting the pin on your finger.

    As a colleague wrote, it is worth treating the pin with a penetrating agent, e.g. WD40. The thermostatic head valve has rust or scale. You can try tapping the valve lightly to make it start. Try to press the pin several dozen times and put the heads back on only when the radiator starts heating.
  • #16 16706609
    stanley274
    Level 10  
    Thank you very much. I`ll fight it tomorrow because I have to buy some tools and WD40, which is a real problem abroad. Of course, I will let you know if my butt is warm or if I still need advice. Greetings from Fulda, see you tomorrow
    Added after 36 [minutes]:
  • #17 16706720
    BUCKS
    Level 39  
    I would first unscrew the head and check the pin.
    It should stick out a little over 5mm, and the range of motion will be about 2mm, so when pressed all the way, it will stick out about 3mm. This will give you an idea of what the starting position should look like.
    The pin must be pushed in with resistance and when released, it must slide out automatically, returning to its starting position.

    I rather doubt that there is an external blockage where WD40 could help. If you have a blocked thermostatic valve, I`m guessing it`s stuck on the water side.
    Then the pin will be pressed despite the head being removed and you can try to tap it or gently grab it with pliers and pull it out, which may be difficult because not all pliers can grip such a 3mm tit well.
    Check what heads you have and the size of the nut, because this determines the key you need, unless you get pliers with adjustable jaw spacing, then they can be adjusted.
    In the case of pliers, use a cloth when unscrewing it to minimize the risk of scratching the nut, so that the owner does not blame you for "destroying" the head. ;)
  • #18 16706736
    stanley274
    Level 10  
    Gentlemen, thank you very much on behalf of myself and my wife. Probably 99% of the time the problem was the temperature control valve. Out of nervousness, I unscrewed it before going to bed and it was all tarnished. I knocked with pliers and he didn`t come in. Finally, I pressed it with a coin as you recommended and it worked. I did this a few times and the heater started working. Now the last question - in what position should I leave this valve at the bottom? Fully unscrewed to the left or more to the center? It`s now all the way to the left, the radiator is heating up, so it`s hard for me to assess the flow. I just want to be able to go to sleep peacefully. Does this temperature control knob need to be calibrated with the radiator somehow, or do I just put it back on, turn it on and the guitar plays?

    As a thank you, I invite you for a beer in DE or near Rzeszów, I thank everyone who helped me warm my ass ;)
  • #19 16706756
    Anonymous
    Level 1  
  • #20 16706773
    stanley274
    Level 10  
    Everything`s fine. The head is installed, it`s warm in the bedroom, there`s no dripping there, I`ll check there again tomorrow. I`m going to bed. Thank you for your help, I really appreciate it. See you tomorrow😉
  • Helpful post
    #21 16706811
    BUCKS
    Level 39  
    Generally, the thermostatic head opens or closes the valve depending on the settings and temperature in the room.
    3 is the equivalent of approximately 20 degrees, 4 is 24 degrees, 5, i.e. the maximum is 28 degrees
    I don`t know whether you have municipal heating or your own private boiler, because if you have your own boiler, depending on the specificity of the installation, parameters and settings of the boiler, it may be necessary to set the head to a larger number or open it to the max.

    Leave the return valve at full capacity.
    If it turns out that the further, second radiator is underheated, you can try turning it one or more turns, you would have to test it.
    By limiting the water flow, you reduce the power of this radiator but provide more water for the other radiator.
    There are also thermostatic valves with the so-called initial adjustment, then you can set the flow on the valve and you can see tiny numbers near the pin. If there were no embossed numbers there, you have a valve without regulation.

    If the valve was stuck, you must take into account that it may get stuck again after installing the head.
    For now, treat it with, for example, WD40 and observe. Ultimately, it will be necessary to replace the valve with a new one for it to function properly.
  • #22 16706848
    willyvmm
    Level 30  
    Buy a new stuffing box for €10 and replace it.
    https://www.amazon.de/danfoss-stopfbuchse-013...%3Aaps%2Ck%3Adanfoss%20stopfbuchse%20013u0070

    Just check exactly what type it is,
    It is replaced without draining the water (at least with Danfoss, I don`t know about others, but I suspect it`s the same), you unscrew the old one and screw in the new one. You will have peace of mind. The water will drip out a little, you need to put something in it,
  • ADVERTISEMENT
  • #23 16707037
    E8600
    Level 41  
    BUCKS wrote:
    For now, treat it with, for example, WD40 and observe

    I treated mine with WD40 a few years ago and a little persuasion with a hammer and it still works and doesn`t jam. Leave the valve at the bottom (on the return) as it is for now, and in a few days, when the dirt is washed out of the radiator, you can tighten it a bit so that the return pipe is cooler than the radiator itself.
  • #24 16707849
    BUCKS
    Level 39  
    E8600 wrote:
    I treated mine with WD40 a few years ago and a little persuasion with a hammer and it still works and it doesn`t jam

    In my case, the valve looked OK externally and it`s hard for me to imagine that it would be tarnished in my apartment, etc. However, the problem was with the stuck plug on the water side, it was stuck and wouldn`t let go. Finally, I replaced all the valves with new ones and since I cleaned the installation of sediments, I have had no problems.
    I believe that most of this type of surprises are the result of lack of maintenance of the installation itself, according to the principle, if it works, why waste money on some voodoo, because if Jan Kowalski, or in this case Helmut, does not see something, he thinks that there is no problem, and the euro stays in your pocket ;) Anyway, it`s the tenant who has the problem, not the owner of the premises. As you can see, the mechanism is the same regardless of the country.
  • #25 16708449
    stanley274
    Level 10  
    I`m closing the topic. The radiator heats perfectly. I will play with the water flow so that both heat up equally strongly. I knew it was something trivial. A plumber here charges 80 euros just for coming to your home (even if he doesn`t do anything). Thank you very much, I am impressed with your knowledge. Best regards from Germany
  • #26 16708757
    BUCKS
    Level 39  
    I`m glad I could help a little.

    For me, no specialist knowledge was needed here, because it was only knowledge gained from my own experience as an amateur, an individual user, but thanks for appreciating it :)
    I believe that every owner/user of a central heating system should have the knowledge to solve such problems on their own. Although I realize that the average person is not interested in how other devices work.
    However, I like to know roughly how something works, which makes it easier to look for potential causes of problems if a fault occurs.
    A plumber should be called in serious matters where Kowalski`s capabilities are insufficient.

    You have had your first experience with something and maybe in the future you will help someone with a similar problem :)
  • #27 16765689
    1702
    Level 10  
    The lower jet valve is an orifice valve. It is used to equalize the pressure in the entire installation. Each radiator is adjusted to a given radiator and the friction resistance in the installation. Try to put it in the position it was in before you started tinkering. It often happens that the difference in the screw-in depth between radiators located next to each other is 1/3 of a turn. Leaving the orifice unscrewed to the maximum setting causes disruptions in the supply of thermal energy to the radiators furthest from the boiler. Regards, Jan
  • #28 16766293
    BUCKS
    Level 39  
    1702 wrote:
    Try to put it in the position it was in before you started tinkering

    So what`s the point of closing the radiator again, because originally this valve was turned all the way off ;)
  • #29 16766638
    1702
    Level 10  
    Do not turn it off and set the appropriate flow (sorry my mistake, thank you for pointing it out). If it is unscrewed too much, it is not correct. Sometimes 1.0 or 1.3 or 3.0 revolutions is enough for everything to function properly. Normally, when designing the central heating system, the number of revolutions for individual radiators is selected. Regards
  • #30 16766718
    BUCKS
    Level 39  
    Generally, you are right about ruffling.
    Only the thread is from a month ago, and the author received a suggestion that if the second radiator heats weaker, he should tighten this screw by 1 or more turns, depending on the current situation.

Topic summary

The discussion revolves around troubleshooting a non-heating radiator valve in a rented apartment. The user initially reported that one radiator was cold despite the water supply pipe being warm. Various responses suggested checking the valve's position, with advice to turn it to the right to open it. It was noted that the valve might be a return valve, and if it was stuck, using penetrating oil like WD40 could help. The user successfully resolved the issue by pressing the stuck pin of the thermostatic valve, allowing the radiator to heat up. Further advice included maintaining the valve's position for optimal heating and ensuring proper flow to other radiators.
Summary generated by the language model.
ADVERTISEMENT