logo elektroda
logo elektroda
X
logo elektroda

OpenBeken and TuyaMCU dimmer - configuration guide/tutorial

p.kaczmarek2 25986 66
ADVERTISEMENT
Treść została przetłumaczona polish » english Zobacz oryginalną wersję tematu
  • #31 20318251
    p.kaczmarek2
    Moderator Smart Home
    @nelevit thank you for reporting, it turns out that Autodiscovery is simply missing a check to work with TuyaMCU.
    You have two options:
    1. just do a Yaml copy/paste from this topic (to configuration yaml, it's very simple, just remember to check device mqtt name)
    2. wait for an update that will add a missing link between TuyaMCU and autodiscovery
    Helpful post? Buy me a coffee.
  • ADVERTISEMENT
  • #32 20319075
    nelevit
    Level 2  
    @p.kaczmarek2 Thanks a lot for your reply!
    Sounds like a plan :)
    Best regards,
    Nestor
  • ADVERTISEMENT
  • #33 20319370
    p.kaczmarek2
    Moderator Smart Home
    @nelevit before that's added to Autodiscovery, is the Yaml from the first post working for you?
    Helpful post? Buy me a coffee.
  • #34 20320685
    nelevit
    Level 2  
    @p.kaczmarek2 I'm very new to HA, so this is still in progress 🙂 But taking into consideration, autoexec.bat was plugnplay I'd say that your configuration is right.
    Best regards,
    Nestor
  • ADVERTISEMENT
  • #35 20326969
    nelevit
    Level 2  
    p.kaczmarek2 wrote:
    @nelevit before that's added to Autodiscovery, is the Yaml from the first post working for you?

    Hi, I have an update :) Managed to add it via configuration.yaml, works like charm.
    The code from above had to be slightly tweaked as they changed syntax:
    mqtt:
      light:
        name: "TuyaMCU Dimmer (N)"
        state_topic: "deviceName/1/get"
        command_topic: "deviceName/1/set"
        brightness_command_topic: "deviceName/2/set"
        brightness_state_topic: "deviceName/2/get"
        brightness_scale: 99
        qos: 1
        payload_on: 1
        payload_off: 0
        retain: true
        optimistic: true

    @p.kaczmarek2 Thanks a lot for your support!
    Best Regards,
    Nestor
  • #36 20327552
    p.kaczmarek2
    Moderator Smart Home
    Very good job and thank you for sharing Yaml. Regarding your question, the Yaml for TuyaMCU devices is still not automatically generated, but it should be easy to find an example how to do that in our threads.
    Helpful post? Buy me a coffee.
  • ADVERTISEMENT
  • #37 20385917
    max_allan
    Level 2  
    I have my MOES MS105-B 2 gang light controller working on 2 channels after querying the DP IDs.

    I have one major problem, the controller has a beeper in. Since getting the autoexec.bat the beeper will not stop. It is very loud and annoying. I could unsolder it, but I figure there has to be a reason it's beeping and some way to control it. Anyone got any ideas??

    Once it is toggled on, I can remove the autoexec.bat and restart the device from the UI and it STILL beeps. If I pull the plug, the beeping stops. But if I reset with the autoexec still in place, the beeping continues.
    My autoexec.bat :
    
    startDriver TuyaMCU
    setChannelType 1 toggle
    setChannelType 2 dimmer
    setChannelType 3 toggle
    setChannelType 4 dimmer
    tuyaMcu_setDimmerRange 0 1000
    linkTuyaMCUOutputToChannel 1 1 1
    linkTuyaMCUOutputToChannel 2 2 2
    linkTuyaMCUOutputToChannel 7 1 3
    linkTuyaMCUOutputToChannel 8 2 4


    I tracked it down to the `startDriver TuyaMCU` command and the `stopDriver TuyaMCU` doesn't reset whatever is causing it.

    I captured the logs when starting it :
    
    Debug:MQTT:MQTT deduper sent 0, culled duplicates 0, culled too fast 0
    Info:MAIN:Time 43, idle 189495/s, free 76640, MQTT 0(2), bWifi 1, secondsWithNoPing -1, socks 2/38
    Debug:MQTT:MQTT deduper sent 0, culled duplicates 0, culled too fast 0
    ExtraDebug:TuyaMCU:TuyaMCU heartbeat_valid = 0, product_information_valid=0, self_processing_mode = 1, wifi_state_valid = 0, wifi_state_timer=0
    Info:MAIN:Time 44, idle 180267/s, free 75616, MQTT 0(2), bWifi 1, secondsWithNoPing -1, socks 2/38
    Debug:MQTT:MQTT deduper sent 0, culled duplicates 0, culled too fast 0
    ExtraDebug:TuyaMCU:TuyaMCU heartbeat_valid = 1, product_information_valid=1, self_processing_mode = 1, wifi_state_valid = 0, wifi_state_timer=0
    Info:TuyaMCU:TUYAMCU received: 55 AA 00 02 00 00 01 
    Info:TuyaMCU:TuyaMCU_ProcessIncoming[ver=0]: processing command 2 (MCUconf) with 7 bytes
    Info:TuyaMCU:TuyaMCU_ProcessIncoming: TUYA_CMD_MCU_CONF, TODO!
    ExtraDebug:TuyaMCU:Will send TUYA_CMD_QUERY_STATE (state_updated==false, try 0).
    Info:MAIN:Time 47, idle 189132/s, free 75616, MQTT 0(3), bWifi 1, secondsWithNoPing -1, socks 2/38
    Debug:MQTT:MQTT deduper sent 0, culled duplicates 0, culled too fast 0
    ExtraDebug:TuyaMCU:TuyaMCU heartbeat_valid = 1, product_information_valid=1, self_processing_mode = 1, wifi_state_valid = 0, wifi_state_timer=0
    Info:TuyaMCU:TUYAMCU received: 55 AA 00 07 00 08 06 02 00 04 00 00 00 00 1A 
    Info:TuyaMCU:TuyaMCU_ProcessIncoming[ver=0]: processing command 7 (State) with 15 bytes
    Info:TuyaMCU:TuyaMCU_ParseStateMessage: processing dpId 6, dataType 2-DP_TYPE_VALUE and 4 data bytes
    Info:TuyaMCU:TuyaMCU_ParseStateMessage: raw data 4 int: 0
    Debug:TuyaMCU:TuyaMCU_ApplyMapping: id 6 with value 0 is not mapped
    Info:TuyaMCU:TUYAMCU received: 55 AA 00 07 00 08 0C 02 00 04 00 00 00 00 20 
    Info:TuyaMCU:TuyaMCU_ProcessIncoming[ver=0]: processing command 7 (State) with 15 bytes
    Info:TuyaMCU:TuyaMCU_ParseStateMessage: processing dpId 12, dataType 2-DP_TYPE_VALUE and 4 data bytes
    Info:TuyaMCU:TuyaMCU_ParseStateMessage: raw data 4 int: 0
    Debug:TuyaMCU:TuyaMCU_ApplyMapping: id 12 with value 0 is not mapped
    Info:TuyaMCU:TUYAMCU received: 55 AA 00 07 00 05 01 01 00 01 00 0E 
    Info:TuyaMCU:TuyaMCU_ProcessIncoming[ver=0]: processing command 7 (State) with 12 bytes
    Info:TuyaMCU:TuyaMCU_ParseStateMessage: processing dpId 1, dataType 1-DP_TYPE_BOOL and 1 data bytes
    Info:TuyaMCU:TuyaMCU_ParseStateMessage: raw data 1 byte: 
    Debug:TuyaMCU:TuyaMCU_ApplyMapping: id 1 with value 0 is not mapped
    Info:TuyaMCU:TUYAMCU received: 55 AA 00 07 00 05 07 01 00 01 00 14 
    Info:TuyaMCU:TuyaMCU_ProcessIncoming[ver=0]: processing command 7 (State) with 12 bytes
    Info:TuyaMCU:TuyaMCU_ParseStateMessage: processing dpId 7, dataType 1-DP_TYPE_BOOL and 1 data bytes
    Info:TuyaMCU:TuyaMCU_ParseStateMessage: raw data 1 byte: 
    Debug:TuyaMCU:TuyaMCU_ApplyMapping: id 7 with value 0 is not mapped
    Info:TuyaMCU:TUYAMCU received: 55 AA 00 07 00 08 02 02 00 04 00 00 00 14 2A 
    Info:TuyaMCU:TuyaMCU_ProcessIncoming[ver=0]: processing command 7 (State) with 15 bytes
    Info:TuyaMCU:TuyaMCU_ParseStateMessage: processing dpId 2, dataType 2-DP_TYPE_VALUE and 4 data bytes
    Info:TuyaMCU:TuyaMCU_ParseStateMessage: raw data 4 int: 20
    Debug:TuyaMCU:TuyaMCU_ApplyMapping: id 2 with value 20 is not mapped
    Info:TuyaMCU:TUYAMCU received: 55 AA 00 07 00 08 08 02 00 04 00 00 00 1E 3A 
    Info:TuyaMCU:TuyaMCU_ProcessIncoming[ver=0]: processing command 7 (State) with 15 bytes
    Info:TuyaMCU:TuyaMCU_ParseStateMessage: processing dpId 8, dataType 2-DP_TYPE_VALUE and 4 data bytes
    Info:TuyaMCU:TuyaMCU_ParseStateMessage: raw data 4 int: 30
    Debug:TuyaMCU:TuyaMCU_ApplyMapping: id 8 with value 30 is not mapped
    Info:MAIN:Time 48, idle 182562/s, free 75616, MQTT 0(3), bWifi 1, secondsWithNoPing -1, socks 2/38
    Debug:MQTT:MQTT deduper sent 0, culled duplicates 0, culled too fast 0
    ExtraDebug:TuyaMCU:TuyaMCU heartbeat_valid = 1, product_information_valid=1, self_processing_mode = 1, wifi_state_valid = 0, wifi_state_timer=0
    Info:TuyaMCU:TUYAMCU received: 55 AA 00 00 00 01 01 01 
    Info:TuyaMCU:TuyaMCU_ProcessIncoming[ver=0]: processing command 0 (Hearbeat) with 8 bytes
    ExtraDebug:TuyaMCU:Will send SetWiFiState 0.
    Info:MAIN:Time 49, idle 142185/s, free 75616, MQTT 0(3), bWifi 1, secondsWithNoPing -1, socks 2/38


    I _thought_ it was caused by `wifi_state_valid = 0`. I'm guessing we're sending that to the MCU and it is getting annoyed and beeping to say "Hey, I'm here in pairing mode ready for you". And the MCU doesn't get reset when the WB2S gets reset, so it's only on hard power off that it stops beeping.

    But later I see :
    
    Info:MAIN:Time 334, idle 185617/s, free 75632, MQTT 0(21), bWifi 1, secondsWithNoPing -1, socks 2/38
    Debug:MQTT:MQTT deduper sent 0, culled duplicates 0, culled too fast 0
    ExtraDebug:TuyaMCU:TuyaMCU heartbeat_valid = 1, product_information_valid=1, self_processing_mode = 1, wifi_state_valid = 1, wifi_state_timer=38
    

    And it's still beeping...
    Also, this controller has switch inputs and light outputs. I am guessing that there should be an output from the MCU when the switch status changes? Would that be DPID 12 or 6? I set 12 & 6 to a dimmer and it doesn't seem to have any outward affect on anything when I change the value. If I set it to ReadOnly, will it read values sent from the MCU and display them? Although I'd expect the switches to be toggle rather than a value, maybe it can use a dimmer switch input...
  • #38 20385930
    p.kaczmarek2
    Moderator Smart Home
    I remember having a report that device beeps while MQTT is not connected. What kind of change would you propose to mitigate it?

    I wouldn't recommend sending raw packets.

    Maybe add a flag to make device always think it's paired?

    I could even change the "wifi state always valid" to default behaviour but I am worried that it might break sensor devices which have to wait for wifi/mqtt state to be correct before reporting.

    Quote:

    And it's still beeping...

    That's strange, according to previous reports it stops once you pair with MQTT:
    OpenBeken and TuyaMCU dimmer - configuration guide/tutorial

    ReadOnly only display value on GUI.

    Regarding dpIds - you just have to investigate.
    
    Info:TuyaMCU:TuyaMCU_ParseStateMessage: processing dpId 7, dataType 1-DP_TYPE_BOOL and 1 data bytes
    Info:TuyaMCU:TuyaMCU_ParseStateMessage: raw data 1 byte: 
    

    This also looks like some on/off value.

    You can do whatever you want with these values in OBK. You can publish them over MQTT:
    
    Flag 19 - [MQTT] Always publish channels used by TuyaMCU
    

    You can use them to trigger events:
    
    addChangeHandler Channel10 == 0 backlog echo "Channel 10 became zero"
    addChangeHandler Channel10 == 1 backlog echo "Channel 10 became one"
    

    You can use them to publish stuff:
    
    addChangeHandler Channel10 == 0 publish switchVal ON
    addChangeHandler Channel10 == 1 publish switchVal OFF


    Maybe we should use a different WiFi state as a default one?
    OpenBeken and TuyaMCU dimmer - configuration guide/tutorial
    by default, obk is using 0x00 status value.
    I could add a command to change it so you can check what happens if 0x02 is a default one...

    Dodano po 19 [minuty]:

    UPDATE:
    added command: tuyaMcu_defWiFiState [Value]
    it will set the default wifi state to use when mqtt/wifi is not connected.
    Usage: add in autoexec bat line:
    
    tuyaMcu_defWiFiState 3
    

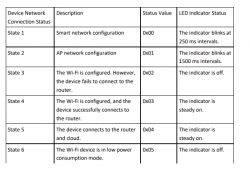
    to makeTuyaMCU think by default that:
    
    The Wi-Fi is configured, and the
    device successfully connects to
    the router.
    

    Can you try if it helps for you?
    Helpful post? Buy me a coffee.
  • #39 20386150
    max_allan
    Level 2  
    p.kaczmarek2 wrote:

    Usage: add in autoexec bat line:
    
    tuyaMcu_defWiFiState 3
    

    Can you try if it helps for you?


    I found when setting values from the logs page I have to wait for the wifi_state_timer to reach 60 and reset (so about a minute) for each value to take effect. That confused me a bit while testing it out, sometimes values worked, sometimes they didn't!
    0 : Rapid beeping, leds flashing (bip bip bip)
    1 : Slow beep, leds flashing (beeep, beeep, beeep)
    2 and above : No beep, leds steady

    So, yes it works, thanks a lot that was really helpful, and such quick service!! :D

    And even more interesting, when I set the Wifi state, it returns me a whole load more dpIds!!
    But from the extra debug logs it looks like maybe something else is trying to reset the wifi state? Maybe why I had to wait for the timer..?
    I haven't got any MQTT setup yet to easily test what happens if I get it working. Maybe with MQTT enabled it would set the state differently.

    
    Debug:CMD:cmd [tuyaMcu_defWiFiState 4]
    ExtraDebug:TuyaMCU:TuyaMCU heartbeat_valid = 1, product_information_valid=1, self_processing_mode = 1, wifi_state_valid = 1, wifi_state_timer=0
    ExtraDebug:TuyaMCU:TuyaMCU heartbeat_valid = 1, product_information_valid=1, self_processing_mode = 1, wifi_state_valid = 1, wifi_state_timer=0
    Info:TuyaMCU:TUYAMCU received: 55 AA 00 00 00 01 01 01 
    Info:TuyaMCU:TuyaMCU_ProcessIncoming[ver=0]: processing command 0 (Hearbeat) with 8 bytes
    ExtraDebug:TuyaMCU:Will send SetWiFiState 0.
    ExtraDebug:TuyaMCU:TuyaMCU heartbeat_valid = 1, product_information_valid=1, self_processing_mode = 1, wifi_state_valid = 1, wifi_state_timer=2
    Info:TuyaMCU:TUYAMCU received: 55 AA 00 03 00 00 02 
    Info:TuyaMCU:TuyaMCU_ProcessIncoming[ver=0]: processing command 3 (WiFiState) with 7 bytes
    Info:TuyaMCU:TUYAMCU received: 55 AA 00 07 00 08 06 02 00 04 00 00 00 00 1A 
    Info:TuyaMCU:TuyaMCU_ProcessIncoming[ver=0]: processing command 7 (State) with 15 bytes
    Info:TuyaMCU:TuyaMCU_ParseStateMessage: processing dpId 6, dataType 2-DP_TYPE_VALUE and 4 data bytes
    Info:TuyaMCU:TuyaMCU_ParseStateMessage: raw data 4 int: 0
    Debug:TuyaMCU:TuyaMCU_ApplyMapping: id 6 with value 0 is not mapped
    Info:TuyaMCU:TUYAMCU received: 55 AA 00 07 00 08 0C 02 00 04 00 00 00 00 20 
    Info:TuyaMCU:TuyaMCU_ProcessIncoming[ver=0]: processing command 7 (State) with 15 bytes
    Info:TuyaMCU:TuyaMCU_ParseStateMessage: processing dpId 12, dataType 2-DP_TYPE_VALUE and 4 data bytes
    Info:TuyaMCU:TuyaMCU_ParseStateMessage: raw data 4 int: 0
    Debug:TuyaMCU:TuyaMCU_ApplyMapping: id 12 with value 0 is not mapped
    Info:TuyaMCU:TUYAMCU received: 55 AA 00 07 00 05 01 01 00 01 00 0E 
    Info:TuyaMCU:TuyaMCU_ProcessIncoming[ver=0]: processing command 7 (State) with 12 bytes
    Info:TuyaMCU:TuyaMCU_ParseStateMessage: processing dpId 1, dataType 1-DP_TYPE_BOOL and 1 data bytes
    Info:TuyaMCU:TuyaMCU_ParseStateMessage: raw data 1 byte: 
    Debug:TuyaMCU:TuyaMCU_ApplyMapping: id 1 with value 0 is not mapped
    Info:TuyaMCU:TUYAMCU received: 55 AA 00 07 00 05 07 01 00 01 00 14 
    Info:TuyaMCU:TuyaMCU_ProcessIncoming[ver=0]: processing command 7 (State) with 12 bytes
    Info:TuyaMCU:TuyaMCU_ParseStateMessage: processing dpId 7, dataType 1-DP_TYPE_BOOL and 1 data bytes
    Info:TuyaMCU:TuyaMCU_ParseStateMessage: raw data 1 byte: 
    Debug:TuyaMCU:TuyaMCU_ApplyMapping: id 7 with value 0 is not mapped
    Info:TuyaMCU:TUYAMCU received: 55 AA 00 07 00 08 02 02 00 04 00 00 00 14 2A 
    Info:TuyaMCU:TuyaMCU_ProcessIncoming[ver=0]: processing command 7 (State) with 15 bytes
    Info:TuyaMCU:TuyaMCU_ParseStateMessage: processing dpId 2, dataType 2-DP_TYPE_VALUE and 4 data bytes
    Info:TuyaMCU:TuyaMCU_ParseStateMessage: raw data 4 int: 20
    Debug:TuyaMCU:TuyaMCU_ApplyMapping: id 2 with value 20 is not mapped
    Info:TuyaMCU:TUYAMCU received: 55 AA 00 07 00 08 08 02 00 04 00 00 00 1E 3A 
    Info:TuyaMCU:TuyaMCU_ProcessIncoming[ver=0]: processing command 7 (State) with 15 bytes
    Info:TuyaMCU:TuyaMCU_ParseStateMessage: processing dpId 8, dataType 2-DP_TYPE_VALUE and 4 data bytes
    Info:TuyaMCU:TuyaMCU_ParseStateMessage: raw data 4 int: 30
    Debug:TuyaMCU:TuyaMCU_ApplyMapping: id 8 with value 30 is not mapped
    ExtraDebug:TuyaMCU:TuyaMCU heartbeat_valid = 1, product_information_valid=1, self_processing_mode = 1, wifi_state_valid = 1, wifi_state_timer=3
    Info:TuyaMCU:TUYAMCU received: 55 AA 00 07 00 08 03 02 00 04 00 00 00 00 17 
    Info:TuyaMCU:TuyaMCU_ProcessIncoming[ver=0]: processing command 7 (State) with 15 bytes
    Info:TuyaMCU:TuyaMCU_ParseStateMessage: processing dpId 3, dataType 2-DP_TYPE_VALUE and 4 data bytes
    Info:TuyaMCU:TuyaMCU_ParseStateMessage: raw data 4 int: 0
    Debug:TuyaMCU:TuyaMCU_ApplyMapping: id 3 with value 0 is not mapped
    Info:TuyaMCU:TUYAMCU received: 55 AA 00 07 00 08 09 02 00 04 00 00 00 00 1D 
    Info:TuyaMCU:TuyaMCU_ProcessIncoming[ver=0]: processing command 7 (State) with 15 bytes
    Info:TuyaMCU:TuyaMCU_ParseStateMessage: processing dpId 9, dataType 2-DP_TYPE_VALUE and 4 data bytes
    Info:TuyaMCU:TuyaMCU_ParseStateMessage: raw data 4 int: 0
    Debug:TuyaMCU:TuyaMCU_ApplyMapping: id 9 with value 0 is not mapped
    Info:TuyaMCU:TUYAMCU received: 55 AA 00 07 00 08 05 02 00 04 00 00 03 E8 04 
    Info:TuyaMCU:TuyaMCU_ProcessIncoming[ver=0]: processing command 7 (State) with 15 bytes
    Info:TuyaMCU:TuyaMCU_ParseStateMessage: processing dpId 5, dataType 2-DP_TYPE_VALUE and 4 data bytes
    Info:TuyaMCU:TuyaMCU_ParseStateMessage: raw data 4 int: 1000
    Debug:TuyaMCU:TuyaMCU_ApplyMapping: id 5 with value 1000 is not mapped
    Info:TuyaMCU:TUYAMCU received: 55 AA 00 07 00 08 0B 02 00 04 00 00 03 E8 0A 
    Info:TuyaMCU:TuyaMCU_ProcessIncoming[ver=0]: processing command 7 (State) with 15 bytes
    Info:TuyaMCU:TuyaMCU_ParseStateMessage: processing dpId 11, dataType 2-DP_TYPE_VALUE and 4 data bytes
    Info:TuyaMCU:TuyaMCU_ParseStateMessage: raw data 4 int: 1000
    Debug:TuyaMCU:TuyaMCU_ApplyMapping: id 11 with value 1000 is not mapped
    Info:TuyaMCU:TUYAMCU received: 55 AA 00 07 00 05 04 04 00 01 00 14 
    Info:TuyaMCU:TuyaMCU_ProcessIncoming[ver=0]: processing command 7 (State) with 12 bytes
    Info:TuyaMCU:TuyaMCU_ParseStateMessage: processing dpId 4, dataType 4-DP_TYPE_ENUM and 1 data bytes
    Info:TuyaMCU:TuyaMCU_ParseStateMessage: raw data 1 byte: 
    Debug:TuyaMCU:TuyaMCU_ApplyMapping: id 4 with value 0 is not mapped
    Info:TuyaMCU:TUYAMCU received: 55 AA 00 07 00 05 0A 04 00 01 00 1A 
    Info:TuyaMCU:TuyaMCU_ProcessIncoming[ver=0]: processing command 7 (State) with 12 bytes
    Info:TuyaMCU:TuyaMCU_ParseStateMessage: processing dpId 10, dataType 4-DP_TYPE_ENUM and 1 data bytes
    Info:TuyaMCU:TuyaMCU_ParseStateMessage: raw data 1 byte: 
    Debug:TuyaMCU:TuyaMCU_ApplyMapping: id 10 with value 0 is not mapped
    Info:TuyaMCU:TUYAMCU received: 55 AA 00 07 00 05 0E 04 00 01 00 1E 
    Info:TuyaMCU:TuyaMCU_ProcessIncoming[ver=0]: processing command 7 (State) with 12 bytes
    Info:TuyaMCU:TuyaMCU_ParseStateMessage: processing dpId 14, dataType 4-DP_TYPE_ENUM and 1 data bytes
    Info:TuyaMCU:TuyaMCU_ParseStateMessage: raw data 1 byte: 
    Debug:TuyaMCU:TuyaMCU_ApplyMapping: id 14 with value 0 is not mapped
    
  • #40 20386202
    p.kaczmarek2
    Moderator Smart Home
    Don't worry, we're here to help get all your devices running cloudfree.

    If you can, could you provide some photos of your devices so we can add it to templates list here:
    https://openbekeniot.github.io/webapp/devicesList.html

    The current code was assuming that TuyaMCU gets only "paired and online" message when MQTT is also connected. That's why it kept it in wifi state 0 all the time.
    Quote:

    I found when setting values from the logs page I have to wait for the wifi_state_timer to reach 60 and reset (so about a minute) for each value to take effect. That confused me a bit while testing it out, sometimes values worked, sometimes they didn't!

    Sorry, this is correct. I can see how that can be confusing.

    The current system periodically sends something like a "keep alive" packets to TuyaMCU and requests dpIDs. You can see that there are counters to see how many seconds has passed since last update.


    Great catch with that "something else is trying", because it's my mistake, I forget to change log string
    OpenBeken and TuyaMCU dimmer - configuration guide/tutorial
    As you can see, it's not trying to set 0, it's just not updated log value.
    It's fixed now.


    Regarding special dpIds - maybe there is something like a countdown timer available? You can check if it works.
    Altough we also have a scritpable countdown timers in OBK itself so it's not really needed
    Helpful post? Buy me a coffee.
  • #41 20411501
    spln
    Level 5  
    Bit back to the opening post:
    I have bought one of these from Aliexpress with v3.0 of the same PCB. They have switched to an SMD transistor SIF7N65F: datasheet
    I guess it's a cheeper option as it has lower current limit and higher resistance: Vds = 650V, RdsOn = 1.1Ohm (vs. 0.6Ohm), Id = 7A (vs. 12A).

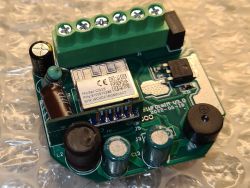
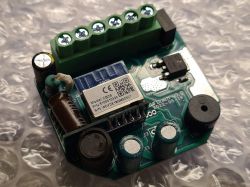
    A problem that could cause the damage to the one burnt is that on mine was basically zero clearance between the Wifi module and the current limiting resistor:
    OpenBeken and TuyaMCU dimmer - configuration guide/tutorial

    What I did I have added some heat shrink on the resistor wire:
    OpenBeken and TuyaMCU dimmer - configuration guide/tutorial

    Other solution could be to rotate the resistor to have the body on the Wifi modules side and the wire on the other, but that would require de-soldering both ends.
  • #42 20412108
    p.kaczmarek2
    Moderator Smart Home
    Those devices are very cheap. It's also good to use powersave command in "short startup command" to reduce stress on their weak cheap power supplies.
    Helpful post? Buy me a coffee.
  • #43 20456812
    gbauer
    Level 2  
    I also had the Beep isse on my recently bought device, could also fix it with the "tuyaMcu_defWiFiState 3". Probably you can also add this to the initial post, it took me some time to recognize that there are additional pages in this topic.

    One question, when i do a power cycle the dimmer is always in "off" state. In Tasmota you can configure this state to use the last known state. Also for relais Contacts this might be helpfull. Is this already possible with openBK? I searched for such a command without success.
  • #44 20456822
    p.kaczmarek2
    Moderator Smart Home
    @gbauer maybe I will just make the value 3 default for all devices? But I am worried that I might break something for other users.

    What was beeping for you? Is your device on our list?
    https://openbekeniot.github.io/webapp/devicesList.html

    For remember last state, we are using:
    OpenBeken and TuyaMCU dimmer - configuration guide/tutorial
    OpenBeken and TuyaMCU dimmer - configuration guide/tutorial
    The problem is, I don't know if it works for TuyaMCU, can you check?

    If it's not working then I can try to fix it for you, but I 'd need your help with tesitng.
    Helpful post? Buy me a coffee.
  • #46 20460296
    p.kaczmarek2
    Moderator Smart Home
    @gbauer I have prepared a work around for your problem, but you show the config of your device?

    Since latest update, the special channel indices 200 at further, are saved in flash memory.

    So you can now do:
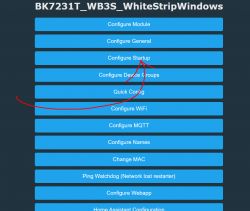
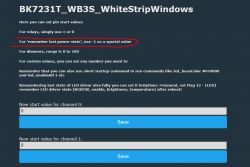
    1. make sure that in startup you have 0 values (or 1, not -1, to avoid overwriting values)
    2. add a script like:
    
    // when channel 0 changes, save it to flash channel 200
    addEventHandler OnChannelChange 0 setChannel 200 $CH0
    // when channel 1 changes, save it to flash channel 201
    addEventHandler OnChannelChange 1 setChannel 201 $CH1
    // when channel 2 changes, save it to flash channel 202
    addEventHandler OnChannelChange 2 setChannel 202 $CH2
    
    // On start
    // addRepeatingEvent [RepeatTime] [RepeatCount]
    // This should fire once due to RepeatCount 1
    addRepeatingEvent 5 1 backlog setChannel 0 $CH200; setChannel 1 $CH201; setChannel 2 $CH202
    

    This basically does two things.
    This addEventHandler saves channel values to special flash channels when the channel changes:
    
    // when channel 0 changes, save it to flash channel 200
    addEventHandler OnChannelChange 0 setChannel 200 $CH0
    // when channel 1 changes, save it to flash channel 201
    addEventHandler OnChannelChange 1 setChannel 201 $CH1
    // when channel 2 changes, save it to flash channel 202
    addEventHandler OnChannelChange 2 setChannel 202 $CH2
    

    And the code below runs only once at startup, after 5 seconds, with 1 repeat (only once), and restores those values from flash manually:
    
    addRepeatingEvent 5 1 backlog setChannel 0 $CH200; setChannel 1 $CH201; setChannel 2 $CH202


    Please try it, you might need to adjust the script, or post your full autoexec here so I can do it for you.
    Helpful post? Buy me a coffee.
  • #47 20462342
    gbauer
    Level 2  
    Hi,

    thanks for the work. Thats my autoexec.bat content:

    startDriver TuyaMCU
    setChannelType 1 toggle
    setChannelType 2 dimmer
    tuyaMcu_setDimmerRange 0 1000
    linkTuyaMCUOutputToChannel 1 1 1
    linkTuyaMCUOutputToChannel 2 2 2
    tuyaMcu_defWiFiState 3
    // when channel 1 changes, save it to flash channel 201
    addEventHandler OnChannelChange 1 setChannel 201 $CH1
    // when channel 2 changes, save it to flash channel 202
    addEventHandler OnChannelChange 2 setChannel 202 $CH2
    // On start
    // addRepeatingEvent [RepeatTime] [RepeatCount]
    // This should fire once due to RepeatCount 1
    addRepeatingEvent 5 1 backlog setChannel 1 $CH201; setChannel 2 $CH202


    It seems not to be working at the moment. I am running FW 1.15.513.
    OpenBeken and TuyaMCU dimmer - configuration guide/tutorial
  • #48 20462358
    p.kaczmarek2
    Moderator Smart Home
    Edit, wait a moment.

    Added after 3 [hours] 6 [minutes]:

    Please update to latest version which has a cosmetic change for echo command, and then can you do some simple debugging steps, so we know what's wrong?

    Let's start by setting your dimmer on user interface to some strange value like 73%.

    Then, on Web App console do:
    
    echo $CH2
    

    This should print value of channel 2, so I'd expect 730 ?
    Then try:
    
    echo $CH202
    

    This should print saved value of channel 2 from slot 202. Also 730?

    Then do reboot. Device restart.
    Then do again:
    
    echo $CH202
    

    This should print saved value of channel 2 from slot 202. Also 730?
    
    echo $CH2
    

    This should print value of channel 2, so I'd expect 730 ?

    Please do all four steps from above.

    And again, I will repeat- you should put "0" (disable) the channel saving in Startup in WWW panel, because otherwise it would overwrite the manually saved channels.

    I will also try to double-check on my device to make sure the mechanism works.
    Helpful post? Buy me a coffee.
  • #49 20464027
    gbauer
    Level 2  
    after updating to the latest FW and applying the autoexec.bat again the dimmer is now doing the job. Here is my config file:

    startDriver TuyaMCU
    setChannelType 1 toggle
    setChannelType 2 dimmer
    tuyaMcu_setDimmerRange 0 1000
    linkTuyaMCUOutputToChannel 1 1 1
    linkTuyaMCUOutputToChannel 2 2 2
    tuyaMcu_defWiFiState 3
    // when channel 1 changes, save it to flash channel 201
    addEventHandler OnChannelChange 1 setChannel 201 $CH1
    // when channel 2 changes, save it to flash channel 202
    addEventHandler OnChannelChange 2 setChannel 202 $CH2
    // On start
    // addRepeatingEvent [RepeatTime] [RepeatCount]
    // This should fire once due to RepeatCount 1
    addRepeatingEvent 1 1 backlog setChannel 1 $CH201; setChannel 2 $CH202
    
  • #50 20464160
    p.kaczmarek2
    Moderator Smart Home
    So it works now, with the manual save of channels? Great! Thank you for testing @gbauer

    I will also look into adding an automatic mechanism for that soon, but it's good to know that a manual, scripting-based solution is also functional.
    Helpful post? Buy me a coffee.
  • #51 20492118
    tetsuo1
    Level 1  
    >>20317841
    Hi,
    I have the same problem. Do you have any solution? Can anyone advise?
    Thanks
  • #52 20551054
    jrhenk
    Level 10  
    Hi!
    So this is a long shot but maybe someone can help me :) I just got the MOES MS 105 WIFI dimmer and want to put openbeken on it. It's a good dimmer and I would like to install a couple of them however hit a wall with the openbeken flashing with cloudcutter. I have set up a raspberry pi 3 just for this and with many devices it worked flawlessly, either with the button pressing method or the 6x on/off method, not with this device however, it looks like this one does the pairing differently.

    - Out of the box and on first power on it is already in AP mode and beeps rapidly, if it's paired in the tuya app the beeping stops.
    - Connecting/disconnecting it to power 6 times does not put it in ap mode again, only deleting it in the tuya app does.
    - When in AP mode, tuya cloudcutter does not see it - I did this with around 10 devices by now so I think I'm not doing something wrong here

    Additional info:
    - The manual emphasizes that bluetooth on your phone needs to be activated, could it be that with this device pairing (and potentially also putting into flashing mode) somehow needs to be achieved via bluetooth?
    - According to the tuya app it runs V 2.0.2

    Would be very great if someone has any ideas how tuya cloudcutter might still work!

    Greetings,
    Jens

    Added after 49 [minutes]:

    Oh yes I managed to flash it successful with tuya cloudcutter after all :)
    The hint was in one video: Someone was demonstrating how to use this device in general and the pairing with tuya did not work. As a fix he explained and showed that by connecting a switch and turning that one 10x on/off puts this device in AP mode. After this, everything worked as usual with cloudcutter. Never saw or read about this 10x switching method, it's not in the manual or on the tuya website, seems to be an undocumented function. I love this stuff, again I learned something after I first thought this might be the first device where I actually have to solder wires but nope, it worked again without opening up the device.

    Added after 23 [minutes]:

    Alright, I used the startup script from above and I can perfectly use it now via its web UI, the autodiscovery for HA still fails though:
    When I go to HA autodiscovery and click the button I get the error message that no "No Relay, PWM, sensor or power driver running, HA discovery queued" - does not show up in HA and I guess the message hints at the reason :) but I don't know how to solve this

    Added after 39 [minutes]:

    Additionally, the field for the yaml config in the home assistant menu is also empty.

    Added after 5 [minutes]:

    haha ok, so sorry for posting so much before thouroughly reading this thread.... I was so focused on getting this to fully work that I completely overlooked the yaml above as well as the promised fix. thanks so much for all your efforts. Also: Big thanks for implementing manual IP configuration in one of the last updates, great improvement!

    Added after 1 [hours] 28 [minutes]:

    Ok one last experience and issue for today, that puts this project back one step to "almost there":

    So everything seemed to work, I even have it beautifully integrated in HA but something that was gone after one of the restarts is now back and I can't seem to stop it: That is, after connecting to power I hear one beep following by the light continuously dimming up and down as if it is in AP mode - guess I can't install it this weekend after all :/

    Added after 3 [hours] 45 [minutes]:

    OOOOKAY! I also fixed this by pure luck :) While doing something else I remembered that originally (see above) I had a switch connected to put the device into AP mode, yet I removed that switch later and then the beep on startup and annoying automatic up/down dimming started... furthermore I wasn't aware that the switch was turned on earlier. With this insights it now works perfectly as intended, no beep on startup and now up/down dimming anymore! However, it needs a little hardware hack as shown on the photo (the brown cable going form L to S). Maybe this can somehow be done via software in a future firmware update or with a command? Anyhow, in this form I can actually install the dimmer tomorrow, very happy about this! (and kinda fun to have documented my struggles haha)
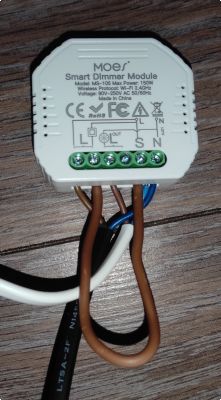
    OpenBeken and TuyaMCU dimmer - configuration guide/tutorial
  • #53 20551594
    p.kaczmarek2
    Moderator Smart Home
    Very good job, it seems you have figured it out, but here are my hints:
    - HA discovery is not there yet for TuyaMCU devices
    - if device beeps, you may force it into thinking it's paired by using tuyaMcu_defWiFiState 4 command in autoexec.bat after starting tuyaMCU
    - if nothing is received, you may also try to change TuyaMCU baud: tuyaMcu_setBaudRate 115200 in autoexec.bat after starting tuyaMCU
    - it is also worth to put PowerSave 1 in autoexec.bat , but make sure to check if it works good on your device. It will reduce power usage and heating of wifi module
    Helpful post? Buy me a coffee.
  • #54 20551611
    jrhenk
    Level 10  
    Thanks for the compliment and sharing these finishing touches! Maybe interesting for the database or future tweaks:
    - I already tried tuyaMcu_defWiFiState 4, also 3 and 5 - but without the cable faking a switch it kept giving the beep on startup and dimming up and down. The strange part about this is that in the manual it says that the dimmer only works with a push switch and with the cable it is now as if you keep holding this switch constantly :) As the connections for the switch are high power, I guess it might be something hardcoded on the daughterboard that is hard to overwrite/control via the firmware?
    - tuyaMcu_setBaudRate 115200 does not work, seems it needs to stay 9600
    - I give PowerSave 1 a try, with this option it's still working perfectly and maybe it indeed stays a bit cooler now. It's not terribly hot but I noticed it is getting a bit warm over time, so thanks for this. There are so many possible commands so a pinpointed recommendation is always nice!
    Thanks again for all the work you put into this, the percentage of openbeken flashed devices keeps growing in my house :)
  • #55 20554301
    jrhenk
    Level 10  
    Hi again!
    So I installed the dimmer and had a bit of time to stress test it - I noticed that ever so often (couldn't find a logic yet) the beken chip thinks the light is on (sends the update via mqtt and displays it on its own webui) but it seems something went wrong with the communication with the tuyaMCU. Would it be possible to build in a check whether the TuyaMCU status and the Bekenchip status are the same after a command has been sent in some of the next updates?
  • #56 20554421
    p.kaczmarek2
    Moderator Smart Home
    TuyaMCU communication is using CRC to check the content of the packets, so there is a very little chance of getting any garbage data.

    Please try to keep Web App Log open with extradebug log mode (or even all) and try to find out what happens in logs when you get a false state report.

    Currently I have no idea what may be happening, the only options is that TuyaMCU reports given dpID as boolean value 1, so it's kinda TuyaMCU's fault for saying that light is on...

    Unless you have a configuration error. That also could be possible.

    Web App log would tell us where does the "light is on" value comes from.

    Btw, you are the first one to have such issue and we already had many TuyaMCU lights and users with obk..
    Helpful post? Buy me a coffee.
  • #57 20555557
    jrhenk
    Level 10  
    Hi,
    Thanks for your quick answer and great to hear that the check is already implemented!

    The next days I'm super busy with other stuff but I try to catch what's going on here in the weblog as soon as I have a bit of time - it's still fun to think that only in smart home geeks house's you can see a lot of light switcheroo going on from outside :)

    Totally possible btw that it's the daughterboard's fault, I never used stuff with their default firmwares so I can't even tell whether this minimal issues for people not flashing their devices might just be something people accept/tollerate.... with the Sonoff D1 Dimmer and TASMOTA there was also this issue that on power loss it would try to get back to the previous state and show as ON yet the light stayed off
  • #58 20587994
    jrhenk
    Level 10  
    Hi! It's been a while so I wanted to ask about the status of getting brightness control with tuyamcu in Home Assistant with autodiscovery again :) I just tried again with the most recent firmware but for me it's still not working. I remember that it was working for you from a screenshot but in my case I just checked the information being sent via autodiscovery in mqtt explorer and I still can't see any brightness information, just on/off. Tried out all possible mqtt (and just to see what's happening also LED related flags), yet without any success. Don't know if I can still do anything from my side here.

    Here's the home assistant mqtt autodiscovery info from a dimmer with a tuyamcu
    Quote:

    {
    "dev": {
    "ids": [
    "temp_studydimmer"
    ],
    "name": "temp_studydimmer",
    "sw": "1.17.118",
    "mf": "Beken Corporation",
    "mdl": "BK7231N",
    "cu": "http://192.168.1.87/index"
    },
    "name": "temp_studydimmer 1",
    "~": "openbk/temp_studydimmer",
    "avty_t": "~/connected",
    "pl_on": "1",
    "pl_off": "0",
    "uniq_id": "temp_studydimmer_light_1",
    "qos": 1,
    "stat_t": "~/1/get",
    "cmd_t": "~/1/set"
    }


    And just for comparison, this is what I see with a tuya rgbw bulb:
    Quote:

    {
    "dev": {
    "ids": [
    "Smart-Connect_RGBC-WW_01"
    ],
    "name": "Smart-Connect_RGBC-WW_01",
    "sw": "1.17.97",
    "mf": "Beken Corporation",
    "mdl": "BK7231T",
    "cu": "http://192.168.1.80/index"
    },
    "name": "Smart-Connect_RGBC-WW_01",
    "~": "Smart-Connect_RGBC-WW_01",
    "avty_t": "~/connected",
    "pl_on": "1",
    "pl_off": "0",
    "uniq_id": "Smart-Connect_RGBC-WW_01_light",
    "qos": 1,
    "rgb_cmd_tpl": "{{'#%02x%02x%02x0000'|format(red,green,blue)}}",
    "rgb_val_tpl": "{{ value[0:2]|int(base=16) }},{{ value[2:4]|int(base=16) }},{{ value[4:6]|int(base=16) }}",
    "rgb_stat_t": "~/led_basecolor_rgb/get",
    "rgb_cmd_t": "cmnd/Smart-Connect_RGBC-WW_01/led_basecolor_rgb",
    "clr_temp_cmd_t": "cmnd/Smart-Connect_RGBC-WW_01/led_temperature",
    "clr_temp_stat_t": "~/led_temperature/get",
    "min_mirs": "154",
    "max_mirs": "500",
    "stat_t": "~/led_enableAll/get",
    "cmd_t": "cmnd/Smart-Connect_RGBC-WW_01/led_enableAll",
    "bri_stat_t": "~/led_dimmer/get",
    "bri_cmd_t": "cmnd/Smart-Connect_RGBC-WW_01/led_dimmer",
    "bri_scl": 100
    }
  • #59 20588750
    p.kaczmarek2
    Moderator Smart Home
    Hello @jrhenk , I was sure that Dimmer+Toggle discovery is working. It was added recently. Latest version should support it. Let me check...

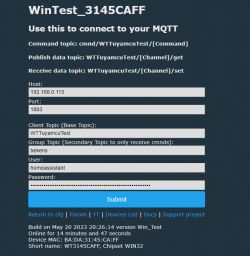
    Okay, first I configure MQTT:
    OpenBeken and TuyaMCU dimmer - configuration guide/tutorial
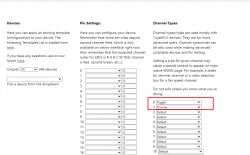
    Then I set channel types:
    OpenBeken and TuyaMCU dimmer - configuration guide/tutorial
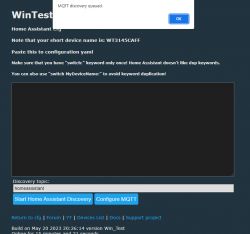
    Then do Discovery:
    OpenBeken and TuyaMCU dimmer - configuration guide/tutorial
    And while debugging, I can see it sees TuyaMCU dimmer TogglE+Dimmer combo:
    OpenBeken and TuyaMCU dimmer - configuration guide/tutorial
    Content:
    Code: JSON
    Log in, to see the code

    Hmm and in HA:
    OpenBeken and TuyaMCU dimmer - configuration guide/tutorial
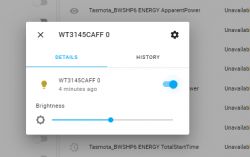
    It seems to work for me:
    OpenBeken and TuyaMCU dimmer - configuration guide/tutorial
    So, the question is, why it's not working for you? Do you setup both channel types for Toggle and Dimmer?
    Helpful post? Buy me a coffee.
  • #60 20589651
    jrhenk
    Level 10  
    Hi,
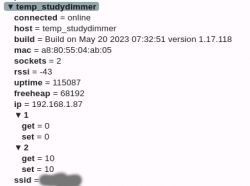
    Thanks for the answer and no worries about the delay... I can fully use it with the manual config in the yaml, this would just be nice to work, too. I really can't say why it is not working, I configured on/off and dimmer level, during testing I even reset the device, gave it a new name just to make sure it's not an mqtt issue or a problem with HA that the same device is configured manually and autodetected but still no change. Moreover, when configured manually the "normal" mqtt broadcasts also contain all the info:
    OpenBeken and TuyaMCU dimmer - configuration guide/tutorial

    But for some reason the homeassistant autodiscovery one does not:

    Quote:
    {
    "dev": {
    "ids": [
    "temp_studydimmer"
    ],
    "name": "temp_studydimmer",
    "sw": "1.17.118",
    "mf": "Beken Corporation",
    "mdl": "BK7231N",
    "cu": "http://192.168.1.87/index"
    },
    "name": "temp_studydimmer 1",
    "~": "openbk/temp_studydimmer",
    "avty_t": "~/connected",
    "pl_on": "1",
    "pl_off": "0",
    "uniq_id": "temp_studydimmer_light_1",
    "qos": 1,
    "stat_t": "~/1/get",
    "cmd_t": "~/1/set"
    }


    The only thing I think is remaining to test is to set different flags, as I couldn't test all combinations and was just randomly activating, disactivating them to see what happened. Then again, when it's broadcasting everything correctly via one MQTT channel this might not help a lot, but who knows :) Which ones are the most crucial ones to set?

    I'm happy to share any log files or dumps if it helps!

Topic summary

The discussion focuses on configuring a TuyaMCU dimmer with OpenBeken firmware for integration with Home Assistant. Users share experiences and solutions regarding the setup process, including the use of specific commands in the autoexec.bat file to define channel types, set dimmer ranges, and link outputs. Issues such as beeping sounds from the dimmer, the need for correct dpIds, and the challenges of MQTT autodiscovery are addressed. Participants also explore troubleshooting methods, including UART sniffing for packet analysis and adjusting firmware settings to ensure proper communication between the dimmer and the TuyaMCU protocol. The conversation highlights the importance of correct configuration for successful device operation and integration into smart home systems.
Summary generated by the language model.
ADVERTISEMENT