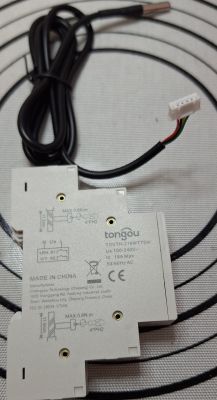
This is a teardown and firmware change guide for Tongou DIN mounted MCB temperature and humidity with two 16A switching relay. Model TOVTH-216WTTDA. It has a BK7231N CB2S inside.
Usage
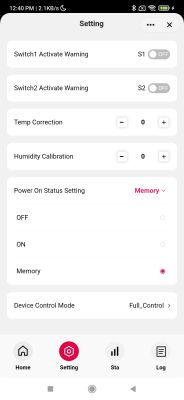
The relays can be programmed on the MCU or remotely controlled via TUYA App based on temperature or humidity.
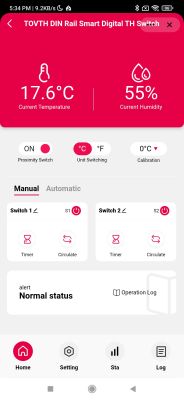
Purchased from the Tongou store https://www.aliexpress.com/item/1005009707659555.html

Opening
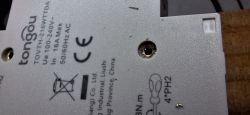
Like most MCBs, the rivets/ferrules must be drilled out on one side and pushed through
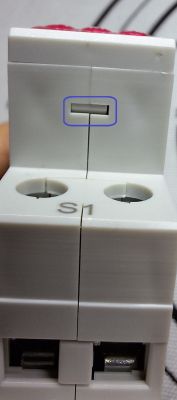
the faceplate is clipped in on the top and bottom, it will slide out with some gentle prying. The rest of the device will open after this
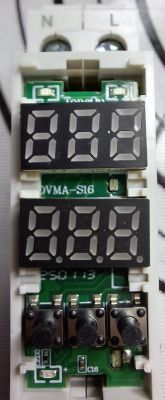
Inside
Which reveals the CB2S chip and a pair of relays quite tightly packed. There is limited space near the CB2S chip and difficult to get to the VCC, GND, TX, and RX which are on the back of the chip.
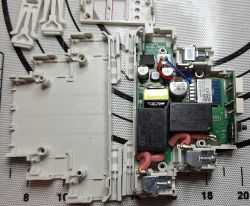
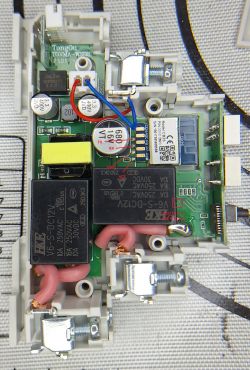
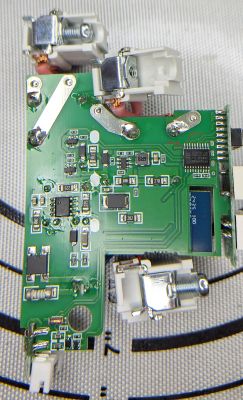
On the back side is the MCU. The RX and TX traces are again difficult to get to. The MCU's TX (which needs to be disconnected for flashing) isn't visible on the back, and is passed on a VIA hole underneath the MCU.
Temperature and Humidity Sensor SHT30
The SHT30 digital temp and humidity sensor attaches via a 6 pin JST 2mm socket on a 1m cable @ 3v. The SHT30 only requires 4 wires for a I2C connection, but the JST connector is 6 pins.
![[CB2S] How to Flash Custom Firmware on Tongou TOVTH-216WTTDA MCB with BK7231N CB2S? [CB2S] How to Flash Custom Firmware on Tongou TOVTH-216WTTDA MCB with BK7231N CB2S?](https://obrazki.elektroda.pl/6923429000_1765830086_thumb.jpg)
![[CB2S] How to Flash Custom Firmware on Tongou TOVTH-216WTTDA MCB with BK7231N CB2S? [CB2S] How to Flash Custom Firmware on Tongou TOVTH-216WTTDA MCB with BK7231N CB2S?](https://obrazki.elektroda.pl/9527585000_1765830086_thumb.jpg)
![[CB2S] How to Flash Custom Firmware on Tongou TOVTH-216WTTDA MCB with BK7231N CB2S? [CB2S] How to Flash Custom Firmware on Tongou TOVTH-216WTTDA MCB with BK7231N CB2S?](https://obrazki.elektroda.pl/3096383200_1765830088_thumb.jpg)
![[CB2S] How to Flash Custom Firmware on Tongou TOVTH-216WTTDA MCB with BK7231N CB2S? [CB2S] How to Flash Custom Firmware on Tongou TOVTH-216WTTDA MCB with BK7231N CB2S?](https://obrazki.elektroda.pl/6901055700_1765830089_thumb.jpg)
Disconnecting MCU and flashing
There are a few options to disconnect the MCU from the CB2S for flashing.
1. Lift the CB2S - Lifting the chip is usually my preferred method, but it's about 1.5mm space around the tuya chip and other components like the capacitor and relay. I abandoned this method as other components started melting
2. Lift the TX pin on the MCU. This would probably work fine, but because I can't see how close the TX VIA underneath the MCU is, I decided not to risk it.
3. the trace traverses underneath the relay, and the only decent opportunity is about 3mm past the relay. Still not a great option, but I did it with two of these without issue.
Gently scratch the circuit board to reveal the copper trace before the MCU TX VIA. Cut the trace 1mm before the VIA to leave yourself enough room to solder the cut later.
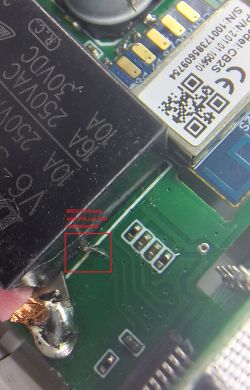
With the MCU disconnected, you can backup and flash the BK7231N as normal with OpenBeken.
OpenBeken config and tuyaMCU dpids
DPIDs were captured with the openbeken capture tools, as well as tuya developer json.
For simplicity, these are summarised in an autoexec.bat below.
Updated now using config using SetChannelEnum
I excluded some configuration for dpid's I'm not using, but have left those ID's in the comments
autoexec.bat:
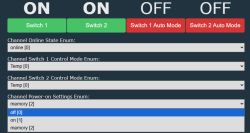
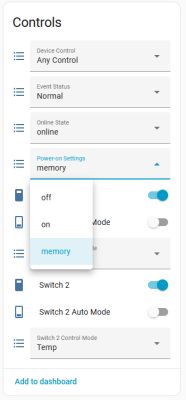
with this config and enum support, the obk and home assistant look like this:
![[CB2S] How to Flash Custom Firmware on Tongou TOVTH-216WTTDA MCB with BK7231N CB2S? [CB2S] How to Flash Custom Firmware on Tongou TOVTH-216WTTDA MCB with BK7231N CB2S?](https://obrazki.elektroda.pl/8348177900_1760404415_thumb.jpg)
![[CB2S] How to Flash Custom Firmware on Tongou TOVTH-216WTTDA MCB with BK7231N CB2S? [CB2S] How to Flash Custom Firmware on Tongou TOVTH-216WTTDA MCB with BK7231N CB2S?](https://obrazki.elektroda.pl/6445921900_1760404550_thumb.jpg)
![[CB2S] How to Flash Custom Firmware on Tongou TOVTH-216WTTDA MCB with BK7231N CB2S? [CB2S] How to Flash Custom Firmware on Tongou TOVTH-216WTTDA MCB with BK7231N CB2S?](https://obrazki.elektroda.pl/6156603300_1760404552_thumb.jpg)
Some points to note:
1. the MCU controls the relays unless DPID 121 enum is set to 2 or 3. In these modes, openbeken can control the relays
2. the physical MCU programming is painful and documentation isn't especially clear.
3. programming the MCU via dpid's is slightly easier. See MCU configuration heading below
4. DPID 7 for cycling on-off patterns via the MCU is defined by a STR type. OBK doesn't currently support String channel types. The could be done with TuyaMCU commands, but I personally don't require this so I did not invest time into it... I control the relays from MQTT so I don't need the MCU doing this.
5. tuyaMCU enums can be passed to homeassistant with SetChannelType Enum if the latest built from PR
repackaging
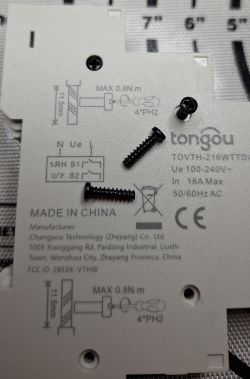
As described in the Tongou MCB smart meter and relay teardown, you can either add new ferrules or use screws. I prefer the M2.5 x 10mm screws since they are easy and repeatable and don't require any special tooling.
MCU configuration
easier than using the physical menus, the switches control can be configure on the MCU
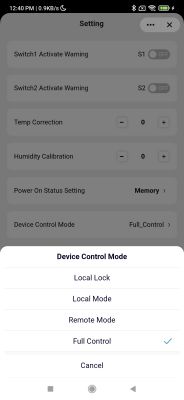
1) set 'Device Control' (dpid 121) must be set to Buttons Locked (0), Device Control (1), or Any Control (3) - can not be Remote Control (2)
2) toggle the 'switch auto mode' to ON for the desired switch (1 or 2)
3) set the Min and Max C values for the switch. Note the defines a range of temperatures the switch will turn on for. i.e min=19,max=80 means the switch is only on for temperatures between 19-80C.
notes: you can override the switch states with 'Device Control' (dpid 121) set to 'Any Control' (3) or 'Remote Control' (2), otherwise MCU has control of the switches.

Usage
The relays can be programmed on the MCU or remotely controlled via TUYA App based on temperature or humidity.


Purchased from the Tongou store https://www.aliexpress.com/item/1005009707659555.html

Opening
Like most MCBs, the rivets/ferrules must be drilled out on one side and pushed through

the faceplate is clipped in on the top and bottom, it will slide out with some gentle prying. The rest of the device will open after this


Inside
Which reveals the CB2S chip and a pair of relays quite tightly packed. There is limited space near the CB2S chip and difficult to get to the VCC, GND, TX, and RX which are on the back of the chip.


On the back side is the MCU. The RX and TX traces are again difficult to get to. The MCU's TX (which needs to be disconnected for flashing) isn't visible on the back, and is passed on a VIA hole underneath the MCU.

Temperature and Humidity Sensor SHT30
The SHT30 digital temp and humidity sensor attaches via a 6 pin JST 2mm socket on a 1m cable @ 3v. The SHT30 only requires 4 wires for a I2C connection, but the JST connector is 6 pins.
![[CB2S] How to Flash Custom Firmware on Tongou TOVTH-216WTTDA MCB with BK7231N CB2S? [CB2S] How to Flash Custom Firmware on Tongou TOVTH-216WTTDA MCB with BK7231N CB2S?](https://obrazki.elektroda.pl/6923429000_1765830086_thumb.jpg)
![[CB2S] How to Flash Custom Firmware on Tongou TOVTH-216WTTDA MCB with BK7231N CB2S? [CB2S] How to Flash Custom Firmware on Tongou TOVTH-216WTTDA MCB with BK7231N CB2S?](https://obrazki.elektroda.pl/9527585000_1765830086_thumb.jpg)
![[CB2S] How to Flash Custom Firmware on Tongou TOVTH-216WTTDA MCB with BK7231N CB2S? [CB2S] How to Flash Custom Firmware on Tongou TOVTH-216WTTDA MCB with BK7231N CB2S?](https://obrazki.elektroda.pl/3096383200_1765830088_thumb.jpg)
![[CB2S] How to Flash Custom Firmware on Tongou TOVTH-216WTTDA MCB with BK7231N CB2S? [CB2S] How to Flash Custom Firmware on Tongou TOVTH-216WTTDA MCB with BK7231N CB2S?](https://obrazki.elektroda.pl/6901055700_1765830089_thumb.jpg)
Disconnecting MCU and flashing
There are a few options to disconnect the MCU from the CB2S for flashing.
1. Lift the CB2S - Lifting the chip is usually my preferred method, but it's about 1.5mm space around the tuya chip and other components like the capacitor and relay. I abandoned this method as other components started melting
2. Lift the TX pin on the MCU. This would probably work fine, but because I can't see how close the TX VIA underneath the MCU is, I decided not to risk it.
3. the trace traverses underneath the relay, and the only decent opportunity is about 3mm past the relay. Still not a great option, but I did it with two of these without issue.
Gently scratch the circuit board to reveal the copper trace before the MCU TX VIA. Cut the trace 1mm before the VIA to leave yourself enough room to solder the cut later.

With the MCU disconnected, you can backup and flash the BK7231N as normal with OpenBeken.
OpenBeken config and tuyaMCU dpids
DPIDs were captured with the openbeken capture tools, as well as tuya developer json.
For simplicity, these are summarised in an autoexec.bat below.
Updated now using config using SetChannelEnum
I excluded some configuration for dpid's I'm not using, but have left those ID's in the comments
autoexec.bat:
/mqtt_broadcastInterval 60

// this large of an autoexec definition currently consumes all heap
//scheduleHADiscovery 3600

// tuyaMCU store RAW data in /cm?cmnd=Dp must be turned off on this device..
// it eats memory because the MCU updates the time every 500ms
setflag 46 0

ntp_setServer 132.163.97.4
ntp_timeZoneOfs 12:00

startDriver TuyaMCU

tuyaMcu_setBaudRate 115200

// always report paired
tuyaMcu_defWiFiState 4

// update states any time the temperature changes
addEventHandler OnChannelChange 27 tuyaMcu_sendQueryState

// 2 switch 1 relay bool - 121 device control must be 2 or 3 (remote mode)
setChannelType 21 Toggle
setChannelLabel 21 "Switch 1"
linkTuyaMCUOutputToChannel 2 bool 21

// 101 switch 2 relay bool - 121 device control must be 2 or 3 (remote mode)
setChannelType 22 Toggle
setChannelLabel 22 "Switch 2"
linkTuyaMCUOutputToChannel 101 bool 22

// 104 Switch 1 Automatic Mode bool
setChannelType 24 Toggle
setChannelLabel 24 "Switch 1 Auto Mode"
linkTuyaMCUOutputToChannel 104 bool 24

// 105 Switch 2 Automatic Mode bool
setChannelType 25 Toggle
setChannelLabel 25 "Switch 2 Auto Mode"
linkTuyaMCUOutputToChannel 105 bool 25

// 27 current temperature /10 - dpId 20 changes C/F
setChannelType 1 Temperature_div10
linkTuyaMCUOutputToChannel 27 val 1

// 46 current humidity
setChannelType 2 Humidity
linkTuyaMCUOutputToChannel 46 val 2

//102 online state enum; 0 online, 1 offline
setChannelType 3 ReadOnlyEnum
setChannelLabel 3 "Online State"
setChannelEnum 3 0:Online 1:Offline
linkTuyaMCUOutputToChannel 102 enum 3

// 118 event RO
setChannelType 4 ReadOnlyEnum
setChannelLabel 4 "Event Status"
SetChannelEnum 4 0:Normal "9:Buttons Locked" "10:Local Mode" "11:Remote Control" "12:Any Control"
linkTuyaMCUOutputToChannel 118 enum 4

// 121 device control mode enum; 0 local_lock, 1 MCU control, 2 OBK control, 3 MCU and Tuya control
setChannelType 5 Enum
setChannelLabel 5 "Device Control"
SetChannelEnum 5 "0:Buttons Locked" "1:Device Control" "2:Remote Control" "3:Any Control"
linkTuyaMCUOutputToChannel 121 enum 5

// 106 device Power-On Relay behaviour
setChannelType 6 Enum
setChannelLabel 6 "Power-on Behaviour"
SetChannelEnum 6 0:off 1:on 2:memory
linkTuyaMCUOutputToChannel 106 enum 6

// 107 Switch 1 Automatic Control Mode
setChannelType 7 Enum
setChannelLabel 7 "Switch 1 Control Mode"
setChannelEnum 7 0:Temp 1:Humidity
linkTuyaMCUOutputToChannel 107 enum 7

// 108 Switch 2 Automatic Control Mode
setChannelType 8 Enum
setChannelLabel 8 "Switch 2 Control Mode"
setChannelEnum 8 0:Temp 1:Humidity
linkTuyaMCUOutputToChannel 108 enum 8

// 22 Switch 1 Min Temp Set C -10-99
setChannelType 10 TextField
setChannelLabel 10 "Switch 1 Min C"
linkTuyaMCUOutputToChannel 22 val 10

// 110 Switch 1 Max Temp Set C -10-99
setChannelType 11 TextField
setChannelLabel 11 "Switch 1 Max C"
linkTuyaMCUOutputToChannel 110 val 11

// 113 Switch 2 Min Temp Set C -10-99
setChannelType 13 TextField
setChannelLabel 13 "Switch 2 Min C"
linkTuyaMCUOutputToChannel 113 val 13

// 115 Switch 2 Max Temp Set C -10-99
setChannelType 15 TextField
setChannelLabel 15 "Switch 2 Max C"
linkTuyaMCUOutputToChannel 115 val 15

// un-used dpIds
// 7 cycle time str
// 20 Temp Unit Convert enum; 0 C, 1 F
// 28 current temperature F /10
// 30 Temp correction; -9 - 9
// 47 Humidity Calibration val -9 - 9
// 103 probe/proximity switch bool
// 41 Switch 1 Min Humidity Set -10-99
// 111 Switch 1 Max Humidity Set -10-99
// 21 Switch 1 Min Temp Set F 14-212
// 109 Switch 1 Max Temp Set F 14-212
// 112 Switch 2 Min Temp Set F 14-212
// 114 Switch 2 Max Temp Set F 14-212
// 116 Switch 2 Min Humidity Set val 0-99
// 117 Switch 2 Max Humidity Set val 0-99
// 119 switch 1 alarm settings raw
// 120 switch 2 alarm settings raw

// refresh tuyaMCU after definitions
tuyaMcu_sendQueryState
with this config and enum support, the obk and home assistant look like this:
![[CB2S] How to Flash Custom Firmware on Tongou TOVTH-216WTTDA MCB with BK7231N CB2S? [CB2S] How to Flash Custom Firmware on Tongou TOVTH-216WTTDA MCB with BK7231N CB2S?](https://obrazki.elektroda.pl/8348177900_1760404415_thumb.jpg)
![[CB2S] How to Flash Custom Firmware on Tongou TOVTH-216WTTDA MCB with BK7231N CB2S? [CB2S] How to Flash Custom Firmware on Tongou TOVTH-216WTTDA MCB with BK7231N CB2S?](https://obrazki.elektroda.pl/6445921900_1760404550_thumb.jpg)
![[CB2S] How to Flash Custom Firmware on Tongou TOVTH-216WTTDA MCB with BK7231N CB2S? [CB2S] How to Flash Custom Firmware on Tongou TOVTH-216WTTDA MCB with BK7231N CB2S?](https://obrazki.elektroda.pl/6156603300_1760404552_thumb.jpg)
Some points to note:
1. the MCU controls the relays unless DPID 121 enum is set to 2 or 3. In these modes, openbeken can control the relays
2. the physical MCU programming is painful and documentation isn't especially clear.
3. programming the MCU via dpid's is slightly easier. See MCU configuration heading below
4. DPID 7 for cycling on-off patterns via the MCU is defined by a STR type. OBK doesn't currently support String channel types. The could be done with TuyaMCU commands, but I personally don't require this so I did not invest time into it... I control the relays from MQTT so I don't need the MCU doing this.
5. tuyaMCU enums can be passed to homeassistant with SetChannelType Enum if the latest built from PR
repackaging
As described in the Tongou MCB smart meter and relay teardown, you can either add new ferrules or use screws. I prefer the M2.5 x 10mm screws since they are easy and repeatable and don't require any special tooling.

MCU configuration
easier than using the physical menus, the switches control can be configure on the MCU
1) set 'Device Control' (dpid 121) must be set to Buttons Locked (0), Device Control (1), or Any Control (3) - can not be Remote Control (2)
2) toggle the 'switch auto mode' to ON for the desired switch (1 or 2)
3) set the Min and Max C values for the switch. Note the defines a range of temperatures the switch will turn on for. i.e min=19,max=80 means the switch is only on for temperatures between 19-80C.
notes: you can override the switch states with 'Device Control' (dpid 121) set to 'Any Control' (3) or 'Remote Control' (2), otherwise MCU has control of the switches.


