I will show here how to create a website for any IoT device on multi-platform firmware
OpenBeken , although the same approach will also offer compatibility with Tasmota (compatibility of sent commands and returned JSON format). We will write the device control page in HTML and Javascript, we will host it on the IoT device itself in the LittleFS file system, and the communication of this page with the device support itself will take place via Ajax and the REST interface, which means that the page will also refresh without reloading.
The basis of the OpenBeken/Tasmota REST interface
OpenBeken has a REST interface compatible with the Tasmota base, which means that the submission of commands and returned data is largely the same.
We send the command itself via HTTP GET, for example:
http://192.168.0.201/cm?cmnd=POWER%20ON
It is a POWER command with an ON argument, i.e. switching on a relay or lighting a lamp.
Then the device returns JSON:
The commands and returned JSON are in the Tasmota documentation. It is also worth taking a look at the OBK documentation, which is constantly being developed.
https://github.com/openshwprojects/OpenBK7231T_App/blob/main/docs/README.md
Information about the device can be retrieved by sending a command without an argument - eg POWER itself.
Basic HTML, Javascript, JSON
This topic assumes that the reader has a basic understanding of the topics mentioned in this paragraph. HTML (along with CSS) allows you to create the appearance of the page, its controls, and so on, Javascript allows you to properly script them - intercept events from the user and then send and receive data accordingly. Javascript here processes data in conjunction with Ajax, i.e. the page is not reloaded entirely, only Javascript itself sends data in the background, receives and updates only selected controls. JSON, on the other hand, is the format in which data is received, it allows for the textual representation of objects (with key/value pairs), arrays, etc.
In this topic, I recommend, among others. W3 course:
https://www.w3schools.com/html/
https://www.w3schools.com/js/
https://www.w3schools.com/js/js_ajax_intro.asp
https://www.w3schools.com/js/js_json_intro.asp
LittleFS file system on OpenBeken
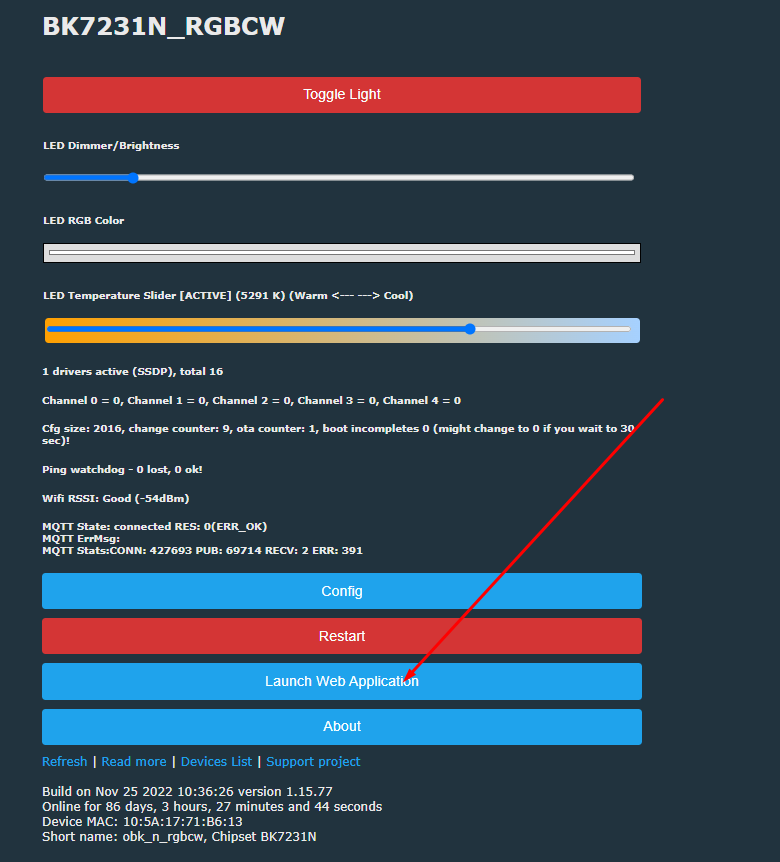
The LittleFS file system is available from the Web App panel, i.e. a panel that is itself downloaded from Github and communicates with the IoT device itself via the REST interface. Of course, it doesn't mean that you won't be able to access this panel without the Internet - if you want, you can host its sources in your network and simply change their address in the OBK configuration.
We open the Web Panel:
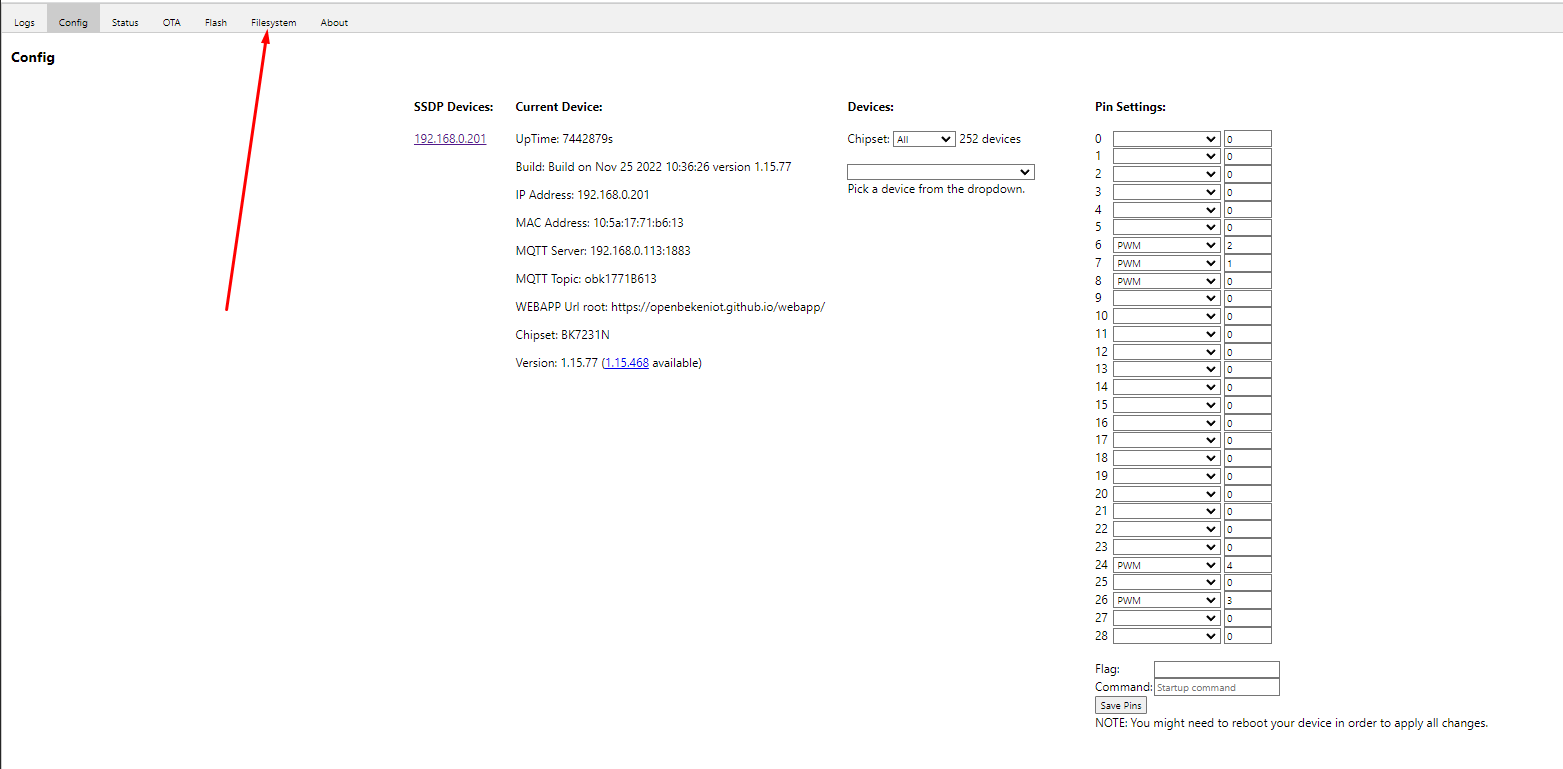
We open the LittleFS tab:
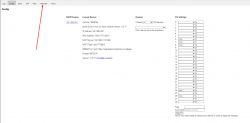
Here is the file system interface:
Create creates a new file, List refreshes their list.
Here we can create autoexec.bat (which is executed at the beginning), any other scripts for the startScript command, and just HTML files and scripts.
We can also drag existing files onto the field
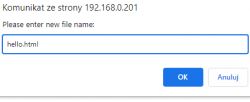
Hello World OBK
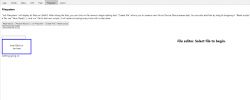
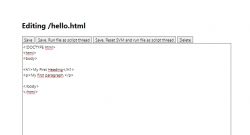
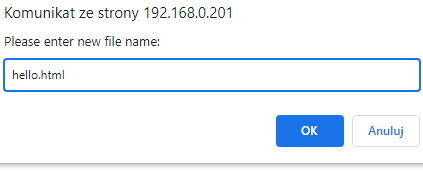
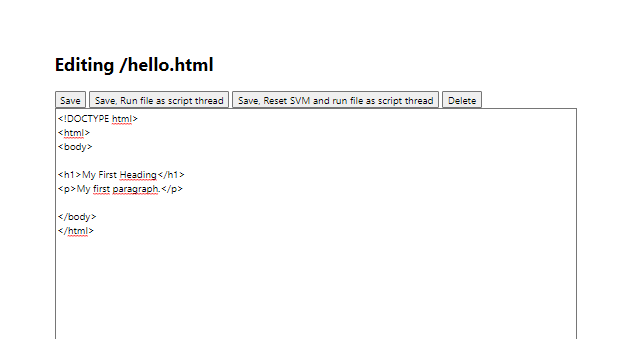
We will create a basic document - Create File, hello.html:
We can paste anything there - even a basic HTML document:
This way (after saving) it will be available under the path:
http://192.168.0.201/api/lfs/hello.html
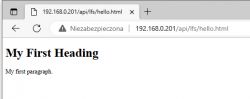
Here is our first HTML document hosted (in this case) on a 12W LED lamp!
REST interface - the simplest button
OBK's REST interface is largely Tasmota compatible. All these POWER, STATUS commands are similarly implemented.
So let's try to check the POWER (on/off) of the lamp.
For ease of use, I've attached the bootstrap style here.
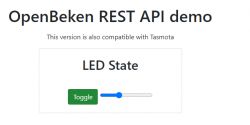
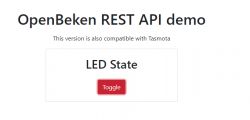
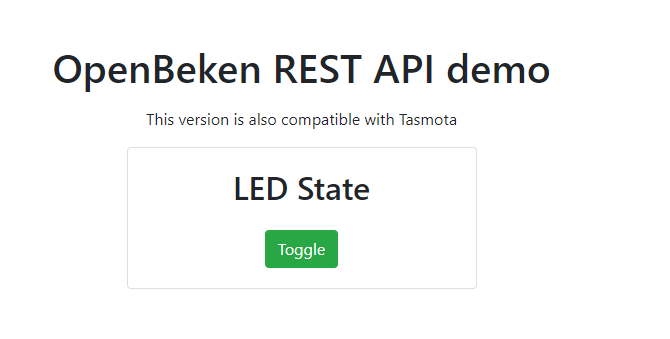
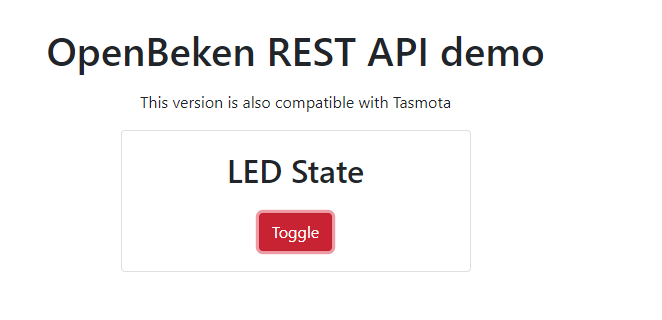
For starters - ready example and result:
Code copy:
https://github.com/openshwprojects/OpenBekenRESTDemo/blob/main/examples/Generic_Power.html

The above page is a SPA (Single Page Application), the simplest possible on OBK, demonstrating the use of Tasmota's POWER command to control the status of the LED.
This page basically does two things:
- after loading the window, it sends an empty POWER (no argument) to the device to retrieve the current LED power state
- after clicking the button, it tries to switch the LED state to the opposite one
The color of the button reflects the status of the LED:
This excerpt:
let baseURL = "http://192.168.0.210";
It allows me to run it on Windows, which is basically anywhere, because it sets the IP of the device. When uploading a device to LittleFS, this variable should be an empty string.
The REST query after the HTTP GET executes this snippet:
According to Tasmota's documentation, POWER without an argument will only return the current state, and with an argument (ON, OFF or Toggle) it will change it.
You can test this in a browser:

This snippet refreshes the state of the LED when the page loads:
The following snippet is a helper function to change the color/style of the button:
And below we have the button itself - along with the API call with the TOGGLE argument (here with an additional space):
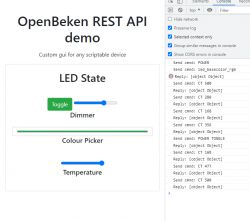
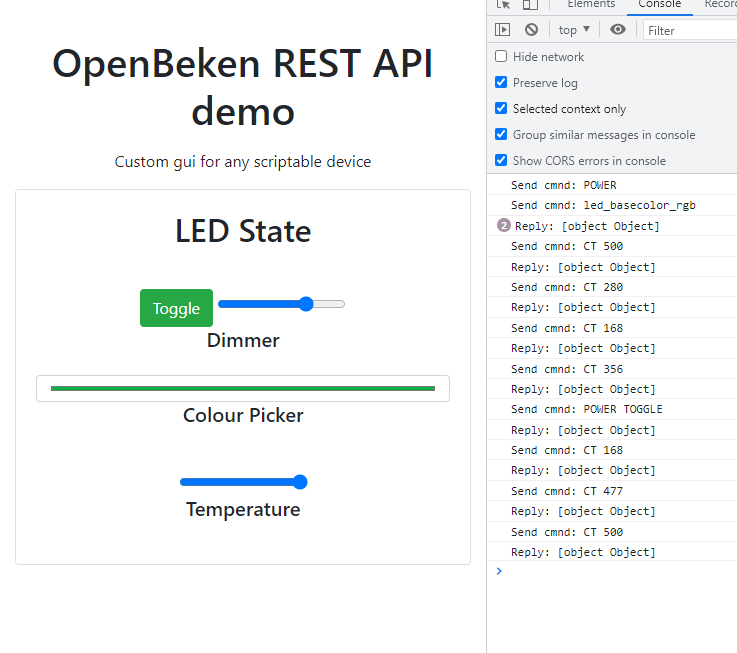
Brightness control bar
Following this lead, we can add support for a dimmer. First you will need a slider:
Then you still have to somehow receive the initial state and handle its change.
The change event is added like this:
There is no sendCmnd function yet, but sendPower is reworked to accept any command. This is because you can use the Dimmer command to control the brightness of the LED.
Here is the whole code:
https://github.com/openshwprojects/OpenBekenR...mo/blob/main/examples/LED_PowerAndDimmer.html
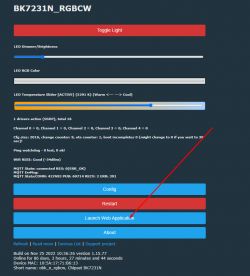
Result:
Both the button and bar work. And even with Tasmota! Only then you have to save the HTML on the disk, and OBK has its own mini-hosting in LittleFS.
Color change
There is also a special HTML5 control for color selection:
It's just as easy to catch the event of its change:
In this case, I used the command from the OBK to make my work easier, led_basecolor_rgb returns the color in the form compatible with HTML.
This is what the updated 'change' event looks like:
In addition, I modified the function sending the command so that it checks whether they exist before using the fields from the response:
Result:

Visually - the script is here:
https://github.com/openshwprojects/OpenBekenR.../blob/main/examples/LED_PowerDimmerColor.html
Light temperature
The white temperature can be handled similarly. It is available in the CW and RGBCW products. Sometimes it is also emulated with RGB diodes (+ warm white diode), but about that another time.
Just a command
CT , which is also consistent with Tasmota.
Here is the page after adding the second bar:
Added HTML:
Javascript (sending change):
Javascript (receiving the state, fragment to be pasted into the then block):
It is worth noting that thanks to the JSON structure of Tasmota, one block is enough to receive various values such as CT or POWER.
Visually - the script is here:
https://github.com/openshwprojects/OpenBekenR...examples/LED_PowerDimmerColorTemperature.html
OpenBeken Channels
OpenBeken introduces a slightly different concept from Tasmota, the so-called channels, which are really general purpose variables and allow you to chain different peripherals and scripts together. The channel can contain anything, from the state of the relay (1 or 0), through PWM (from 0 to 100), to e.g. a value read from the ADC or even just a simple event counter (e.g. if we want the system to take some action after N events action).
Access to OpenBeken channels is available e.g. by the command:
http://127.0.0.1/cm?cmnd=Ch1%20100
Basic submission is
Ch , then without spaces the channel index and . possibly its value if we want to set it and not just read it. Similar to Tasmota.
Ch+4 style notation is also supported, where + means that we want to add something to the channel value.
OBK then returns JSON like this:
The presence of channels in a packet determines whether they are used - eg mapping a channel to a relay or ADC (or setting its type) causes the channel to appear in those used.
Compatibility is also very important
TuyaMCU . In OpenBeken, you can map any TuyaMCU variable to a channel, even one whose type was not provided during software development (for example, I don't know, pollen level in the air or gas concentration) and then pass it on for processing via the REST interface.
In addition, there are slightly older commands that return a text value:
- SetChannel [index] [value] - sets the channel to a given value and returns the current value
- AddChannel [index] [value] - adds a value to the channel and returns the current value
- GetChannel [index] - just returns the current value
But in general it's better to use the common Ch* command I already mentioned.
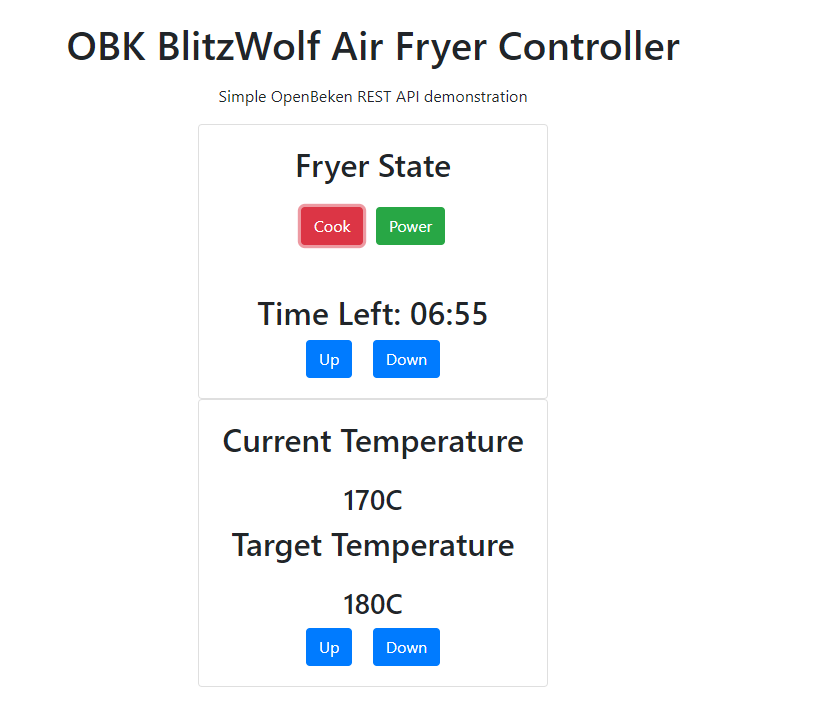
Based on duct access, I made a fryer controller just for fun:
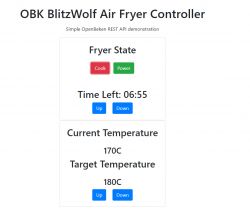
source on Github:
https://github.com/openshwprojects/OpenBekenRESTDemo/blob/main/examples/TuyaMCU_AirFryer.html
Downloading information about the device, sensors, electricity measurements
OpenBeken also supports Tasmota-style STATUS commands, i.e. you can download a JSON description of the entire device status through them. For example, for a device with BL0942 (electricity measurement) we can obtain:
Similarly for many other sensors, both in Tasmot and OpenBeken, eg the entire DHT family (DHT11 and similar), etc. also publishes its results in JSON.
Can you go the other way?
The entire presentation was based on the assumption that this IoT device is a mini server and responds to a GET request, but can it be done the other way around?
It so happens that in OpenBeken there is a SendGET command, which also supports substituting variables (channels), so nothing stands in the way of reporting measurements from the device to an external server in the timer or in the onChange event (even one on HTTP hosting in the network). But about that another time.
Summary
The following conclusions can be drawn from this short game:
- for both Tasmota and OpenBeken, you can easily write a simple page to control a given device
- it can be hosted e.g. on OpenBeken itself in the LittleFS file system, but it can also be left as an HTML document on our computer, or on any HTTP hosting (e.g. on Raspberry)
- such a page can have any style and any interface, you can do anything really with CSS
- the REST interface basically gives access to everything, so it's possible to create really arbitrary controllers for any use
- OpenBeken also offers a simple scripting language, so you can even place fields for creating automation on the website, e.g. you can configure the sprinkler switch-on time and then operate them on the OBK itself (firmware supports downloading time from NTP and supports events set for a given hour of a given day)
The possibilities are really great. In addition to controlling a single device, you could basically also make one collective page for many devices, which is basically your own DIY Home Assistant.
So are there any downsides?
One of the downsides may be the nature of Javascript itself and the fact that such a site only works if we have it open in the browser, i.e. we will not, for example, record a nice record of power consumption measurements from BL0942 to the graph, unless we only want to have a time graph when we have a website open. By the way, I would like to add that information between sessions could be kept on the browser's side in cookies, but that's another thing...
Still, I think the possibilities are still great. Soon I will try to present a more practical example of such a page, but that's for another topic.


Comments
As always a great elaboration. I unfortunately encountered a problem with WB2S after winning your soft configuring wifi mqtt everything works until disconnected from the power supply for a few hours then... [Read more]
I'll be happy to try to help you, but start a separate topic. The description of the problem sounds strange to say the least. Disconnecting the power should not break anything, the data is stored in... [Read more]
UPDATE: If you want to make a button link to LittleFS on latest OBK version, do: startDriver httpButtons setButtonEnabled 0 1 setButtonLabel 0 "Open Config" setButtonCommand 0 "*/api/lfs/cfg.html" setButtonColor... [Read more]
This is amazing!!! :D This is a whole new level of customization and configuration possibilities!!! Thank you! [Read more]
Sample pages added to https://github.com/openshwprojects/OpenBekenRESTDemo/tree/main/examples , especially those two ones: TuyaMCU_RadarSensorConfig.html TuyaMCU_RadarSensorConfigAndResults.html [Read more]
The "window.onload" function doesn't work with Tasmota. Only the "onclick" button event is working with Tasmota. They both are working with OpenBeken totally fine. I can't figure out why, the JSON... [Read more]
I have tried my best to keep my examples compatible with Tasmota, although OpenBeken features some more advanced API which is useful for handling TuyaMCU devices. @dedamraz knows some more about it, as... [Read more]
Thanks , I already modified the code found on the git... This is my modified code: First is OpenBeken Second is Tasmota. "Onload" state of the Tasmota device doesn't get updated (2nd button stay blue)... [Read more]
It looks like Tasmota has changed something recently. They are enforcing CORS policy now. I've found a related Reddit thread: https://obrazki.elektroda.pl/7211192900_1687547377_thumb.jpg You can... [Read more]
Thanks for your testings. I Hope you'll find the best solution... I Don't know how to check those stuff... [Read more]
Btw, if you want simple on/off access, why not try this approach? [Read more]
Actually I think I Will pass the option of HTML . I need to port forward all my devices to make it work for my purposes... Is anybody know a free cloud (mqtt) ? Tried hivemq but it can't connect.... [Read more]