The author of the following project, having no experience with Raspberry Pi, set about creating a simple air conditioning control system. As he did very well, he decided to create the following guide so that any other person could also build a similar device.
Step 1: What you'll need To compile the system described below we need:
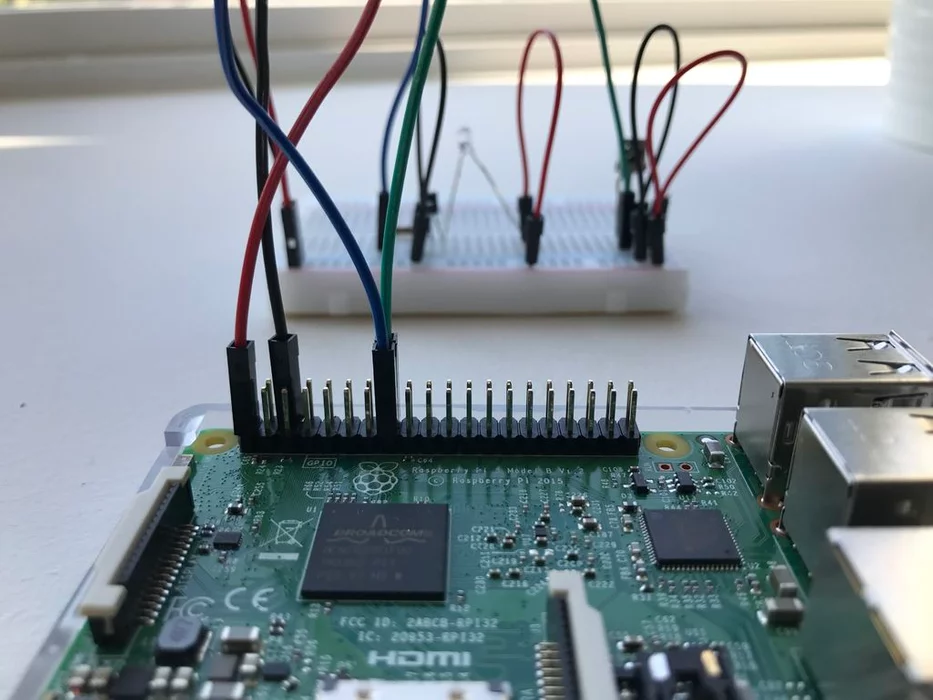
* Raspberry Pi;
* SD card;
* Infrared receiver and transmitter (RC5 code);
* Transistor, resistors and contact plate;
* Connection jumpers.
Step 2: Format the SD card and upload the system After purchasing all parts, we can start our computer. The first step is to format the SD card and load the image on it with the system that we download from the network.
From the Raspberry Pi website, we can download a number of different versions of Raspberry - the Linux distribution for this minicomputer. If we are a novice user, it is good to download the NOOBS version.
We can obtain more information about this process
here .
Step 3: Configuring Raspberry Pi After the first start of our minicomputer, we can proceed to its configuration. We connect to it a keyboard, mouse and TV or monitor via the HDMI port. We can connect a network to the Ethernet socket, which will greatly simplify the use of the machine.
After logging in to the computer (default data is user: pi and password: raspberry) we can proceed to configuration. First, we should extend the file system on the partition on the card so that the partition takes up the whole card, regardless of its capacity.
To configure the system, we need to enable the appropriate tool. To do this, enter in the terminal:
In the program we need to find the "expand rootfs" option and enable it. Then turn off the configuration tool and restart the system:
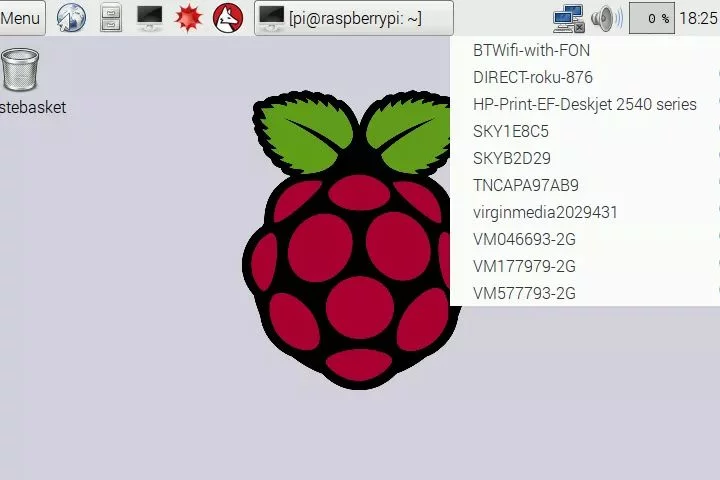
The next step is to launch the Wi-Fi interface and connect to our home network. If we use a graphical interface, the photo on the left shows how to make a network selection. However, if we use only the terminal, then we use the published advice
here .
Finally, we need to enable the SSH server, which will allow us to log into the system remotely. To this end, we again use raspi-config (see above) and there, in the menu with interfaces we choose to enable SSH.
Step 4: Installation and configuration of LIRC LIRC (Linux Infrared Remote Control) is a software package that allows decoding and sending infrared signals supported by most (but not all) remote controls. This allows both remote control of many devices from the Raspberry Pi level, and control of the raspberry itself with the help of a remote control.
We will use this package to record the signals of an infrared remote control, which is used e.g. to control the air conditioning system. We will later use LIRC to send the same messages to the air conditioner.
You can learn more about the software itself
here .
To install and run LIRC, we will use the terminal. First enter:
If we have any problem before installation, it is worth updating the package list in the repositories. Even if we have no problems installing LIRC, it's good to do it from time to time:
Then, after installation, we need to add LIRC to the list of modules installed in our system. To do this, we must use the following commands:
[syntax=bash]sudo cat >> /etc/modules

Comments
And to think that for this you just need an ordinary arduino, for this we can buy a "top" with an ir receiver and a relay and more poster a few other things. [Read more]
This project was created mainly to show how you can program Raspberry to support GPIO and use LIRC, I do not understand how Arduino would replace RPI here. The same could be done on Arduino, but for... [Read more]
Hello. I am also thinking about such things, standing before making a new installation at home. I just wonder if the matter will be handled by a device called Broadlink. It gets us all the remote controls... [Read more]
e.t.c... I didn't know shutdown is such a universal command. ;-) [Read more]
I don't know where it comes from ... it looks different in the post :O [Read more]
https://obrazki.elektroda.pl/6823863900_1548409426_thumb.jpg [Read more]
Strange, it works for me: https://obrazki.elektroda.pl/2842938300_1548411422_thumb.jpg [Read more]
But not with us, I see like a pineapple. Added after 2 [minutes]: Maybe you read from the cache, try a different browser or clear the cache. [Read more]
And for me like a ghost ghost, hence how it is in computer science jokes "weird, it works for me" [Read more]
I still have: [Read more]
I have a remark that relates to many project descriptions, namely what does this project actually do and how? Both the author of the original article and the translator did not write in the first paragraph... [Read more]
The problem occurs in the new look of the forum. In the old one is OK. [Read more]
A very good idea, I will start doing so, especially in DIY projects. [Read more]
Do not damage the memory environment (RAM) and all packages associated with it (FLASH)? Isn't it better to use a more customized distribution and get into the machine after ssh? It's supposed to... [Read more]
In that case ESP8266. I like the NodeMCU version. RPI to IR alone is a light form. [Read more]
ESP8266 and we have WiFi control from anywhere on earth, I gave a description on the electrode, and as you can see the code is trivial :) So even in pure Arduino we can in a few lines control any device... [Read more]
I think that the presented project shows how trivial it is on RPI, but as if it is obvious that it should be part of a larger whole. [Read more]
Sure, I will replace Rm mini 3 additionally with tense domoticz, without the need to use Chinese software :) Greetings. robert [Read more]
It is a pity that there was no such guide as I set up LIRC on raspberry and I had to look for puzzle pieces on various forums ... Very legible instruction, someone will definitely use, estimate. I also... [Read more]