Everyone likes Arduino, from the smallest modules on Attiny85 to the largest modules based on MEGA2560 microcontrollers. Unfortunately, they have their limitations - if we need more computing power, higher precision or more analog inputs, we do not have much choice in the Arduino family ... There is, however, an elegant solution that will ensure that we do not have to leave this ecosystem at all.
There is a board compatible with Arduino nano with a microcontroller from the STM32 family - Blue Pill. Unfortunately - there is a catch here - it cannot be programmed via USB, because the system does not have a pre-programmed bootloader (it is a small program that works a bit like an operating system on a microcontroller and allows you to upload software via USB.
In the following instructions, we will learn how to easily upload an Arduino-compatible bootloader to the system, thanks to which we will be able to program these systems with the Arduino IDE, just like any other module from this ecosystem.
Step 1: What we will need Of course, we need the tile itself - you can buy it on eBay, AliExpress or Allegro.
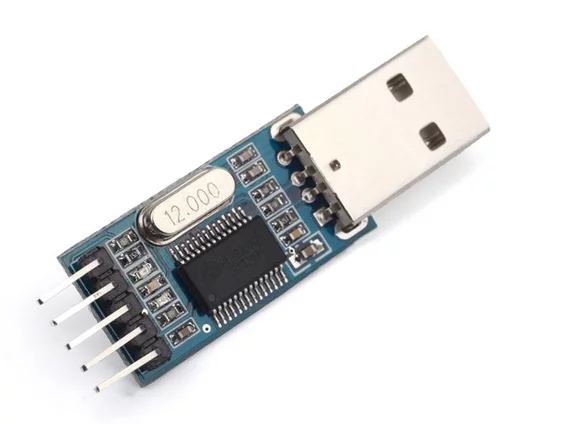
In addition to the module itself, we also need a USB to UART TTL converter to upload the first program - bootloader - to the microcontroller's memory. An example converter is shown in the photo in the article. In principle, any converter will do.
Finally, of course, we need cables to connect the controller to the module, but this is something that every Arduino enthusiast definitely has in his workshop.
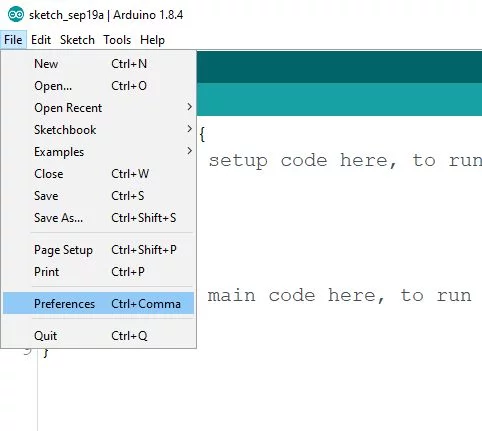
Step 2: Configuring the Arduino IDE Before we start connecting and programming Blue Pill via the Arduino IDE, we need to do a few simple things. First of all - we need to load the configuration data for this chip into our environment. For this purpose, in the Arduino IDE, press File and select the Preferences menu. A new window will open, in which we need to find an icon with the description "Additional Boards Manager URLs:" There we add a link to the configuration file for STM32:
http://dan.drown.org/stm32duino/package_STM32duino_index.json .
If there is already something here, just add another entry on a new line. We can now close the Arduino IDE and restart it. Now select the boards and Board Manager tab in the Tools menu (it is the first on the list). In the "Filter your search ..." box, type stm32f1 to filter the available options. There should be one search result. When we find the correct driver, we can click on it to install it in our IDE. After that, we can turn off the Arduino IDE - its configuration is finished.
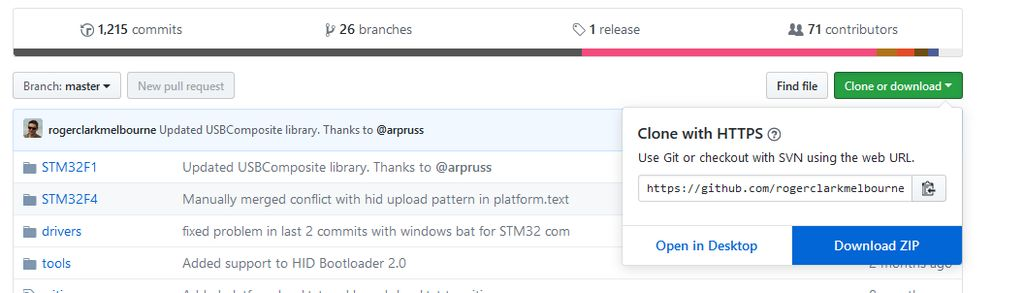
Step 3: Drivers After connecting Blue Pill to the computer, Windows will not automatically detect this device, it is necessary to install drivers. It's also a very simple process. We start with downloading the drivers. They are located
here .
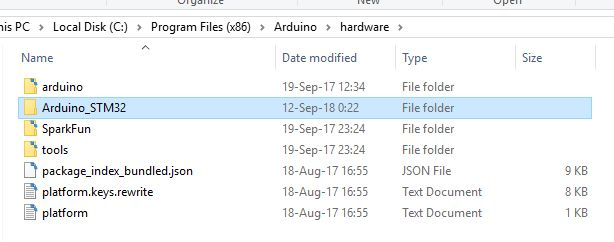
After entering the repository, press the green button "Clone or Download" and select "Download ZIP". After downloading it, download the package and copy it to the folder with the Arduino IDE. If we installed the software in the default location, we will find it in C: \ Program files (x86) \ Arduino. We find or create a folder under the name "hardware" and copy the file "Arduino_STM32-master" from the downloaded ZIP file there. Let's change its name to Arduino_STM32.
At this stage, the software preparation is almost ready. There is only one more step ahead of us.
Step 4: Loading the bootloader We need to upload the bootloader. For this, we need two things - the program udo loading the firmware to STM32, which can be downloaded
here (you need to register on the site and you will be able to download it) and the bootlader itself in binary form, which can be found in
this repository . Select the file "generic_boot_pc13.bit" and simply download it.
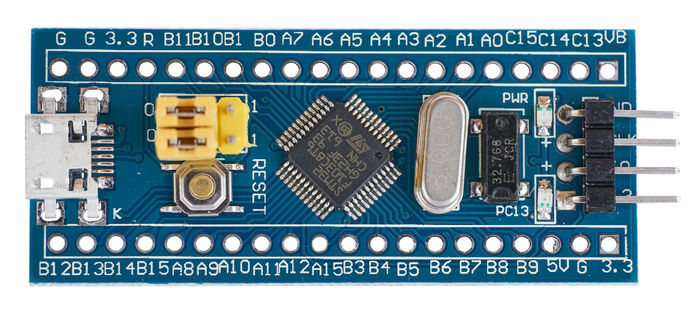
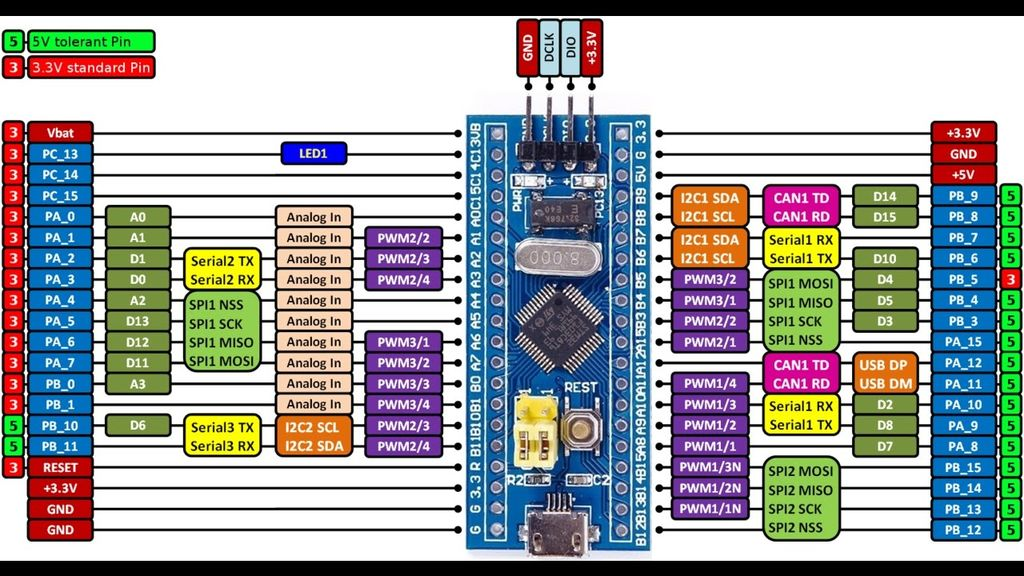
Now we have everything we need. We need to connect the USB-UART converter to Blue Pill and load it. The connections are very simple as described in the table:
| USB UART converter | Blue Pill |
| TX | A10 |
| RX | A9 |
| VCC | 3.3 V |
| mass | GND |
We also set the highest jumper on the module with STM32 in the right position. We can now connect the converter to the USB port on the computer.
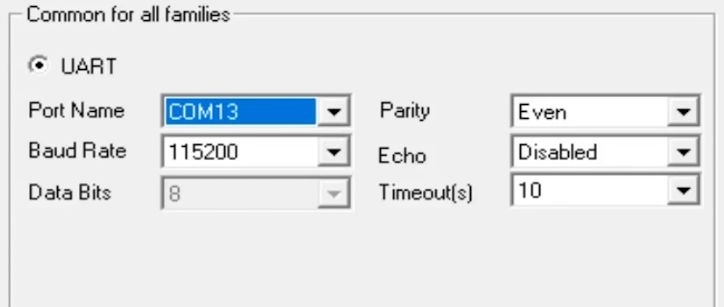
Now we can install the software we downloaded. Just click on the downloaded installer and follow the instructions. After starting it, you should see a new COM port in the programmer. If it does not appear in our system, you need to check all connections in our system and run the program again.
After correctly detecting the COM port, click "Next" three times, and finally we get to the window where we can select the "Download to device" option. Select the "Download from file" option there, and locate the previously downloaded bootloader file. Then click OK and "Next" again. The program will automatically install the new firmware. The program can now be loaded but
can not yet disconnect the boards from the computer.
First we put the top jumper back to the left position so that both jumpers are in the zero position. Now we can disconnect everything.
Step 5: First Program We can now connect Blue Pill to the computer and run the Arduino IDE. In the Boards menu, select "Generic STM32F103C series". Then select the program loading option - "STM32duino bootloader", where the port is "COMX (Maple Mini)" where X is the number that our computer assigned to the new serial port.
Now Blue Pill is recognized as Maple Mini. We can start writing and loading sketches in the Arduino IDE into the layout.
The first program doesn't have to be anything special. To check the correctness of our installation, it is enough to compile and upload an empty, default sketch consisting of a setup and a loop. We can additionally add Serial.print to it to check 100% that the system is working properly. Below is the code for this sample program that we can copy to the Arduino IDE.
This program will send a welcome string in a loop through the serial port. We can read it using the serial port monitor built into the Arduino IDE.
And it's ready! Now you can start using the module with STM32 just like with a regular Arduino.
Source:
https: // www.instructables.com/id/Programming-STM32-Blue-Pill-Via-USB/ 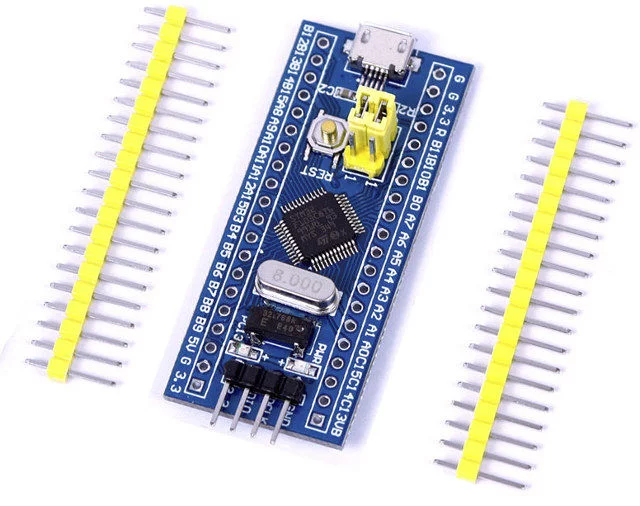


Comments
Today the abovementioned the plate (the second, the first I bought on Alla) after 2 months of waiting, price [Read more]
The thesis that everyone likes Arduino is risky to say the least :) But in terms of content - for years, the Arduino version with ARM has been available - there are versions with Atmelowski SAMD. But... [Read more]
I somehow noticed the popularity of blue pill tiles. In my opinion, a successful design due to the price / performance ratio. As for learning the code, this is my first board for arduino and I had no problem... [Read more]
STM32 boards are now very well supported in the PlatformIO environment (Linux / Windows), even better than AVR. Arduino HAL also has very good support in PIO, so if someone wants to work a little more... [Read more]
I believe that STMs are becoming a deeper and deeper nail in the coffin of AVRs when it comes to amateur applications. Generally, the differences are very big when it comes to functionality and attractive... [Read more]
Another interesting fact is that, most likely, the processors assembled by the Chinese in blue piles are not the original processors from STMicroelectronics - stm32f103c8t6, but the coloring of GigaDevice... [Read more]
Exactly - I wrote about it some time ago: https://www.elektroda.pl/rtvforum/topic3552273.html Soon we plan to test this system for possible differences. [Read more]
The situation with GigaDevice is so interesting that it appeared in TME's distribution, which it even boasts on its website: https://www.tme.eu/pl/pages/New_Product:mikrokontrolery-gd32-firmy-gigadevice.html... [Read more]
Here in this topic, ie. STM32 programmed with the Arduino platform, there is some confusion. This package, signed by Dan Drown, which must be entered as a preference in the text you translate, is referred... [Read more]
@ rb401 - I don't know about these packages, but in PIO I had to use older mysensors for compilation because newer ones didn't work (and just spit something out of LL). I remember that for the... [Read more]
It is very possible, because when I took a look at mysensors sources, I can see that there are variant modules for basic hardware functions (e.g. using digitalWrite or digitalWriteFast) depending on the... [Read more]
By the way, someone knows if the OSC32 timer can be stopped, or is it free running like a systick? I am currently using it as a stopwatch. I perform the stop by soft (writes and reads its value from /... [Read more]
This explains the low price of these modules. I recently ordered 2 pcs from a Chinese, when they come I want to play with it because so far I am only tattooing AVRs. Are there any surprises that something... [Read more]
I made a programmable calculator on such a Chinese, I have various things programmed there and it works (I still have a lot to add as if that were not enough). I wouldn't expect any surprises, if someone... [Read more]
Among other things, this is what I would like to check - choose a Flash memory area in the MCU and get it ;) . [Read more]
GigaDevices works on a different principle because it has serial flash and loads the program to the framework after startup ... [Read more]
How much RAM does it have if it has to divide it into variables and the program? [Read more]
Assuming you didn't do it in arduino - how did you program the board? Stlinek or via bootloader? [Read more]
I did in ardu on STM32duino. Programmable via UART. [Read more]