
BK7231 is usually programmed via UART - this is allowed by the bootloader uploaded by the manufacturer. In exceptional situations, however, we can accidentally overwrite this bootloader - then we have to use the SPI programming mode to recover the blocked system. Here I will describe how the SPI mode works in BK7231 and I will present the simple code of my own primitive SPI programmer for Beken. The "programmer" will be written in Python and will run on a Raspberry Pi (okay, here on Banana Pi - but it's very similar on Raspberry).
SPI interface in BK7231
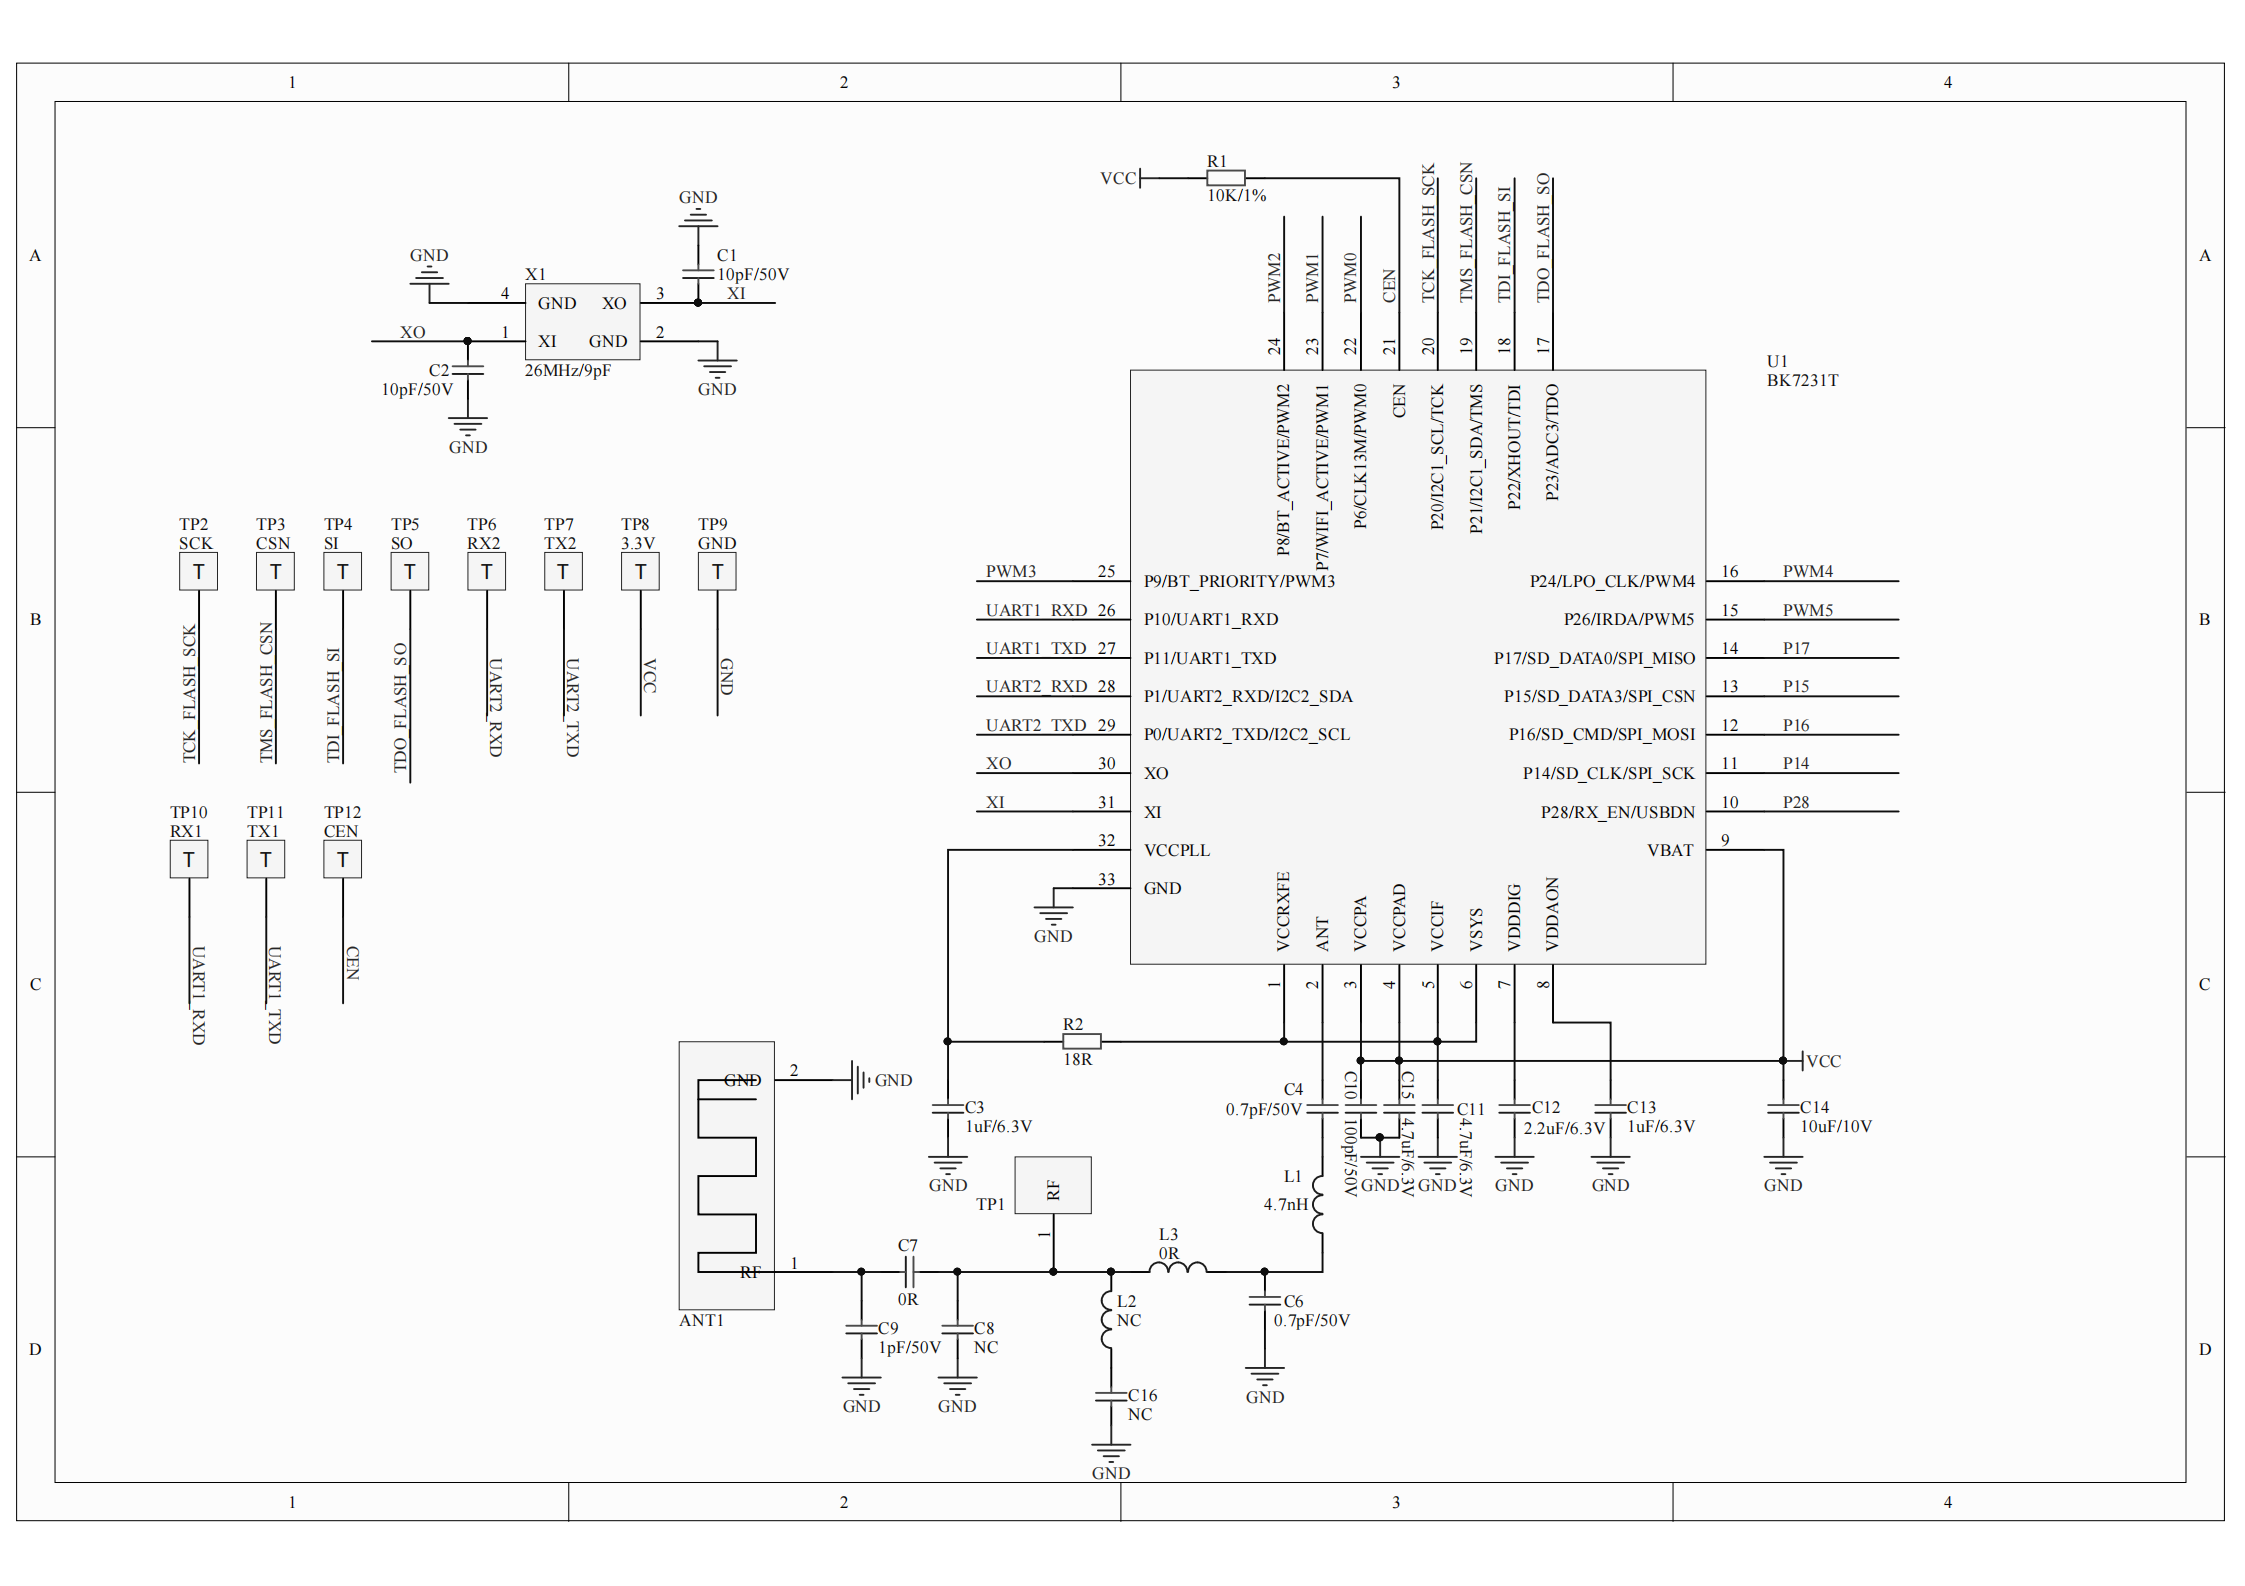
Consider the derivation of BK7231:

We see the pins: P20, P21, P22, P23 (SCK, CSN, SI and SO). Contrary to appearances, it is not an external memory interface, as in ESP8266, here Beken itself is memory.
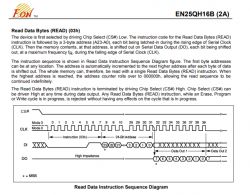
Beken is an SPI memory and identifies itself as 00 15 70 1C, so it looks like a bone similar to EN25QH16B - and the EN25QH16B datasheet with read / write operations can brighten the situation a bit here.

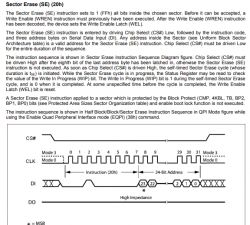
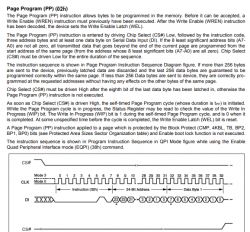
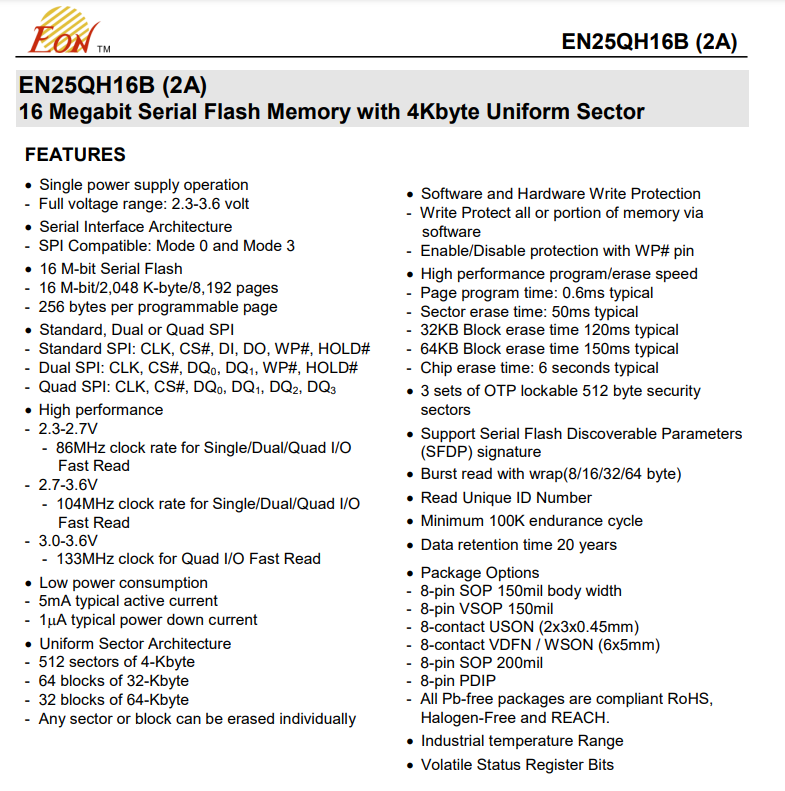
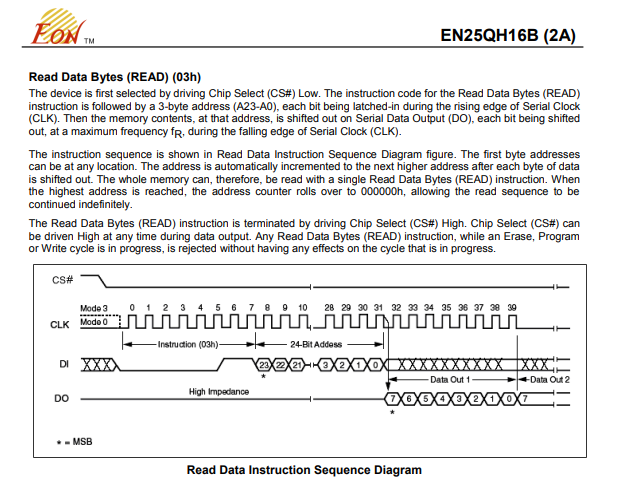
Below is a preview of three commands from EN25QH16B that we will use.
Page read (command 0x03):
Deleting a sector - sector erase (command 0x20):
Programming (saving data) to the page - page program (command 0x02):
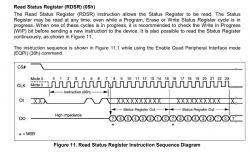
Additionally, access to the status register may be useful (to check if, for example, the operation was performed):
It is worth emphasizing that subscribing to a page requires first deleting it. Page erase sets its bits to 1, and writing can 'blank' selected bits. Writing cannot 'light up' these bits - that's what erase is for. Interestingly, it allows for various combinations with saving flash page deletion cycles, but more on that another time.
It is similar at BK - let's see how.
But first you have to run the SPI mode at all ...
How to put BK7231 into SPI mode?
The algorithm is simple. The algorithm below will execute my script.
- we initiate SPI in mode 3 (0b11 mode), frequency 30kHz (faster ones did not work for me)
- we set the CEN to a low state
- we wait 1 second
- we set the CEN to a high state
- we send D2 250 times after SPI
- we expect an answer once D2, then 249 times 00
From then on, Beken is in SPI mode. This can be checked by sending a request for ID - 9F 00 00 00. Expected answer:
00 15 70 1C.
Then you can operate on the Flash memory - read it or write to it (writing must be preceded by its deletion). Both reading and writing are per-page, i.e. 256 bytes each.
The format of the read and write commands is simple - first one command byte (as I mentioned - 0x02 page write, 0x03 read, etc.) and then 3 bytes of the address.
What is the easiest way to do it? Probably on the Raspberry PI. I used Banana Pi myself because I had one at hand.
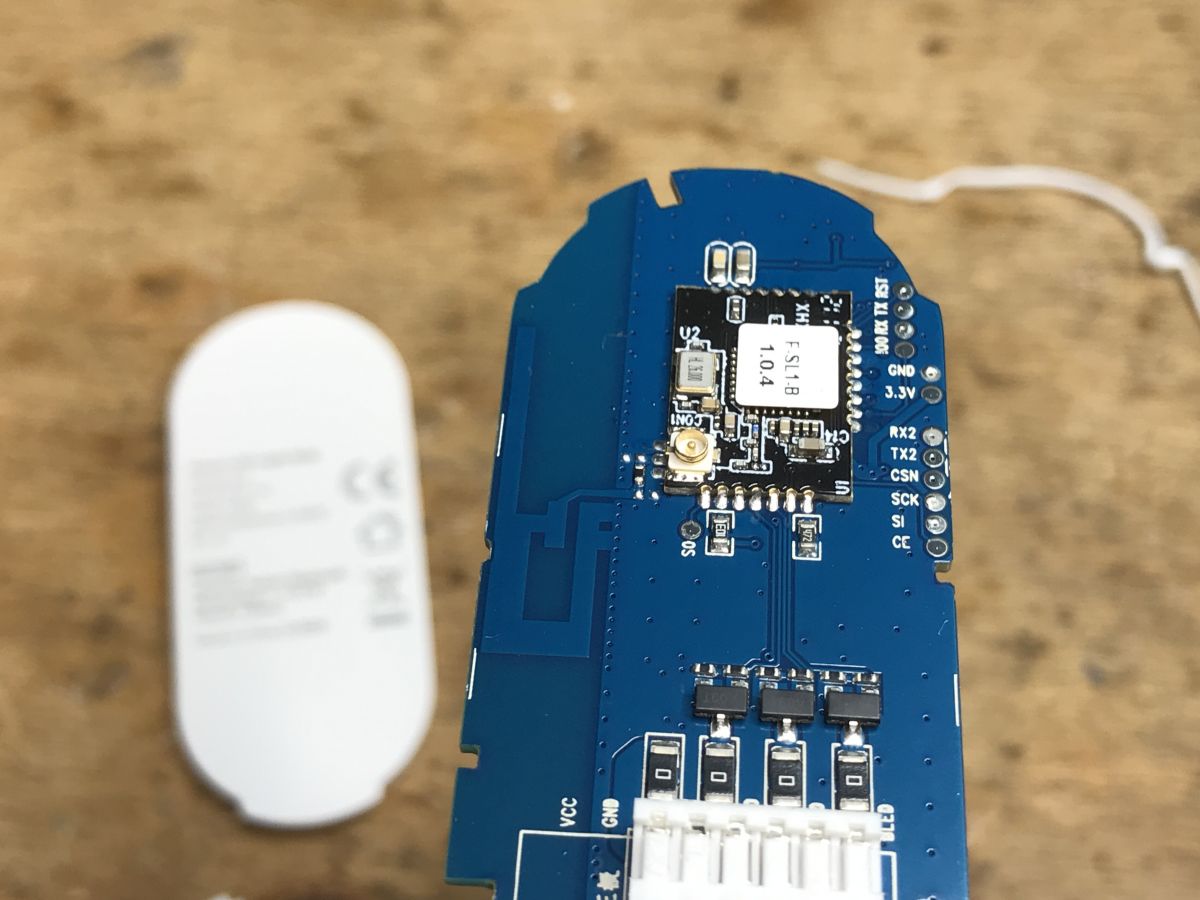
Patient from the subject
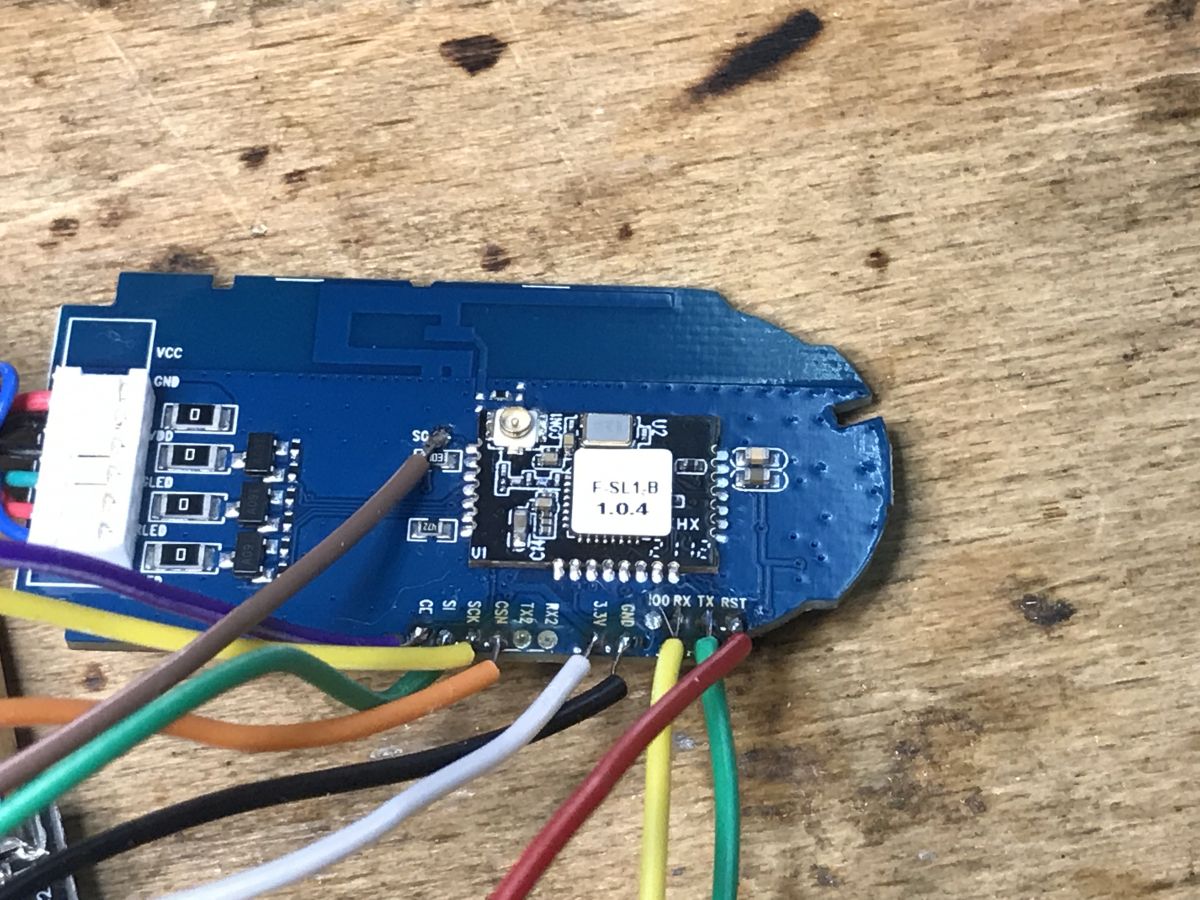
Here is the aforementioned module with a damaged bootloader - BK7231T on a board with readily available signals from SPI.
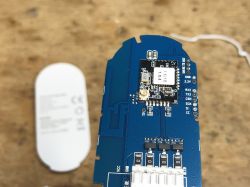
As a supplement, I will add that in the picture above we have pins:
- TX and RX (normal UART programming)
- TX2 and RX2 (log UART)
- IO0 - it's probably a remnant of ESP, I don't know what it's for
- RST - I didn't check what it was for, but it's probably RESET
- CE (CEN) - this is the pin I reset BK7231
- SO, SI, SCK, CSN - SPI interface
- ground and 3.3V power supply - you know
Preparation of Banana Pi
The version used is exactly the Banana Pi BPI-M1 +, although I hope it doesn't matter here. It should be quite similar on the popular Raspberry.
I started completely at 0. I downloaded Armbian. The version used is:
Armbian_22.08.7_Bananapi_bullseye_current_5.15.74.img
https://www.armbian.com/banana-pi-plus/
I uploaded it to the SD card via Etcher.
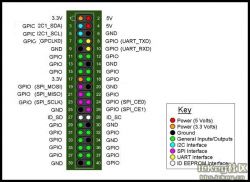
From the hardware side, I took the SPI pins from here:
https://wiki.banana-pi.org/Banana_Pi_BPI-M1%2B#Hardware_interface
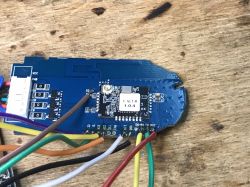
BK7231T already connected:
For SPI control I used spidev (available on both Banana Pi and Raspberry Pi):
https://pypi.org/project/spidev/
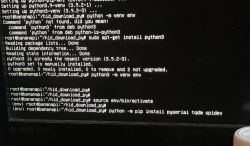
For ease of use, I used a virtual Python environment. Commands as on the screen, sequentially:
- python3 -m venv env - the command creates a virtual environment
- source env / bin / activate - the command activates them (after restarting the system, they should also be activated again, at least I had to every time ...)
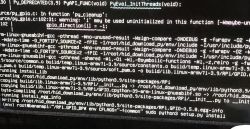
- python -m pip install spidev - command installs packages; in the screenshot there is also tqdm and pyserial, but they were not needed in the end
Here is the spidev installation (and more):
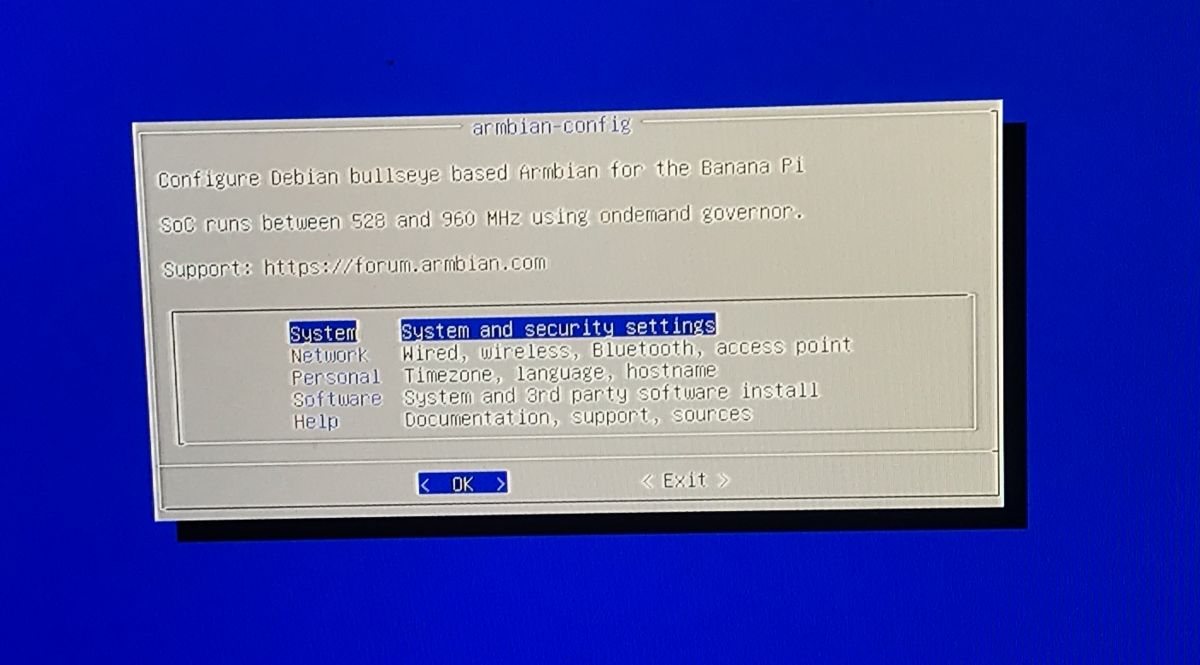
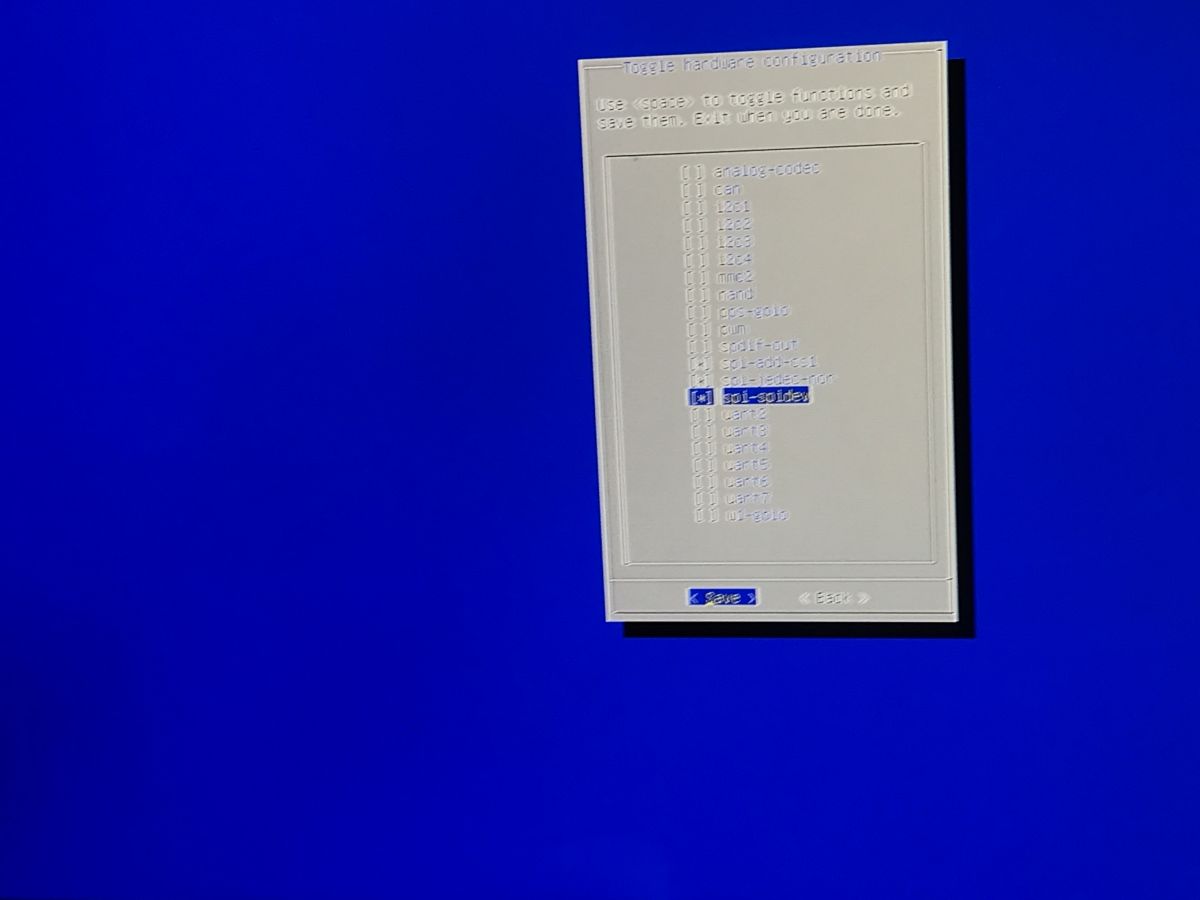
You also had to turn on SPI. At first I thought that it would be enough to change "armbian-config" (this command invokes such a tool):


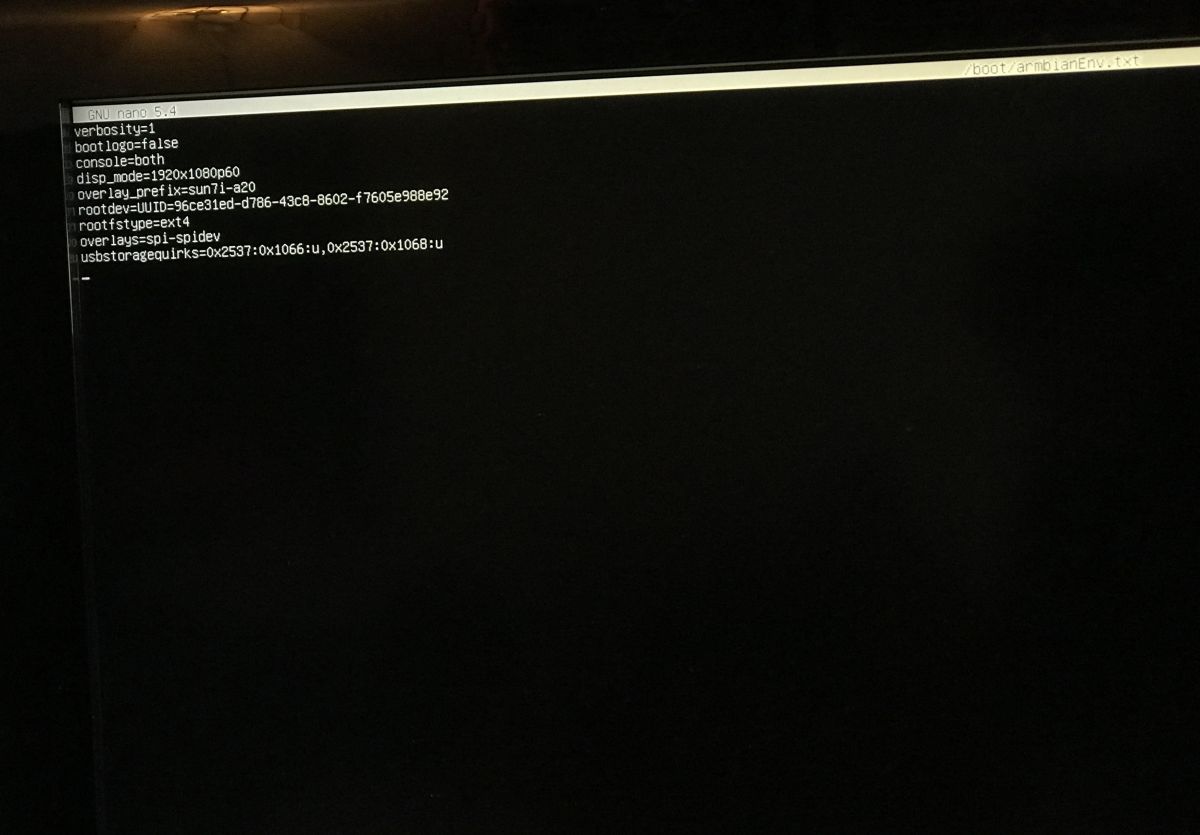
 But no. You had to add one more line to /boot/armbianEnv.txt in the file editor
 :
I wrote
param_spidev_spi_bus = 0 to /boot/armbianEnv.txt.
The GPIO library was also missing. I had to use RPi.GPIO_BP as RPi.GPIO replacement for BananaPi, hence:
https://github.com/LeMaker/RPi.GPIO_BP
I made a copy of the repository and wanted to install as instructed in the repo, but it was not without problems.
I've had a lot of problems
multiple definition of linker errors.
The solution was to add
-fcommon down
CFLAGS .
 Writing a Python Program
Now it's time for proper programming. I wrote the program on a Windows computer via FTP client - Filezille and Notepad ++ text editor. I have already done all tests and commissioning on Banana Pi.
Running SPI and GPIO in Python
My SPI flasher program starts with SPI and CEN pin configuration:
I used RAW addressing mode for GPIO, because on Banana Pi I couldn't find information about other ways of pin addressing. I run SPI in mode 3, with a frequency of 30,000, because in the case of higher frequencies I was not able to read the memory ID.
Now it's time to start the SPI mode in BK ...
Establishing communication in the SPI mode
First, we set the low state to CEN per second:
And then we send the byte 0xD2 250 times:
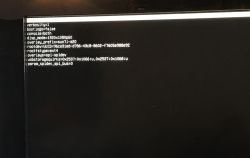
It is also worth somehow verifying whether the SPI mode has been set for sure, and whether our chosen communication speed is not too high. The easiest way to do it is by querying for the Flash memory ID, i.e. the command 0x9F 0x00 0x00 0x00:
The above code checks what we have received - we expect ID 0x00 0x1c 0x70 0x15 and we return 1 or 0 depending on it.
This will allow us to detect possible communication problems early.
The code could be improved - in case of failure, for example, try again with a slower transfer speed.
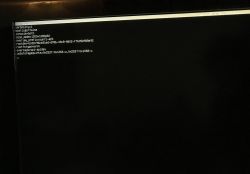
The photo shows the first success of establishing SPI communication:
 Reading SPI memory
Details of data reading can be found either in the SPI memory documentation and in the Tuya SDK.
Reading the memory boils down to sending 0x03 commands with an appropriately encoded address. The address is encoded as 3 bytes, and the first byte is the command code - 0x03. 0x03 this is a full page read.
On the occasion of reading, I write the data to the file - the variable 'f'.
Writing to SPI memory
We used to read memory page by page, now it's time for page write.
Unfortunately, here you will also need to delete the sector first - that is, we need two commands:
Auxiliary functions, to wait for the completion of the operation and to perform the enable (in the while loop; I have not described this step in detail, but here it is also analogous to the SPI):
Here is the full feature:
As before - one command byte, three address bytes. First, we delete the contents of the memory, then write to it.
BK7231 programming via SPI
We have almost everything - just use it.
Thanks to this, we will recover BK7231 with overwritten UART bootloader.
Basically, we now have two options.
1. full OpenBeken upload - we need a QIO version with a bootloader. The UA version is not suitable as it does not contain a bootloader and starts with an offset of 0x11000.
2. we can also restore the original batch ripped by e.g. bkWriter 1.60, which by default reads from the offset 0x11000. For this purpose, we take the bootloader from QIO, and then load the original batch:
If our REST.bin file contains the original Tuya software, this procedure will restore it on our BK7231.
Ready program on Github
You can download the full program from my repository. You can also improve it and open new ones
pull request :
https://github.com/openshwprojects/BK7231_SPI_Flasher
Summary
With this simple program you can bring the BK7231 back to life, although it should be remembered that without the removed SPI pins it can be difficult.
With my program, I was able to bring back to life two BK7231.
Someone might still be wondering why I didn't try to use incomplete Tuya code from hid_download_py? It just did not work for me - in theory it supports several versions of Beken chips, but in my opinion it is too complicated and problematic. He was spilling out somewhere before SPI, on some weirder reset procedure.
I am enclosing a catalog note of the Flash memory on which:. in I was based - it can explain a bit more than the topic, it's worth having a look, each command is described in more detail there, as is the status register. 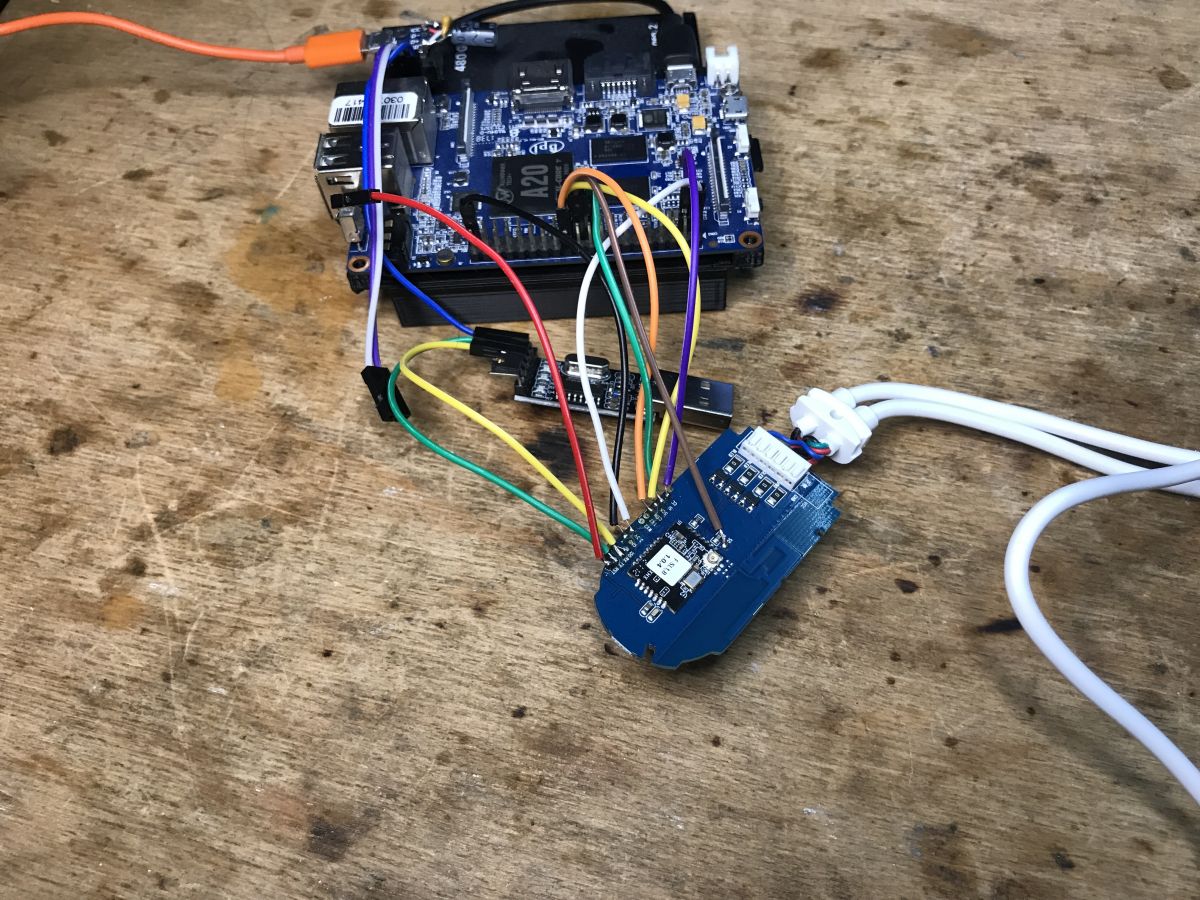


Comments
I've been trying this method to resurrect a BK7231T with no success as of yet. I'm using a Raspberry Pi Zero, SPI seems to be functional (tested with spi_test). I soldered wires to SPI_* pins on the chip... [Read more]
Hello @danaia, it seems that you are correct. It must be an editing error. All my boards used for experiments have already broken out pins so I didn't verify that. You should try these pins: https://obrazki.elektroda.pl/9275920800_1668170976_thumb.jpg... [Read more]
It worked! I have the WBLC5 board, so I was able to used its provided pads instead of soldering directly to the chip. The device ID wasn't correct with 30000Hz configured, so I tried some random values... [Read more]
3000Hz is very slow. I wonder if it would have worked for you in 20 000Hz mode or something like that, but anyway, the most important thing is that it worked out! Good job, I'm glad I helped. Is there... [Read more]
Hahah yeah, it certainly wasn't fast, but I didn't want to stop it once it got going :D Not right now, thanks :) Got the LEDs mostly working so I'll post again if something comes up further down the ... [Read more]
Thanks a lot for this manual. I've used this procedure to recover from a wrong flash I did before. My CB2S module has a BK7231T chip installed instead of a BK7231N. https://obrazki.elektroda.pl/1036079700_1671303174_thumb.jpg... [Read more]
CB2S with BK7231T... I have never expected to see such an oddity. I wonder what was the story behind it. A BK7231N shortage? A production error? Anyway, good job. That bit of information with 0.2 also... [Read more]
Hello goodnight Could you adapt the script to use with the arduino mega 2560? would be very grateful to you [Read more]
It should be possible, but Arduino Mega 2560 doesn't have enough memory space to keep whole BK7231 dump, so we would have to also write some kind of mechanism to send the BK7231 binary file from PC to... [Read more]
Could you provide a script for this? I have my device dead and I have no other way to recover it, I would be very grateful. [Read more]
I would have to write such a script from scratch and I would also need to test it on my side. I may look into it into the following weeks, I don't have a setup for that right now. I think that script... [Read more]
It's an addressable led strip with BK7231T microphone chip, I don't even have a knowledge about arduino I started with it today :( I even ran the firmware on the device, but I couldn't control it,... [Read more]
I do SPI on WB2S root@raspberrypi:~# python beken_sp_flash.py /root/beken_sp_flash.py:13: RuntimeWarning: This channel is already in use, continuing anyway. Use GPIO.setwarnings(False) to disable... [Read more]
Please post the RX2 log at 115200 baud rate so we know what happens on the chip. [Read more]
Ok, how can do that? I never to SPI before now :) Added after 11 [minutes]: When I connect the chip to USB-TTL and try to connect with bk7231flasher I can't get anything...I start all and 1sec I connect... [Read more]
No, you don't get debug log from SPI. Debug log can be accessed via UART, you need USB to UART dongle, solder the RX of your dongle to TX2 pin of Beken and use RealTerm or any other terminal app to receive... [Read more]
Unfortunately nothing...only blue LED work. As soon as I turn it on, the LED lights up and when I connect CEN to GND in ms off and again LED is on. LED doesn't blink...works constantly. https://obrazki.elektroda.pl/8664092000_1683879050_thumb.jpg... [Read more]
It's not "bothering", I am happy to help. Please ask much as you want. We're here to help you. Ok, so now, are you really, 100% sure that you are getting nothing from TX2 pin? Please keep UART terminal... [Read more]
Ok, so now, are you really, 100% sure that you are getting nothing from TX2 pin? ----Nothing, when I power off and on BK in ms, I get RX on COOLTERM software goes green but nothing to see on console. ----You... [Read more]