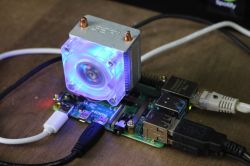
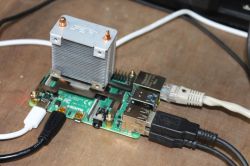
We recently presented active cooling system dedicated to smartphones ; it is not the only device that currently needs active cooling with increased computational effort. Another one is the Raspberry Pi 4 single-board computer. While the earlier, third version, was known for overheating and was often supplemented with small heat sinks, the fourth edition of the popular 'Raspberry' has already been fully cooled for the system. Let's take a closer look at this structure.
Most people already know that the Raspberry Pi 4 can get very hot and a heat sink for the SoC is required if you intend to use maximum computing performance under heavy load or if the module is to be operated in high ambient temperatures.
Big fan designs for the Raspberry Pi 4 have already appeared to prevent the computer from overheating. Perhaps this is a bit of an exaggeration and the system does not require such cooling, but let's take a look at one of the Raspberry Pi 4 active cooling kit offered by stores (it is also compatible with Raspbery Pi 3).
Packaging and assembly of a heat sink with active cooling
The packaging tells us that the module is made by the company 52Pi and designed specifically for the Raspberry Pi 4B, 3B + and 3B. Probably not as useful for the last two modules as for the fourth version of 'Raspberry'.
The package includes a heat sink with an attached fan, sets of screws, screwdrivers, mounting brackets for the Raspberry Pi 3, 3B + and RPi 4, as well as a useful user manual.
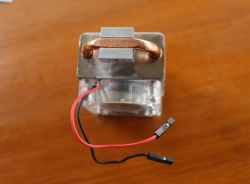
The Raspberry Pi 3 and 4 are almost the same mechanically, so the differences between the mounting brackets of these modules are slight. Below you can see a rarely published photo of the lower part of the heatsink - the one that will be in contact with the cooled processor through a thermal pad. We see, in addition to a block of metal, a copper heat-pipe, used to transport heat away from the system, to the heat sink, where it can be safely dissipated.
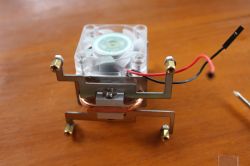
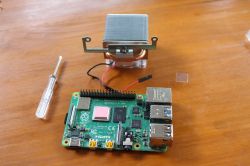
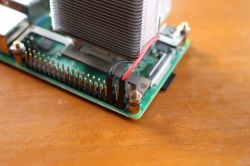
So let's start assembling. First, we need to put a thermally conductive pad on the processor (of course, after peeling off the protective films). In the next step, the instruction tells you to install the first bracket with the M2 screw as shown below left. Then we can tighten the second bracket to the heat sink. Finally, place the mounting nuts in the holes of the brackets, securing them with the attached screws. After completing this stage of assembly, everything should look like in the photo below, on the right.
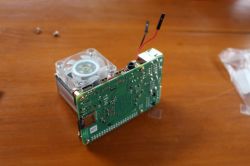
The next step is to place the heatsink cooling fan - it should be placed on the side facing the micro HDMI ports. It is mounted with M2.5 screws. After assembly, there may be two unused M2 screws left, so if you cannot tighten the fan to the heat sink, look for the other screws in the bag of the correct size.
The last step is to connect the fan to the power supply. It is powered by 5 V, which is taken from the appropriate pins of the 40-pin GPIO connector on the Raspberry Pi.
Thermal tests
Now it's time to plug in the power and start the computer. We can admire the beautiful blue LEDs in the fan before moving on to further testing the device.
The normal operating system is installed on the Raspberry Pi, with no additional modifications to the firmware.
Test software
In order to monitor the SoC temperature in our minicomputer, we need the appropriate software. To install them, enter the following commands in the command line. They will allow you to install rpimonitor - software that allows you to track, inter alia, Raspberry Pi CPU temperature
In order to repetitively force the minicomputer to the effort, we can use, for example, the SBC-bench script, which is dedicated to loading single-board computers running Linux distributions such as Debian Stretch and Ubuntu Bionic. To install it we download it from githhab and just run:
Raspberry 4 - Reference Test
First, let's run the SBC-bench test on a regular RPi, without any cooling systems. The performance test report looks like this:
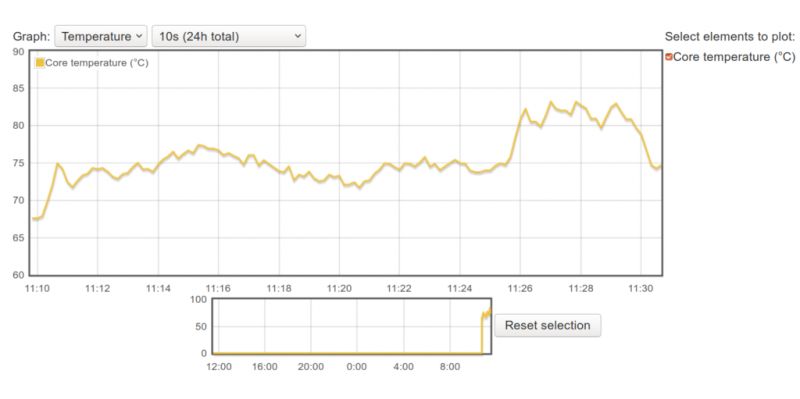
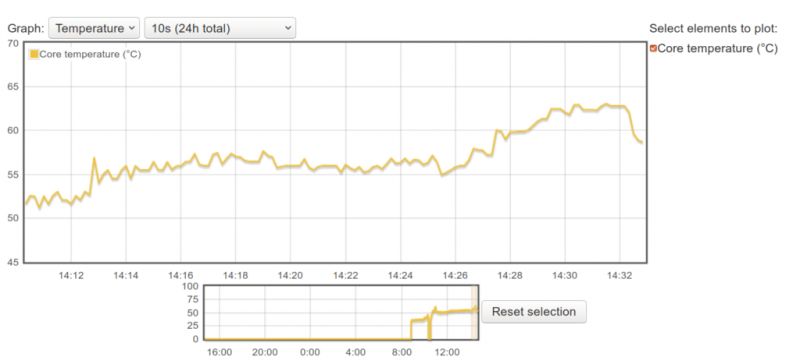
The temperature during the tests behaved as follows:
The 7-zip usage test did not complete because the application ran out of memory three times. This is perfectly normal for a Raspberry Pi with 1GB of memory, which is on the verge of application requirements.
Despite the problems, it was possible to collect temperature data. Initially, it amounts to 67 ° C (idle) and grows to over 80 ° C under load. That's a lot - at 85 ° C Broadcom BCM2711 triggers thermal protection and reduces computing performance.
Heatsink and fan
Run the SBC Bench script again after installing the heat sink. The test is similar to the reference case. The performance test results are as follows:
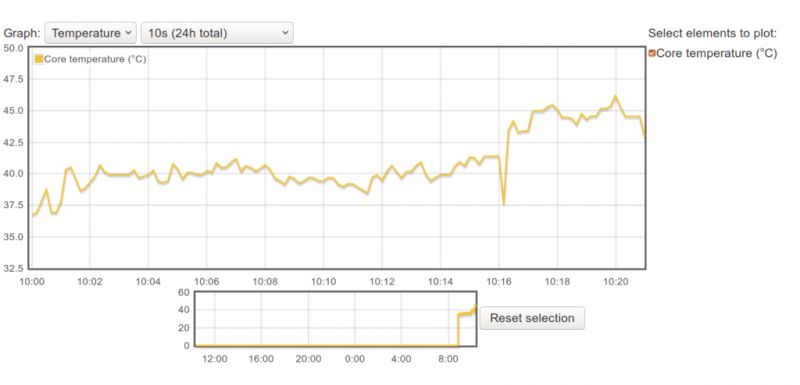
Here, again, 7-zip used up all the available memory and couldn't finish its work. With the heatsink, the Raspberry Pi 4 at rest reaches 37 ° C, and under load, the temperature rises to 46.2 ° C (multi-core load using 7-zip).
The fan clearly does the job, but some say they didn't buy the Raspberry Pi 4 to install a noisy fan which also increases power consumption (by about 400mW).
The heat sink itself
We can disconnect the fan's power wires and even remove it completely, as it is just screwed onto the heat sink. Nothing will shine and make noise.
Let's repeat the above test:
The temperatures, as seen below, are higher, but the system is still quite cool. When idle, the Raspberry Pi 4 reaches around 42 ° C. The maximum temperature reached by the SoC of the module under load is 61.2 ° C.
Summary
The above tests mean that the heat sink alone is more than adequate for most Raspberry Poi 4 use cases. It is even too large as a much smaller heat sink should suffice for cooling in most cases.
The fan may still be useful if we intend to use the module in a higher ambient temperature (e.g. 60 ° C and above), but without an oven, this application cannot be tested .
.
The heatsink and fan shown here costs around $ 20.
Sources:
https://www.cnx-software.com/2019/07/25/review-raspberry-pi-4-ice-tower-cooling-fan/
https://www.cnx-software.com/2019/06/29/new-raspberry-pi-4-vli-firmware-lowers-temperature/
Most people already know that the Raspberry Pi 4 can get very hot and a heat sink for the SoC is required if you intend to use maximum computing performance under heavy load or if the module is to be operated in high ambient temperatures.
Big fan designs for the Raspberry Pi 4 have already appeared to prevent the computer from overheating. Perhaps this is a bit of an exaggeration and the system does not require such cooling, but let's take a look at one of the Raspberry Pi 4 active cooling kit offered by stores (it is also compatible with Raspbery Pi 3).
Packaging and assembly of a heat sink with active cooling
The packaging tells us that the module is made by the company 52Pi and designed specifically for the Raspberry Pi 4B, 3B + and 3B. Probably not as useful for the last two modules as for the fourth version of 'Raspberry'.
The package includes a heat sink with an attached fan, sets of screws, screwdrivers, mounting brackets for the Raspberry Pi 3, 3B + and RPi 4, as well as a useful user manual.
The Raspberry Pi 3 and 4 are almost the same mechanically, so the differences between the mounting brackets of these modules are slight. Below you can see a rarely published photo of the lower part of the heatsink - the one that will be in contact with the cooled processor through a thermal pad. We see, in addition to a block of metal, a copper heat-pipe, used to transport heat away from the system, to the heat sink, where it can be safely dissipated.
So let's start assembling. First, we need to put a thermally conductive pad on the processor (of course, after peeling off the protective films). In the next step, the instruction tells you to install the first bracket with the M2 screw as shown below left. Then we can tighten the second bracket to the heat sink. Finally, place the mounting nuts in the holes of the brackets, securing them with the attached screws. After completing this stage of assembly, everything should look like in the photo below, on the right.
The next step is to place the heatsink cooling fan - it should be placed on the side facing the micro HDMI ports. It is mounted with M2.5 screws. After assembly, there may be two unused M2 screws left, so if you cannot tighten the fan to the heat sink, look for the other screws in the bag of the correct size.
The last step is to connect the fan to the power supply. It is powered by 5 V, which is taken from the appropriate pins of the 40-pin GPIO connector on the Raspberry Pi.
Thermal tests
Now it's time to plug in the power and start the computer. We can admire the beautiful blue LEDs in the fan before moving on to further testing the device.
The normal operating system is installed on the Raspberry Pi, with no additional modifications to the firmware.
Test software
In order to monitor the SoC temperature in our minicomputer, we need the appropriate software. To install them, enter the following commands in the command line. They will allow you to install rpimonitor - software that allows you to track, inter alia, Raspberry Pi CPU temperature
Code: Bash
In order to repetitively force the minicomputer to the effort, we can use, for example, the SBC-bench script, which is dedicated to loading single-board computers running Linux distributions such as Debian Stretch and Ubuntu Bionic. To install it we download it from githhab and just run:
Code: Bash
Raspberry 4 - Reference Test
First, let's run the SBC-bench test on a regular RPi, without any cooling systems. The performance test report looks like this:
Code: Bash
The temperature during the tests behaved as follows:
The 7-zip usage test did not complete because the application ran out of memory three times. This is perfectly normal for a Raspberry Pi with 1GB of memory, which is on the verge of application requirements.
Despite the problems, it was possible to collect temperature data. Initially, it amounts to 67 ° C (idle) and grows to over 80 ° C under load. That's a lot - at 85 ° C Broadcom BCM2711 triggers thermal protection and reduces computing performance.
Heatsink and fan
Run the SBC Bench script again after installing the heat sink. The test is similar to the reference case. The performance test results are as follows:
Code: Bash
Here, again, 7-zip used up all the available memory and couldn't finish its work. With the heatsink, the Raspberry Pi 4 at rest reaches 37 ° C, and under load, the temperature rises to 46.2 ° C (multi-core load using 7-zip).
The fan clearly does the job, but some say they didn't buy the Raspberry Pi 4 to install a noisy fan which also increases power consumption (by about 400mW).
The heat sink itself
We can disconnect the fan's power wires and even remove it completely, as it is just screwed onto the heat sink. Nothing will shine and make noise.
Let's repeat the above test:
Code: Bash
The temperatures, as seen below, are higher, but the system is still quite cool. When idle, the Raspberry Pi 4 reaches around 42 ° C. The maximum temperature reached by the SoC of the module under load is 61.2 ° C.
Summary
The above tests mean that the heat sink alone is more than adequate for most Raspberry Poi 4 use cases. It is even too large as a much smaller heat sink should suffice for cooling in most cases.
The fan may still be useful if we intend to use the module in a higher ambient temperature (e.g. 60 ° C and above), but without an oven, this application cannot be tested
The heatsink and fan shown here costs around $ 20.
Sources:
https://www.cnx-software.com/2019/07/25/review-raspberry-pi-4-ice-tower-cooling-fan/
https://www.cnx-software.com/2019/06/29/new-raspberry-pi-4-vli-firmware-lowers-temperature/
Cool? Ranking DIY


