I will show here my simple implementation of the so-called "WiFiManger". "WiFiManger" on the Arduino R4, which is a mechanism that allows you to pair the Arduino with our WiFi network in the style of Tasmota pairing, that is, first the Arduino is in open access point mode to which you can connect and enter the data of our WiFi network, and then the Arduino joins our network, while still maintaining a web page with a form, where you can change the WiFi bearings (enter a new password and SSID) or return to AP mode. In addition, the library too allows you to reset the WiFi setting via an optional button on the selected Arduino GPIO.
This functionality is offered, among others, by the ready-made WiFiManager from Github:
https://github.com/tzapu/WiFiManager
But it does not support Arduino R4 WiFi at the moment, so here I will show my simple equivalent of this library, much truncated but still functional.
Design requirements Before implementation, it's a good idea to set some simple goals, that will make up the finished product. In this case, I highlighted the following:
- Arduino must boot by default in open access point mode (or with a password) so that the first configuration is possible
- Arduino must offer a page where you can enter the SSID and password of the target WiFi
- Arduino must remember the settings after power loss, so we must save them to EEPROM
- Arduino must offer the ability to reset the settings in case of failure (e.g. Arduino must offer the possibility of resetting the settings in case of failure (e.g. loss of router), for example by pressing a button on one of the GPIOs
- the configuration page must work both in AP mode, and in STA, moreover in STA it must also offer the possibility of disconnection from the selected WiFi (return to AP mode)
Additionally, I gave myself one more goal, also quite important, although overlooked by beginners, and that is the whole thing would be nice to pack in some convenient classes, so that you can use it in different projects.
Used HTTP library To make my task easier, I intend to use an additional library to handle HTTP, namely QuickSander work:
https://github.com/QuickSander/ArduinoHttpServer
After my corrections, it is compatible with R4:
Arduino R4 WiFi and ArduinoHttpServer - corrections, startup, usage examples
Use example This time let's start in reverse. Let's think about what we would want our program to look like once the library is ready? Everything needs to be tucked away in classes, we want to have little code in setup and loop.
I would see it roughly like this:
Code: C / C++
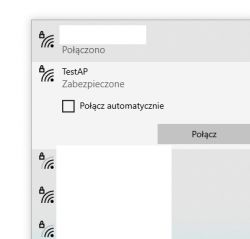
The effect of running this on the Arduino should be the presence of an AP with the name specified in the code:
 .
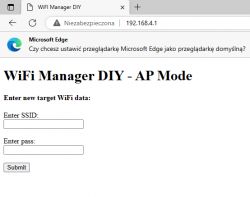
.After connecting to it (and entering the password specified in the code), it should be possible to open a page with IP 192.168.4.1, where you can give the bearings of our WiFi network:

After entering the data and approving it, the Arduino should connect to it:

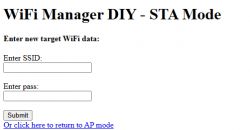
Now the configuration page should be available under the new IP assigned by DHCP. Its appearance should also change to some extent:

Here you can either disconnect from the current WiFi (return to AP mode), or change to a different WiFi network.
Implementation of settings Maybe let's start with how to store the settings in the EEPROM. You will need a structure, preferably with a simple checksum to verify its correctness:
Code: C / C++
In the structure I put the data separately for both WiFi modes and in addition the information which is now active.
Then I wrapped it in a class:
Code: C / C++
In this class there will be methods operating on the settings. I guess you should start with a method that counts a simple checksum. I've decided to make it as simple as possible:
Code: C / C++
I'm going byte by byte through the structure fields here and adding up their values. I skip the last field, which is the CRC. Let me remind you that sizeof( ) returns the byte size of a given type, this is done at compile time.
Now you can use the CRC when reading and writing data to the Arduino's EEPROM. When reading, we read the CRC from memory and count it too, and then compare these values If they are different, it means that something went wrong:
Code: C / C++
When writing to EEPROM, we just count the current CRC to be able to write it:
Code: C / C++
This solution gives us a relatively high degree of confidence that the read settings are correct, although it may also involve some problems. For example, adding another field to this structure here would be problematic. Perhaps it would be worth putting one additional byte at the beginning of it, informing us in which version of the settings the data is stored. This would allow us to convert the settings structure to the current version later, if anything. However, all this is beyond the scope of a simple WiFi Manager DIY demo.
Implementation of the manager
More or less, the topic of storing settings in EEPROM is covered. The simple getters and setters for the settings themselves are not discussed, as is the fact that if you change them, you have to rewrite their structure into EEPROM, etc. Alternatively, at the time of the change, you can just set a flag showing that the structure has been modified and then save all the changes at once to save the delete and save cycles.
Now perhaps let's focus on the handling of the simple HTTP page itself.
I've made it based on my material:
Arduino R4 WiFi and ArduinoHttpServer - fixes, startup, usage examples As in the example above, in the bundle I check if a new client appears and if so, handle it:
Code: C / C++
Code: C / C++
This is where we will stop for a moment longer. As you can see, the page is dynamically generated. I'm putting the whole thing together on the fly with pure HTML, it's the simplest form. Some parts of the page are conditional, for example the header:
Code: C / C++
The page contains a simple form within it. This form sends variables via a GET request, so I have to handle that in the code, too. If something is sent, I intercept it and handle it accordingly, also giving a communiqué about it:
Code: C / C++
The openAccessPoint and setupSTA functions are not important at this point. They simply change the settings accordingly, store them in the EEPROM and the mode change is done with a delay:
Code: C / C++
Basically, that would be it. You can still look at the functions that set the WiFi mode, but that's even in the examples from Arduino itself:
Code: C / C++
Code: C / C++
Code: C / C++
Summary In the topic I made some big simplifications and left out some side issues, but I still think that the final demo provides the necessary minimum functionality. Based on my sketch, you can build your own application on the Arduino R4 and you could even spin off my code into a library and share between different projects. It is possible that later I will take care of it, finish all the code, fix minor bugs, shortcomings (buffer size safety - see strcpy, etc.) and put it on Github as a library. In the meantime here you have the full version:
Spoiler:
Code: C / C++
If anyone wants to improve it, feel free to play. In the future, you could add some simple interface to handle additional variables or subpages, maybe via callbacks. This is how users could "plug" their add-ons into this page, such as displaying the current temperature and humidity from a DIY weather station or controlling a relay.
Cool? Ranking DIY Helpful post? Buy me a coffee.


