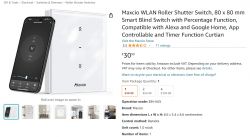
I recently bought a WiFi Shutter Controller from Maxcio and didn't want to use their app since I have a FHEM Server.
https://www.amazon.de/dp/B0C3M5CQKS/ref=twister_B0C3M3XNMZ?_encoding=UTF8&th=1
There are Tasmota Infos on the internet but they are outdated. The current version sold supports percentage setting and works just great.
I am new here so sorry if I miss something or post it in the wrong area.

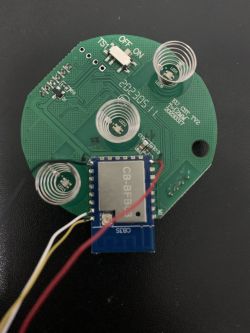
So I flashed the latest version of openbeken on this CB3S Module,
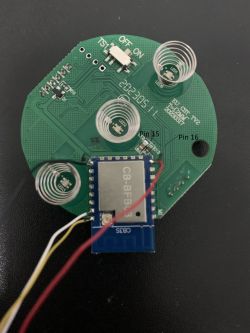
Pin 8 is VCC, Pin 9 is GND, Pin 15 is RX, and Pin 16 is TX.
I had to unsolder Pin 15 and 16 since they are already connected to a TuyaMCU (Py32).
After normal flashing with BK7231N, I resoldered it and started configuring.
I used the following for the autoexec.bat:
Channel 1: 0 = up, 1 = stop, 2 = down
Channel 2: Gives the position in %, also you can set the position
Channel 3: It's normally set to 1. If you set it to 0 and back to 1, the switch starts calibration. It drives once up and once down, then you can select positions in channel 2 in percentage. Very handy for Alexa.
Channel 7: It's for switching the button light on and off
Channel 101: I have no clue what it does, it switches to 0 when shutters are moving and after a second or two, it goes to 1 again once the unit is idle.
I have to admit the Web interface in Openbeken is not as nice as it could be, but I am not experienced with the software and don't use it anyway. I just need it to interact via MQTT with my server.
It seems that the PY32 Chip is doing everything and the WiFi module is just in place to command the PY32 via WiFi.
So in theory, someone could exchange it with some esp8266 type module.
Update: Each of the switches experienced pretty much exactly after one year of operation a failure.
I found that one electrolyte capacitor was failing in the power supply, the cap was starting to bulge.
I replaced the original with a capacitor with the same capacity but higher voltage rating and they worked again flawlessly since then.
It seems that they made a mistake building it with a too weak capacitor when it comes to voltage.
https://www.amazon.de/dp/B0C3M5CQKS/ref=twister_B0C3M3XNMZ?_encoding=UTF8&th=1
There are Tasmota Infos on the internet but they are outdated. The current version sold supports percentage setting and works just great.
I am new here so sorry if I miss something or post it in the wrong area.

So I flashed the latest version of openbeken on this CB3S Module,
Pin 8 is VCC, Pin 9 is GND, Pin 15 is RX, and Pin 16 is TX.
I had to unsolder Pin 15 and 16 since they are already connected to a TuyaMCU (Py32).
After normal flashing with BK7231N, I resoldered it and started configuring.
I used the following for the autoexec.bat:
startDriver TuyaMCU
tuyaMcu_defWiFiState 4

setChannelType 1 LowMidHigh
linkTuyaMCUOutputToChannel 1 4 1
setChannelType 2 TextField
linkTuyaMCUOutputToChannel 2 2 2
setChannelType 3 TextField
linkTuyaMCUOutputToChannel 3 4 3
setChannelType 4 toggle
linkTuyaMCUOutputToChannel 7 1 4
setChannelType 5 toggle
linkTuyaMCUOutputToChannel 101 1 5
Channel 1: 0 = up, 1 = stop, 2 = down
Channel 2: Gives the position in %, also you can set the position
Channel 3: It's normally set to 1. If you set it to 0 and back to 1, the switch starts calibration. It drives once up and once down, then you can select positions in channel 2 in percentage. Very handy for Alexa.
Channel 7: It's for switching the button light on and off
Channel 101: I have no clue what it does, it switches to 0 when shutters are moving and after a second or two, it goes to 1 again once the unit is idle.
I have to admit the Web interface in Openbeken is not as nice as it could be, but I am not experienced with the software and don't use it anyway. I just need it to interact via MQTT with my server.
It seems that the PY32 Chip is doing everything and the WiFi module is just in place to command the PY32 via WiFi.
So in theory, someone could exchange it with some esp8266 type module.
Update: Each of the switches experienced pretty much exactly after one year of operation a failure.
I found that one electrolyte capacitor was failing in the power supply, the cap was starting to bulge.
I replaced the original with a capacitor with the same capacity but higher voltage rating and they worked again flawlessly since then.
It seems that they made a mistake building it with a too weak capacitor when it comes to voltage.
Cool? Ranking DIY


