FAQ
TL;DR: Want to open a 1990s wicket remotely with Home Assistant? Use a Wi‑Fi voltage‑free relay; the module takes 230 V AC. "Yes, to L and N 230V AC must be connected." [Elektroda, 12robert12, post #20772953]
Why it matters: This helps owners of older electric door strikes add Home Assistant remote unlock without rewiring or replacing the whole access system.
Quick Facts
- Use a dry-contact (voltage‑free) relay in pulse/momentary mode to mimic your bell button. [Elektroda, 12robert12, post #20764688]
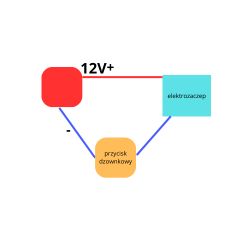
- Power the smart module with 230 V AC on L and N; wire the strike loop to COM and NO. [Elektroda, 12robert12, post #20772953]
- If you wire NC, the strike will remain open; use NO for normally-locked behavior. [Elektroda, 12robert12, post #20772953]
- Tuya/OXT Wi‑Fi dry‑contact modules are acceptable for remote opening, with some cloud delay. [Elektroda, 12robert12, post #20772778]
- No spare wires? Pair a battery remote button to the module instead of using S1. [Elektroda, 12robert12, post #20772778]
What’s the simplest way to add remote unlock to a 1990s wicket?
Install a Wi‑Fi dry‑contact (voltage‑free) relay set to pulse/momentary. It electrically replaces the bell button and briefly closes the strike circuit. This avoids rewiring and preserves your existing door hardware. Search for modules advertised as “voltage‑free” with pulse mode support. Mount near the current button or near the strike where power is available. [Elektroda, 12robert12, post #20764688]
Is the OXT mini Tuya dry‑contact module OK for this job?
Yes. It’s suitable for app‑controlled unlocking of an electric strike. Expect a small delay because it operates through the cloud. "this is sufficient - minus the delays" is a fair assessment for such modules. It’s a practical choice when you want quick results and basic Home Assistant integration via the Tuya platform. [Elektroda, 12robert12, post #20772778]
How should I wire COM, NO, and NC to the electric strike?
Use COM and NO to mimic a normally‑open bell button. The relay briefly closes the circuit to release the strike. Avoid NC for this application. If you use NC, the strike stays open, which is unsafe. Power the module separately on L and N. This mirrors how a bell button triggers the strike only during the press. [Elektroda, 12robert12, post #20772953]
Do I need to supply the relay with 230 V AC?
For the referenced Tuya/OXT module, yes. Connect 230 V AC to L and N to power the device. The relay side remains voltage‑free for the strike circuit. This is distinct from the strike’s own power wiring. "Yes, to L and N 230V AC must be connected." [Elektroda, 12robert12, post #20772953]
Will pulse (momentary) mode mimic my bell button?
Yes. Pulse mode briefly closes the contact, just like pressing and releasing the button. That’s exactly what an electric strike expects. As one expert noted, "Everyone has a 'pulse' mode of operation" for these relays. Enable momentary in the device app to avoid latching the circuit. [Elektroda, 12robert12, post #20764688]
My intercom wires are damaged—what’s the workaround without rewiring?
Replace the wall bell button with a smart dry‑contact relay to control the strike wires you still have. Then unlock remotely from the app. This approach avoids pulling new cables and keeps the existing strike. The original poster concluded the same: replace the traditional bell button with a smart solution. [Elektroda, bonss, post #20762781]
Can I add a wireless button instead of wiring S1?
Yes. Pair a battery‑powered remote button to the module and trigger unlock wirelessly. This avoids bringing mains to a wall switch input and keeps the strike wiring isolated. It’s a clean option when existing control wires are missing or unsafe to reuse. [Elektroda, 12robert12, post #20772778]
How do I integrate a Tuya/OXT Wi‑Fi relay with Home Assistant?
First, add the device in the Tuya app and confirm it toggles the relay. Then enable the official Tuya integration in Home Assistant and log in to link your account. The relay appears as a switch entity. Use an automation to turn it on briefly to unlock the strike. ["Tuya - Home Assistant"]
I want to avoid cloud delay—what local options work with Home Assistant?
Use a locally controlled dry‑contact relay that integrates natively with Home Assistant, such as Shelly 1. It offers local LAN control and a dedicated HA integration. This reduces latency and keeps unlock actions on your network. Create an automation to pulse the relay for a second. ["Shelly - Home Assistant"]
How do I wire the smart relay to replace my bell button? (3 steps)
- Cut power, then connect 230 V AC to the module’s L and N terminals to power it.
- Move the two bell‑button wires that go to the strike circuit onto the relay’s COM and NO.
- Restore power and use the app to trigger the relay; verify the strike releases.
This replicates your button press electronically. [Elektroda, 12robert12, post #20772953]
What happens if I wire NC by mistake?
The strike will remain open because NC keeps the circuit closed until the relay energizes. That’s a security risk and can overheat the strike. Move the strike wires to COM and NO to ensure it stays locked until triggered. This also matches a typical bell button circuit. [Elektroda, 12robert12, post #20772953]
Could I use a handheld RF remote instead of Wi‑Fi?
Yes. You can add a remote control receiver to switch the strike via a relay. This avoids app or cloud delays. It’s convenient if you don’t need Home Assistant control. Keep in mind integration with HA would then require a compatible receiver or bridge. [Elektroda, sosarek, post #20762822]
How do I confirm my button is normally‑open (NO)?
Observe the existing behavior: if the strike releases only while the button is pressed, that’s NO. Wire the smart relay as COM/NO to match it. If needed, you can swap NO/NC on the relay to suit your circuit. That flexibility simplifies migration from the button. [Elektroda, 12robert12, post #20773072]
 .
.
 .
.


