logo elektroda
logo elektroda
X
logo elektroda

WiFi door/window opening sensor - test, interior, integration with the rest of t

p.kaczmarek2 11076 15
ADVERTISEMENT
Treść została przetłumaczona polish » english Zobacz oryginalną wersję tematu
  • WiFi door/window opening sensor - test, interior, integration with the rest of t
    Hello my dears
    Here I will present in detail how to configure and inside the battery-powered WiFi door/window sensor compatible with the SmartLife smart home control application. I will also show here how you can configure its work scenarios, e.g. automatically turn on the light bulb when the door is opened. Finally, I will also measure the power consumption of the sensor.

    Purchase of WiFi Smartlife door/window opening sensor
    I found the sensor on the Internet under the slogan "Smart Wifi Door Window Sensor Burglar Security Alarm For Alexa Google Tuya" for less than $ 10, i.e. PLN 40:
    WiFi door/window opening sensor - test, interior, integration with the rest of t
    The graphics prepared by the seller well illustrate its operation:
    WiFi door/window opening sensor - test, interior, integration with the rest of t
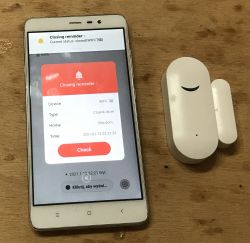
    An Android phone will allow us to keep track of the status of the door and receive notifications about their opening or closing, no matter where we are. You only need to register the sensor in our WiFi network (traffic goes through the manufacturer's servers).
    Specification acc. seller:
    Quote:

    Two Status: Open & Close
    Battery: 2 * 1.5V AAA Batteries(not included)
    Standby Current:

    Cool? Ranking DIY
    Helpful post? Buy me a coffee.
    About Author
    p.kaczmarek2
    Moderator Smart Home
    Offline 
    p.kaczmarek2 wrote 11919 posts with rating 9984, helped 572 times. Been with us since 2014 year.
  • ADVERTISEMENT
  • #2 19209326
    austin007
    Level 17  
    Thanks for the description. PLN 40 is quite expensive. Especially the WiFi version and from majfriend without FV. Can it be converted by flashing the batch to Zigbee 3.0? I've seen zigbee versions of this type of sensors for PLN 32 gross + kW. Wifi are cheaper. What is the maximum distance between the magnet and the sensor that is acceptable?
  • ADVERTISEMENT
  • #3 19209396
    p.kaczmarek2
    Moderator Smart Home
    austin007 wrote:
    What is the maximum distance between the magnet and the sensor that is acceptable?

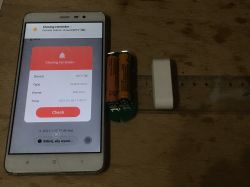
    good question, I checked now and it turns out that the 'closed' state is detected when it is about 1.5cm, and 'open' when it is less than 2cm (or subtract these 3mm more from the housing, because I did the test without the housing)
    WiFi door/window opening sensor - test, interior, integration with the rest of t
    This sensor here does not support Zigbee, only WiFi. There are Zigbee sensors, but at the moment I haven't dealt with them yet (but yes, they are in the plans, I already have a cc2531)
    Helpful post? Buy me a coffee.
  • #4 19209460
    prosiak_wej
    Level 39  
    p.kaczmarek2 wrote:
    (traffic goes through the producer's servers)


    And as soon as the manufacturer shuts down the server or the Internet provider fails, it's all about the edge of ... break! :lol:

    BTW - has anyone encountered a network voltage recorder working online? Adjustable recording interval from 0.5s to a minute, additional records when the min/max voltage is exceeded, online preview, SD memory (enables saving slightly more than three days every half second).
  • #5 19210152
    krzbor
    Level 27  
    Too bad it's not ESP.
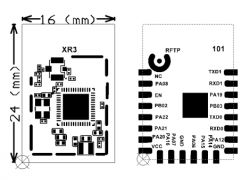
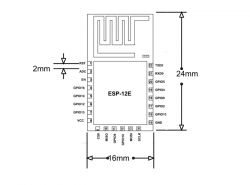
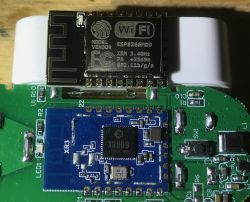
    The comparison of this system and ESP12f looks interesting:
    WiFi door/window opening sensor - test, interior, integration with the rest of t WiFi door/window opening sensor - test, interior, integration with the rest of t
    It seems that the "electrically" modules fit together (the lower pins in ESP12 are not used). You can see that the system wants to compete with ESP - it is enough for the equipment manufacturer to prepare a batch for a new processor and place it instead of ESP.
  • #6 19210378
    p.kaczmarek2
    Moderator Smart Home
    krzbor wrote:
    (the lower pins in ESP12 are rather not used).

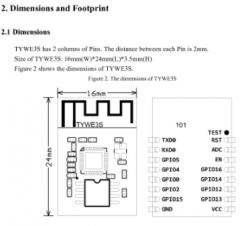
    it is also worth adding that the famous TYWE3S from many 'smart' devices is compatible with ESP12 pins
    WiFi door/window opening sensor - test, interior, integration with the rest of t
    I have this module:
    WiFi door/window opening sensor - test, interior, integration with the rest of t
    it could be soldered, but maybe not so fast..


    prosiak_wej wrote:

    BTW - has anyone encountered a network voltage recorder working online? (...)

    There are 'smart' sockets for ESP that offer such measurements, although they do not record what you say, but you can always make your own input to them and send even this GET to the server and receive PHP and upload it to the database ... and as for 100% I don't know ready-made solutions

    prosiak_wej wrote:

    And as soon as the manufacturer shuts down the server or the Internet provider fails, it's all about the edge of ... break! :lol:

    For this reason, I usually recommend using Tasmota or Home Assistant, etc., although the problem is that it is not ESP.

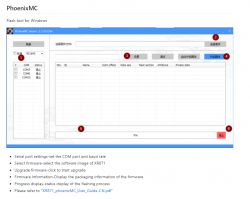
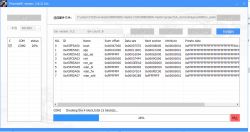
    I was still looking if it would be possible to program the XR809, and as it turns out, a tool for this is also available - PhoenixMC (exe in the repo):
    https://github.com/XradioTech/xradiotech-wiki/wiki/dev-about-tools
    WiFi door/window opening sensor - test, interior, integration with the rest of t
    WiFi door/window opening sensor - test, interior, integration with the rest of t
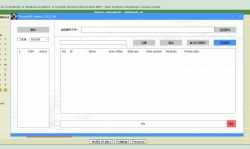
    It works on Win 10, but... there is a language problem
    WiFi door/window opening sensor - test, interior, integration with the rest of t
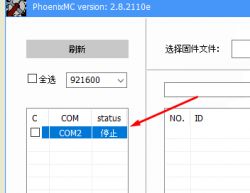
    detects COM port
    WiFi door/window opening sensor - test, interior, integration with the rest of t
    Translated programming instructions (Chinese to English):
    Quote:

    1 Introduction to phoenixMC
    phoenixMC is a flashing tool for XR871 chip in windows environment, including flash debugging function.
    1.1 Main interface of burning tool
    The main interface of the programming tool is shown in Figure 1-1
    WiFi door/window opening sensor - test, interior, integration with the rest of t
    Figure 1-1

    1.2 Serial ports settings
    The available serial ports are displayed in the list box. Tick the serial ports that need to be programmed for firmware upgrade. When the serial port number changes, click the refresh button to proceed to the serial portRefresh of the list. The upper drop-down box is to select the serial port baud rate, the chip only supports three baud rates: 9600, 115200, 921600
    .1.3 Choose firmware
    Click the "Select Firmware" button and a dialog box will pop up to select the *.img file. After the selection, the path will be displayed in the edit box at the back, and theThe information of the img file will be displayed in the information box
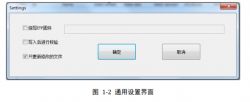
    1.4 General settings
    WiFi door/window opening sensor - test, interior, integration with the rest of t
    1.4.1 Burn ETF firmware
    If there is a need to burn ETF firmware, check this option, and a dialog box will pop up for the user to select the required ETF firmware;
    1.4.2 Verify after writing
    Tick this option, when the flash is programmed, the data will be read back for verification. Since the communication protocol comes with verification, it is fine to uncheck this option;
    1.4.3 Update only modified files
    After checking this option, the data of the block on the flash will be read first. If it is the same as the data to be programmed, the block will not be updated;
    1.5 Upgrade firmware
    Click this button to upgrade the firmware.
    1.6 Progress bar and status prompt
    The progress bar here only displays the current serial port programming progress, and the current operation step will be prompted in the status prompt bar. When the programming is successful, the progress bar willIt displays green, red when it fails, and blue when programming is in progress.
    1.7 Stop
    Click this button to stop the current flash programming


    2. steps
    1. Check the serial port number and baud rate you need to program;
    2. Click "Select Firmware" to select the *.img file that needs to be upgraded, you can see the file path will be displayed in the edit box on the left, and the big edit belowThe box displays the information parsed inside the img file;
    3. According to needs, select ETF firmware and verify configuration;
    4. Click "Upgrade Firmware" to perform the upgrade operation;
    5. If necessary, manually click to stop the operation;
    6.Update OK or error

    EDIT: w sieci są już "ocr translator" chyba dość funkcjonalne, np. https://translate.yandex.com/ocr może się przydać

    EDIT2: instrukcje instalacji alios:
    https://github.com/alibaba/AliOS-Things/wiki/Quick-Start
    https://github.com/alibaba/AliOS-Things/wiki/...-Environment-Setup#1-system-environment-setup

    https://www.programmersought.com/article/64543811118/

    Więcej materiałów (niektóre trzeba tłumaczyć, można przez google translate np):
    Helpful post? Buy me a coffee.
  • ADVERTISEMENT
  • #7 19210657
    Lantis
    Level 12  
    Nice gadget, but this communication with the manufacturer's servers disqualifies it for me. I wonder if there are any "open source" solutions...

    prosiak_wej wrote:
    BTW - has anyone encountered a network voltage recorder working online? Configurable recording interval from 0.5s to a minute, additional records when the min/max voltage is exceeded, live preview via the Internet, SD memory (enables saving slightly more than three days every half second)

    Just out of curiosity - what practical application of such a recorder do you mean?
  • #8 19211057
    p.kaczmarek2
    Moderator Smart Home
    Lantis wrote:
    Nice gadget, but this communication with the manufacturer's servers disqualifies it for me. I wonder if there are any "open source" solutions...


    I didn't find it, but I played with this SDK and I think it's all you need to make your own firmware.
    There is, for example, an example of AT commands:
    https://github.com/XradioTech/XR809SDK/tree/a...678b9433be96b1f82fd82872cdc85/project/at_demo
    It can be compiled with make on Ubuntu, but you also need to install it separately: gcc-arm-none-eabi-4_9-2015q2

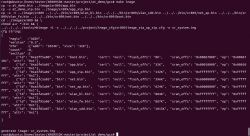
    Then you first make the whole sdk (make lib) and then the selected example, and then make the image (to create the .img file via mkImage):
    WiFi door/window opening sensor - test, interior, integration with the rest of t

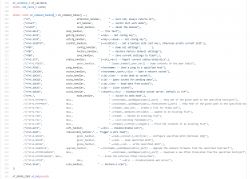
    now it remains to find where exactly to connect to upload the batch to XR809 via phoenixMC.exe

    Quote:
    During firmware burning, both PB02 and PB03 need to be connected to a low level. When the module works properly, PB02 and PB03 cannot be connected to a low level


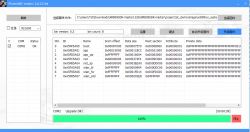
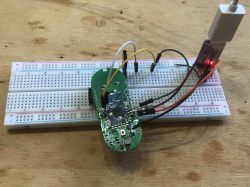
    EDIT: managed to upload the batch
    WiFi door/window opening sensor - test, interior, integration with the rest of t
    programming success:
    WiFi door/window opening sensor - test, interior, integration with the rest of t
    layout used:
    WiFi door/window opening sensor - test, interior, integration with the rest of t
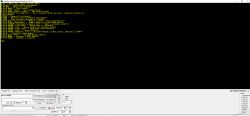
    I uploaded a batch of AT commands and now I can communicate with the module via UART:
    WiFi door/window opening sensor - test, interior, integration with the rest of t
    result on realterm:
    WiFi door/window opening sensor - test, interior, integration with the rest of t
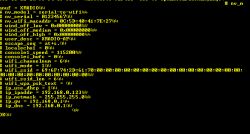
    you can display e.g. network settings (by default the ap is called XRADIO-AP):
    WiFi door/window opening sensor - test, interior, integration with the rest of t

    All in all, we have everything you need to make your own dunk on the XR809.
    I will try to make some simple demo based on it and I will give a detailed description on the forum as a separate topic of what and how it works with this module (how to program, etc.)
    Helpful post? Buy me a coffee.
  • #9 19212517
    krzbor
    Level 27  
    Do you see any significant advantage of XR809 over ESP8266 or ESP32S? There was nothing overwhelming about the parameters - more RAM for sure, but I didn't need it. ADC 12bit - there is no madness either. The power consumption is also similar. What is important: TYWE3S and the original ESP-12 (AI-Thinker) are FCC certified, and this opens the door to the "world".
  • #10 19212669
    p.kaczmarek2
    Moderator Smart Home
    Rather not, and at the moment I have not seen any place where you can buy the XR3/XR809 module alone.

    It's more about giving the opportunity to upload your own firmware (independent of the manufacturer's servers) to finished products. Not only this sensor from the subject is based on XR.
    Helpful post? Buy me a coffee.
  • ADVERTISEMENT
  • #11 19220289
    MiG25
    Level 20  
    prosiak_wej wrote:
    p.kaczmarek2 wrote:
    (traffic goes through the producer's servers)


    And as soon as the manufacturer shuts down the server or the Internet provider fails, it's all about the edge of ... break! :lol:

    BTW - has anyone encountered a network voltage recorder working online? Adjustable recording interval from 0.5s to a minute, additional records when the min/max voltage is exceeded, online preview, SD memory (enables saving slightly more than three days every half second).


    After extracting "deviceid" and "local key" there are programs that control it locally, without the Internet.
  • #12 19742096
    Oskaeg
    Level 13  
    I bought it because of the very good description of the topic founder. I live in the forest and the internet is via GPS and it is weak. I managed to download the TUJA applications but I haven't been able to set it up yet.

    The device is very interesting, but I am devastated by the fact that it goes through the manufacturer's servers ... I thought it would be a shot, and launching the application in the field is pure lottery ...

    I need such a device, but to work in the local network. I am very concerned, can someone help me? What would you advise you, rummage in this sensor or look for another? Again, I'm asking for help, this is quite urgent...
  • #13 19742101
    p.kaczmarek2
    Moderator Smart Home
    @Oskaeg - what exactly do you want to achieve? What do you want to enable?

    How locally have you considered placing a Home Assistant?
    https://www.elektroda.pl/rtvforum/topic3777098.html

    There is some possibility...
    - or Tuya Local (as mentioned by someone above); but i haven't tested it yet.
    - or Home Assistant with my XR809 input, only that you would have to wait for its next version, because what is now is an early prototype:
    https://www.elektroda.pl/rtvforum/topic3806769.html
    - or solder XR809 to ESP12F and upload Tasmota and probably Home Assistant
    https://www.elektroda.pl/rtvforum/topic3816654.html
    - or buy a zigbee door opening sensor and also Home Assistant
    https://www.elektroda.pl/rtvforum/topic3805186.html
    - or buy a door opening sensor but with ESP and upload it as above I wrote Tasmota ...

    Do you need access from outside your local network to this sensor at all?
    Helpful post? Buy me a coffee.
  • #14 19742112
    Oskaeg
    Level 13  
    Thank God. I don't have much time... It's great that you replied so quickly, I was even going to write to you... I need to know if the door is open or closed. I need to do it discreetly, so I wanted to hide this sensor. I thought about leading the reed switch out of the room on cables, but I don't know if I will be able to do it, wireless communication is easy to install, but it can be unreliable. I thought your post saved my life, it's a miracle that something like this exists at all, but I can't handle it, I'm halfway through the topic and I need to install it as soon as possible. Help me, give me some advice. I was afraid that there might be problems with this... and it is exactly as I feared. I'm a little desperate, maybe we could talk about it over the phone? I am able to return the favor, but now I have no time to think, I need a ready solution as soon as possible.
  • #15 19742117
    p.kaczmarek2
    Moderator Smart Home
    But you want to check this door opening status from your phone, being in the same WiFi network as the device?

    Do you have your own WiFi there?

    If you just want to be able to check the status of the door (open/closed) and you have a WiFi network there, this solution is enough:
    https://www.elektroda.pl/rtvforum/topic3816654.html
    Quote:

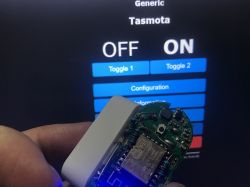
    After this operation, the logical levels are normal. A state change is detected immediately:
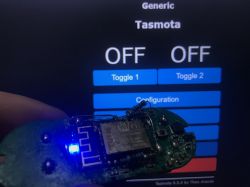
    WiFi door/window opening sensor - test, interior, integration with the rest of t WiFi door/window opening sensor - test, interior, integration with the rest of t
    The first ON/OFF is a button temporarily assigned to the LED, and the second ON/OFF is the status of the door (magnetic sensor).

    or another door / window opening sensor on ESP already (the one with a "square" housing probably has ESP in it from what I remember, I did teardown but did not post it on the forum).

    Once you upload Tasmota, you can access it via the local network via the IP address of the device directly from your phone and computer and see if it is open or closed.
    Then Home Assistant or Tuya servers are redundant. A single device with Tasmota (door opening sensor) is a server (on the router you give it, for example, a permanent IP assignment in DHCP) and you enter it by IP and view the ON / OFF status of the sensor.

    Panic is not recommended. I will try to help on this topic. What's your budget and is this door within WiFi range?
    Helpful post? Buy me a coffee.
  • #16 19742133
    Oskaeg
    Level 13  
    I wrote a PM message. I will also write about the TUYA application itself, in my case it turned out that the problem is not the Internet connection itself, as I thought before, but the application's fault.

    I use free aero2 internet, it is known to be sneezing, but interestingly, I live in a forest and most GSM operators have poor coverage here, which means that paid internet is worse than aero2 on plus networks ...

    It can't be the fault of the Internet because today I watched the whole movie on yt in 360p really comfortable, maybe it was buffered for a few seconds 3 - 4 times for 1.5 hours.

    I found that uninstalling the app helped. A fresh app is running... Then I started clearing cache data and the app started running again.

    The problem I have is that TUYA works only once after logging in, i.e. I will drop the application (turn it off) and it cannot be restarted, because it does not load ... Resetting the settings helps.

    At first I thought it was the fault of the Internet, because aero2 breaks sessions. But the internet doesn't seem to have anything to do with it...

    It cannot function in this condition. I can put the sensor only once and that's it...

Topic summary

The discussion revolves around configuring a battery-powered WiFi door/window sensor compatible with the SmartLife smart home application. Users express concerns about the sensor's reliance on the manufacturer's servers, potential integration with Zigbee, and the feasibility of using alternative firmware like Tasmota or Home Assistant for local control. Key points include the sensor's operational distance, power consumption measurements, and the possibility of modifying the device for better functionality. Users also share experiences with the Tuya application and suggest various solutions for local network operation, including using ESP-based devices or Zigbee alternatives.
Summary generated by the language model.
ADVERTISEMENT