FAQ
TL;DR: For a 24 V stair-light controller, use a Zigbee/Wi‑Fi dry-contact module to short SW to GND; "a 'voltage free relay' will suffice." Home Assistant can toggle it, but HA can’t infer state from manual switches without feedback. [Elektroda, hindoos, post #21487506]
Why it matters: It lets DIYers integrate 24 V stair-light controllers into Home Assistant without losing manual control.
Quick Facts
- Dry-contact control: Shorting the controller’s SW to GND toggles lights; no voltage injection needed. [Elektroda, hindoos, post #21487506]
- Power: The suggested OXT Zigbee mini relay needs 230 V L/N supply for its electronics. [Elektroda, kmarkot, post #21488835]
- Inputs/Modes: Use push buttons (bistable) or a traditional staircase circuit (monostable), depending on module settings. [Elektroda, hindoos, post #21488693]
- Visibility: Without feedback, HA cannot know actual on/off if someone uses a wall switch. [Elektroda, hindoos, post #21487506]
- Compatibility: A similar OXT SWTZ22 is listed as ZHA-compatible for Home Assistant. [“OXT_SWTZ22 — Zigbee Device Compatibility Repository”]
What’s the simplest way to control a 24 V stair-light controller from Home Assistant?
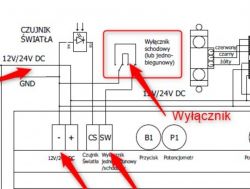
Use a Zigbee or Wi‑Fi module with a dry (voltage‑free) relay contact. Wire its contact across the controller’s SW and GND terminals. Do not feed any voltage into SW. This mirrors what a wall switch does on the 24 V side. Pair the module with Home Assistant and create an automation. [Elektroda, hindoos, post #21487506]
Where should I wire the smart relay so wall switches still work?
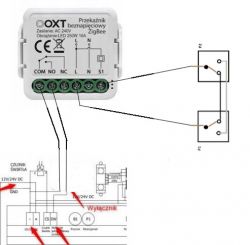
Place the relay contact in parallel at the controller, across SW and GND. Do not insert it in series with the staircase switches. Parallel wiring lets either the relay or any switch short SW to GND. Both manual and Home Assistant control then work independently. The module still needs 230 V L and N, wired separately. [Elektroda, kmarkot, post #21488835]
Can I keep traditional staircase switches, or do I need push buttons?
You can do either, depending on the module mode. Use bistable mode with momentary bell push buttons for impulses. Use monostable or staircase mode to work with existing two‑way wiring. Configure the relay’s input behavior in its app or during pairing. This preserves manual control while enabling HA automations. [Elektroda, hindoos, post #21488693]
Which Zigbee relay was suggested in the thread?
The OXT intelligent mini relay with dry (voltage‑free) contacts, Zigbee, and Tuya support was suggested. It provides a contact output that does not inject voltage, ideal for SW‑to‑GND control. Use it as an actuator to feed ground to the controller input. Confirm its mode in the manual before wiring. [Elektroda, kmarkot, post #21488647]
Does that OXT relay need 230 V power?
Yes. Power the module with 230 V AC by connecting Neutral and Live to N and L. The contact side remains isolated and dry for the 24 V control loop. Keep mains and low‑voltage wiring separate in the enclosure. Follow the module’s wiring diagram for terminal identification and safety. [Elektroda, kmarkot, post #21488835]
Is an OXT dry-contact relay compatible with Home Assistant ZHA?
A similar OXT SWTZ22 dry‑contact relay is listed as ZHA‑compatible. Pair it through Home Assistant’s ZHA “Add Device.” Then expose the relay entity for automations and dashboards. This provides local, low‑latency control on your Zigbee network. Always verify your exact model in the database before purchase. [“OXT_SWTZ22 — Zigbee Device Compatibility Repository”]
Will Home Assistant show the correct state if someone presses a wall switch?
Not without feedback from the circuit. The relay contact only actuates; it does not sense manual toggles. “You won’t know from the HA whether the light is on or off.” For true state, control the switch loop through the smart relay or add sensing. Otherwise, HA state can desynchronize after manual use. [Elektroda, hindoos, post #21487506]
Can I power the smart relay from 24 V instead of 230 V?
Not for the OXT shown. It requires 230 V AC for its electronics. Consider Wi‑Fi devices like certain Shelly models that accept 24 V DC. Confirm input voltage on the datasheet before wiring. Using the wrong supply can damage the module or be unsafe. [Elektroda, hindoos, post #21488693]
How do I wire it? (3-step quick start)
- Feed the Zigbee relay with 230 V AC (connect L and N) in a safe enclosure.
- Wire the relay’s dry contact across the controller’s SW and GND terminals.
- Set the module to staircase or bistable mode, pair to HA, and test both controls. [Elektroda, kmarkot, post #21488835]
Will putting the relay before the switches block manual control?
Yes, if you wire it in series before the switches, it can interrupt manual operation. Instead, place the relay contact in parallel at the controller, across SW and GND. Either path can complete the control circuit without blocking the other. This maintains manual control even when the relay is off. [Elektroda, kmarkot, post #21488835]
Did this solution work for the original poster?
Yes. The original poster confirmed success after implementing the suggested wiring. That validates adding a Zigbee dry‑contact relay to a 24 V controller. It achieved Home Assistant control alongside existing stair switches. [Elektroda, sajmon_mówi, post #21491943]
Are the relay contacts safe to use on the 24 V controller input?
Yes. Use the relay’s voltage‑free contact to bridge SW to GND on the 24 V input. The contact does not supply voltage; it only closes the circuit like a switch. This matches the controller’s expected signaling method. Ensure solid, low‑voltage terminations at the controller. [Elektroda, hindoos, post #21487506]
