logo elektroda
logo elektroda
X
logo elektroda

Exploring Scimagic-RC SMG-8116: 6-Channel Tuya Relay - Features and Specifications

io2345 534 7
ADVERTISEMENT
  • Helpful post
    #1 21486912
    io2345
    Level 7  
    Let's find out more about this device:
    Scimagic-RC SMG-8116 (eon0r4)
    a 6-channel Tuya Relais, mentioned here: Link

    This is what Tuya Developer Platform gives us:

    {
      "modelId": "eon0r4",
      "services": [
        {
          "actions": [],
          "code": "",
          "description": "",
          "events": [],
          "name": "默认服务",
          "properties": [
            {
              "abilityId": 1,
              "accessMode": "rw",
              "code": "switch_1",
              "description": "",
              "extensions": {"iconName": "icon-dp_power2", "attribute": "144"},
              "name": "开关1",
              "typeSpec": {"type": "bool"}
            },
            {
              "abilityId": 2,
              "accessMode": "rw",
              "code": "switch_2",
              "description": "",
              "extensions": {"iconName": "icon-dp_power2", "attribute": "144"},
              "name": "开关2",
              "typeSpec": {"type": "bool"}
            },
            {
              "abilityId": 3,
              "accessMode": "rw",
              "code": "switch_3",
              "description": "",
              "extensions": {"iconName": "icon-dp_power2", "attribute": "144"},
              "name": "开关3",
              "typeSpec": {"type": "bool"}
            },
            {
              "abilityId": 4,
              "accessMode": "rw",
              "code": "switch_4",
              "description": "",
              "extensions": {"iconName": "icon-dp_power2", "attribute": "144"},
              "name": "开关4",
              "typeSpec": {"type": "bool"}
            },
            {
              "abilityId": 5,
              "accessMode": "rw",
              "code": "switch_5",
              "description": "",
              "extensions": {"iconName": "icon-dp_power2", "attribute": "144"},
              "name": "开关5",
              "typeSpec": {"type": "bool"}
            },
            {
              "abilityId": 6,
              "accessMode": "rw",
              "code": "switch_6",
              "description": "",
              "extensions": {"iconName": "icon-dp_power2", "attribute": "144"},
              "name": "开关6",
              "typeSpec": {"type": "bool"}
            },
            {
              "abilityId": 9,
              "accessMode": "rw",
              "code": "countdown_1",
              "description": "",
              "extensions": {"iconName": "icon-dp_time2", "attribute": "128"},
              "name": "开关1倒计时",
              "typeSpec": {
                "type": "value",
                "max": 86400,
                "min": 0,
                "scale": 0,
                "step": 1,
                "unit": "s"
              }
            },
            {
              "abilityId": 10,
              "accessMode": "rw",
              "code": "countdown_2",
              "description": "",
              "extensions": {"iconName": "icon-dp_time2", "attribute": "128"},
              "name": "开关2倒计时",
              "typeSpec": {
                "type": "value",
                "max": 86400,
                "min": 0,
                "scale": 0,
                "step": 1,
                "unit": "s"
              }
            },
            {
              "abilityId": 11,
              "accessMode": "rw",
              "code": "countdown_3",
              "description": "",
              "extensions": {"iconName": "icon-dp_time2", "attribute": "128"},
              "name": "开关3倒计时",
              "typeSpec": {
                "type": "value",
                "max": 86400,
                "min": 0,
                "scale": 0,
                "step": 1,
                "unit": "s"
              }
            },
            {
              "abilityId": 12,
              "accessMode": "rw",
              "code": "countdown_4",
              "description": "",
              "extensions": {"iconName": "icon-dp_time3", "attribute": "128"},
              "name": "开关4倒计时",
              "typeSpec": {
                "type": "value",
                "max": 86400,
                "min": 0,
                "scale": 0,
                "step": 1,
                "unit": "s"
              }
            },
            {
              "abilityId": 13,
              "accessMode": "rw",
              "code": "countdown_5",
              "description": "",
              "extensions": {"iconName": "icon-dp_time2", "attribute": "128"},
              "name": "开关5倒计时",
              "typeSpec": {
                "type": "value",
                "max": 86400,
                "min": 0,
                "scale": 0,
                "step": 1,
                "unit": "s"
              }
            },
            {
              "abilityId": 14,
              "accessMode": "rw",
              "code": "countdown_6",
              "description": "",
              "extensions": {"iconName": "icon-dp_time2", "attribute": "128"},
              "name": "开关6倒计时",
              "typeSpec": {
                "type": "value",
                "max": 86400,
                "min": 0,
                "scale": 0,
                "step": 1,
                "unit": "s"
              }
            },
            {
              "abilityId": 38,
              "accessMode": "rw",
              "code": "relay_status",
              "description": "",
              "extensions": {"iconName": "icon-zhuangtai", "attribute": "640"},
              "name": "设备重启状态设置",
              "typeSpec": { "type": "enum", "range": ["off", "on", "memory"] }
            },
            {
              "abilityId": 40,
              "accessMode": "rw",
              "code": "light_mode",
              "description": "",
              "extensions": {"iconName": "tcl_function_light", "attribute": "128"},
              "name": "指示灯模式",
              "typeSpec": { "type": "enum", "range": ["relay", "pos", "none"] }
            },
            {
              "abilityId": 42,
              "accessMode": "rw",
              "code": "cycle_time",
              "description": "",
              "extensions": {"iconName": "icon-dp_time3", "attribute": "128"},
              "name": "循环定时",
              "typeSpec": {"type": "string", "maxlen": 255}
            },
            {
              "abilityId": 43,
              "accessMode": "rw",
              "code": "random_time",
              "description": "",
              "extensions": {"iconName": "icon-dp_time2", "attribute": "128"},
              "name": "随机定时",
              "typeSpec": {"type": "string", "maxlen": 255}
            },
            {
              "abilityId": 44,
              "accessMode": "rw",
              "code": "switch_inching",
              "description": "",
              "extensions": {"iconName": "icon-dp_power2", "attribute": "144"},
              "name": "点动开关",
              "typeSpec": {"type": "string", "maxlen": 255}
            }
          ]
        }
      ]
    }


    "export_code" on the Tuya Developers Page delivers us:

    {"1":"Switch 1","2":"Switch 2","3":"Switch 3","4":"Switch 4","5":"Switch 5","6":"Switch 6","9":"Countdown 1","10":"Countdown 2","11":"Countdown 3","12":"Countdown 4","13":"Countdown 5","14":"Countdown 6","38":"Restart status","40":"Light Mode","42":"cycle time","43":"random","44":"Switch inching"}


    Pretty few, compared to the 8-channel model in the above link.
    But obviously the Pin Assignment for the simple usage that I plan (switching the relais) is 1->1, 2->2, 3->3 and so on.
  • ADVERTISEMENT
  • #2 21487657
    io2345
    Level 7  
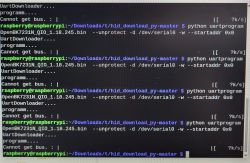
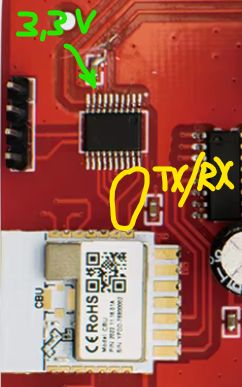
    Today I tried to make a backup and flash it, using the BK7231 Flasher. I did set it to "BK7231N" and tried a firmware read, but it can not connect to bus. Instead, the device can be accessed in the SmartLife-App. TX and RX are connected to Pins 15/16 (as always), CBU's Pin 14 is connected to a dedicated power supply 3,3 Volt, ground is connected to Pin 13 and the UART adapter as well. Pin 18 ist Reset and pulled to ground for a short moment.
    Serial connector shows up in Device Manager, COM-Port is selcted accordingly.
    After trying for about a hour, de- and resoldering connections, restarting Flasher-App, dozens of resets on CEN, I gave up for now.
    A cross-check with the 8-channel model gave expected results: succesful backup in a few seconds.

    What can I do? Desoldering the CBU isn't an option. This could only be done by using a heat gun, but even if I manage to detach it without destroying, I couldn't resolder it again. The CBU is soldered invisible (on the backside) to the mainboard

    What could be done, if it helps: Disconnect the TX/RX lines between CBU and MCU (quite easy) or disconnecting 3,3V line to the MCU (very difficult). Which option is more promising?

    Electronic board with 3.3V and TX/RX markings

    Impossible to read anything on the MCU, thus I can't find any information about this chip

    Hinzugefügt nach 8 [Stunden] 23 [Minuten]:

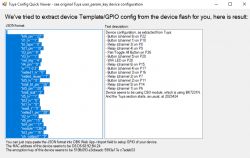
    I did cut RX/TX Pins to the MCU, then I managed to do a Readback and finally flash the device.
    The readback provides a proper JSON, that can be easily imported:

    Screenshot of Tuya Config Quick Viewer tool extracting Tuya device GPIO configuration.

    {
    	"bt6_pin":"22",
    	"rl1_lv":"1",
    	"bt_type":"0",
    	"bt1_pin":"10",
    	"rl3_pin":"8",
    	"rl3_lv":"1",
    	"net_trig":"4",
    	"rl4_pin":"9",
    	"jv":"1.0.3",
    	"netled1_lv":"0",
    	"netled_reuse":"1",
    	"bt5_lv":"0",
    	"total_bt_pin":"26",
    	"bt5_pin":"20",
    	"total_stat":"2",
    	"rl5_lv":"1",
    	"bt3_lv":"0",
    	"bt1_lv":"0",
    	"reset_t":"5",
    	"netled1_pin":"28",
    	"rl2_lv":"1",
    	"rl6_pin":"15",
    	"bt4_pin":"17",
    	"module":"CBU",
    	"bt3_pin":"16",
    	"ch_cddpid1":"9",
    	"rl2_pin":"7",
    	"bt4_lv":"0",
    	"ch_cddpid6":"14",
    	"bt6_lv":"0",
    	"bt2_pin":"11",
    	"ch_cddpid4":"12",
    	"ch_cddpid5":"13",
    	"ch_cddpid2":"10",
    	"ch_cddpid3":"11",
    	"rl5_pin":"14",
    	"rl6_lv":"1",
    	"total_bt_lv":"0",
    	"ch_dpid5":"5",
    	"ch_num":"6",
    	"ch_dpid6":"6",
    	"bt2_lv":"0",
    	"rl1_pin":"6",
    	"rl4_lv":"1",
    	"ch_dpid3":"3",
    	"ch_dpid4":"4",
    	"ch_dpid1":"1",
    	"ch_dpid2":"2",
    	"crc":"11"
    }
  • ADVERTISEMENT
  • #3 21489313
    io2345
    Level 7  
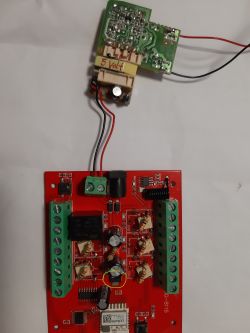
    My module is running on 5V.
    The power for the electronics part is supplied by a voltage regulator (green circle). (This board is running on 5 channels only, the remaining 12V relay isn't functional)


    Circuit board with electronic components and wires.

    Hinzugefügt nach 6 [Stunden] 44 [Minuten]:

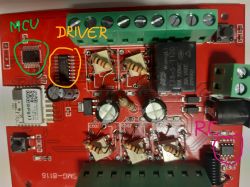
    Just discovered, that I have a problem: For the five inputs, that I would need to have (they sense the status of the thermostat switches) I have only two unused, free pins on the CBU. All other are taken: six channels control the hardware relays, one is the hardware switch for "toggle all relays", one for the Wifi LED, two are +3,3V and ground, four for RX/TX and RX2/TX2. Six more (and here starts the riddle) are non-hardware buttons. They connect from the chip that (I thought) is the MCU. So what function has this "MCU" (if it is one), if it doesn't control the relays? In the above picture it is the chip where the green arrow points to. The other chip (where the yellow X is on it) probably could be the driver for the hardware relays (they are originally 12V types).
    This board is intended to ship with a remote control, maybe this is the function of the supposed MCU? Maybe it forwards separate signals for each relay that has to be switched - thus the configuration as "button" ???
    Sadly my board was shipped without RC (maybe by mistake), so I can't verify that. But if my thoughts are correct, I wouldn't need this MCU (?) at all, and could re-use the CBU pins, that it occupies.
  • ADVERTISEMENT
  • #4 21490147
    io2345
    Level 7  
    Could one of the moderators please change the title of this thread from "Exploring eon0r4..." to "Exploring Scimagic-RC SMG-8116..."
    Can't do it by myself.

    Hinzugefügt nach 38 [Minuten]:

    io2345 wrote:
    The other chip (where the yellow X is on it) probably could be the driver for the hardware relays (they are originally 12V types).


    It's as expected: The MCU connects on various Pins directly to the RC-chip (at least that's what I call it). And the yellow marked chip is really the relay driver. All inputs (on the CBU side) connect directly to the CBU, all outputs (on the relay side) connect individually to the GROUND Pins of the hardware relays.
    So I'd guess, that this MCU isn't needed at all, unless one plans to use a remote controller 433 MHz.

    Anyone who shares my thoughts?


    Electronic board with markings MCU, DRIVER, and RC in different colors.

    Hinzugefügt nach 18 [Minuten]:

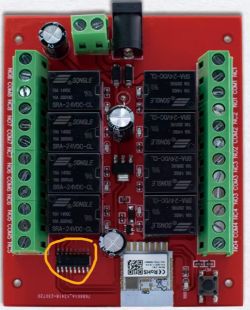
    Another idea, to proof that I'm probably right: This board is available also in a 8-channel version without RC, and this board lacks completely the MCU and RC chips. There is only the hardware driver:


    Red electronic board with green connectors, relays, and markings.

    ======================================================================
    Hinzugefügt nach 7 [Stunden] 36 [Minuten]:

    To a certain degree, I love those threads where you are talking with yourself only ;-)
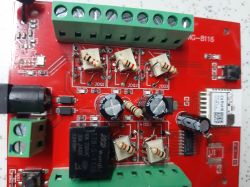
    At least there's no one that says "Better don't do that...". So I decided (after some more thinking) that the risk isn't too high, and desoldered both of the potentially unnecessary chips (don't do that if you're weak hearted or feel like not having the appropriate equipment). It worked out fine, and I have now five free pins that I can use for input.


    Printed circuit board with electronic components labeled Scimagic-RC SMG-8116.
  • ADVERTISEMENT
  • #5 21504417
    io2345
    Level 7  
    @Administator Could one of the moderators please change the title of this thread from "Exploring eon0r4..." to "Exploring Scimagic-RC SMG-8116..."
    Can't do it by myself.

    Hinzugefügt nach 6 [Stunden] 59 [Minuten]:

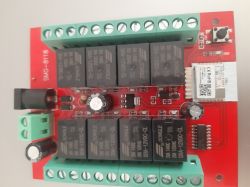
    Now we have also the 8-channel version, SMG - 8118

    Scimagic-RC SMG-8116 electronic board with various components.

    What we get in Tuya Developer Platform for this type is:

    {
      "result": {
        "model": "{
    "modelId":"eop5ww","services":[
    {
    "actions":[],"code":"","description":"","events":[],"name":"默认服务","properties":[
    {
    "abilityId":1,"accessMode":"rw","code":"switch_1","description":"","extensions":{
    "iconName":"icon-dp_power2","attribute":"144"},"name":"开关1","typeSpec":{
    "type":"bool"}},{
    "abilityId":2,"accessMode":"rw","code":"switch_2","description":"","extensions":{
    "iconName":"icon-dp_power2","attribute":"144"},"name":"开关2","typeSpec":{
    "type":"bool"}},{
    "abilityId":3,"accessMode":"rw","code":"switch_3","description":"","extensions":{
    "iconName":"icon-dp_power2","attribute":"144"},"name":"开关3","typeSpec":{
    "type":"bool"}},{
    "abilityId":4,"accessMode":"rw","code":"switch_4","description":"","extensions":{
    "iconName":"icon-dp_power2","attribute":"144"},"name":"开关4","typeSpec":{
    "type":"bool"}},{
    "abilityId":5,"accessMode":"rw","code":"switch_5","description":"","extensions":{
    "iconName":"icon-dp_power2","attribute":"144"},"name":"开关5","typeSpec":{
    "type":"bool"}},{
    "abilityId":6,"accessMode":"rw","code":"switch_6","description":"","extensions":{
    "iconName":"icon-dp_power2","attribute":"144"},"name":"开关6","typeSpec":{
    "type":"bool"}},{
    "abilityId":7,"accessMode":"rw","code":"usb_switch_1","description":"","extensions":{
    "iconName":"icon-dp_power2","attribute":"16"},"name":"USB1开关","typeSpec":{
    "type":"bool"}},{
    "abilityId":8,"accessMode":"rw","code":"usb_switch_2","description":"","extensions":{
    "iconName":"icon-dp_power2","attribute":"16"},"name":"USB2开关","typeSpec":{
    "type":"bool"}},{
    "abilityId":9,"accessMode":"rw","code":"countdown_1","description":"","extensions":{
    "iconName":"icon-dp_time2","attribute":"736"},"name":"倒计时1","typeSpec":{
    "type":"value","max":86400,"min":0,"scale":0,"step":1,"unit":"s"}},{
    "abilityId":10,"accessMode":"rw","code":"countdown_2","description":"","extensions":{
    "iconName":"icon-dp_time2","attribute":"736"},"name":"开关2倒计时","typeSpec":{
    "type":"value","max":86400,"min":0,"scale":0,"step":1,"unit":"s"}},{
    "abilityId":11,"accessMode":"rw","code":"countdown_3","description":"","extensions":{
    "iconName":"icon-dp_time2","attribute":"736"},"name":"开关3倒计时","typeSpec":{
    "type":"value","max":86400,"min":0,"scale":0,"step":1,"unit":"s"}},{
    "abilityId":12,"accessMode":"rw","code":"countdown_4","description":"","extensions":{
    "iconName":"icon-dp_time3","attribute":"736"},"name":"开关4倒计时","typeSpec":{
    "type":"value","max":86400,"min":0,"scale":0,"step":1,"unit":"s"}},{
    "abilityId":13,"accessMode":"rw","code":"countdown_5","description":"","extensions":{
    "iconName":"icon-dp_time2","attribute":"736"},"name":"开关5倒计时","typeSpec":{
    "type":"value","max":86400,"min":0,"scale":0,"step":1,"unit":"s"}},{
    "abilityId":14,"accessMode":"rw","code":"countdown_6","description":"","extensions":{
    "iconName":"icon-dp_time2","attribute":"736"},"name":"开关6倒计时","typeSpec":{
    "type":"value","max":86400,"min":0,"scale":0,"step":1,"unit":"s"}},{
    "abilityId":15,"accessMode":"rw","code":"usb_countdown_1","description":"","extensions":{
    "iconName":"icon-dp_time3","attribute":"608"},"name":"USB1倒计时","typeSpec":{
    "type":"value","max":86400,"min":0,"scale":0,"step":1,"unit":"s"}},{
    "abilityId":16,"accessMode":"rw","code":"usb_countdown_2","description":"","extensions":{
    "iconName":"icon-dp_time3","attribute":"608"},"name":"USB2倒计时","typeSpec":{
    "type":"value","max":86400,"min":0,"scale":0,"step":1,"unit":"s"}},{
    "abilityId":38,"accessMode":"rw","code":"relay_status","description":"","extensions":{
    "iconName":"icon-zhuangtai","attribute":"736"},"name":"上电状态设置","typeSpec":{
    "type":"enum","range":["off","on","memory"]
    }},{
    "abilityId":40,"accessMode":"rw","code":"light_mode","description":"","extensions":{
    "iconName":"tcl_function_light","attribute":"224"},"name":"指示灯状态设置","typeSpec":{
    "type":"enum","range":["relay","pos","none"]
    }},{
    "abilityId":42,"accessMode":"rw","code":"cycle_time","description":"","extensions":{
    "iconName":"icon-dp_time3","attribute":"224"},"name":"循环定时","typeSpec":{
    "type":"string","maxlen":255}},{
    "abilityId":43,"accessMode":"rw","code":"random_time","description":"","extensions":{
    "iconName":"icon-dp_time2","attribute":"224"},"name":"随机定时","typeSpec":{
    "type":"string","maxlen":255}}
    ]
    }
    ]
    }"
      },
      "success": true,
      "t": 1743614120996,
      "tid": "0e813fda0fe611f0905d5e1a959ba61d"
    }
  • #6 21508163
    io2345
    Level 7  
    Readback result:

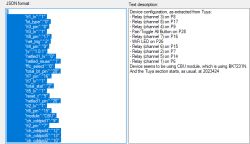
    Screenshot showing device configuration in JSON format and a textual description.

    {
       "rl1_lv":"1",
       "bt_type":"0",
       "rl3_pin":"8",
       "rl3_lv":"1",
       "rl8_pin":"17",
       "net_trig":"2",
       "rl4_pin":"9",
       "jv":"1.0.1",
       "netled1_lv":"0",
       "netled_reuse":"1",
       "ffc_select":"0",
       "total_bt_pin":"28",
       "rl7_pin":"16",
       "rl7_lv":"1",
       "total_stat":"2",
       "rl5_lv":"1",
       "reset_t":"5",
       "netled1_pin":"26",
       "rl2_lv":"1",
       "rl6_pin":"15",
       "module":"CBU",
       "ch_cddpid1":"9",
       "rl2_pin":"7",
       "ch_cddpid4":"12",
       "ch_cddpid5":"13",
       "ch_cddpid2":"10",
       "ch_cddpid3":"11",
       "ch_flag6":"1",
       "rl5_pin":"14",
       "ch_dpid7":"7",
       "rl6_lv":"1",
       "ch_dpid8":"8",
       "ch_flag7":"1",
       "total_bt_lv":"0",
       "ch_dpid5":"5",
       "ch_flag8":"1",
       "ch_num":"8",
       "ch_dpid6":"6",
       "rl1_pin":"6",
       "rl4_lv":"1",
       "ch_dpid3":"3",
       "ch_dpid4":"4",
       "rl8_lv":"1",
       "ch_dpid1":"1",
       "ch_dpid2":"2",
       "crc":"43"
    }
    [/code]

    The 8-channel version is easy to flash. You just need to connect RX/TX and Ground,
  • #7 21511708
    io2345
    Level 7  
    As always, I have a lack of available, untaken pins on the CBU for input purpose of the thermostat switches. There are only three available by scratch and I need six in total. The "Toggle all" hardware button is unnecessary for me and I could use this pin, so two are still missing. Probably I could missuse the pin for Wifi-LED, but one would still be missing. So I should opt for the control lines for the two unused relays and disconnect them from the relays driver chip. Let's wait and see what turns out to be easier.
  • #8 21527976
    io2345
    Level 7  
    >>21511708 I used the relays control lines, they are easy to reach.

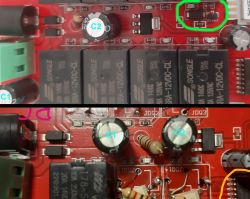
    It might be worth to mention, that the 8-channel board can not be run with a 5 volts power supply initially. They changed the power rail slightly, shifted C1 to the periphery and introduced an additional circuit (green circle). Now the 3,3 Voltage regulator doesn't get enough power on the input side (in fact only 3,3 V, which gives an output of 2,3 Volts). Until now I didn't understand the sense of the additional circuit, will have to think about that a little more.
    In the picture the upper board is the 8-channel, the lower the 6-channel version:


    Close-up of two printed circuit boards with electronic components, including capacitors, relays, and resistors.

    ======================0
    Edit: Just throw out the 100 Ohm resistor next to C2 and insert a bridge instead. It will run on 5V now (which makes only sense, if you substitute the stock relays by electronic ones).

Topic summary

The discussion explores the Scimagic-RC SMG-8116, a 6-channel Tuya relay module identified by model ID "eon0r4" on the Tuya Developer Platform. Attempts to back up and flash the device firmware using the BK7231 Flasher failed due to connection issues on the UART bus, despite correct wiring and COM port recognition. The device operates on 5V with an onboard voltage regulator, but only five relay channels are functional in the tested unit, with one 12V relay inactive. The module features a complex pin allocation on the CBU (control board unit), with limited free pins for additional inputs such as thermostat switch status sensing. The MCU on the board appears to interface directly with an RC chip and relay driver, controlling relay outputs via grounding pins. The MCU's role is questioned, possibly limited to 433 MHz remote control functionality, as an 8-channel variant (SMG-8118) lacks the MCU and RC chip entirely. Firmware readback reveals detailed pin and relay configurations, including relay pins, levels, and network LED control. Due to insufficient free input pins, users consider repurposing pins assigned to unused relays or the WiFi LED for additional input sensing. The thread title was updated to reflect the correct device name, and images of the hardware and firmware data were shared to support analysis.
Summary generated by the language model.
ADVERTISEMENT