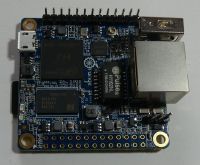
The popularity of the Raspberry Pi is growing thanks to the many examples available and the development driven by the community interested in minicomputer platforms. In addition to RPi, it is worth taking an interest in alternative minicomputers, perhaps they will be better suited to the planned project.
OrangePi Zero is equipped with SoC AllWinner H2 1.2GHz ARM Cortex A7, 256MB / 512MB RAM, Ethernet 100Mb / s, WiFi 802.11 b / g / n, USB, microSD slot, support for Android, Lubuntu, Debian, Raspbian, all with 48mm × dimensions 46mm and the price of 60-80 PLN. The module, compared to typical Arduino or ESP8266 / 32 boards, gives us a much larger amount of RAM, efficient CPU and the ability to run software known from Linux distributions. On the other hand, you should take into account the increased power consumption and more complex software, compared to eg Arduino we will be "further away from the hardware".
Preparation of the SD card
OrangePi will start from the system image located on the SD card. I used the distribution for testing Armbian . After downloading and unpacking the file with the system image, "burn" the img file on the card, eg using the software Etcher and a reader connected to the PC.
First launch of OrangePi Zero
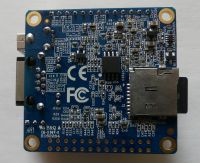
Place the prepared microSD card in the slot on the OrangePi board, then supply 5V power using the micro USB connector, power consumption during start up 1-2W depending on the tasks performed by the system. The board does not have an HDMI output (video output is available), so we log into the CLI of the installed Linux distribution using UART or SSH.
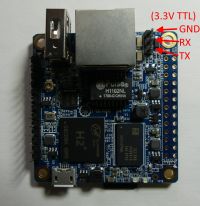
For the first login, I used a UART connection and a USB UART converter that accepts 3.3V voltage levels and software, for example PuTTY, in which we will open a connection on the selected COM with a speed of 115200. This method allows you to observe the start-up process and log in regardless of the state and configuration of the network . The default login details for the current Armbian distribution are root user and password 1234 which of course we change. By issuing the ifconfig command, we can check and modify the settings of network interfaces. After configuring the Internet connection, it is worth updating the software by issuing the apt upgrade command.

We can also completely resign from UART by connecting the device to the local network with a twisted pair and an Ethernet interface, then we can log into the system using ssh, e.g. PuTTY, we only need to determine what address from DHCP was assigned during the first start of OrangePi (at a later time, we can e.g. set static IP or abandon Ethernet in favor of a WiFi interface).
- To determine what IP address has been assigned, we can log into the router, which assigns IP addresses in a given LAN using DHCP.
- You can also run a DHCP server on a PC and connect OrangePi with a twisted pair to the PC port, thanks to which we will have control over the initial IP address assigned.
- Another way to determine what address has been assigned to a new device in our network may be to scan the addresses in the subnet using e.g. axence nettools .
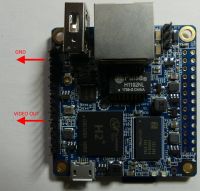
- Another way is to use the TV-OUT output and connect the signal to the TV's video input, then connect the USB keyboard to OrangePi.
Finally, we can review the configuration using the tool: armbian-config
it's worth a look at h3consumption -p and optimize the settings for power consumption
monitoring of the system operation is possible eg by running armbianmonitor -m
Description of the PCB leads: OrangePi Zero pinout
What do you think about Orange Pi Zero? The cheapest version can be purchased for a few or a dozen dollars.
OrangePi Zero is equipped with SoC AllWinner H2 1.2GHz ARM Cortex A7, 256MB / 512MB RAM, Ethernet 100Mb / s, WiFi 802.11 b / g / n, USB, microSD slot, support for Android, Lubuntu, Debian, Raspbian, all with 48mm × dimensions 46mm and the price of 60-80 PLN. The module, compared to typical Arduino or ESP8266 / 32 boards, gives us a much larger amount of RAM, efficient CPU and the ability to run software known from Linux distributions. On the other hand, you should take into account the increased power consumption and more complex software, compared to eg Arduino we will be "further away from the hardware".
Preparation of the SD card
OrangePi will start from the system image located on the SD card. I used the distribution for testing Armbian . After downloading and unpacking the file with the system image, "burn" the img file on the card, eg using the software Etcher and a reader connected to the PC.

First launch of OrangePi Zero
Place the prepared microSD card in the slot on the OrangePi board, then supply 5V power using the micro USB connector, power consumption during start up 1-2W depending on the tasks performed by the system. The board does not have an HDMI output (video output is available), so we log into the CLI of the installed Linux distribution using UART or SSH.
For the first login, I used a UART connection and a USB UART converter that accepts 3.3V voltage levels and software, for example PuTTY, in which we will open a connection on the selected COM with a speed of 115200. This method allows you to observe the start-up process and log in regardless of the state and configuration of the network . The default login details for the current Armbian distribution are root user and password 1234 which of course we change. By issuing the ifconfig command, we can check and modify the settings of network interfaces. After configuring the Internet connection, it is worth updating the software by issuing the apt upgrade command.


We can also completely resign from UART by connecting the device to the local network with a twisted pair and an Ethernet interface, then we can log into the system using ssh, e.g. PuTTY, we only need to determine what address from DHCP was assigned during the first start of OrangePi (at a later time, we can e.g. set static IP or abandon Ethernet in favor of a WiFi interface).
- To determine what IP address has been assigned, we can log into the router, which assigns IP addresses in a given LAN using DHCP.
- You can also run a DHCP server on a PC and connect OrangePi with a twisted pair to the PC port, thanks to which we will have control over the initial IP address assigned.
- Another way to determine what address has been assigned to a new device in our network may be to scan the addresses in the subnet using e.g. axence nettools .
- Another way is to use the TV-OUT output and connect the signal to the TV's video input, then connect the USB keyboard to OrangePi.

Finally, we can review the configuration using the tool: armbian-config
it's worth a look at h3consumption -p and optimize the settings for power consumption
monitoring of the system operation is possible eg by running armbianmonitor -m
Description of the PCB leads: OrangePi Zero pinout
What do you think about Orange Pi Zero? The cheapest version can be purchased for a few or a dozen dollars.
Cool? Ranking DIY


