Teardown and reflash of the garden Tuya CCWFIO232PK two-channel relay switch built around a BK7231T WiFi MCU on the main PCB.
The board uses a transformerless ICW4008 power supply, dual relay drivers, and programming pads for UART1, UART2, SPI, and CEN reset.
Flashing used OpenBK7231T binaries with BKwriter 1.60, a 3.3V USB-UART adapter, and a brief CEN-to-ground pulse to trigger bootloader mode.
Programming succeeded: the BK access point appeared, the device was configured through 192.168.4.1, and it can integrate with MQTT and Home Assistant.
The author notes there is no easy ESP conversion because the WiFi chip is not a separate module, and the enclosure should not be trusted for true outdoor exposure.
Very good job! Remember to submit flashes to tuya cloudcutter guys with device model and photos.
CRC failure for BK7231N is normal. It's because of the rolling hashes. You can easily ignore it. You can see that Python flash tool saves the flash correctly in spite of CRC error. That's ok.
If you're worried that there was a true error during read, just do the read twice... but still, CRC message will show every time.
PS: This will be a little offtopic, but my firmware now also supports W800 platform:
Forgive me for the stupid questions. Before I changed my mind about changing the WB2C modules to ESP8266, I used only Notepad++ and Arduino IDE. As far as I understand the binary file, for example OpenBK7231T_App_UA_1.0.0.bin, is not in the downloaded folders. I found the instructions https://github.com/openshwprojects/OpenBK7231T_App/blob/main/BUILDING.md but it's hard for me. I installed cygwin. And then the problem. Is there a way to help me? Instructions on how to use cygwin correctly and create a project-it will be just as wonderful as your project.
I haven't succeeded yet, but I give you a lot of respect for your great work!!!
Just get the .bin file . Sorry for the inattention and inexperience.
I will try it right now!!!
Everything worked out, although the control of the CEN output was somewhat different.
I'm starting to study the settings.
Before this project, I used ESPEasy.
I'm happy that worked out for you.
If you have some photos of the module, you can post a short teardown report here in this forum section. Thanks!
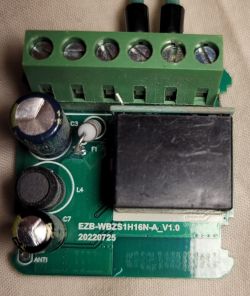
These switches were used in the experiments.
At the same time, one of the modules received, by mistake, voltage to the brain, and not to where it is needed and will be used further as a body. The WB2S module. I used the "programmer" for ESP-01.
The second test subject was assembled on the CB2S module on BK7231N. He has not yet participated in experiments.
Schematics from modules, pinout, are found here The third module, Sonoff, is built on 8285. The firmware will be loaded either homemade or ESPEasy.
Spoiler:
Foto
20220903_0..356.jpg (664.57 kB)You must be logged in to download this attachment.20220903_0..712.jpg (1.04 MB)You must be logged in to download this attachment.20220903_0..921.jpg (632.57 kB)You must be logged in to download this attachment.20220903_0..914.jpg (740.31 kB)You must be logged in to download this attachment.20220903_0..931.jpg (567.29 kB)You must be logged in to download this attachment.20220903_0..058.jpg (364.22 kB)You must be logged in to download this attachment.20220910_1..745.jpg (829.23 kB)You must be logged in to download this attachment.20220910_1..032.jpg (781.81 kB)You must be logged in to download this attachment.20220910_1..831.jpg (965.08 kB)You must be logged in to download this attachment.20220910_1..726.jpg (1.37 MB)You must be logged in to download this attachment.
p.s. The plans are to add an external triac relay, G3MB-202P, to the small module and output another control channel.
What is missing, the first sensations, is the possibility of writing small scripts, rules. If it's not difficult for you, look at how it's done in ESPEasy - Link.
For example, you have implemented one-button control of two channels, 1 and 2 by single or double pressing. But if you add a long press turns everything off?
If someone needs module diagrams, I can redraw them.
I myself am looking for a diagram of a module that works without a neutral. I really want to understand how it is implemented there. I haven't bought such a module yet.
Sorry for the spelling - I write through a translator.
I myself am looking for a diagram of a module that works without a neutral. I really want to understand how it is implemented there. I haven't bought such a module yet.
.
I've been testing such a switch once. I wrote a short article about this topic. I don't think we have an English translation for that yet, but schematic is there, so take a look here, maybe use Google Translate:
https://www.elektroda.pl/rtvforum/topic3793509.html
Yes, that's what I wanted to understand!!!Link That's how they came up with it!
D3, 4 and 5 are zener diodes. Probably about 3-5 volts.
The supply voltage minus the voltage required to trigger the optocoupler in the feedback circuit. R3 is not 195, it's 561.
Now any browser makes any page readable.
Thanks, I'm glad I helped.
It was very fun to reverse engineer that schematic, altough I would note that I saw some slightly different solutions used as well, but I didn't draw schematics for them yet.
Also, T2 is not BC547 on that schematic, I just used the first transistor I had at hand in Eagle. It is rather MJE13001.
Small tests on MQTT communication.
What I feel at first is that there is clearly not enough opportunity for me to assign the retain 1 property to channels - when the client restarts, he does not know what state the channel is in. Maybe it's there somewhere, but I didn't find it.
Perhaps it makes sense to create a separate topic that will be dedicated specifically to software?
How would you like the retain assigning to work?
On per-channel basis?
1. I can add that for you, but currently @iprak is working on MQTT and HA discovery so I'm not sure if I can do it RIGHT NOW, because it would conflict with his changes.
we already have a RETAIN flag in code:
2. maybe you can just use the "always retain" global device flag?
2. maybe you can just use the "always retain" global device flag?
Flag 7 ?
Yes!!!
Sorry, I found it.
Once again, I apologize for the importunity, but perhaps the marked topics should be attributed to a separate opportunity to send or not? Isn't this necessary only at the debugging stage?
Spoiler:
Screensho..84.jpg (163.65 kB)You must be logged in to download this attachment.
]
p.s. The plans are to add an external triac relay, G3MB-202P, to the small module and output another control channel.
What is missing, the first sensations, is the possibility of writing small scripts, rules. If it's not difficult for you, look at how it's done in ESPEasy - Link.
For example, you have implemented one-button control of two channels, 1 and 2 by single or double pressing. But if you add a long press turns everything off?
Please do not count the flood.
Another experiment.
Configured - button 1 turns on channel 1 by a single click, channel 2 by a double click. Button 2, located on the board, is configured for channel 3, the output for it is P8, it really exists, but is not used yet.
On Raspberry, channel statuses are accepted in Node-Red, the following happens:
With each change in the status of channels 1 and 2, their values are assigned to variables.
When the status of channel 3 changes to on, 1, we check the status of channel 1 and 2. If at least one has the status 1, we store the statuses of channels 1 and 2 in other variables, and send them to three channels off, 0 for management.
If there is currently 0 and in memory the current statuses are 0 - we just turn on channel 1.
Otherwise, we restore the last saved state.
There are no rules yet, or I have not found them due to lack of education, I am trying to implement them like this...
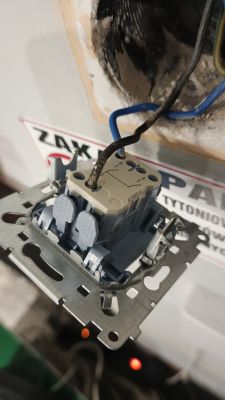
A switch will be used for implementation, the power internals will be dismantled, two buttons will be added, they will be connected directly inside, as well as an additional relay - the terminals on the module are not enough.
Button 1 will be activated by pressing the upper part of the key, 2 - by pressing the lower part. the photo is just a fitting.
Spoiler:
011.jpg (196.72 kB)You must be logged in to download this attachment.012.jpg (209.68 kB)You must be logged in to download this attachment.013.jpg (177.4 kB)You must be logged in to download this attachment.Screensho..86.jpg (49.16 kB)You must be logged in to download this attachment.Screensho..87.jpg (57.23 kB)You must be logged in to download this attachment.Screensho..88.jpg (49.96 kB)You must be logged in to download this attachment.Screensho..89.jpg (78.85 kB)You must be logged in to download this attachment.
Once again, I apologize for the importunity, but perhaps the marked topics should be attributed to a separate opportunity to send or not? Isn't this necessary only at the debugging stage?
Spoiler:
As far as I know, it was added by @iprak and in the current state of things it's always published. Do you think it should be only published when a certain flag is set?
Very nice setup! I like how advanced is your Node-Red usage.
We already have event handlers and timer, more advanced scripting is coming soon.
I was referred here to ask for help, so here goes:
I recently found they updated the circuit board inside the FEIT wifi dimmer switch to one that looks easier to get at and uses the BK7231TQN32 chip.
Unfortunately, I am running into issues getting it to flash. I have been able to connect to RX2/TX2 and see the logs, and I can reset by grounding CEN. However, Beken Writer fails every time I try to read/write to it.
I'm guessing I am overlooking something simple. Are there any steps beyond connecting the HW-597 and flashing? I'm starting to wonder if the pinouts on the board are not quite true to their labels.
Can you check with multimeter, is the RX/TX of BK7231 chip connect to any pins of the secondary MCU on the board?
I would guess that this board is using TuyaMCU to communicate the WiFi module with secondary MCU and its using RX/TX lines for this purpose, so MCU interferes with programming.
@p.kaczmarek2 Right you are!
It looks like the TX1 pin is connected to one of the pins on the larger chip. Not sure I can easily disable that with it so small/tight.. I'll have to bust out the bench magnifier to see what I can trace on the board. Unless there is another option?
Option 1: cut RX/TX traces to secondary MCU
Option 2: Find secondary MCU datasheet, determine if it has a RESET pin, and if so, put this MCU in RESET mode so it does not interfere with programming.
I will give grounding NRST and see if that works.
Wish me luck!
Added after 2 [hours] 1 [minutes]:
Well, on the plus side, there is a NRST contact on the back of the board connecting directly to the NRST pin on the secondary MCU:
On the downside, I cannot seem to get it to read the firmware no matter when I touch off the NRST and click "Read flash" in BKWriter.
I see output in the logs when I reset the secondary MCU:
[01-01 18:14:05 TUYA Notice][frame_handle.c:850] wifi ble mode not config data not to send fail:1
[01-01 18:14:05 TUYA Err][frame_handle.c:888] data_upload_async_proc error.
That repeats a few times and then it goes back to periodic:
[01-01 18:14:34 TUYA Notice][process_server.c:112] send jump_pack
[01-01 18:14:35 TUYA Notice][frame_handle.c:420] recv jump_pack ok.
Hoping there is a proper sequence that may work. Something like "within 3 seconds of grounding NRST, start reading flash" (which doesn't seem to work, but you get the idea).
Anyone have any experience on if/how using NRST could work? Otherwise, I will have to try the cutting method.
If that's a NRST of MCU, you just ground it forever, do a flash read, and then unground it only if you want MCU to run again.
Do a full 2MB flash read first, for tuya-cloudcutter.
Now the question is, do you know how to do a Beken flash read (or write) in generic device, without the MCU interference?
It's nothing like "within 3 seconds of grounding NRST, start reading flash" . I'd say its:
1. ground NRST permanently
2. start flash read in bkWriter 1.61, it will keep on trying go communicate with device
3 do a device reboot by
OPTION A: ground CEN for a short while (it's tricky)
OPTION B: power off/power on the device (but only device, not the USB to UART converter)
4. bkWRiter 1.60 will proceed with read/write
5. after all is done, you can unground NRST
So close and yet so far.
So I can actually start reading the flash (fortunately for me there is a direct pinout for the CEN so I can easily reset it).
However it starts trying to communicate with the secondary MCU and causes the read to fail once it hits that loop:
[01-01 18:13:34 TUYA Notice][tuya_uart_adapt.c:362] try:9600/3/1/0
[01-01 18:13:37 TUYA Notice][tuya_uart_adapt.c:362] try:115200/3/1/0
[01-01 18:13:40 TUYA Notice][tuya_uart_adapt.c:362] try:9600/3/1/0
[01-01 18:13:43 TUYA Notice][tuya_uart_adapt.c:362] try:115200/3/1/0
BKWriter reports:
Time:5.894s
Speed of Reading:115200bps
reading flash:0x00000000...FAILED
My best guess is that the 7231T is stepping on the flash read on TX1/RX1 as it tries to contact the secondary MCU. It seems that would imply that even cutting the TX1/RX1 traces to the seconday MCU would not help.
So an update:
I was actually able to get it to read/verify the firmware. I thought this was great, so I went ahead and tried to flash it.
It started to erase and then hung.
I think it is dead. Primarily because the log is spewing:
At least it is amusing. Oh well. Maybe I will try again with the other one in the pack.
Could be it started to erase from the wrong starting address or something.
Did you remember that in case of BK7231T you write/read to/from default offset and use UA binary, while for BK7231N you use 0x0 offset and use QIO binary?
I actually do. Before trying to flash, I was able to read the firmware from BKWriter, then I compared that firmware (bk7231s_dump-2022-10- 4-10-53-38.bin) and they matched.
Then I loaded the firmware I wanted to burn (OpenBK7231T_UA_1.12.60.bin) and hit Programm.
It came back with:
This is counterintuitive, but can you try higher baud rate? The next one to the one you have chosen, the second lowest possible?
Which USB to UART converter do you have?
Quote:
I had some reports from users saying that they are unable to flash BK7231T with CP2102 but CH340 works. So, maybe try different USB to UART dongle. Some of them might not be reliable enough for flashing.
Also, can you send us a flash dump so I can share it with tuya-cloudcutter, and also give more information about the device, where it was bought, how is it called, how the packaging looks like?
Flash dump sent to you in a message.
This is part of the 2-pack FEIT WiFi Dimmer switches from Costco. Seems to be a newer model from the teardowns I have seen.
I am using the CH340 to connect. I will give it some tries with the faster speed and let you know.
Added after 9 [minutes]:
Ok! That worked!
I see logs and can connect to the wifi from it:
Debug:MAIN:started timer
Info:MAIN:Time 1, free 108224, MQTT 0, bWifi 0, secondsWithNoPing 0, socks 2/38
Info:MAIN:Time 2, free 108224, MQTT 0, bWifi 0, secondsWithNoPing 0, socks 2/38
Info:MAIN:Time 3, free 108224, MQTT 0, bWifi 0, secondsWithNoPing 0, socks 2/38
Info:MAIN:Time 4, free 108224, MQTT 0, bWifi 0, secondsWithNoPing 0, socks 2/38
Info:MAIN:Time 5, free 108224, MQTT 0, bWifi 0, secondsWithNoPing 0, socks 2/38
Info:MAIN:no flash configuration, use default
Info:MAIN:set ip info: 192.168.4.1,255.255.255.0,192.168.4.1
Info:MAIN:ssid:OpenBK7231T_8DE62329 key: mode:0
Thanks! Now I will see what I can do. Sadly, it seems to require a neutral wire which none of my light switches seem to have. Still, I may find a purpose.
The new circuit board definitely makes it simple to connect up and flash. There are easily accessible contacts for all the necessary connections.
✨ The discussion revolves around the Tuya CCWFIO232PK double relay device, which has transitioned from using the ESP8266 module to the BK7231T microcontroller. Users express concerns about the lack of Tasmota support for the new BK7231T, as Tasmota is primarily designed for ESP-based devices. The author has developed an alternative firmware, OpenBK7231T, which aims to replicate Tasmota's functionality, including MQTT support. Participants share experiences with flashing firmware, troubleshooting communication issues with secondary MCUs, and enhancing the user interface of the firmware. There are also discussions about the growing trend of IoT devices using BK7231T and similar microcontrollers instead of ESP chips, which complicates firmware modifications for users. The conversation includes technical details on programming, pin configurations, and the importance of community contributions to improve firmware capabilities. Generated by the language model.
TL;DR: Flashing a BK7231T-based Tuya relay took 5.894 s at 115 kbps, and “Tasmota is only on ESP—You won't put Tasmota there anymore” [p.kaczmarek2, 19907139] using BKWriter 1.60 [20223386].
Why it matters: BK7231 chips now dominate new Tuya hardware, so ESP-only guides no longer work.
What microcontroller does the CCWFIO232PK now use?
Recent production runs replaced the ESP8266 with a BK7231TQN32 Wi-Fi SoC mounted directly on the main PCB [19906670].
Can I still install Tasmota on BK7231T hardware?
No. “Tasmota is only on ESP. You won't put Tasmota there anymore” [19907139]. Use OpenBK7231 firmware instead, which mirrors Tasmota features on Beken chips [19907139].
Which firmware file and offset should I choose when flashing?
For BK7231T pick the UA binary (e.g., OpenBK7231T_UA_xxx.bin) and keep the default 0x10000 offset in BKWriter [19906670]. BK7231N uses the QIO build at offset 0x0 [20221894].
How do I enter flashing mode on a BK7231T board?
Disconnect mains. 2. Power the board with 3.3 V, connect UART1 TX/RX and ground. 3. Start BKWriter, then momentarily pull CEN to GND; flashing begins [19906670].
I only get logs on UART2 and flashing fails—why?
UART2 carries debug; flashing must use UART1. If UART1 is shared with a secondary MCU (e.g., AT32F421), hold that MCU in reset or cut its RX/TX traces before starting BKWriter [20211555; 20214840].
BKWriter stops with a CRC error on BK7231N—normal?
Yes. Rolling hashes on BK7231N trigger a false CRC failure; the Python uartprogram still saves a valid 2 MB dump [20097650].
Which USB-UART dongle is reliable for Beken flashing?
Users reported consistent success with CH340; some CP2102 adapters miss bytes during high-speed transfers [20094280].
How can I toggle both relays with one button?
Assign the pin role “Button Toggle All” or use the new single-button logic: single-click toggles Relay 1, double-click toggles Relay 2 (added in firmware 1.0.1) [19911623].
What MQTT features are already available?
OpenBK publishes state, accepts commands, supports Home-Assistant discovery and a global RETAIN flag (Device Flag 7). Per-channel retain is planned [20184302].
How do I configure pins after flashing?
Open 192.168.4.1 → Configure Module → choose roles (e.g., Relay, LED, Button). Ready-made templates sit under Quick Config [19906670].
Edge case: The log shows “BEDEAD01” after erase—did I brick it?
The code at 0x10000 got wiped but new firmware failed to write. Re-enter bootloader and flash again; if backup exists, restore it [20221749].
Can I style the web UI?
Yes. A 1 474-byte CSS makeover was merged; place the CSS in a separate file for browser caching and ≤2 kB footprint [20090478; 20090501].
How do I share dumps with Tuya-Cloudcutter?
Before flashing, pair the device to dummy Wi-Fi, read the full 2 MB image, then submit the BIN plus photos and model info for OTA exploit creation [20095259].