Elektroda.com
Elektroda.com
X

TOPGREENER Smart Mini Wi-Fi Plug with Energy Monitoring, TGWF115PQM (C2BS BK7231N)

RealTimeKodi 1017 3
  • Hi! I came here to post my teardown of the Topgreener TGWF115PQM. They were on sale recently for $14.99 for a four pack but now they're back up to $29.99.
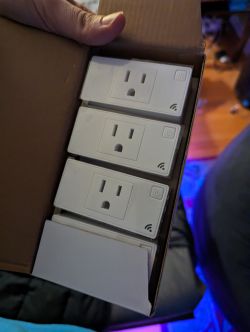
    TOPGREENER Smart Mini Wi-Fi Plug with Energy Monitoring, TGWF115PQM (C2BS BK7231N)
    The plug itself was pretty easy to get open, I just had to break the glue holding the tabs at these 4 spots and then pry it open from one end.
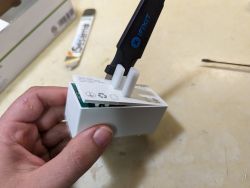
    TOPGREENER Smart Mini Wi-Fi Plug with Energy Monitoring, TGWF115PQM (C2BS BK7231N)
    The PCB itself just pulls out, you don't have to desolder the plug pins or anything:
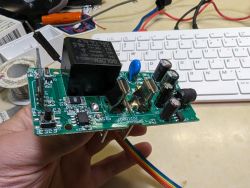
    TOPGREENER Smart Mini Wi-Fi Plug with Energy Monitoring, TGWF115PQM (C2BS BK7231N) TOPGREENER Smart Mini Wi-Fi Plug with Energy Monitoring, TGWF115PQM (C2BS BK7231N)
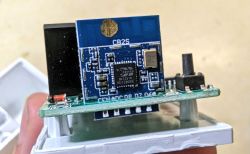
    Here is a closeup of the wifi module. Clearly a C2BS BK7231N
    TOPGREENER Smart Mini Wi-Fi Plug with Energy Monitoring, TGWF115PQM (C2BS BK7231N)
    I tried flashing it over serial, but the button is connected to the UART's RX pin and I kept getting "Cannot get bus."
    I was able to get tuya-cloudcutter to flash them all sucessfully so that's the method I went with.

    The pinout is as follows:
    P6 - BL0937CF1
    P7 - BL0937CF
    P8 - LED (inverted) (1)
    P10 - Button (1)
    P24 - BL0937SEL
    P26 - Relay (1)

    That is hopefully all of the information that's needed, but feel free to ask if you have any questions. I had no trouble setting up OpenBK7231T_app via tuya-cloudcutter. The firmware version was 1.1.8 and they were listed correctly in the database. The above configuration has been tested in OpenBK7231T_app and seems to be working correctly after being calibrated with a 100w light bulb and a kill-a-watt.

    Good work to everyone involved, this was much less painful than using tuya-convert!

    Cool? Ranking DIY
    About Author
    RealTimeKodi
    Level 2  
    Offline 
    RealTimeKodi wrote 2 posts with rating 3. Been with us since 2023 year.
  • #2
    muchtall
    Level 2  
    Thanks for this post! It was quite helpful in figuring out how to get this model working on the LibreTiny fork(-ish) of ESPHome.
    Quote:
    The above configuration has been tested in OpenBK7231T_app and seems to be working correctly after being calibrated with a 100w light bulb and a kill-a-watt


    Maybe I missed something, but I didn't see your calibration configuration values posted. I calibrated mine with a multimeter and a 100w incandescent bulb and came up with these values for ESPHome:
    substitutions:
      current_res: "0.00106"
      voltage_div: "762"


    I followed this template for the most part: https://github.com/cbpowell/ESPSense/blob/master/configs/espsense-TopGreener_TGWF115PQM.yml

    I used these modifications for the BK7231N version of this unit
    # Based roughly on:
    # - https://github.com/cbpowell/ESPSense/blob/master/configs/espsense-TopGreener_TGWF115PQM.yml
    # - https://github.com/tuya-cloudcutter/tuya-cloudcutter.github.io/blob/master/devices/topgreener-tgwf115pqm-energy-monitoring-plug.json
    # - https://www.elektroda.com/rtvforum/viewtopic.php?p=20401325#20401325
    
    substitutions:
      device_brand: topgreener
      device_model: tgwf115pqm
      device_mac_suffix: a1b2c3   # Replace this with the last 6 digits of the device's mac address
      # device_friendly_name: "${device_model}-${device_mac_suffix}"
      device_friendly_name: "Reading Lamp"
      entity_name_prefix: ""
      # Plug state to set upon powerup (or after power loss)
      # See options here: https://esphome.io/components/switch/index.html?highlight=restore_mode
      restore_mode: ALWAYS_ON
      
      # Base calibration to a 100W incandescent lightbulb and a multimeter
      # Detail calibration can be done with calibrate_linear sensor filters below
      current_res: "0.00106"
      voltage_div: "762"
    
    esphome:
      name: "${device_brand}-${device_model}-${device_mac_suffix}"
      friendly_name: "${device_friendly_name}"
    
    libretiny:
      board: cb2s
      framework:
        version: dev
    
    wifi:
      ssid: !secret wifi_ssid
      password: !secret wifi_password
      ap:
        ssid: "${device_brand}-${device_model}-${device_mac_suffix}"
        password: !secret wifi_fallback_password
    
    captive_portal:
    web_server:
    logger:
      baud_rate: 0
    api:
    ota:
    
    time:
      - platform: homeassistant
        id: homeassistant_time
    
    light:
      - platform: status_led
        internal: true
        id: "led"
        pin:
          number: PIN_P8
          inverted: True
        restore_mode: ${restore_mode}
    
    sensor:
      - platform: uptime
        name: ${entity_name_prefix}Uptime Sensor
      - platform: hlw8012
        model: BL0937
        sel_pin:
          number: PIN_P24
          inverted: true
        cf_pin:
          number: PIN_P7
          inverted: true
        cf1_pin:
          number: PIN_P6
          inverted: true
        current_resistor: ${current_res}
        voltage_divider: ${voltage_div}
        energy:
          name: "${entity_name_prefix}Energy"
          unit_of_measurement: Wh
        current:
          name: "${entity_name_prefix}Amperage"
          unit_of_measurement: A
          filters:
            # - calibrate_linear:
            #   # Map X (from sensor) to Y (true value)
            #   # At least 2 data points required
            #   - 0.0 -> 0.0
            #   - 1.0 -> 1.0 #load was on
        voltage:
          name: "${entity_name_prefix}Voltage"
          unit_of_measurement: V
          filters:
            # - calibrate_linear:
            #   # Map X (from sensor) to Y (true value)
            #   # At least 2 data points required
            #   - 0.0 -> 0.0
            #   - 1.0 -> 1.0 #load was on
        power:
          id: "wattage"
          name: "${entity_name_prefix}Wattage"
          unit_of_measurement: W
          filters:
            # Moving average filter to try and reduce a periodic drop of ~1-2W
            # Unsure of cause, may be a better solution!
            - sliding_window_moving_average:
                window_size: 2
                send_every: 1
            # - calibrate_linear:
            #   # Map X (from sensor) to Y (true value)
            #   # At least 2 data points required
            #   - 0.0 -> 0.0
            #   - 1.0 -> 1.0 #load was on
        change_mode_every: 8
        update_interval: 3s
      - platform: total_daily_energy
        name: "${entity_name_prefix}Total Daily Energy"
        power_id: "wattage"
        filters:
            - multiply: 0.001
        unit_of_measurement: kWh
    
    binary_sensor:
      - platform: gpio
        internal: true
        pin:
          number: PIN_P10
          inverted: True
        name: "${entity_name_prefix}Button"
        on_press:
          then:
            - switch.toggle: "relay"
    
    switch:
      - platform: gpio
        pin:
          number: PIN_P26
          inverted: False
        name: "${entity_name_prefix}Switch"
        id: relay
        restore_mode: ${restore_mode}
        on_turn_on:
          - light.turn_on: led
        on_turn_off:
          - light.turn_off: led


    I know this tends to be mostly an OpenBeken forum, but figured this would be helpful to someone else out there since this post seems to be the best search result for this model.

    Edit: Updated the example yaml from an excerpt to a full config since there was a bit more that I altered than I initially realized.
  • #3
    RealTimeKodi
    Level 2  
    I didn't post any calibration data because I assumed it would be different for each unit. I'll have to check what my units say when I get home.

    As for the esphome config, that's excellent. I don't usually use esphome on smart plugs but I had been meaning to bodge a sensor into one and esphome is probably the easiest way to get that working.
  • #4
    muchtall
    Level 2  
    Quote:
    I didn't post any calibration data because I assumed it would be different for each unit.


    Ahh yeah. You are correct. I had assumed that the resistor values would be more consistent than that, but I assumed wrong. Now that I have converted a pack of these, I'm seeing values between 762 and 805.