Basic Information:
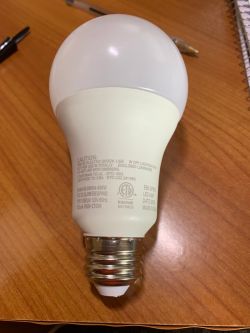
Brand: Merkury
Model: MI-BW904-999W
Chip: WB2L
Vendor: Walmart (bought in December 2020 for about $5)
Teardown Photos
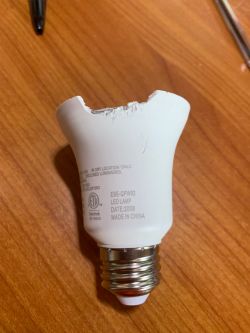
The plastic dome is glued with some compound to the aluminum base. I had to heat it up with a heat gun, and the dome came off pretty easily. Unfortunately the LED board is glued with another compound that was not so easy to remove. I used the Force and a screwdriver, but this is not necessary (see below).
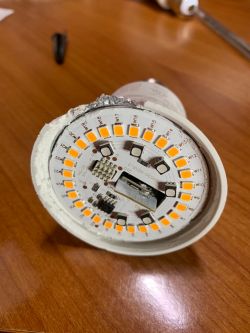
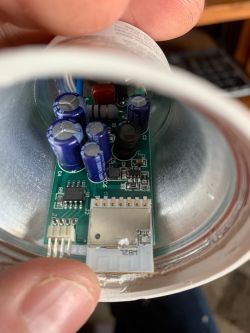
As you see (Fig.4), the lamp's brain is a WB2L module. The black IC next to it is a BP1638 driver (this will be important later). I decided to try out Tuya Cloud Cutter (CC henceforth). CC doesn't know this exact model but knows MI-BW932-999W. I downloaded OpenBK7231T_UG_1.15.566.bin firmware from the OpenBeken github. (Note the UG - since we will be programming it OTA, it is important to take the right firmware.) I then flashed the lamp following CC's instructions. After the CC is done, you should see a wifi network with SSID OpenBK7231T_XXXXX. Follow the setup instructions from OpenBeken: connect to the WiFi, open 192.168.4.1, enter your SSID and password, enter your MQTT server (if needed).
Pin definition
Now comes the fun part. WB2L has five pins that can drive the peripherals. It turns out the module is connected to the BP1638CJ driver located next to it on the main board. Looking at the application diagram:
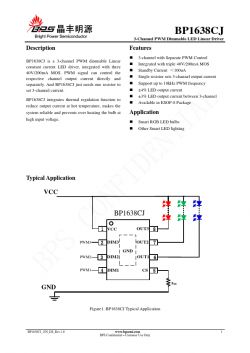
We see that the only inputs it takes are three PWM for red, green, and blue. The lamp, as you see in Fig. 3 above, has a circle of color LEDs and a circle of white LEDs. The IC on the LED boards has the label BP5711J. I couldn't find a datasheet for that but found one for CN5711
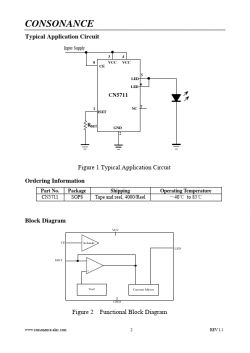 - so it looks like this is the driver for the high-power white LEDs.
So, all four RGBW LED strips are driven by PWM pins of WB2L. After some permutations, I found that
P6 -> PWM0
P8 -> PWM3
P24->PWM2
P26->PWM1
If you follow this arrangement, the color wheel in Home Assistant will give you the right colors. Make sure to select "Flag 3 - [LED][Debug] Show raw PWM controller on WWW index instead of new LED RGB/CW/etc picker;" otherwise, the interface will be messed up. Then, I paired the light bulb with Homeassitant using the native OpenBeken function, and voilà, I have a $5 no-cloud lamp.
Brand: Merkury
Model: MI-BW904-999W
Chip: WB2L
Vendor: Walmart (bought in December 2020 for about $5)
Regular disclaimer: electricity kills (some), always remove power, tear down at your own risk, etc.Teardown Photos
The plastic dome is glued with some compound to the aluminum base. I had to heat it up with a heat gun, and the dome came off pretty easily. Unfortunately the LED board is glued with another compound that was not so easy to remove. I used the Force and a screwdriver, but this is not necessary (see below).


As you see (Fig.4), the lamp's brain is a WB2L module. The black IC next to it is a BP1638 driver (this will be important later). I decided to try out Tuya Cloud Cutter (CC henceforth). CC doesn't know this exact model but knows MI-BW932-999W. I downloaded OpenBK7231T_UG_1.15.566.bin firmware from the OpenBeken github. (Note the UG - since we will be programming it OTA, it is important to take the right firmware.) I then flashed the lamp following CC's instructions. After the CC is done, you should see a wifi network with SSID OpenBK7231T_XXXXX. Follow the setup instructions from OpenBeken: connect to the WiFi, open 192.168.4.1, enter your SSID and password, enter your MQTT server (if needed).
Pin definition
Now comes the fun part. WB2L has five pins that can drive the peripherals. It turns out the module is connected to the BP1638CJ driver located next to it on the main board. Looking at the application diagram:

We see that the only inputs it takes are three PWM for red, green, and blue. The lamp, as you see in Fig. 3 above, has a circle of color LEDs and a circle of white LEDs. The IC on the LED boards has the label BP5711J. I couldn't find a datasheet for that but found one for CN5711
 - so it looks like this is the driver for the high-power white LEDs.
So, all four RGBW LED strips are driven by PWM pins of WB2L. After some permutations, I found that
P6 -> PWM0
P8 -> PWM3
P24->PWM2
P26->PWM1
If you follow this arrangement, the color wheel in Home Assistant will give you the right colors. Make sure to select "Flag 3 - [LED][Debug] Show raw PWM controller on WWW index instead of new LED RGB/CW/etc picker;" otherwise, the interface will be messed up. Then, I paired the light bulb with Homeassitant using the native OpenBeken function, and voilà, I have a $5 no-cloud lamp.
Cool? Ranking DIY


