First, thank you all for your help
This is the sequence:
sudo ./tuya-cloudcutter.sh
[sudo] password for minchutu:
Building cloudcutter docker image
Sending build context to Docker daemon 23.18MB
Step 1/10 : FROM python:3.9-slim-buster AS base
---> 954110adf96f
Step 2/10 : RUN apt-get -qq update && apt-get install -qy --no-install-recommends git hostapd rfkill dnsmasq build-essential libssl-dev iproute2 mosquitto
---> Using cache
---> b3dcd8221715
Step 3/10 : FROM base AS python-deps
---> b3dcd8221715
Step 4/10 : RUN pip install --upgrade pipenv
---> Using cache
---> bcdb7816cdf0
Step 5/10 : COPY src/Pipfile /src/
---> Using cache
---> e5b258010cfc
Step 6/10 : COPY src/Pipfile.lock /src/
---> Using cache
---> 52da6d1b41e2
Step 7/10 : RUN cd /src && PIPENV_VENV_IN_PROJECT=1 pipenv install --deploy
---> Using cache
---> e45e9a626ade
Step 8/10 : FROM python-deps AS cloudcutter
---> e45e9a626ade
Step 9/10 : COPY src /src
---> Using cache
---> 6a3be18d0fa6
Step 10/10 : WORKDIR /src
---> Using cache
---> 73a318802cb0
Successfully built 73a318802cb0
Successfully tagged cloudcutter:latest
Successfully built docker image
1) Detach from the cloud and run Tuya firmware locally
2) Flash 3rd Party Firmware
[?] Select your desired operation [1/2]: 2
Loading options, please wait...
[?] Select your custom firmware file: OpenBK7231N_UG_1.15.635.bin
> OpenBK7231N_UG_1.15.635.bin
[?] How do you want to choose the device?: By firmware version and name
By manufacturer/device name
> By firmware version and name
From device-profiles (i.e. custom profile)
[?] Select the firmware version and name: 1.1.17 - BK7231N / oem_bk7231n_temp_hum_sensor
1.1.0 - BK7231T / oem_bk7231s_curtain_switch_nuohua
1.1.0 - BK7231T / oem_bk7231s_light5_sleepwake_random_globe
1.1.0 - BK7231T / oem_bk7231s_rnd_switch
1.1.1 - BK7231T / HYS_03_018_bk7231t_a4y9plclmzpct6ol
1.1.1 - BK7231T / oem_bk7231s_light_ty_oldDp
1.1.11 - BK7231N / oem_bk7231n_temp_hum_sensor
> 1.1.17 - BK7231N / oem_bk7231n_temp_hum_sensor
1.1.2 - BK7231N / oem_bk7231n_control_switch
1.1.2 - BK7231T / oem_bk7231s_control_switch
1.1.2 - BK7231T / oem_bk7231s_hailai_1_plug
1.1.2 - BK7231T / oem_bk7231s_light_db
1.1.2 - BK7231T / oem_bk7231s_light_ty
1.1.2 - BK7231T / oem_bk7231s_rnd_switch
[?] Select the brand of your device: Tuya Generic
> Tuya Generic
[?] Select the article number of your device: Temperature and Humidity Sensor v1.1.17
> Temperature and Humidity Sensor v1.1.17
Selected Device Slug: tuya-generic-temperature-and-humidity-sensor-v1.1.17
Selected Profile: oem-bk7231n-temp-hum-sensor-1.1.17-sdk-2.3.1-40.00
Selected Firmware: /work/custom-firmware/OpenBK7231N_UG_1.15.635.bin
================================================================================
Place your device in AP (slow blink) mode. This can usually be accomplished by either:
Power cycling off/on - 3 times and wait for the device to fast-blink, then repeat 3 more times. Some devices need 4 or 5 times on each side of the pause
Long press the power/reset button on the device until it starts fast-blinking, then releasing, and then holding the power/reset button again until the device starts slow-blinking.
See
https://support.tuya.com/en/help/_detail/K9hut3w10nby8 for more information.
================================================================================
Scanning for open Tuya SmartLife AP
.............................
Found access point name: "A-A1BC", trying to connect...
Device 'wlp2s0' successfully activated with '14cb3162-ba10-402c-8a70-89ef237829df'.
Connected to access point.
Waiting 1 sec to allow device to set itself up...
Running initial exploit toolchain...
Exploit run, saved device config too!
output=/work/configured-devices/obzM4Umou2nr.deviceconfig
Saved device config in /work/configured-devices/obzM4Umou2nr.deviceconfig
================================================================================
Power cycle and place your device in AP (slow blink) mode again. This can usually be accomplished by either:
Power cycling off/on - 3 times and wait for the device to fast-blink, then repeat 3 more times. Some devices need 4 or 5 times on each side of the pause
Long press the power/reset button on the device until it starts fast-blinking, then releasing, and then holding the power/reset button again until the device starts slow-blinking.
See
https://support.tuya.com/en/help/_detail/K9hut3w10nby8 for more information.
================================================================================
Scanning for open Tuya SmartLife AP
...............................................
Found access point name: "A-A1BC", trying to connect...
Device 'wlp2s0' successfully activated with '14cb3162-ba10-402c-8a70-89ef237829df'.
Connected to access point.
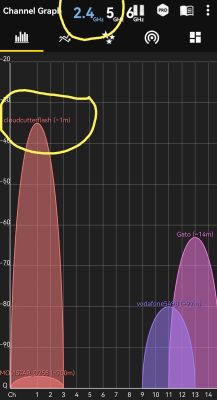
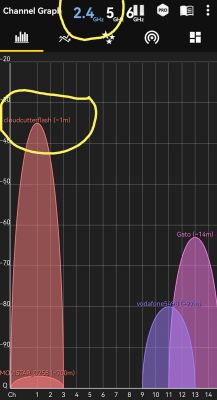
Configured device to connect to 'cloudcutterflash'
Device is connecting to 'cloudcutterflash' access point. Passphrase for the AP is 'abcdabcd' (without ')
Checking UDP port 53... Occupied by dnsmasq with PID 2362.
Port 53 is needed to resolve DNS queries
Do you wish to terminate dnsmasq? [y/N] y
Attempting to stop dnsmasq.service
Checking UDP port 67... Available.
Checking TCP port 80... Available.
Checking TCP port 443... Available.
Checking TCP port 1883... Occupied by mosquitto with PID 2293.
Port 1883 is needed to run MQTT
Do you wish to terminate mosquitto? [y/N] y
Attempting to stop mosquitto.service
Checking TCP port 8886... Available.
Flashing custom firmware...
================================================================================
Wait for up to 10-120 seconds for the device to connect to 'cloudcutterflash'. This script will then show the firmware upgrade requests sent by the device.
================================================================================
Using WLAN adapter: wlp2s0
Configuration file: /dev/stdin
Using interface wlp2s0 with hwaddr ec:55:f9:53:d1:aa and ssid "cloudcutterflash"
wlp2s0: interface state UNINITIALIZED->ENABLED
wlp2s0: AP-ENABLED
After that I got nothing else. I've tried:
- wait for half an hour
- EZ mode (quick blick)
- AP mode (slow blink)
- Use Tuya App trying to connect with the sensor
I do not know what else to do.
 it. It doesn't show up in the DHCP list anywhere.
 it. It doesn't show up in the DHCP list anywhere.


