Colleagues,
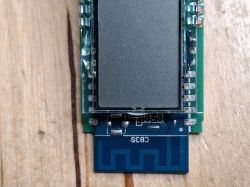
I am trying to sflash the module as in the title by Tuya Cloudcutter. The method is nicely described here: https://digiblur.com/2023/08/19/updated-tuya-cloudcutter-with-esphome-bk7231-how-to-guide/ , except that in the link there is a tutorial on how to do it with the help of Rasp Pi, however I am using the Live CD with Debian. I have a device exactly like the one in https://www.elektroda.com/rtvforum/topic3912748.html , only that I strongly doubt I'll be able to solder anything to such micropads. Consequently, I've been pinning high hopes with the 'non-soldering' method, which I'm 'failing'. And here is the question - am I doing something wrong, or is my device not susceptible to the 'exploit' method?
I am pasting the 'dialogue' from the console below. Is there any chance of success with the solderless method or should I buy a more powerful magnifying glass?
P.S. The computer is connected via both cable and WiFi.
.
I am trying to sflash the module as in the title by Tuya Cloudcutter. The method is nicely described here: https://digiblur.com/2023/08/19/updated-tuya-cloudcutter-with-esphome-bk7231-how-to-guide/ , except that in the link there is a tutorial on how to do it with the help of Rasp Pi, however I am using the Live CD with Debian. I have a device exactly like the one in https://www.elektroda.com/rtvforum/topic3912748.html , only that I strongly doubt I'll be able to solder anything to such micropads. Consequently, I've been pinning high hopes with the 'non-soldering' method, which I'm 'failing'. And here is the question - am I doing something wrong, or is my device not susceptible to the 'exploit' method?
I am pasting the 'dialogue' from the console below. Is there any chance of success with the solderless method or should I buy a more powerful magnifying glass?
P.S. The computer is connected via both cable and WiFi.
user@debian:~/tuya-cloudcutter$ sudo ./tuya-cloudcutter.sh -r
Building cloudcutter docker image
[+] Building 1.7s (13/13) FINISHED                               docker:default
 => [internal] load build definition from Dockerfile                       0.0s
 => => transferring dockerfile: 462B                                       0.0s
 => [internal] load metadata for docker.io/library/python:3.9.18-slim-bul  1.7s
 => [internal] load .dockerignore                                          0.0s
 => => transferring context: 2B                                            0.0s
 => [base 1/2] FROM docker.io/library/python:3.9.18-slim-bullseye@sha256:  0.0s
 => [internal] load build context                                          0.0s
 => => transferring context: 3.02kB                                        0.0s
 => CACHED [base 2/2] RUN apt-get -qq update && apt-get install -qy --no-  0.0s
 => CACHED [python-deps 1/4] RUN pip install --upgrade pipenv              0.0s
 => CACHED [python-deps 2/4] COPY src/Pipfile /src/                        0.0s
 => CACHED [python-deps 3/4] COPY src/Pipfile.lock /src/                   0.0s
 => CACHED [python-deps 4/4] RUN cd /src && PIPENV_VENV_IN_PROJECT=1 pipe  0.0s
 => CACHED [cloudcutter 1/2] COPY src /src                                 0.0s
 => CACHED [cloudcutter 2/2] WORKDIR /src                                  0.0s
 => exporting to image                                                     0.0s
 => => exporting layers                                                    0.0s
 => => writing image sha256:a93d49921baac0d1ce1aa3ba53e496a59900e84c6374a  0.0s
 => => naming to docker.io/library/cloudcutter                             0.0s
Successfully built docker image
1) Detach from the cloud and run Tuya firmware locally
2) Flash 3rd Party Firmware
[?] Select your desired operation [1/2]: 1
Detaching requires an SSID and Password, please enter each at the following prompt
In order to provide secure logging, the values you type for your password will not show on screen
If you make a mistake, you can run the detach process again
You can also pass credentials via the -s command line option, see './tuya-cloudcutter.sh -h' for more information'
Please enter your SSID: happinessoneseven
Please enter your Password:
Loading options, please wait...
[?] How do you want to choose the device?: By manufacturer/device name
 > By manufacturer/device name
   By firmware version and name
   From device-profiles (i.e. custom profile)

[?] Select the brand of your device: Aubess
   Antela
   Aoycocr
   Arlec
   Atarm
   Athom
   Atomi
 > Aubess
   Avatar
   Avatto
   BN-LINK
   BNETA IoT
   Baytion
   Beca

[?] Select the article number of your device: 16A Mini Smart Switch
 > 16A Mini Smart Switch
   20A Plug
   IR Remote Controller

[?] Select the firmware version and name: 1.2.1 - BK7231N / oem_bk7231n_control_[?] Select the firmware version and name: 1.2.1 - BK7231N / oem_bk7231n_control_[?] Select the firmware version and name: 1.2.1 - BK7231N / oem_bk7231n_control_[?] Select the firmware version and name: 1.2.1 - BK7231N / oem_bk7231n_control_[?] Select the firmware version and name: 1.2.1 - BK7231N / oem_bk7231n_control_[?] Select the firmware version and name: 1.2.1 - BK7231N / oem_bk7231n_control_[?] Select the firmware version and name: 1.2.1 - BK7231N / oem_bk7231n_control_[?] Select the firmware version and name: 1.2.1 - BK7231N / oem_bk7231n_control_[?] Select the firmware version and name: 1.2.1 - BK7231N / oem_bk7231n_control_[?] Select the firmware version and name: 1.2.1 - BK7231N / oem_bk7231n_control_[?] Select the firmware version and name: 1.2.1 - BK7231N / oem_bk7231n_control_switch.1 - BK7231N / oem_bk7231n_control_switch
 > 1.2.1 - BK7231N / oem_bk7231n_control_switch


Performing safety checks to make sure all required ports are available
Checking UDP port 53... Available.
Checking UDP port 67... Available.
Checking TCP port 80... Available.
Checking TCP port 443... Available.
Checking TCP port 1883... Available.
Checking TCP port 8886... Available.
Safety checks complete.

Selected Device Slug: aubess-16a-mini-smart-switch
Selected Profile: oem-bk7231n-control-switch-1.2.1-sdk-2.3.3-40.00

================================================================================
Place your device in AP (slow blink) mode.  This can usually be accomplished by either:
Power cycling off/on - 3 times and wait for the device to fast-blink, then repeat 3 more times.  Some devices need 4 or 5 times on each side of the pause
Long press the power/reset button on the device until it starts fast-blinking, then releasing, and then holding the power/reset button again until the device starts slow-blinking.
See https://support.tuya.com/en/help/_detail/K9hut3w10nby8 for more information.
================================================================================

Wiping NetworkManager configs
Scanning for open Tuya SmartLife AP
.........
Found access point name: "SmartLife-1EB9", trying to connect...
Device 'wlp3s0' successfully activated with 'c5bd9f60-dee2-4ba5-a1d0-5a0cbd472575'.
Connected to access point.
Waiting 1 sec to allow device to set itself up...
Running initial exploit toolchain...
Exploit run, saved device config too!
output=/work/configured-devices/XtztoThpHBUb.deviceconfig
Saved device config in /work/configured-devices/XtztoThpHBUb.deviceconfig

================================================================================
Power cycle and place your device in AP (slow blink) mode again.  This can usually be accomplished by either:
Power cycling off/on - 3 times and wait for the device to fast-blink, then repeat 3 more times.  Some devices need 4 or 5 times on each side of the pause
Long press the power/reset button on the device until it starts fast-blinking, then releasing, and then holding the power/reset button again until the device starts slow-blinking.
See https://support.tuya.com/en/help/_detail/K9hut3w10nby8 for more information.
================================================================================

Wiping NetworkManager configs
Scanning for open Tuya SmartLife AP
..
Found access point name: "SmartLife-1EB9", trying to connect...
Device 'wlp3s0' successfully activated with 'fd82cc79-6b70-4427-a01e-603800293cb1'.
Connected to access point.
================================================================================
[!] The profile you selected did not result in a successful exploit.
================================================================================
user@debian:~/tuya-cloudcutter$


