2CH Mini Smart Switch Spectrum WOJ+14632
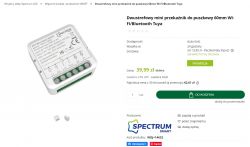
https://sklep.spectrumled.pl/pl/p/Dwustrefowy...znik-do-puszkowy-60mm-Wi-FiBluetooth-Tuya/320
It is also available on allegro.com.
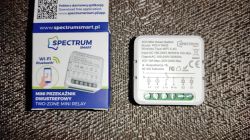
Disassembly is very easy. You don't need any tools. Just use your nails.
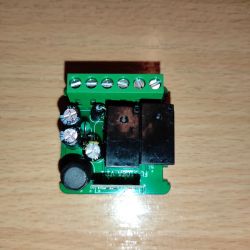
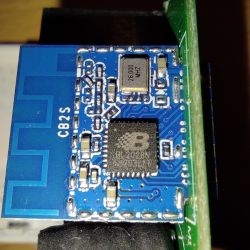
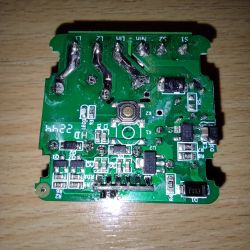
As you can see the board and elements are identical as described in the another topic. However, I managed to flash it without disassembling and soldering so I decided to describe this process here.
Most of the sellers/distributors rate this device as 16 A. And it even agrees with what is printed on the relays:
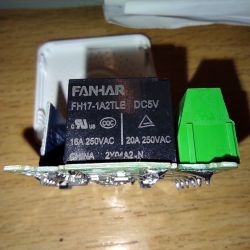
But this device is rated 2 x 5 A which is probably closer to reality.
Dodano po 36 [minuty]:
Flashing OpenBeken using tuya-claudcutter
All things described here were done on the laptop with Ubuntu Linux. I don't known is it possible on Windows.
Your WiFi interface must support AP mode. I tried two USB WiFi dongles on desktop and they don't work because of lack of AP support.
tuya-cloudcutter requires Docker to be installed. If you don't have it, install it: apt install docker.io.
1. Install tuya-claudcutter.
2. Run it:
While running tuya-cloudcutter asks you a few questions. Choose the answers as below:
The following step requires to check the firmware version installed on the device. The process requires connecting the device to the Tuya cloud and is described here. In my case the firmware version is 1.2.1.
Sometimes Tuya / Smart Life app doesn't display the firmware version and asks you to upgrade your device. In such case do not upgrade it! It's better to try different versions without knowing the right one.
You will then be asked to put your device into slow blink mode.
Long press the builtin button to enter the fast blink mode and next long press it again to enter the slow blik mode.
Bellow is the log of the rest of the flashing process. You will be asked one more time to restart the device and enter the slow blink mode.
Dodano po 2 [godziny] 16 [minuty]:
Configuration:
P6: Rel 1
P7: Rel 2
P10: TglChanOnTgl 1
P11: TglChanOnTgl 2
P24: WifiLED
P26: Btn_Tgl_All
Device template:
Information extracted from Tuya binary:

https://sklep.spectrumled.pl/pl/p/Dwustrefowy...znik-do-puszkowy-60mm-Wi-FiBluetooth-Tuya/320
It is also available on allegro.com.

Disassembly is very easy. You don't need any tools. Just use your nails.


As you can see the board and elements are identical as described in the another topic. However, I managed to flash it without disassembling and soldering so I decided to describe this process here.
Most of the sellers/distributors rate this device as 16 A. And it even agrees with what is printed on the relays:

But this device is rated 2 x 5 A which is probably closer to reality.
Dodano po 36 [minuty]:
Flashing OpenBeken using tuya-claudcutter
All things described here were done on the laptop with Ubuntu Linux. I don't known is it possible on Windows.
Your WiFi interface must support AP mode. I tried two USB WiFi dongles on desktop and they don't work because of lack of AP support.
tuya-cloudcutter requires Docker to be installed. If you don't have it, install it: apt install docker.io.
1. Install tuya-claudcutter.
2. Run it:
$ cd tuya-cloudcutter
$ sudo ./tuya-cloudcutter.sh
While running tuya-cloudcutter asks you a few questions. Choose the answers as below:
1) Detach from the cloud and run Tuya firmware locally
2) Flash 3rd Party Firmware
[?] Select your desired operation [1/2]: 2
ADVERTISEMENT
[?] How do you want to choose the device?:
  By manufacturer/device name
> By firmware version and name
  From device-profiles (i.e. custom profile)
The following step requires to check the firmware version installed on the device. The process requires connecting the device to the Tuya cloud and is described here. In my case the firmware version is 1.2.1.
Sometimes Tuya / Smart Life app doesn't display the firmware version and asks you to upgrade your device. In such case do not upgrade it! It's better to try different versions without knowing the right one.
[?] Select the firmware version and name:
  1.1.9 - BK7231T / oem_bk7231s_ceiling_light_ty
  1.1.9 - BK7231T / oem_bk7231s_strip_ir_daybetter
> 1.2.1 - BK7231N / oem_bk7231n_control_switch
  1.2.1 - BK7231N / oem_bk7231n_dctrl_switch
  1.2.16 - BK7231N / oem_bk7231n_light_ty
[?] Select your custom firmware file for BK7231N chip:
   ESPHome-Kickstart-v23.08.29_bk7231n_app.ota.ug.bin
 > OpenBeken-v1.17.262_bk7231n.ug.bin
You will then be asked to put your device into slow blink mode.
================================================================================
Place your device in AP (slow blink) mode.  This can usually be accomplished by either:
Power cycling off/on - 3 times and wait for the device to fast-blink, then repeat 3 more times.  Some devices need 4 or 5 times on each side of the pause
Long press the power/reset button on the device until it starts fast-blinking, then releasing, and then holding the power/reset button again until the device starts slow-blinking.
See https://support.tuya.com/en/help/_detail/K9hut3w10nby8 for more information.
================================================================================
Long press the builtin button to enter the fast blink mode and next long press it again to enter the slow blik mode.
Bellow is the log of the rest of the flashing process. You will be asked one more time to restart the device and enter the slow blink mode.
Scanning for open Tuya SmartLife AP
......
Found access point name: "A-5359", trying to connect...
Device 'wlo1' successfully activated with 'da2b8a4f-6cc4-4d48-800e-5bda3b16fa3c'.
Connected to access point.
Waiting 1 sec to allow device to set itself up...
Running initial exploit toolchain...
Exploit run, saved device config too!
output=/work/configured-devices/ybQPpedKP84X.deviceconfig
Saved device config in /work/configured-devices/ybQPpedKP84X.deviceconfig

================================================================================
Power cycle and place your device in AP (slow blink) mode again.  This can usually be accomplished by either:
Power cycling off/on - 3 times and wait for the device to fast-blink, then repeat 3 more times.  Some devices need 4 or 5 times on each side of the pause
Long press the power/reset button on the device until it starts fast-blinking, then releasing, and then holding the power/reset button again until the device starts slow-blinking.
See https://support.tuya.com/en/help/_detail/K9hut3w10nby8 for more information.
================================================================================

Scanning for open Tuya SmartLife AP
........
Found access point name: "A-5359", trying to connect...
Device 'wlo1' successfully activated with 'da2b8a4f-6cc4-4d48-800e-5bda3b16fa3c'.
Connected to access point.
Configured device to connect to 'cloudcutterflash'
Device is connecting to 'cloudcutterflash' access point. Passphrase for the AP is 'abcdabcd' (without ')
Flashing custom firmware...

================================================================================
Wait for up to 10-120 seconds for the device to connect to 'cloudcutterflash'. This script will then show the firmware upgrade requests sent by the device.
================================================================================
Using WLAN adapter: wlo1
Configuration file: /dev/stdin
Using interface wlo1 with hwaddr 60:67:xx:xx:xx:xx and ssid "cloudcutterflash"
wlo1: interface state UNINITIALIZED->ENABLED
wlo1: AP-ENABLED
Using PSK v1 - Received PSK ID version 01
Processing endpoint /v2/url_config
Processing endpoint tuya.device.active
Processing endpoint tuya.device.beacon.key.fetch
!!! Endpoint response not found, using default response - tuya.device.beacon.key.fetch (This is usually okay and safe to ignore unless something isn't working)
Processing endpoint tuya.device.dynamic.config.get
Processing endpoint tuya.device.upgrade.get
Processing endpoint tuya.device.upgrade.status.update
Processing endpoint /files/OpenBeken-v1.17.262_bk7231n.ug.bin
Firmware update progress: 10%
Firmware update progress: 10%
Firmware update progress: 10%
Firmware update progress: 10%
Processing endpoint tuya.device.uuid.pskkey.get
Firmware update progress: 25%
Processing endpoint atop.online.debug.log
Processing endpoint tuya.device.dynamic.config.get
Firmware update progress: 30%
Processing endpoint tuya.device.dynamic.config.ack
Firmware update progress: 45%
Firmware update progress: 60%
Firmware update progress: 90%
[Firmware Upload] /files/OpenBeken-v1.17.262_bk7231n.ug.bin send complete, request range: bytes=0-636847/636848
Firmware update progress: 98%
Firmware file has been sent and MQTT reported a progress of nearly complete.  Waiting 15 seconds to ensure flashing completes.
Flashing should be complete.  It takes about 15 seconds for the device to reboot and verify the flash was valid.
Please wait about 30 seconds then look for signs of activity from the firmware you supplied (either watch for AP mode or check if it joined your network).
Device MAC address: c8:47:xx:xx:xx:xx
Dodano po 2 [godziny] 16 [minuty]:
Configuration:
P6: Rel 1
P7: Rel 2
P10: TglChanOnTgl 1
P11: TglChanOnTgl 2
P24: WifiLED
P26: Btn_Tgl_All
Device template:
Code: JSON
Information extracted from Tuya binary:
Device configuration, as extracted from Tuya:
- Pair/Toggle All Button on P26
- WiFi LED on P24
- TglChannelToggle (channel 1) on P10
- TglChannelToggle (channel 2) on P11
- Relay (channel 2) on P7
- Relay (channel 1) on P6
Device seems to be using CB2S module, which is using BK7231N.
And the Tuya section starts at UNCOMMON POSITION 0
{
	"rl1_lv":"1",
	"onoff_rst_m":"1",
	"rand_dpid":"42",
	"net_trig":"2",
	"onoff_n":"10",
	"netled1_lv":"0",
	"jv":"101",
	"onoff_rst_type":"0",
	"total_bt_pin":"26",
	"nety_led":"2",
	"total_stat":"2",
	"reset_t":"5",
	"netled1_pin":"24",
	"rl2_lv":"1",
	"remote_add_dp":"49",
	"remote_list_dp":"50",
	"net_type":"0",
	"inch_dp":"44",
	"module":"CB2S",
	"ch_cddpid1":"9",
	"onoff1":"10",
	"onoff2":"11",
	"clean_t":"3",
	"init_conf":"38",
	"rl2_pin":"7",
	"zero_select":"0",
	"onoff_type":"0",
	"series_ctrl":"0",
	"ch_cddpid2":"10",
	"total_bt_lv":"0",
	"cyc_dpid":"43",
	"remote_select":"0",
	"ch_num":"2",
	"rl1_pin":"6",
	"netn_led":"2",
	"ch_dpid1":"1",
	"ch_dpid2":"2",
	"crc":"121",
	"}QhgHJAgw_diwYAwd_channel_mem":"40.00",
	"pv":"2.2",
	"lpv":"3.4",
	"pk":"keyjnuy4s3kre7m7",
	"firmk":"keyjnuy4s3kre7m7",
	"cadv":"{abi",
	"id":"null",
	"swv":"1.2.1",
	"bv":"40.00",
	"cdv":"1.0.0",
	"dev_swv":"1.2.1",
	"s_id":"null",
	"dtp":"0",
	"sync":"0",
	"attr_num":"1",
	"mst_tp_0":"9",
	"mst_ver_0":"1.2.1",
	"mst_tp_1":"0",
	"mst_ver_1":"null",
	"mst_tp_2":"0",
	"mst_ver_2":"null",
	"mst_tp_3":"0",
	"mst_ver_3":"null }",
	"0EAtls_ca_cnt_ver_2":"null"
}


