Kia ora/Hi all,
I picked up several of these : PROGLO Obi Smart Light Bars, 2 Pack H: 285mm Incl Base
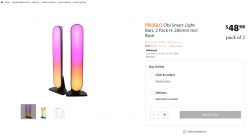
Link
on special about a year ago and finally got around to getting them flashed with something useful.
They are a CBU BK7231N based PCB, with 12V input and step-up/down ladder along with a Microphone input (unused/untested as I never paired them to tuyacloud) and oddly a USB-C connector for 12V VCC and Data to the strips which use the SM16703P driver in openbk with GRB colour order.
Everything seems to be working fine, except that I get continuous press SPAM from Pin14 which is SW1 in the console- I am wondering if this is possibly something to do with how the Microphone on the board is wired in? Inverting the pin doesn't resolve. It doesn't seem to affect functionality and you could just leave pin14 undefined If you want to silence it.
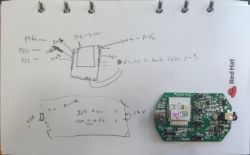
The controller board is very nice to open, just pop from an easily priable gap along the USB-C connector, no hot-glue etc . There are convenient solder pads on the reverse of the board for initial flashing.
Pin-map sketch with PCB
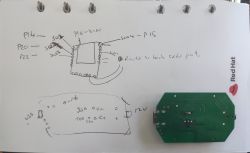
Reverse
LED Strip inside case/diffuser:
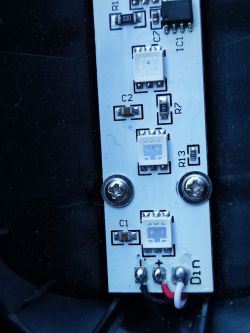
For some brain-dead reason the output is a USB-C connector and the input a mini-12V DC barrel, this is actually relatively dangerous as the USB-C output port doesn't have any sort of PD trigger so just spits out 12V all the time when plugged; don't go using the USB-C port for anything other than the supplied lights. This should have been the Feeder in the original design , but am guessing they dropped the PD controller to save some money and used the connector on the output side instead.
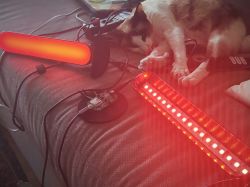
Cat approved result:

They are using WS2811C 12V Controllers in Groups of 3 LED (for a total of 6 addressable segments per Light). For whatever reason (probably voltage drop) Each of the pairs are wired in parallel so the second light in a chain just mimics the first. You could probably, cut the 2nd light cord , drill a hole and solder the second light to the top of the first and get a single strip of 12 addressable, but I didn't try as the form factor and diffusion of these units is quite nice as is.
I have these attached as DDP segments to existing WLED controlled lights. In the example I provide basic stand-alone dimmer and colour control (taken directly from https://www.elektroda.com/rtvforum/topic4036716.html ) as commented section in the attached autoexec.bat script. I would like to use the 4 switches and have local colour/brightness control along-side the DDP receiver. Currently however it appears that any local dimmer controls etc override the DDP. So I leave them configured as basic DDP targets OOTB. WLED handles this by poping up an overide when a DDP packet is received asking the user if they want to ignore DDP in tthe WebUI once or until reboot. Something like this could probably be scripted so that a button press for power down overrides the DDP until another press. But I haven't investigated how openbk handles button actions.
Since there are 4 available momentary switches on the control unit, I would ideally like to map each one to a rolling over 0-255 per color channel control and the 4th as a On - Off + Long Press Dimmer. If anyone has an example for doing any of the above - would be keen to see how.
There are some more photos and videos and commentary on my fediverse thread here:
https://cloudisland.nz/@jwp/112317522315834359
The only flag I have set is the MQTT one, if you want to use with local only you'll need to set flag4.
Attached original firmware dump (no useful config for cloudcutter). Also I couldn't use the gui tool and used hid_downloader to flash along with openbk tools to dump the full original bin from Fedora40.
Cheers
-Joel
example autoexec.bat
///By default we just run the driver for the LED and setup NTP and DDP(poorman's e1.31) which can be added to an existing WLED controller triple commented blocks can only be run individually

startDriver SM16703P
startDriver NTP
startDriver DDP

SM16703P_Init 6 GRB

/// This will allow for basic WebUI control - currently will overide DDP so we disable it by default
///Also need to set flag Flag 4 - [LED] Force show RGBCW controller (for example, for SM2135 LEDs, or for DGR sender)
//Dimmer
//again:
//SM16703P_SetPixel all $led_enableAll*$led_red*$led_dimmer/255 $led_enableAll*$led_green*$led_dimmer/255
//$led_enableAll*$led_blue*$led_dimmer/255
//SM16703P_Start

//delay_s 1
//goto again

/// Dimmer only follows choose this or the above - can't use both
// number of LEDs
//setChannel 5 18

// init
//SM16703P_Init $CH5

// on channel 1 dimmer change, refresh
//addEventHandler OnChannelChange 1 startScript autoexec.bat refresh

// refresh function
//refresh:

// iteration variable
//setChannel 6 0

// loop for each LEd
//again:
template.json
{
  "vendor": "Proglo/OBI",
  "bDetailed": "0",
  "name": "PROGLO Obi Smart Light Bars, 2 Pack H: 285mm Incl Base",
  "model": "PGLSB100-2PK",
  "chip": "BK7231N",
  "board": "CBU",
  "flags": "1024",
  "keywords": [
    "WS2811C",
    "4 Buttons",
    "Microphone"
  ],
  "pins": {
    "14": "Btn_Tgl_All;0",
    "15": "Btn;0",
    "20": "Btn;0",
    "22": "Btn;0"
  },
  "command": "",
  "image": "https://obrazki.elektroda.pl/6705621000_1714016724_thumb.jpg",
  "wiki": "https://www.elektroda.com/rtvforum/topic4050771.html"
}
Cool? Ranking DIY


