With this S01 Pro I liked how it has usb-c, temp & humidity and a programmable button when using ESPHome or OpenBeken.
This was very easy to open and flash. There are no screws so I simply pried it open with my two thumbs fingernails starting from near the button and moving them left and right.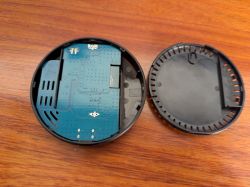
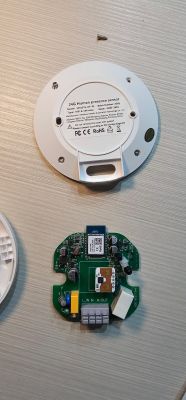
Once inside simply remove the PCB.
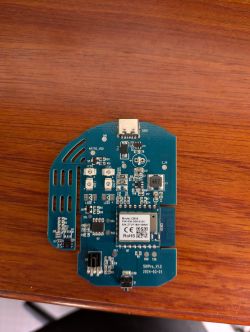
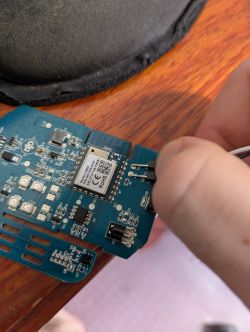
It has a CB3S chip with firmware V2.1.17 which is patched. Fortunately serial flashing was incredibly easy. On the board there are RX and TX pads that can be used for flashing. So I plugged the S01 Pro into power via its USB port, then put RX to TX on serial flasher and TX to RX. Then in BK7231Flasher or ltchiptool select to start flashing. Then remove and plug in again the USB port to the S01 Pro and it'll start flashing! Super easy with no soldering required. Just hold the RX and TX steady.
Here is the Tuya bin file
Tuya Datapoints
temperature: 101
humidity: 102
IR transmitter: GPIO 26
IR receiver:GPIO 7
Status LED: GPIO 8
Button: GPIO 6
Tuya icon: https://images.tuyaeu.com/smart/icon/ay152574...414yotNt/2cd0db38a7acee7f1b07bac9c90d0486.png
ESPHome config. You can set up Home Assistant to do automation based on button press, or modify to make ESPHome do actions based on button press. I also tested with OpenBeken and it worked quite well.
This was very easy to open and flash. There are no screws so I simply pried it open with my two thumbs fingernails starting from near the button and moving them left and right.

Once inside simply remove the PCB.

It has a CB3S chip with firmware V2.1.17 which is patched. Fortunately serial flashing was incredibly easy. On the board there are RX and TX pads that can be used for flashing. So I plugged the S01 Pro into power via its USB port, then put RX to TX on serial flasher and TX to RX. Then in BK7231Flasher or ltchiptool select to start flashing. Then remove and plug in again the USB port to the S01 Pro and it'll start flashing! Super easy with no soldering required. Just hold the RX and TX steady.

Here is the Tuya bin file
Tuya Datapoints
temperature: 101
humidity: 102
IR transmitter: GPIO 26
IR receiver:GPIO 7
Status LED: GPIO 8
Button: GPIO 6
Tuya icon: https://images.tuyaeu.com/smart/icon/ay152574...414yotNt/2cd0db38a7acee7f1b07bac9c90d0486.png
ESPHome config. You can set up Home Assistant to do automation based on button press, or modify to make ESPHome do actions based on button press. I also tested with OpenBeken and it worked quite well.
esphome:
  name: s01-pro-ir-blaster
  friendly_name: S01 Pro IR Blaster

bk72xx:
  board: cb3s

# Enable logging
logger:
#  level: VERBOSE

# Enable Home Assistant API
api:
  services:
    - service: send_raw_command
      variables:
        command: int[]
      then:
        - remote_transmitter.transmit_raw:
            code: !lambda "return command;"

ota:
  - platform: esphome

wifi:
  ssid: !secret wifi_ssid
  password: !secret wifi_password
  ap:
web_server:

captive_portal:

tuya:

sensor:
  - platform: uptime
    name: Uptime

  - platform: tuya
    sensor_datapoint: 101
    name: Temperature
    unit_of_measurement: "°C"
    accuracy_decimals: 1
    filters:
      - multiply: 0.1
      #- lambda: return (x * 0.1);

  - platform: tuya
    sensor_datapoint: 102
    name: Humidity
    unit_of_measurement: "%"

remote_transmitter:
  id: transmitter_ir
  pin: 26 # from IRSend line
  carrier_duty_percent: 50%

remote_receiver:
  id: receiver_ir
  dump: all
  pin:
    number: 7
    inverted: True # from IRRecv line
    mode:
      input: true
      pullup: true
  # high 55% tolerance is recommended for some remote control units
  tolerance: 55%

status_led:
  pin: 8

climate:
  - platform: heatpumpir
    protocol: panasonic_ckp
    name: "ESPHome AC Panasonic CKP"
    receiver_id: receiver_ir
    transmitter_id: transmitter_ir
    horizontal_default: auto
    vertical_default: auto
    max_temperature: 30
    min_temperature: 16

binary_sensor:
  - platform: gpio
    pin: 6
    name: "Physical Button"
    filters:
      - invert:

uart:
  rx_pin: RX1
  tx_pin: TX1
  baud_rate: 9600

switch:
  - platform: template
    name: Raw Code Power Off AC Button
    turn_on_action:
      - remote_transmitter.transmit_raw:
          carrier_frequency: 38kHz
          code: [3665,-3697,932,-2764,900,-2764,868,-2829,900,-2764,900,-2764,900,-2796,868,-2796,900,-2764,932,-2764,900,-2764,900,-2796,868,-2796,900,-2764,932,-2764,868,-2796,868,-2829,868,-965,900,-932,868,-2796,900,-932,900,-932,900,-932,932,-932,868,-965,900,-932,900,-932,900,-2764,900,-932,900,-932,900,-932,932,-932,868,-965,3665,-3697,900,-2764,868,-2796,900,-2796,900,-2764,868,-2829,900,-2764,900,-2764,900,-2796,900,-2764,900,-2764,932,-2764,900,-2764,900,-2764,900,-2796,900,-2764,900,-2796,900,-932,868,-965,900,-2764,900,-932,900,-932,932,-900,932,-932,868,-965,900,-932,900,-932,868,-2796,900,-932,900,-932,932,-932,900,-932,900,-932,3665,-3697,900,-14690,3697,-3665,900,-965,900,-932,900,-932,900,-932,900,-2764,868,-965,900,-932,932,-2764,868,-965,900,-932,868,-965,868,-965,900,-2796,900,-932,900,-932,900,-2764,900,-932,900,-2796,900,-2764,900,-932,868,-2796,932,-2764,900,-932,900,-932,900,-932,900,-2764,932,-2764,900,-932,868,-2796,900,-2796,900,-932,900,-932,3665,-3697,900,-932,900,-932,868,-965,900,-932,868,-2829,900,-932,900,-932,868,-2796,900,-932,868,-965,900,-965,900,-932,868,-2796,868,-965,900,-932,868,-2796,932,-932,868,-2796,900,-2764,900,-932,932,-2764,900,-2764,868,-965,868,-965,900,-965,900,-2764,900,-2764,932,-900,900,-2796,900,-2764,868,-965,900,-932,3729,-3632,900]

  - platform: template
    name: NEC Code Power On Button
    turn_on_action:
      - remote_transmitter.transmit_nec:
          address: 0x0
          command: 0x31
          command_repeats: 1

  - platform: template
    name: NEC Code Power Off Button
    turn_on_action:
      - remote_transmitter.transmit_nec:
          address: 0x0
          command: 0x32
          command_repeats: 1


