logo elektroda
logo elektroda
X
logo elektroda

[BK7231N/BL0937] Teardown Generic 20A EU Wifi Smart Plug with Energy Measurement

halmartin 855 8
ADVERTISEMENT
  • Helpful post
    #1 21385407
    halmartin
    Level 5  
    Following the LSPA9 thread I ordered the following from AliExpress in December 2024:
    "Tuya European Graffiti Wifi Smart Mobile Phone Timing Remote Voice Control with Electricity Socket Plug" from ATODUL Store (Store no: 1103832298)

    Price when I ordered was 58 SEK (~5.10€) with AliExpress Choice. Screenshot below is from today with a higher price.
    Screenshot from AliExpress showing a Tuya smart plug device with a higher price.

    I forgot to take photos of the packaging before discarding. It was basically the same as what is pictured in the LSPA9 thread.

    I found an easier method to open, as there is not much glue holding this together. I put the plug sideways onto a carpet to protect the surface underneath, and hit each side with a rubber mallet. After hitting each side with moderate force, the top came off easily, without any visible damage anywhere.

    There is no text or any markings (CE, model number, voltage/current rating, etc) on the outside of the plug.

    Inside I expected something similar to the LSPA9, but the plug has no module in it. The BK7231N chip is directly mounted to the main PCB. Tear down photos:
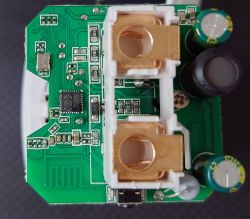
    Internal view of a Tuya smart socket with BK7231N chip installed.
    View of the PCB with electronic components in a smart plug.

    Removing the PCB requires only one Philips screw, located near the middle. Push up from the bottom to remove the PCB with the metal contacts. The plug is using the Fanhar FH17-1A2TLE relay.

    Flashing was easy, as the UART Tx/Rx, 3.3V, and GND are all available at testpoints:
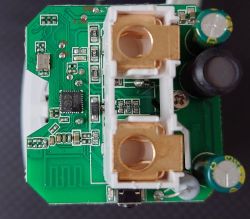
    PCB of the device showing BK7231N chip and golden contacts.

    After some tracing and continuity testing with the DMM, here is the observed pin configuration:
    Code: JSON
    Log in, to see the code


    Apologies for any mistakes, this is my first time posting. Let me know if the photos are too low resolution and I will try to provide better quality, or if anything else should be improved.
  • ADVERTISEMENT
  • #2 21393109
    P2812
    Level 9  
    Hi - I also bought the same, but to open I found another method on the forum, very easy - door opening method.
    Place the socket between the door frame and the door and slightly close the door, then turn 90 degrees and close again with feeling - then the socket opens.
    I have not yet reworked the Beken chip - I have some doświadczenie with esp, arduino.
    Please suggest in points - how to do flashing, I have read the shaved tool manual https://openbekeniot.github.io/webapp/devicesList.html.
    Thanks to the author and all for the work done on this project, (really impressive).
    I have 2 more questions;
    1. is there a 16 A relay in this, or a 20 A relay, on the box it was marked 20 A, but it looks like a hoax.
    2. for flashing you need to supply 3.3 external or can I give from CH340?
    [BK7231N/BL0937] Teardown Generic 20A EU Wifi Smart Plug with Energy Measurement173688238..30.jpg Download (1.89 MB).
    [BK7231N/BL0937] Teardown Generic 20A EU Wifi Smart Plug with Energy Measurement173688238..78.jpg Download (1.32 MB).
    [BK7231N/BL0937] Teardown Generic 20A EU Wifi Smart Plug with Energy Measurement173688238..53.jpg Download (1.37 MB).
    [BK7231N/BL0937] Teardown Generic 20A EU Wifi Smart Plug with Energy Measurement173688238..04.jpg Download (1.59 MB).
    [BK7231N/BL0937] Teardown Generic 20A EU Wifi Smart Plug with Energy Measurement173688238..46.jpg Download (1.7 MB).
    [BK7231N/BL0937] Teardown Generic 20A EU Wifi Smart Plug with Energy Measurement173688238..82.jpg Download (7.09 MB).
    [BK7231N/BL0937] Teardown Generic 20A EU Wifi Smart Plug with Energy Measurement173688238..24.jpg Download (1.59 MB).
    [BK7231N/BL0937] Teardown Generic 20A EU Wifi Smart Plug with Energy Measurement173688238..98.jpg Download (1.18 MB).
    [BK7231N/BL0937] Teardown Generic 20A EU Wifi Smart Plug with Energy Measurement173688238..60.jpg Download (1.37 MB).
    [BK7231N/BL0937] Teardown Generic 20A EU Wifi Smart Plug with Energy Measurement173688238..07.jpg Download (1.3 MB).
    3. Do you still need to do a calibration afterwards?
  • ADVERTISEMENT
  • #3 21393597
    halmartin
    Level 5  
    P2812 wrote:
    Please suggest in points - how to do flashing


    It is the same method as other BK7231N chips and is well described on the forum.

    Always with the plug disconnected from 220V!

    You solder to the points I have labeled (Tx, Rx, 3.3V, GND) from the UART adapter, plug in the UART adapter and quickly run:
    Code: Bash
    Log in, to see the code


    I cannot provide Windows instructions since I run Linux. But process will be similar just with COM device instead of /dev/tty

    P2812 wrote:
    1. is there a 16 A relay in this, or a 20 A relay, on the box it was marked 20 A, but it looks like a hoax.


    As you can see the relay has both 16A/20A markings. I would not trust this plug for any high current applications. Personally I will only use it for low powered devices (less than 300W).

    P2812 wrote:
    2. for flashing you need to supply 3.3 external or can I give from CH340?


    It is fine to use 3.3V from ch340.

    P2812 wrote:
    3. Do you still need to do a calibration afterwards?


    Yes
  • #4 21396066
    P2812
    Level 9  
    but I have a problem - on Linux I can't back up
    Code: Bash
    Log in, to see the code


    what is the correct command to backup Orig.firmware ?

    Added after 6 [minutes]: .

    I still tried it like this
    Code: Bash
    Log in, to see the code


    I have the pins correctly soldered, short cables, voltage 3.3 from Ch340, but I also checked the external, maybe I need to short some pin to ground ????
  • ADVERTISEMENT
  • #5 21396380
    halmartin
    Level 5  
    P2812 wrote:
    I have the pins correctly soldered, short cables, voltage 3.3 from Ch340, but I also checked the external, maybe I need to short some pin to ground ????


    You need to cycle power between each attempt. I did not specify any baud rate, just used the default. Your first command output shows an error changing baud rate, have you tried it without specifying manually the baud rate?

    I also did not attempt to read the original firmware, it was of no interest to me to make a backup.
  • ADVERTISEMENT
  • #6 21398832
    P2812
    Level 9  
    I managed - uploaded using arduino mega
    [BK7231N/BL0937] Teardown Generic 20A EU Wifi Smart Plug with Energy Measurement173719283..08.jpg Download (2.34 MB) .
    [BK7231N/BL0937] Teardown Generic 20A EU Wifi Smart Plug with Energy Measurement173719283..71.jpg Download (3.86 MB) .
    but I still have a problem with the configuration .
    I have entered the wifi ssid and password - I get the address from the router, but I can not enter the website with the new IP
    I do not understand why the page does not report, is this page only at the beginning to set up the configuration? ,
    my goal is to enter the command into mqtt to control the relay and read the energy measurement in node-red .
    There are a lot of tutorials - but it is all very scattered .
    Maybe it is possible to upload some config right away .
  • #7 21400048
    P2812
    Level 9  
    I uploaded the firmware once again,
    I go to 192.168.4.1 - I set the ssid and password of the network of the router ( closed internal network without access to the Internet )
    On the router I see that I have connected I get the address 172.16.0.181 ( dhcp )
    Then I connect to this network and enter the page 172.16.0.181 and silence, nothing is reported.
    5 times fast shutdown and I have the emergency mode - I set the address statically - but still the same
    What is wrong with it - why can't I connect ?????????????????????????????????
    I have loaded OpenBK7231N_QIO_1.18.20.bin
  • #8 21400128
    halmartin
    Level 5  
    P2812 wrote:
    On the router I see that I have connected I get the address 172.16.0.181 ( dhcp )
    Then I connect to this network and enter the page 172.16.0.181 and silence, nothing is reported.
    5 times fast shutdown and I have the emergency mode - I set the address statically - but still the same
    What is wrong with it - why can't I connect ?????????????????????????????????


    This thread is regarding the device tear-down.

    For your problem, I would suggest you create an issue on GitHub: https://github.com/openshwprojects/OpenBK7231T_App/issues
  • #9 21410438
    P2812
    Level 9  
    I am back again after the break
    I checked everything again, restored the original image from the backup, - everything is working
    uploaded 1.18.24 again, checked the router settings once more - I have a separate IoT network here - it turned out I had client isolation enabled = turned off
    and now everything works.
    Now I have encountered another problem with mqtt configuration . I have read a lot of posts but I can not set it up correctly .
    Please help how the command syntax should look like . I tried something like this :
    Server broker mosqitto 172.16.0.1
    OpenBeken 172.16.0.181
    
    root@OpenWrt:~#  mosquitto -c /etc/mosquitto/mosquitto2.conf
    1737883011: mosquitto version 1.6.8 starting
    1737883011: Config loaded from /etc/mosquitto/mosquitto2.conf.
    1737883011: Opening ipv4 listen socket on port 1884.
    1737883011: Opening ipv6 listen socket on port 1884.
    1737883026: New connection from 172.16.0.181 on port 1884.
    1737883026: New client connected from 172.16.0.181 as obk/1/set (p2, c1, k100, u'adam').
    1737883164: New connection from 172.16.0.1 on port 1884.
    1737883164: New client connected from 172.16.0.1 as mosq-PwuyvA9mGovn1Wqpsp (p2, c1, k60, u'adam').
    1737883164: Client mosq-PwuyvA9mGovn1Wqpsp disconnected.
    1737883226: New connection from 172.16.0.1 on port 1884.
    1737883226: New client connected from 172.16.0.1 as mosq-ZFB9ulb2s2NOS8GhGB (p2, c1, k60, u'adam').
    1737883226: Client mosq-ZFB9ulb2s2NOS8GhGB disconnected.
    1737883514: New connection from 172.16.0.1 on port 1884.
    1737883514: New client connected from 172.16.0.1 as mosq-af1cFbh6xkcWljMNux (p2, c1, k60, u'adam').
    1737883514: Client mosq-af1cFbh6xkcWljMNux disconnected.
    
    .

    Sending a command
    
    root@OpenWrt:~# mosquitto_pub -h 172.16.0.1 -t "obk/1/set"  -m "1" -p 1884 -u adam -P adam
    root@OpenWrt:~# mosquitto_pub -h 172.16.0.1 -t "obk/1/get"  -m "1" -p 1884 -u adam -P adam
    root@OpenWrt:~# mosquitto_pub -h 172.16.0.1 -t "obk/1/set"  -m "0" -p 1884 -u adam -P adam
    
    .

    OpenBeken setting
    Host 172.16.0.1
    Port 1884
    Client Topic (Base Topic): obk/1/set
    Group Topic (Secondary Topic to only receive cmnds): BK7231N
    User - adam
    Password: adam
    How should this be set up - I don't understand this mechanism - where to get the data to enable the relay . I do not use HA only node-red

Topic summary

The discussion revolves around the teardown and modification of a Tuya European Graffiti Wifi Smart Plug, specifically focusing on the BK7231N and BL0937 chips. Users share various methods for opening the device, including using a rubber mallet and a door frame technique. Concerns are raised about the relay's current rating, with conflicting markings of 16A and 20A. Instructions for flashing the firmware using a UART adapter are provided, emphasizing the need for a 3.3V power supply. Users encounter issues with backing up firmware on Linux and configuring the device for MQTT control and energy measurement. Solutions include checking router settings and ensuring client isolation is disabled. The thread also suggests creating GitHub issues for unresolved problems.
Summary generated by the language model.
ADVERTISEMENT