This was a great success and I stood on the shoulders of this thread for a very similar product.
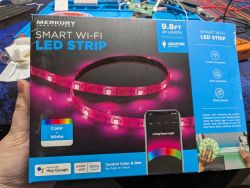
This Merkury LED Strip shows up in the Smart Life app as Merkury EW020 Smart LED Strip, however was sold to me with the model MI-EW010-999WW. I can't find that anywhere on the box or product itself so I went with the advertised model.
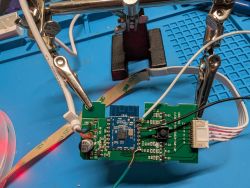
The product photos from that thread are nearly identical to this one so I didn't go to great detail in getting more photos. Just one of the box and one of the board since this uses the CB3S chip so it's a little different to set up.


Flashing was mostly straightforward. I had a moment where the board didn't seem to be responding to button presses or recovering after power cycling by unplugging it. I thought it was bricked, but shorting GRND to CEN briefly forced a reboot and things got going again. This happened more than once after the firmware backup step starting with a device fresh from the box and not yet set up so if someone has trouble with the flashing process keep that in mind.
I also had trouble with the flashing tool not being able to automatically discover the correct config to use. From that other thread and some fiddling with the GPIO discovery tools I settled on this config.
8 is RED
24 is GREEN
26 is BLUE
7 is WHITE
9 is BUTTON
With this everything works as expected. Even the button is able to control power and cycle through some scenes. Notably, I set these flags to get the behavior I was expecting. This strip is RGBW (I think it's RGBWW, but honestly the light is pretty cool even at the warmest setting).
Flag 12 - [LED] Remember LED driver state (RGBCW, enable, brightness, temperature) after reboot
Flag 24 - [LED] Emulate Cool White with RGB in device with four PWMS - Red is 0, Green 1, Blue 2, and Warm is 4
This Merkury LED Strip shows up in the Smart Life app as Merkury EW020 Smart LED Strip, however was sold to me with the model MI-EW010-999WW. I can't find that anywhere on the box or product itself so I went with the advertised model.
The product photos from that thread are nearly identical to this one so I didn't go to great detail in getting more photos. Just one of the box and one of the board since this uses the CB3S chip so it's a little different to set up.


Flashing was mostly straightforward. I had a moment where the board didn't seem to be responding to button presses or recovering after power cycling by unplugging it. I thought it was bricked, but shorting GRND to CEN briefly forced a reboot and things got going again. This happened more than once after the firmware backup step starting with a device fresh from the box and not yet set up so if someone has trouble with the flashing process keep that in mind.
I also had trouble with the flashing tool not being able to automatically discover the correct config to use. From that other thread and some fiddling with the GPIO discovery tools I settled on this config.
8 is RED
24 is GREEN
26 is BLUE
7 is WHITE
9 is BUTTON
{
  "vendor": "Merkury",
  "bDetailed": "0",
  "name": "Merkury White Plus Color LED Strip [PN: MI-EW010-999WW]",
  "model": "EW010",
  "chip": "BK7231N",
  "board": "CB3S",
  "flags": "16782336",
  "keywords": [
    "RGBW",
    "LED Strip",
    "Geeni",
    "5V"
  ],
  "pins": {
    "7": "PWM;4",
    "8": "PWM;0",
    "9": "Btn_SmartLED;0",
    "24": "PWM;1",
    "26": "PWM;2"
  },
  "command": "",
  "image": "https://obrazki.elektroda.pl/7525944100_1738570897.jpg",
  "wiki": "https://www.elektroda.com/rtvforum/viewtopic.php?p=21422570#21422570"
}
With this everything works as expected. Even the button is able to control power and cycle through some scenes. Notably, I set these flags to get the behavior I was expecting. This strip is RGBW (I think it's RGBWW, but honestly the light is pretty cool even at the warmest setting).
Flag 12 - [LED] Remember LED driver state (RGBCW, enable, brightness, temperature) after reboot
Flag 24 - [LED] Emulate Cool White with RGB in device with four PWMS - Red is 0, Green 1, Blue 2, and Warm is 4


