Hi everyone,
I would like to share with the community the details of the ELIVCO model BSD33 device. After seeing similar contributions here, I decided to open it up to see what’s inside and check if it was possible to integrate it with OpenBeken.
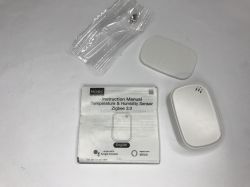
1. Device Description
This is a smart plug that I purchased on AliExpress. The hardware feels robust, and fortunately, it was easy to open without breaking any plastic tabs.
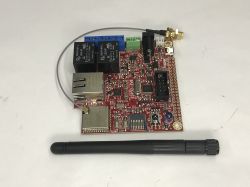
2. Hardware Identification
After opening the casing, this is what I found on the PCB:
Microcontroller (MCU): BL602
Module: SM-028_V1.3
Operating Voltage: 240 V AC


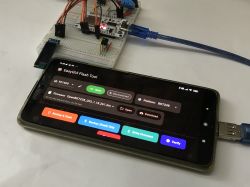
3. Flashing Process
To dump the firmware and flash OpenBeken, I used a USB-to-TTL adapter (CH340).
Pins used: GND, 3.3 V, TX, RX, Boot.
Boot: It was necessary to connect the Boot pin to 3.3 V during startup to enter flash mode.
Note: Always remember to power the device with a stable external 3.3 V power supply or be very careful when using the adapter. Never attempt to flash the device while it is connected to mains voltage, as it is a major safety hazard.
4. Pinout (Configuration)
Once flashed, the following configuration in OpenBeken is required for it to work correctly:
JSON
"pins": {
"2": "Rel;1",
"3": "BL0937CF1;0",
"4": "LED_n;1",
"14": "BL0937CF;0",
"20": "WifiLED_n;1",
"21": "BL0937SEL;0",
"22": "Btn;1"
}
5. Conclusion
The device works perfectly under full local control. It is a cost-effective alternative, and after flashing, it integrates seamlessly with Home Assistant via MQTT.
Has anyone else tried this model with a different configuration or found a different PCB version?
I would like to share with the community the details of the ELIVCO model BSD33 device. After seeing similar contributions here, I decided to open it up to see what’s inside and check if it was possible to integrate it with OpenBeken.
1. Device Description
This is a smart plug that I purchased on AliExpress. The hardware feels robust, and fortunately, it was easy to open without breaking any plastic tabs.
2. Hardware Identification
After opening the casing, this is what I found on the PCB:
Microcontroller (MCU): BL602
Module: SM-028_V1.3
Operating Voltage: 240 V AC


3. Flashing Process
To dump the firmware and flash OpenBeken, I used a USB-to-TTL adapter (CH340).
Pins used: GND, 3.3 V, TX, RX, Boot.
Boot: It was necessary to connect the Boot pin to 3.3 V during startup to enter flash mode.
Note: Always remember to power the device with a stable external 3.3 V power supply or be very careful when using the adapter. Never attempt to flash the device while it is connected to mains voltage, as it is a major safety hazard.
4. Pinout (Configuration)
Once flashed, the following configuration in OpenBeken is required for it to work correctly:
JSON
"pins": {
"2": "Rel;1",
"3": "BL0937CF1;0",
"4": "LED_n;1",
"14": "BL0937CF;0",
"20": "WifiLED_n;1",
"21": "BL0937SEL;0",
"22": "Btn;1"
}
5. Conclusion
The device works perfectly under full local control. It is a cost-effective alternative, and after flashing, it integrates seamlessly with Home Assistant via MQTT.
Has anyone else tried this model with a different configuration or found a different PCB version?