FAQ
TL;DR: "It's a very interesting design" [Elektroda, p.kaczmarek2, post #20465797]—a compact 3-gang switch using 10 A relays and a BK7231N CBU module that can be flashed in ~45 s over UART1. PowerSave cuts standby draw by approx. 30 % (CBU datasheet).
Why it matters: You gain local control, lower energy use and easy hardware access.
Quick Facts
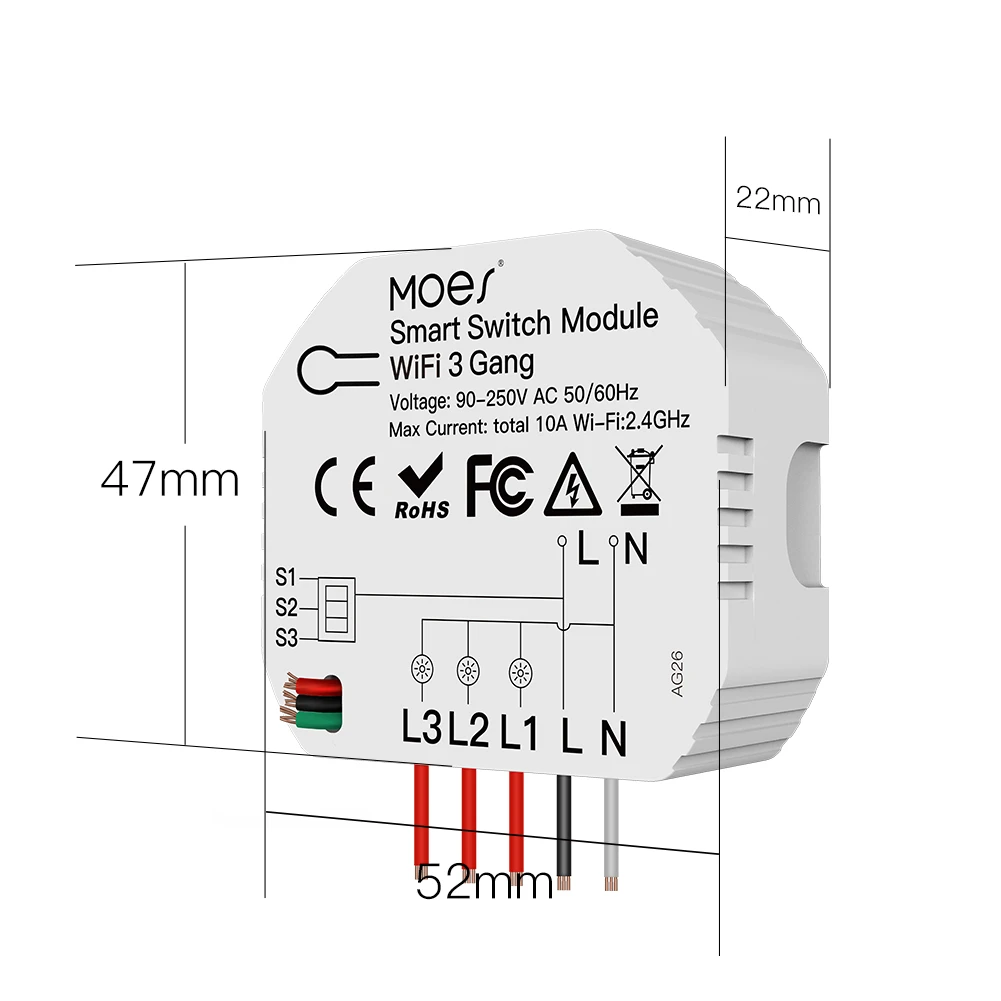
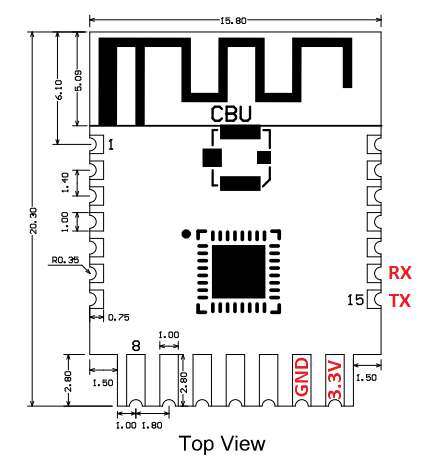
• MCU: Tuya CBU (BK7231N), 32-bit 120 MHz core [CBU datasheet].
• Relay rating: 10 A @ 250 VAC, three channels [Elektroda, herbertvianna, post #20465453]
• Flashing tool: BK7231Flasher v1.0.6; cost ≈ $0 (open-source) [Elektroda, herbertvianna, post #20465453]
• Adapter: FT232RL USB-UART; typical price ≈ $3 [AliExpress listing].
• Stand-by draw with PowerSave: ~0.25 W (-30 %) [CBU datasheet].
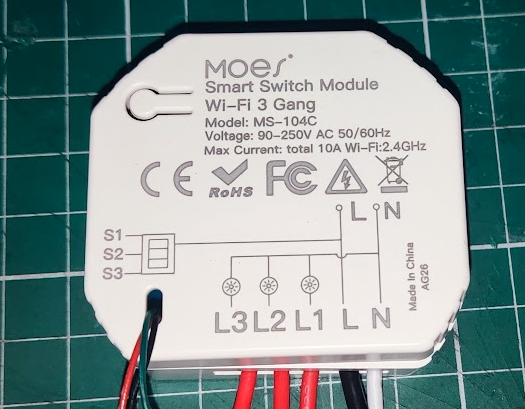
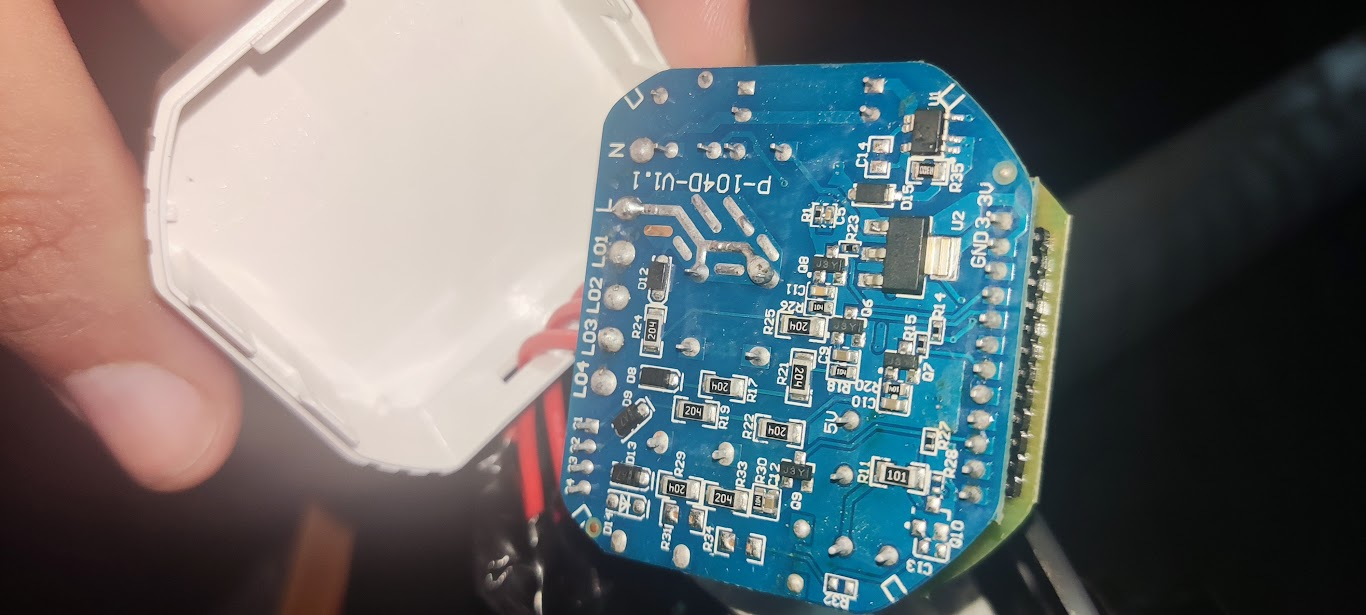
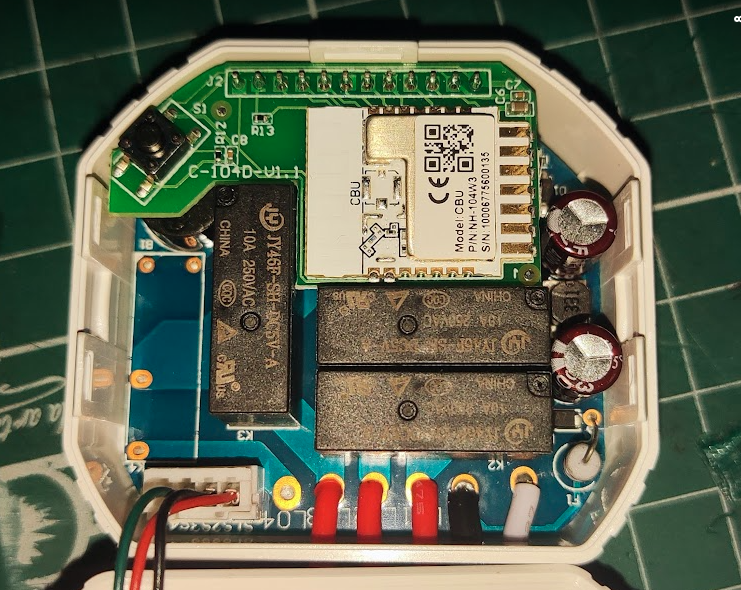
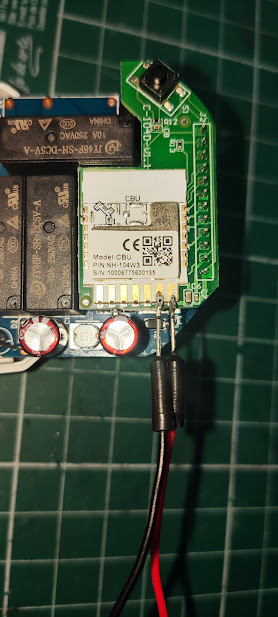
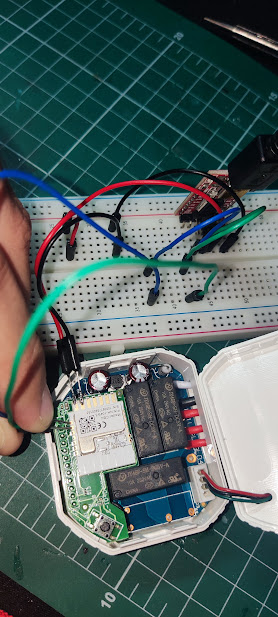
What hardware sits inside the Moes MS-104C-1 smart switch?
Which pins must I wire to flash the BK7231N?
Which flashing software and adapter work?
How long does the flashing process take?
How do I enable PowerSave and what benefit will I see?
Add the command PowerSave 1 to your startup script; standby consumption drops about 30 %, from ~0.36 W to ~0.25 W [CBU datasheet].
What load can the relays handle safely?
Each SONGLE-type relay is rated 10 A at 250 VAC or 15 A resistive at 120 VAC. Exceeding this rating overheats contacts and may weld them shut—an edge-case failure to avoid [Relay datasheet].
Is the CB2L variant as easy to hack?
Can you outline a simple 3-step flashing procedure?
- Solder jumper wires to 3.3 V, GND, RX, TX, BOOT0.
- Hold BOOT0 low, connect USB-UART, and start BK7231Flasher.
- Select firmware, click Flash, then reboot and configure Wi-Fi.
Entire job takes under five minutes.
What happens if I power the CBU with 5 V by mistake?
BK7231N is a 3.3 V device; applying 5 V can damage the MCU instantly, leaving the switch unresponsive—a common failure scenario explained in Tuya repair guides [CBU datasheet].
How can I revert to factory Tuya firmware?
Only if you first made a full 2 MB backup (bk7231-flasher –read). Write the original image back with the same tool; without a backup, factory OTA servers will reject the custom firmware [OpenBeken wiki].
Summary generated by AI based on the discussion content.
Comments
Thank you for config, but please next time use syntax tag with JSON mark so the config can be copy/pasted (it's easier than writing it again from image). By the way, this switch has a very interesting... [Read more]
Thank you for your help. I made an update to the original post to add the json instead of the image. I also enabled PowerSave on module startup. The solution they came up with for the module to be very... [Read more]
At least it's the CBU module, so UART1 is easily accessible. It would be worse in case of CB2L, because CB2L has UART1 pads on back so it would have be needed to be desoldered first before flashing. I... [Read more]
I watched the video, it's a lot of work. So far, I only have flashed CBU and WB2S, both with easy access to all pins. [Read more]
It's not that hard, the module from video has at least a single row of soldered pads so it can be easily removed with the PB solder+cheap soldering iron+flux trick, without hot air. Some other modules... [Read more]
I have same module too. I used BK7231GUIFlashTool v126 but it downloaded automatically QIO version of FW. As i understand the FW should be _UA" labelled for uart download. I confused. and installed... [Read more]
The only difference between UA and QIO, is that QIO contains bootloader, while UA doesn't. And it's important for BK7231T/U and BK7252, because bootloader on them can't be overwritten via UART. While... [Read more]
So, shouldn't QIO files be written from offset 0, and UA files from offset 0x11000? Does BK7231GUIFlashTool automatically determine where to write? In my example, should the QIO file be written from... [Read more]
On BK7231N, if bootloader overwrite is disabled (it's disabled by default), then it will skip 0x11000 bytes from QIO and write the rest to flash at 0x11000 offset. If enabled, then nothing is skipped... [Read more]
So my device should boot :) i will add the TX2 logs [Read more]
Hello again, There is no log on TX2 pin. I flashed again OpenBK7231N_QIO_1.18.205.bin via BK7231GUIFlashTool-v144. Nothing happen. The device consumes only 1-2mA. It didn't boot. I also restored... [Read more]