I will show here how you can mass configure and control IoT devices flashed with Tasmota or with Tasmota-compatible, cross-platform OpenBeken . Configuration will be done by sending console commands in the HTTP GET request. This will allow, for example, to set MQTT server parameters on a mass scale, or to configure energy saving (on Obk) on a mass scale, or, for example, to change the colour, brightness level or white temperature of the LED lights. The GET request should be directed to the IP address of the device, the target resource should be a subaddress cm , while the variable cmnd, what we put in it will be executed by the device.
I will run all scripts on the platform windows , but on Linux it would look similar, just a slightly different assembly.
HTTP interface - Tasmota commands (and OBK)
To begin with, let's consider an example HTTP request to control the light status of a Tasmota lamp:
http://192.168.0.201/cm?cmnd=POWER%20TOGGLE
There are three segments here:
- 92.168.0.201 - this is the address of our device
- cm?cmnd= - cm is the target resource, and after the question mark are the parameters of the GET query, their format is the key (here cmnd) and after the equal sign is the value
- POWER%20TOGGLE - is a command with an argument, instead of a space we set the code %20
We can take the commands from the Tasmota or OpenBeken documentation:
https://github.com/openshwprojects/OpenBK7231T_App/blob/main/docs/commands.md
https://tasmota.github.io/docs/Commands/
Several commands can be sent simultaneously using the backlog. The syntax is:
backlog cmd1; cmd2; cmd3;
Example:
http://192.168.0.201/cm?cmnd=backlog%20CT%20500;POWER%20ON;
Device responses
These commands also allow you to check the status of the device, and the device responds to them in JSON format. For example, sending POWER with no argument results in:
http://192.168.0.201/cm?cmnd=POWER
receiving such an answer (the one from OBK, in Tasmot it may be slightly different):
Code: JSON
A lot of information about the device can be obtained through the Status command, which can be read in the Tasmota documentation.
Curl - sending commands without a browser
As you can probably guess, such a magic URL is enough to be pasted into the browser and the command will be sent. It's normal. Then the browser will show us the answer in JSON, but it is not convenient for us.
GET can also be sent in various other ways.
A good example of such a method is the cURL library:
https://curl.se/
curl repository:
https://github.com/curl/curl
Installation description:
https://curl.se/docs/install.html
FAQ:
https://curl.se/docs/faq.html
Curl can be run on different systems, it shouldn't be a problem. If your command line does not see the CURL command after installing it, you may need to add the folder containing curl.exe to your PATH environment variable, as you do with Python and other such programs. This makes curl.exe visible in every folder.
Let's check if my curl is visible:

It is visible what will I show us the help switch?
Spoiler:
C:\>curl --help
Usage: curl [options...]
     --abstract-unix-socket  Connect via abstract Unix domain socket
     --anyauth       Pick any authentication method
 -a, --append        Append to target file when uploading
     --basic         Use HTTP Basic Authentication
     --cacert  CA certificate to verify peer against
     --capath   CA directory to verify peer against
 -E, --cert  Client certificate file and password
     --cert-status   Verify the status of the server certificate
     --cert-type  Certificate file type (DER/PEM/ENG)
     --ciphers  SSL ciphers to use
     --compressed    Request compressed response
 -K, --config  Read config from a file
     --connect-timeout  Maximum time allowed for connection
     --connect-to  Connect to host
 -C, --continue-at  Resumed transfer offset
 -b, --cookie  Send cookies from string/file
 -c, --cookie-jar  Write cookies to  after operation
     --create-dirs   Create necessary local directory hierarchy
     --crlf          Convert LF to CRLF in upload
     --crlfile  Get a CRL list in PEM format from the given file
 -d, --data    HTTP POST data
     --data-ascii  HTTP POST ASCII data
     --data-binary  HTTP POST binary data
     --data-raw  HTTP POST data, '@' allowed
     --data-urlencode  HTTP POST data url encoded
     --delegation  GSS-API delegation permission
     --digest        Use HTTP Digest Authentication
 -q, --disable       Disable .curlrc
     --disable-eprt  Inhibit using EPRT or LPRT
     --disable-epsv  Inhibit using EPSV
     --dns-interface  Interface to use for DNS requests
     --dns-ipv4-addr  IPv4 address to use for DNS requests
     --dns-ipv6-addr  IPv6 address to use for DNS requests
     --dns-servers  DNS server addrs to use
 -D, --dump-header  Write the received headers to
     --egd-file  EGD socket path for random data
     --engine  Crypto engine to use
     --expect100-timeout  How long to wait for 100-continue
 -f, --fail          Fail silently (no output at all) on HTTP errors
     --fail-early    Fail on first transfer error, do not continue
     --false-start   Enable TLS False Start
 -F, --form  Specify HTTP multipart POST data
     --form-string  Specify HTTP multipart POST data
     --ftp-account  Account data string
     --ftp-alternative-to-user  String to replace USER [name]
     --ftp-create-dirs Create the remote dirs if not present
     --ftp-method  Control CWD usage
     --ftp-pasv      Use PASV/EPSV instead of PORT
 -P, --ftp-port  Use PORT instead of PASV
     --ftp-pret      Send PRET before PASV
     --ftp-skip-pasv-ip Skip the IP address for PASV
     --ftp-ssl-ccc   Send CCC after authenticating
     --ftp-ssl-ccc-mode  Set CCC mode
     --ftp-ssl-control Require SSL/TLS for FTP login, clear for transfer
 -G, --get           Put the post data in the URL and use GET
 -g, --globoff       Disable URL sequences and ranges using {} and []
 -I, --head          Show document info only
 -H, --header  Pass custom header(s) to server
 -h, --help          This help text
     --hostpubmd5  Acceptable MD5 hash of the host public key
 -0, --http1.0       Use HTTP 1.0
     --http1.1       Use HTTP 1.1
     --http2         Use HTTP 2
     --http2-prior-knowledge Use HTTP 2 without HTTP/1.1 Upgrade
     --ignore-content-length Ignore the size of the remote resource
 -i, --include       Include protocol response headers in the output
 -k, --insecure      Allow insecure server connections when using SSL
     --interface  Use network INTERFACE (or address)
 -4, --ipv4          Resolve names to IPv4 addresses
 -6, --ipv6          Resolve names to IPv6 addresses
 -j, --junk-session-cookies Ignore session cookies read from file
     --keepalive-time  Interval time for keepalive probes
     --key      Private key file name
     --key-type  Private key file type (DER/PEM/ENG)
     --krb    Enable Kerberos with security
     --libcurl  Dump libcurl equivalent code of this command line
     --limit-rate  Limit transfer speed to RATE
 -l, --list-only     List only mode
     --local-port  Force use of RANGE for local port numbers
 -L, --location      Follow redirects
     --location-trusted Like --location, and send auth to other hosts
     --login-options  Server login options
     --mail-auth  Originator address of the original email
     --mail-from  Mail from this address
     --mail-rcpt  Mail from this address
 -M, --manual        Display the full manual
     --max-filesize  Maximum file size to download
     --max-redirs  Maximum number of redirects allowed
 -m, --max-time  Maximum time allowed for the transfer
     --metalink      Process given URLs as metalink XML file
     --negotiate     Use HTTP Negotiate (SPNEGO) authentication
 -n, --netrc         Must read .netrc for user name and password
     --netrc-file  Specify FILE for netrc
     --netrc-optional Use either .netrc or URL
 -:, --next          Make next URL use its separate set of options
     --no-alpn       Disable the ALPN TLS extension
 -N, --no-buffer     Disable buffering of the output stream
     --no-keepalive  Disable TCP keepalive on the connection
     --no-npn        Disable the NPN TLS extension
     --no-sessionid  Disable SSL session-ID reusing
     --noproxy  List of hosts which do not use proxy
     --ntlm          Use HTTP NTLM authentication
     --ntlm-wb       Use HTTP NTLM authentication with winbind
     --oauth2-bearer  OAuth 2 Bearer Token
 -o, --output  Write to file instead of stdout
     --pass  Pass phrase for the private key
     --path-as-is    Do not squash .. sequences in URL path
     --pinnedpubkey  FILE/HASHES Public key to verify peer against
     --post301       Do not switch to GET after following a 301
     --post302       Do not switch to GET after following a 302
     --post303       Do not switch to GET after following a 303
     --preproxy [protocol://]host[:port] Use this proxy first
 -#, --progress-bar  Display transfer progress as a bar
     --proto  Enable/disable PROTOCOLS
     --proto-default  Use PROTOCOL for any URL missing a scheme
     --proto-redir  Enable/disable PROTOCOLS on redirect
 -x, --proxy [protocol://]host[:port] Use this proxy
     --proxy-anyauth Pick any proxy authentication method
     --proxy-basic   Use Basic authentication on the proxy
     --proxy-cacert  CA certificate to verify peer against for proxy
     --proxy-capath  CA directory to verify peer against for proxy
     --proxy-cert  Set client certificate for proxy
     --proxy-cert-type  Client certificate type for HTTS proxy
     --proxy-ciphers  SSL ciphers to use for proxy
     --proxy-crlfile  Set a CRL list for proxy
     --proxy-digest  Use Digest authentication on the proxy
     --proxy-header  Pass custom header(s) to proxy
     --proxy-insecure Do HTTPS proxy connections without verifying the proxy
     --proxy-key  Private key for HTTPS proxy
     --proxy-key-type  Private key file type for proxy
     --proxy-negotiate Use HTTP Negotiate (SPNEGO) authentication on the proxy
     --proxy-ntlm    Use NTLM authentication on the proxy
     --proxy-pass  Pass phrase for the private key for HTTPS proxy
     --proxy-service-name  SPNEGO proxy service name
     --proxy-ssl-allow-beast Allow security flaw for interop for HTTPS proxy
     --proxy-tlsauthtype  TLS authentication type for HTTPS proxy
     --proxy-tlspassword  TLS password for HTTPS proxy
     --proxy-tlsuser  TLS username for HTTPS proxy
     --proxy-tlsv1   Use TLSv1 for HTTPS proxy
 -U, --proxy-user  Proxy user and password
     --proxy1.0  Use HTTP/1.0 proxy on given port
 -p, --proxytunnel   Operate through a HTTP proxy tunnel (using CONNECT)
     --pubkey   SSH Public key file name
 -Q, --quote         Send command(s) to server before transfer
     --random-file  File for reading random data from
 -r, --range  Retrieve only the bytes within RANGE
     --raw           Do HTTP "raw"; no transfer decoding
 -e, --referer  Referrer URL
 -J, --remote-header-name Use the header-provided filename
 -O, --remote-name   Write output to a file named as the remote file
     --remote-name-all Use the remote file name for all URLs
 -R, --remote-time   Set the remote file's time on the local output
 -X, --request  Specify request command to use
     --request-target Specify the target for this request
     --resolve  Resolve the host+port to this address
     --retry    Retry request if transient problems occur
     --retry-connrefused Retry on connection refused (use with --retry)
     --retry-delay  Wait time between retries
     --retry-max-time  Retry only within this period
     --sasl-ir       Enable initial response in SASL authentication
     --service-name  SPNEGO service name
 -S, --show-error    Show error even when -s is used
 -s, --silent        Silent mode
     --socks4  SOCKS4 proxy on given host + port
     --socks4a  SOCKS4a proxy on given host + port
     --socks5  SOCKS5 proxy on given host + port
     --socks5-basic  Enable username/password auth for SOCKS5 proxies
     --socks5-gssapi Enable GSS-API auth for SOCKS5 proxies
     --socks5-gssapi-nec Compatibility with NEC SOCKS5 server
     --socks5-gssapi-service  SOCKS5 proxy service name for GSS-API
     --socks5-hostname  SOCKS5 proxy, pass host name to proxy
 -Y, --speed-limit  Stop transfers slower than this
 -y, --speed-time  Trigger 'speed-limit' abort after this time
     --ssl           Try SSL/TLS
     --ssl-allow-beast Allow security flaw to improve interop
     --ssl-no-revoke Disable cert revocation checks (WinSSL)
     --ssl-reqd      Require SSL/TLS
 -2, --sslv2         Use SSLv2
 -3, --sslv3         Use SSLv3
     --stderr        Where to redirect stderr
     --suppress-connect-headers Suppress proxy CONNECT response headers
     --tcp-fastopen  Use TCP Fast Open
     --tcp-nodelay   Use the TCP_NODELAY option
 -t, --telnet-option  Set telnet option
     --tftp-blksize  Set TFTP BLKSIZE option
     --tftp-no-options Do not send any TFTP options
 -z, --time-cond  Transfer based on a time condition
     --tls-max  Use TLSv1.0 or greater
     --tlsauthtype  TLS authentication type
     --tlspassword   TLS password
     --tlsuser  TLS user name
 -1, --tlsv1         Use TLSv1.0 or greater
     --tlsv1.0       Use TLSv1.0
     --tlsv1.1       Use TLSv1.1
     --tlsv1.2       Use TLSv1.2
     --tlsv1.3       Use TLSv1.3
     --tr-encoding   Request compressed transfer encoding
     --trace   Write a debug trace to FILE
     --trace-ascii  Like --trace, but without hex output
     --trace-time    Add time stamps to trace/verbose output
     --unix-socket  Connect through this Unix domain socket
 -T, --upload-file  Transfer local FILE to destination
     --url      URL to work with
 -B, --use-ascii     Use ASCII/text transfer
 -u, --user  Server user and password
 -A, --user-agent  Send User-Agent  to server
 -v, --verbose       Make the operation more talkative
 -V, --version       Show version number and quit
 -w, --write-out  Use output FORMAT after completion
     --xattr         Store metadata in extended file attributes
There are a few of these options. A very rich tool, but do we need to complicate it?
Let's try to send a GET to the smart lamp:
curl http://192.168.0.201/cm?cmnd=POWER%20TOGGLE
Lamp status changes - POWER is switched from ON to OFF or from OFF to ON, everything works:
Similarly, you can do:
curl http://192.168.0.201/cm?cmnd=backlog%20CT%20500;POWER%20ON;
This will set the temperature of the light (the command works with OBK and Tasmota) and turn on the light.
Batch files, autostart, scripts
What you can type in the Windows console can also be typed into a batch file. Such a file can then be launched and executed.
It can also be added to autostart.
Windows - Batch Script - Selection
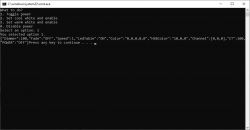
Let's try a simple script. we will use choice and we ask the user what he wants to do, we get the index of his choice and with if we check what we need to do. A special variable is used to receive the result errorlevel .
Code: text
And now NOTE - IMPORTANT : on Windows % is a special character to insert a variable. Therefore, in the console the % signs were single, and here in the script they are double. Without it, the script won't work for you.

Windows - Batch Script - Animation
In Batch, you can also gradually increment variables with some delay. We will use timeout for the delay, and we will increase the color temperature of the light in a loop.
Code: text
In addition, we run EnableDelayedExpansion to be able to conveniently insert the value of the iterative variable i into curl.
The script works, the color of white gradually changes.
Windows - Batch Script - Mass Control
Now let's do something like an IP scanner, a very primitive one. We will also use a loop, but this time we will put the iterative variable into the target IP address. The following script will change the status of all OBK/WiFi devices visible on the given IP range:
Code: text

Windows - Batch Script - Mass Configuration
Configuration can be performed in the same way.
For example, if you want to enable MQTT Host everywhere, just use the MQTTHost command:
Code: text
Similarly for other configuration commands. Here is a list of commands supported by Obk:
https://github.com/openshwprojects/OpenBK7231T_App/blob/main/docs/README.md
If we want to use several commands then we can use backlog as I showed earlier.
In this way, you can really configure a lot with one script. All the MQTT leads, flags, settings and so on.
Windows - Batch script - Ready configurator
But why do it all by hand?
Suppose we have a file my_ips.txt:
192.168.0.200
192.168.0.201
192.168.0.212
and the my_cfg.txt file:
POWER TOGGLE
SetFlag 10 1
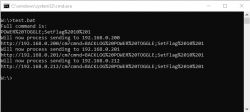
The bash script developed below will load the cfg file, combine everything into one backlog, set semicolons, replace spaces with encoded characters for HTTP, and then send this command via CURL to each recipient in turn:
Code: text
Result:

As for the operation of the script, it is worth emphasizing that it loads files line by line, connects configurations line by line by adding ; (starting with redundant ;, which is then removed), and IP loads one, serves, and then only loads the other. The line a, b, c replaces the space (there is a space after b, you can't see it at first glance) with the space code %20. There are two % signs, because one would mean the batch variable. A line with :~1! removes the first character from the commands, i.e. the extra ;.
Summary
Curl and Batch scripts make it very easy to mass configure Tasmota and OpenBeken devices on Windows. The compatibility of most commands allows you to use one script for basic configuration of devices with different firmware. Commands for MQTT and so on are compatible between firmwares.
In a similar way, you can also control devices as needed, trigger various events from the Windows level and download the status of devices, but I will show downloading the status another time.
Everything would look the same on Linux, only you would have to rewrite the scripts to bash or a related language.
Cool? Ranking DIY Helpful post? Buy me a coffee.


