logo elektroda
logo elektroda
X
logo elektroda

How To Fix Your RTV Remote Effectively, Quickly Without Effort and Expenses

momo222 103998 27
ADVERTISEMENT
Treść została przetłumaczona polish » english Zobacz oryginalną wersję tematu
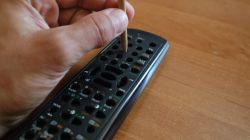
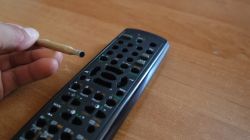
  • Recently I have encountered the problem of not being able to buy a new remote control for my ONKYO turret (discontinued). In my RC-647M, the buttons stopped working one by one. Cleaning was no longer effective. I am not convinced by the methods of replacing erasers or drawing with a pencil. I used a different method - simple, cheap, fast, but extremely effective and durable (the repaired fields have been working for several months without any problems).
    Here's a video explaining how to do it.


    Cool? Ranking DIY
    About Author
    momo222
    Level 12  
    Offline 
    momo222 wrote 51 posts with rating 30, helped 1 times. Been with us since 2005 year.
  • ADVERTISEMENT
  • #2 11545592
    Naimad_86
    Level 16  
    As for me, a better and faster method (I'm talking about repairing from what we have at hand) is to stick a piece of foil directly to the eraser. One of the pilots has been working like this for several years.
  • #3 11546906
    perszeron
    Level 21  
    Hello.
    Regarding the movie - repairing the remote control in this case always consists in replacing the conductive rubber bands. You shouldn't deviate from this rule, but if you want to fix it for yourself, this is a very simple way - just move the hot geothermal soldering iron over the eraser, which has lost its conductive properties. After that, there is no hassle with switching any more (simple and effective). I am giving this method, because I strongly advise against sticking a gold leaf (foil). ;-)
    Greetings.
  • ADVERTISEMENT
  • #4 11547064
    momo222
    Level 12  
    You have to remember that the buttons of the remote control are all the time greasy from our fingers (grease goes through the silicone to the electronics board) so, for example, the foil stuck to the buttons will peel off once twice.
    Greetings
  • #5 11553049
    sq9mm
    Level 12  
    Nice 9 minutes x number of buttons = ????? . it is not easier to clean - wash the erasers and the plate, then stock up on graphite spray and spray the erasers after drying. I suppose the cost of the foil web and in some cases the punch is more than graphite or at least similar. In addition, the aluminum foil is rather not resilient and may not detach from the plate after some time, and then there will be more cleaning because there is still glue from the tape. I do not like this solution, the more muck (aluminum adhesive tapes) in the remote control, the worse it is for it.
  • #6 11553798
    DziadzioMiecio
    Level 27  
    Terrible it is not done this way. When you have to come up with something, use the membranes from the cell phone keypad. Glue them with a thin foil, water rarely gets under them, sometimes you shouldn't change anything when it comes to the rubber bands.
  • #7 11557205
    FoxTech
    Level 20  
    First of all, when disassembling the remote control, you should use a plastic tool to lift the latches (special or e.g. an ATM, telephone card, etc.) and not a screwdriver, see what the places where you split it with a screwdriver look in the remote control. the electronics board should be washed. As for the repair of damaged buttons, I do not think that this repair would be the best solution, I would personally suggest replacing the damaged conductive erasers with new ones, you can buy special repair kits for this, or you can do it using a home-made method, i.e. cut off the damaged eraser with a razor blade and its paste the place on a piece of thick double-sided tape with a contact area cut out of a contact foil from an old computer keyboard. After assembling, the operation of the buttons can be tested using the phone's camera, simply use the remote control to aim at the camera lens on the phone and press each button in turn, the display shows the infrared LED lighting as white light.
  • #8 11557450
    h jaworski
    Home appliances specialist
    sq9mm wrote:
    then stock up on graphite spray and squirt the erasers after drying
    The graphite in the spray after time passes from the rubber bands to the PCB and makes a short circuit and either the remote control sends 1 command all the time or if 2 buttons short circuit, the remote control stops working. We tried to repair the remote controls with graphite 20 years ago, when after 2 weeks all started to come back on command, not working quickly, we withdrew from this method.
  • #9 11598919
    satanistik
    Level 27  
    I personally use a metallic foil from an old PC keyboard. I cut a circle out of two layers - the conductive one and the intermediate one with holes. Good method, but in fact the fat from the fingers and the constant pressure cause the degradation of the glued joints.
  • #10 14610842
    pmu
    Level 10  
    I will add my PLN 0.05, maybe I will shorten the repair for someone.
    After cleaning the Panasonic rubber keyboard and the plate, one more button did not work: POWER ON / OFF. I have already cut out (two tiny) buttons / contacts from the old Sony remote. The glue has already been prepared. The last time I scrubbed the broken button. I was scrubbing really hard by wiping the rubber contact of the Panasonic remote with a cotton pad: "What the hell. Now I can wipe off all the graphite. I'm going to cut it anyway." More perversely, I checked if it works ... and ... it works.
    The moral of this is that it is difficult to wipe off the conductive erasers produced at the beginning of this century of pilots. It is much easier to grind them with non-conductive liquid and dirt.
  • #11 15202128
    januszjh
    Level 17  
    The high conductivity of the aluminum foil is unlikely to damage the button, but if it peels off, it can move where it makes a short circuit, damaging the remote control. The double-sided tape is too thick and the button may turn on permanently. What is the best glue for the buttons on the remote control?
    Conductive rubber bands can be obtained from a damaged cheap calculator by cutting off the top with a razor blade or a scalpel.
    Once upon a time the buttons were made of plastic and the grease did not pass through the silicone. But now it's getting as cheap as possible ...
  • ADVERTISEMENT
  • #12 17720386
    kubass
    Level 11  
    Please tell me, are there any easier methods to repair pilots? I have a logitech harmony 525 and the exit button and menu stopped working. A few others also started to walk poorly, but these are the ones I use the most. I have to fix this because the remote is great. Is there any conductive varnish so as not to play with sticking rubber bands? I really don't like modeling and I feel that it will blow the remote control faster than stick one or two rubber bands.
  • #13 17727273
    h jaworski
    Home appliances specialist
    Buddy, you buy a pack of conductive rubber bands with glue for up to 5 zeta and you have rubber bands for several remote controls.
  • #14 17795966
    januszjh
    Level 17  
    Maybe so, but by the time there is a co-pilot, the glue will dry. And when necessary, it takes a few days to dry. And you have to scalp old erasers, which is all time-consuming. A pilot worth PLN 30 and work per hour. The idea with varnish is interesting.
  • #15 17799121
    h jaworski
    Home appliances specialist
    You do not need to scalp the old rubber bands, if the new ones are thin, the glue will not dry out when you screw the tube on. You can see that you did not make a single pilot with this method, I made hundreds, if not thousands.
  • #16 17964566
    malec82
    Level 11  
    Yo!
    I found this thread because I was looking for a method to repair the remote control myself. What my colleague Perszeron wrote seemed stupid, but the least demanding, so of course I decided to give it a try. IT WORKS! I do not know for how long, but right after the procedure it is ok.
    Greetings!
  • #17 18272719
    Zvirek
    Level 24  
    Let me refresh the topic, because a few weeks ago I used this method of rubber band regeneration and I am thinking about two issues.
    How long will this last? And the more difficult question - how does it work? the temperature causes the impurities to evaporate, or does it somehow change the structure of the conductive part of the rubber? Anyone wondering about this?
  • #18 18280794
    krzych890768
    Level 1  
    The percheron method works for me the immediate effect for how long?
  • #19 18658899
    GienekM
    Level 12  
    I found one more way:
    Scratch some graphite off the pencil onto the eraser of the broken button and rub it with this pencil - briefly ...
    For longer: rub this graphite into a 1/1 droplet of liquid silicone glue, mix well and apply to the buttons.
    Instead of pencil graphite, you can use a carbon core from the battery.
    Greetings
  • #20 18739381
    adasko83
    Level 10  
    perszeron wrote:
    Hello.
    Regarding the movie - repairing the remote control in this case always consists in replacing the conductive rubber bands. You shouldn't deviate from this rule, but if you want to fix it for yourself, this is a very simple way - just move the hot geothermal soldering iron over the eraser, which has lost its conductive properties. After that, there is no hassle with switching any more (simple and effective). I am giving this method, because I strongly advise against sticking a gold leaf (foil). ;-)
    Greetings.


    I confirm, it works. For how long? We'll see. I was a little worried about these rubber bands that they would melt. None of these things.

    Thanks a lot.
  • #21 19235004
    Zvirek
    Level 24  
    And I have an answer to the question "for how long" - for about half a year.
    That's why I gave up and used the proven method - glue plus new rubber bands.
  • #22 19604909
    Gelip
    Level 35  
    And I think I have a solution to all the disadvantages described here - description in commentary under the author's video, but I will write here as well. I warn you in advance that I have not tested but it seems very good:
    [letter: e250bb595d] [*: e250bb595d] we need a PCB size matrix, e.g. 5x20cm with holes, e.g. 5mm in places of buttons on the remote's PCB - you can remove the remote's PCB, scan or take a photo or simply measure and scratch it manually in a graphics program
    [*: e250bb595d] now we print it 1: 1 on the printer and cut holes and matrix (holes can be punched with a punch or a sharp drill or a punch - they are for making holes in leather belts)
    [*: e250bb595d] cut a rectangle from the aluminum foil reduced on each side by 0.5 - 1cm, which in our case is 4x19cm
    [*: e250bb595d] stick this strip of foil to the matrix with cut holes so that the foil is 0.5 cm from the edge - e.g. with adhesive tape (it would hold this 0.5 - 1 cm along the edges)
    [*: e250bb595d] now it is enough to put the side with holes and aluminum foil visible through the holes on the remote control PCB
    [*: e250bb595d] on it we put the membrane with rubber buttons and close the remote control [/ letter: u: e250bb595d]
    Of course, at the very beginning, after disassembling the remote control, we clean the PCB and the membrane with buttons.

    No dabbing with some tiny pieces of tape, foil and more tape.

    Added after 36 [minutes]:

    PS You can always like this:
    How To Fix Your RTV Remote Effectively, Quickly Without Effort and Expenses How To Fix Your RTV Remote Effectively, Quickly Without Effort and Expenses

    8-) :lol: :D
  • #23 19618904
    Anonymous
    Level 1  
  • #24 19619021
    Gelip
    Level 35  
    Jakub Urban wrote:
    Your "patent" is a solution straight from the 70's

    If so, the author's patent is probably the "stone age" :-)
    Anyway, the topic is not about whether it pays off or not, just how to effectively repair it. I have an old universal remote for which I once gave a lot and I am not going to throw it away because sometimes it can be useful to set up a device.
  • #25 19620525
    Anonymous
    Level 1  
  • #26 19620651
    Gelip
    Level 35  
    Jakub Urban wrote:
    I also have an EL-MAK, MAK MAXIM remote control but it did not fall apart and it looks like new.

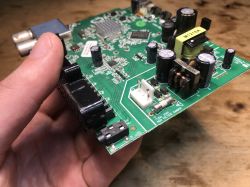
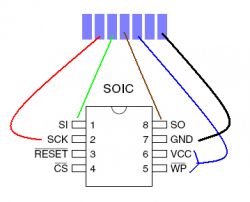
    Unfortunately, I can not say the same about the Mak Maxi 2000 - the buttons stopped working and it was probably quite quickly, I did wrong that I threw the rubber membrane because now it would be useful for my patent. So everything else works as needed set (do not use) it comes in handy. I tried to decipher what this connector on the PCB is and I got the following connections:
    How To Fix Your RTV Remote Effectively, Quickly Without Effort and Expenses How To Fix Your RTV Remote Effectively, Quickly Without Effort and Expenses
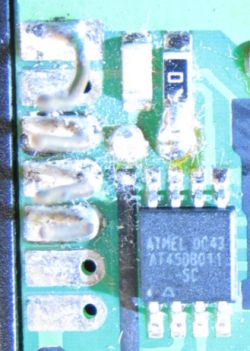
    I also tried to clip the firmware from the chip - I think AT45DB011-SC but either my programmer does not recognize this chip or it cannot be copied in the system (soldered)
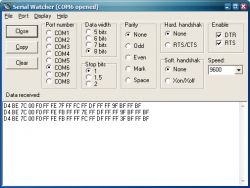
    I also connected the USB-TTL FTDI converter without a power pin (battery powered) and when I press the button, Serial Watcher shows some data - probably IR. SO to RXD and GND ground to ground:
    How To Fix Your RTV Remote Effectively, Quickly Without Effort and Expenses
    I also asked the manufacturer via e-mail what this connector was and whether it was possible to update the firmware - unfortunately I did not get an answer.
  • #27 19860293
    mirek 1
    Level 11  
    There are replacements at a very low price, repair is sometimes not profitable.
  • ADVERTISEMENT
  • #28 20074375
    mar_tym
    Level 2  
    I opened the Hitachi 43HAK5750 TV remote control and for the first time I saw a construction where there is a foil with metal "points" on the PCB, the rubber bands do not short-circuit, they only press / deform these convex points. Has anyone encountered such a construction, can guide me where / how to look for some materials on this topic?

    In general, in my case, the two (most popular) buttons interrupt a bit. I was considering trying to rinse with alcohol, but I'm not sure if the foil will peel off the plate - it seems to be stuck.

    I would be grateful for any advice.

Topic summary

The discussion revolves around effective methods for repairing malfunctioning remote controls, particularly focusing on the ONKYO RC-647M. Users share various techniques, including using aluminum foil, conductive rubber bands, and graphite spray. Some suggest replacing conductive rubber bands with new ones or using conductive varnish, while others caution against methods that may lead to short circuits or degradation over time. The importance of cleaning the remote's PCB and using appropriate tools for disassembly is emphasized. Several users report success with different methods, but there are concerns about the longevity and reliability of these repairs.
Summary generated by the language model.
ADVERTISEMENT