The author, while shopping with his girlfriend, had quite a lot of time to think and look around. As he wandered from store to store, a mirror displaying inscriptions caught his attention. It was then that he had the idea to build a similar one, but better for himself. Your own magic mirror!
What is needed to build such a system?
* Mirror
* Thin monitor
* Raspberry Pi
* Some wood and paint for the case
* A lot of free time.
Let's follow the stages of the project in turn.
Mirror
In the described system, an ordinary mirror would not work, so you need to use another - translucent one. The mirror should be chosen so that when the monitor screen behind it is blank - black - behaves like a normal mirror, but when the monitor is lit, it allows you to view the displayed information as on the screen. Venetian mirrors, often seen in films in interrogation scenes, work on the same principle. When the light is on in one of the rooms and it is dark in the other, the Venetian mirror allows you to look through them only in one direction. Besides, it's just ordinary glass.
Buying such a mirror is not as easy as it may seem. The glazier from whom we buy them may have various insinuations as to the purpose of their purchase ... Basically, such mirrors are used for peeking, so the associations are self-evident. Despite temporary problems, the author of the project has purchased the mirror and can continue assembling the Magic Mirror.
Monitor
The second critical element of Magic Mirror is the monitor behind the mirror. When selecting a monitor, the author had to make many decisions: whether to be a new or used monitor; what size monitor is needed; how thin a monitor can be purchased; how to place the control buttons of the monitor; will the monitor be bright enough?
As the monitor will be placed vertically (in portrait orientation, not horizontally as usual), the choice of monitor size was a factor in choosing its appropriate width, which translates into height in this arrangement. After making some adjustments and a few simple measurements, the author came to the conclusion that a 24 "monitor would be perfect for its use. An additional advantage of using such a monitor is the fact that most cheap 24" monitors work natively at 1080p resolution - and this is what the author wants to use for displaying information.
Now it was only necessary to find the right model. The author toured all the stores within 20 km of his home, often arousing security interest when he looked at the monitors, especially from the back and bottom. Why is it so important? It's about the arrangement of the connectors. Most of the monitors had the connectors at the rear. The author was looking for one that has the pinouts on the side.
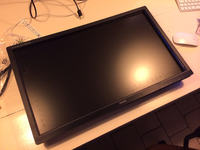
The search ended with the selection of an Iiyama monitor. They are quite cheap, have a small size, have simple touch buttons and a connector located on the side of the housing. At this stage, it was still unknown whether the casing would be easy to remove and how the buttons were connected, but unfortunately no retailer allowed the casing to be opened in a store to check it.
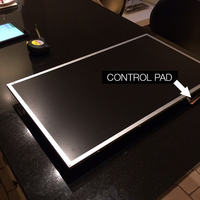
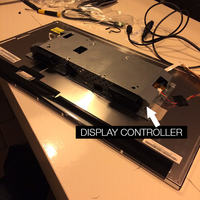
The author chose a 24-inch monitor from Iiyama, model E2481HS-B1. In order to minimize the distance between the monitor and the mirror glass, the author removed the casing from the monitor. It turned out that the internal screen of the monitor quite tightly covers the electronics, which does not take up too much space, which leaves a lot of space around it to place the necessary elements in the Magic Mirror housing.
The monitor itself, after removing the housing, is about 10 mm, after adding the controller, the author has set the dimensions of the whole: 556 mm x 323 mm x 46 mm (+ 6mm for the mirror). These dimensions define the size of the entire device and the size of the enclosure that had to be constructed.
Case
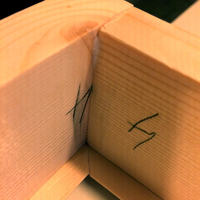
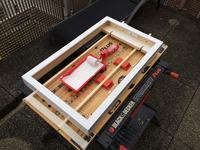
After removing the dimensions from the monitor with the mirror, it was possible to start assembling the housing. It is made of wood glued together to form a durable mirror frame.
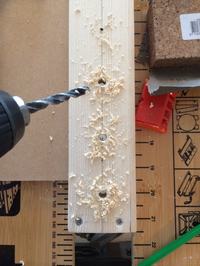
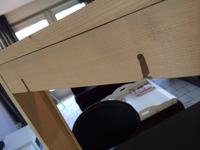
As the electronics inside the mirror will generate a lot of heat, the author drilled a number of ventilation holes in the housing. Elements that will allow it to be hung on the wall have also been added. The whole thing weighs around 6.5 kg, so you need a strong suspension point. A small slot for the power cable has been added to the bottom of the case.
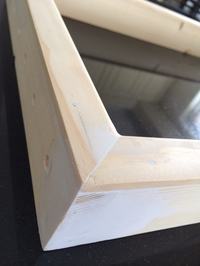
After assembling the frame and filling all imperfections, the frame was sanded and painted - with paint with two layers of varnish. The chip housing was ready.
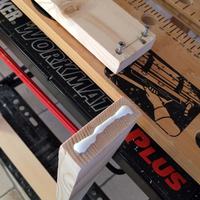
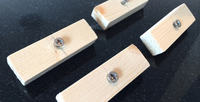
Additionally, in order to fix the mirror in the housing, it was necessary to make four brackets that will be screwed to the frame and will hold the mirror pane in the right position. After the carpentry work, it was possible to move on to the next stage of the project - electronics assembly.
Electronics installation
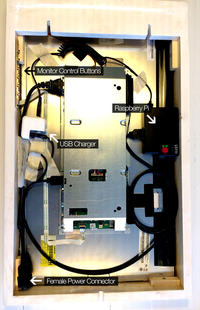
Inside the housing there are the following elements:
* Monitor
* A Raspberry Pi
* HDMI cable connecting the 'Raspberry' with the monitor
* USB-microUSB cable for powering the Raspberry Pi
* Monitor power cable.
The author assumed that the computer's power supply would be solved via the USB port in the monitor, after all, all modern monitors have a USB port ... It turned out otherwise - this monitor was not equipped with such a socket, which generated an additional problem.
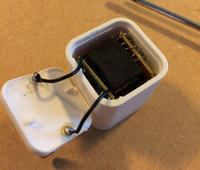
It is not an insoluble problem, but in order for no additional cables to protrude from the mirror, it had to be elegantly solved. The author added a USB power supply and installed it so that it was integrated with the monitor's power cable.
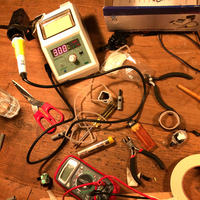
The USB power supply is mounted directly on the power cable and fixed with glue and insulating tape. The system looked really professional. Now is the time to test the power. All the elements were connected and the device plugged into a 230 V socket. The system worked without any problems, the Raspberry Pi was loaded and nothing seemed to be overheating. In a word - ideal.
Unfortunately, 10 minutes later, the fuses in the apartment blown and cut off the power. It was not difficult to guess what was the cause of the failure ... After connecting the system to the power supply - this time with the unplugged Raspberry Pi and the monitor we could hear only a loud boom, and smoke flew from the USB power supply. Therefore, the solution created by the author did not work ...
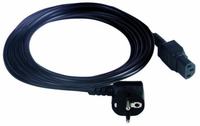
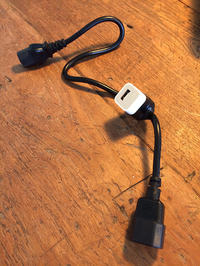
It's hard to see what caused the crash, but it didn't do the job for the cheap USB power supply. Maybe it was damaged while soldering it to the power cord, or the 'Raspberry' was drawing too much current. Either way, another solution was necessary. The author changed the power cable so that one part of it could be connected to the USB charger for the iPad, and the other to the monitor's power supply. This time the system worked flawlessly and nothing was burnt. The next step to the project implementation.
Proper powering of the entire system on the table allowed us to proceed to the next stage of the project - installation of the Raspberry Pi in the housing.
Installing the Raspberry Pi
When the whole system is assembled, the Raspberry Pi - the heart of the Mirror - can be screwed into the housing. You need to configure the following in 'Raspberry':
* Connection to a WiFi network
* Screen rotation 90 degrees
* Local web server for application presentation
* Browser working in full screen mode
The operating system chosen to control the Mirror is of course Raspbian. This OS is very flexible and has a lot of support for users. After downloading the image, load it on the SD card, which unfortunately takes a lot ...
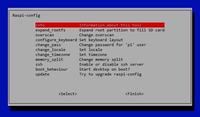
After inserting the SD card into the system, the system will load, which allows you to log in and run the configuration wizard. You can get to it at any time through the raspi-config command running with admin rights. In the configuration, you need to take care of the following things:
* Make sure that the system will be loaded to the desktop and not to e.g. the command line / text terminal;
* Configure time zones so that the computer displays the correct time;
* Reserve 128 MB of RAM for the graphics processor in the advanced settings.
The configuration can be played with impunity anywhere, but remember - if something goes wrong, it will be necessary to reinstall the system on the SD card, which as mentioned above - takes a lot of time ...
WiFi configuration
The installation of a wireless USB WiFi adapter is highly dependent on the card used. Some models are quite problematic to configure, but once launched, they should work flawlessly all the time. The author writes that it was the most problematic element of computer configuration.
Screen rotation
As the monitor screen is rotated from its normal position, it is necessary to flip it in the system. The effective resolution is then 1080 x 1920 px. It turned out to be very easy, it was enough to find the configuration file config.txt in the / boot folder and add the line in it:
In order for the monitor to work more efficiently, the author additionally commented on the line responsible for connecting HDMI 'hot':
After saving the changed settings and restarting the computer, everything should work immediately.
Webserver
The mirror interface is a simple website, therefore a web server, for example the popular Apache, is required to display it. Its installation and commissioning are very simple, just follow the steps below one by one. First, we make sure our system is up to date:
Then download and install apache:
Ready! However, if we want to use PHP on our web server (and we want to), we need to install the modules responsible for its operation:
And again - done! after the machine reset, the Apache server will be operational. If we now put the index.php file in the / var / www folder and enter the Raspberry Pi IP browser, we will see the content of the page from index.php
Kiosk mode [/ b]
To make sure that the computer will display the page correctly every time, we will use the Chromium browser in the so-called Kiosk mode. Its installation is extremely simple:
At this stage, we also have to bury a little bit in the system configuration to disable the screen saver and automatically boot the system in the described mode. Just add a box (#) before the line in the / etc / xdg / lxsession / LXDE-pi / autostart file:
And add the following lines:
These entries will turn off the screen saver completely and make Chromium run in the mode we set, launching the local page immediately in full-screen mode. You can now save and restart our microcomputer. After launching, the page loads correctly, so everything is fine and we can move on.
Creating an interface
The assumption of the project was quite simple: the interface was to be 100% passive. It would be difficult to implement interaction with the user in this system - the touch interface would dirty the mirror and most importantly: there are better devices for such solutions. Additionally, the mirror is also intended to be usable as a mirror. The excess of information on the display would be difficult to reconcile with the possibility of viewing it, so the author decided to use a passive interface that presents the following information:
* Compliments, because it's best to start the day with a nice word;
* The weather, because since we are getting dressed, it is good to know if the conditions outside allow us to assume this or that.
* A clock with a calendar - it will let us know how much time we have left;
* Messages, because we would like to know if our appearance is the only thing we should worry about.
Of course, the system is open-ended and allows modifications to be made at any time, so further functions can be added at any time.
The information is displayed as a website written in HTML with CSS and Javascript. The author used this opportunity to test not only his skills, but also the ability to write pages on an Apple computer.
In addition to the self-created code, the application uses several open libraries, which turned out to be necessary to speed up the creation of the page. Those are:
* Jquery
* Moment.js
* FeedToJson
* ICal parser
Moment.js allows you to conveniently work with dates and times, which makes it much easier to create an application with a clock with a calendar. FeedToJson and the iCal parser can import data from RSS feeds and the iCal calendar, respectively. The data is imported in JSON format, which makes it extremely easy to process it via HTML and Javascript responsible for the website.
[u] Project
A magic mirror must be pretty. The author - Apple fanboy - decided to use the company's style with an apple in the logo in this matter and used Apple's Design Guidelines.
As the mirror is to allow viewing, the background must be black; therefore the letters are displayed in white and shades of gray. Of course, you could add colorful elements, but the author decided to stay true to the minimalist style.
API
The data to be displayed on the mirror is taken from a number of streams and via an API. The author uses, inter alia:
* Openweathermap.org for downloading weather data and meteorological forecasts. The API of this system allows you to download weather for a specific location and date.
* ICal calendar; iCloud allows you to share your calendar in the iCal format. However, it cannot be downloaded directly with Javascript (for security reasons) data is downloaded through a proxy written in PHP:
[syntax=php]
What is needed to build such a system?
* Mirror
* Thin monitor
* Raspberry Pi
* Some wood and paint for the case
* A lot of free time.
Let's follow the stages of the project in turn.
Mirror
In the described system, an ordinary mirror would not work, so you need to use another - translucent one. The mirror should be chosen so that when the monitor screen behind it is blank - black - behaves like a normal mirror, but when the monitor is lit, it allows you to view the displayed information as on the screen. Venetian mirrors, often seen in films in interrogation scenes, work on the same principle. When the light is on in one of the rooms and it is dark in the other, the Venetian mirror allows you to look through them only in one direction. Besides, it's just ordinary glass.
Buying such a mirror is not as easy as it may seem. The glazier from whom we buy them may have various insinuations as to the purpose of their purchase ... Basically, such mirrors are used for peeking, so the associations are self-evident. Despite temporary problems, the author of the project has purchased the mirror and can continue assembling the Magic Mirror.
Monitor
The second critical element of Magic Mirror is the monitor behind the mirror. When selecting a monitor, the author had to make many decisions: whether to be a new or used monitor; what size monitor is needed; how thin a monitor can be purchased; how to place the control buttons of the monitor; will the monitor be bright enough?
As the monitor will be placed vertically (in portrait orientation, not horizontally as usual), the choice of monitor size was a factor in choosing its appropriate width, which translates into height in this arrangement. After making some adjustments and a few simple measurements, the author came to the conclusion that a 24 "monitor would be perfect for its use. An additional advantage of using such a monitor is the fact that most cheap 24" monitors work natively at 1080p resolution - and this is what the author wants to use for displaying information.
Now it was only necessary to find the right model. The author toured all the stores within 20 km of his home, often arousing security interest when he looked at the monitors, especially from the back and bottom. Why is it so important? It's about the arrangement of the connectors. Most of the monitors had the connectors at the rear. The author was looking for one that has the pinouts on the side.
The search ended with the selection of an Iiyama monitor. They are quite cheap, have a small size, have simple touch buttons and a connector located on the side of the housing. At this stage, it was still unknown whether the casing would be easy to remove and how the buttons were connected, but unfortunately no retailer allowed the casing to be opened in a store to check it.
The author chose a 24-inch monitor from Iiyama, model E2481HS-B1. In order to minimize the distance between the monitor and the mirror glass, the author removed the casing from the monitor. It turned out that the internal screen of the monitor quite tightly covers the electronics, which does not take up too much space, which leaves a lot of space around it to place the necessary elements in the Magic Mirror housing.
The monitor itself, after removing the housing, is about 10 mm, after adding the controller, the author has set the dimensions of the whole: 556 mm x 323 mm x 46 mm (+ 6mm for the mirror). These dimensions define the size of the entire device and the size of the enclosure that had to be constructed.
Case
After removing the dimensions from the monitor with the mirror, it was possible to start assembling the housing. It is made of wood glued together to form a durable mirror frame.
As the electronics inside the mirror will generate a lot of heat, the author drilled a number of ventilation holes in the housing. Elements that will allow it to be hung on the wall have also been added. The whole thing weighs around 6.5 kg, so you need a strong suspension point. A small slot for the power cable has been added to the bottom of the case.
After assembling the frame and filling all imperfections, the frame was sanded and painted - with paint with two layers of varnish. The chip housing was ready.
Additionally, in order to fix the mirror in the housing, it was necessary to make four brackets that will be screwed to the frame and will hold the mirror pane in the right position. After the carpentry work, it was possible to move on to the next stage of the project - electronics assembly.
Electronics installation
Inside the housing there are the following elements:
* Monitor
* A Raspberry Pi
* HDMI cable connecting the 'Raspberry' with the monitor
* USB-microUSB cable for powering the Raspberry Pi
* Monitor power cable.
The author assumed that the computer's power supply would be solved via the USB port in the monitor, after all, all modern monitors have a USB port ... It turned out otherwise - this monitor was not equipped with such a socket, which generated an additional problem.
It is not an insoluble problem, but in order for no additional cables to protrude from the mirror, it had to be elegantly solved. The author added a USB power supply and installed it so that it was integrated with the monitor's power cable.
The USB power supply is mounted directly on the power cable and fixed with glue and insulating tape. The system looked really professional. Now is the time to test the power. All the elements were connected and the device plugged into a 230 V socket. The system worked without any problems, the Raspberry Pi was loaded and nothing seemed to be overheating. In a word - ideal.
Unfortunately, 10 minutes later, the fuses in the apartment blown and cut off the power. It was not difficult to guess what was the cause of the failure ... After connecting the system to the power supply - this time with the unplugged Raspberry Pi and the monitor we could hear only a loud boom, and smoke flew from the USB power supply. Therefore, the solution created by the author did not work ...
It's hard to see what caused the crash, but it didn't do the job for the cheap USB power supply. Maybe it was damaged while soldering it to the power cord, or the 'Raspberry' was drawing too much current. Either way, another solution was necessary. The author changed the power cable so that one part of it could be connected to the USB charger for the iPad, and the other to the monitor's power supply. This time the system worked flawlessly and nothing was burnt. The next step to the project implementation.
Proper powering of the entire system on the table allowed us to proceed to the next stage of the project - installation of the Raspberry Pi in the housing.
Installing the Raspberry Pi
When the whole system is assembled, the Raspberry Pi - the heart of the Mirror - can be screwed into the housing. You need to configure the following in 'Raspberry':
* Connection to a WiFi network
* Screen rotation 90 degrees
* Local web server for application presentation
* Browser working in full screen mode
ADVERTISEMENT
The operating system chosen to control the Mirror is of course Raspbian. This OS is very flexible and has a lot of support for users. After downloading the image, load it on the SD card, which unfortunately takes a lot ...
After inserting the SD card into the system, the system will load, which allows you to log in and run the configuration wizard. You can get to it at any time through the raspi-config command running with admin rights. In the configuration, you need to take care of the following things:
* Make sure that the system will be loaded to the desktop and not to e.g. the command line / text terminal;
* Configure time zones so that the computer displays the correct time;
* Reserve 128 MB of RAM for the graphics processor in the advanced settings.
The configuration can be played with impunity anywhere, but remember - if something goes wrong, it will be necessary to reinstall the system on the SD card, which as mentioned above - takes a lot of time ...
WiFi configuration
The installation of a wireless USB WiFi adapter is highly dependent on the card used. Some models are quite problematic to configure, but once launched, they should work flawlessly all the time. The author writes that it was the most problematic element of computer configuration.
Screen rotation
As the monitor screen is rotated from its normal position, it is necessary to flip it in the system. The effective resolution is then 1080 x 1920 px. It turned out to be very easy, it was enough to find the configuration file config.txt in the / boot folder and add the line in it:
display_rotate=1In order for the monitor to work more efficiently, the author additionally commented on the line responsible for connecting HDMI 'hot':
hdmi_force_hotplug=1After saving the changed settings and restarting the computer, everything should work immediately.
Webserver
The mirror interface is a simple website, therefore a web server, for example the popular Apache, is required to display it. Its installation and commissioning are very simple, just follow the steps below one by one. First, we make sure our system is up to date:
sudo apt-get update && apt-get upgrade -yThen download and install apache:
sudo apt-get install apache2 apache2-doc apache2-utilsReady! However, if we want to use PHP on our web server (and we want to), we need to install the modules responsible for its operation:
sudo apt-get install libapache2-mod-php5 php5 php-pear php5-xcacheAnd again - done! after the machine reset, the Apache server will be operational. If we now put the index.php file in the / var / www folder and enter the Raspberry Pi IP browser, we will see the content of the page from index.php
Kiosk mode [/ b]
To make sure that the computer will display the page correctly every time, we will use the Chromium browser in the so-called Kiosk mode. Its installation is extremely simple:
sudo apt-get install chromium x11-xserver-utils unclutterAt this stage, we also have to bury a little bit in the system configuration to disable the screen saver and automatically boot the system in the described mode. Just add a box (#) before the line in the / etc / xdg / lxsession / LXDE-pi / autostart file:
@xscreensaver -no-splashAnd add the following lines:
@xset s off
@xset -dpms
@xset s noblank
@chromium --kiosk --incognito http://localhost
These entries will turn off the screen saver completely and make Chromium run in the mode we set, launching the local page immediately in full-screen mode. You can now save and restart our microcomputer. After launching, the page loads correctly, so everything is fine and we can move on.
Creating an interface
The assumption of the project was quite simple: the interface was to be 100% passive. It would be difficult to implement interaction with the user in this system - the touch interface would dirty the mirror and most importantly: there are better devices for such solutions. Additionally, the mirror is also intended to be usable as a mirror. The excess of information on the display would be difficult to reconcile with the possibility of viewing it, so the author decided to use a passive interface that presents the following information:
* Compliments, because it's best to start the day with a nice word;
* The weather, because since we are getting dressed, it is good to know if the conditions outside allow us to assume this or that.
* A clock with a calendar - it will let us know how much time we have left;
* Messages, because we would like to know if our appearance is the only thing we should worry about.
Of course, the system is open-ended and allows modifications to be made at any time, so further functions can be added at any time.
The information is displayed as a website written in HTML with CSS and Javascript. The author used this opportunity to test not only his skills, but also the ability to write pages on an Apple computer.
In addition to the self-created code, the application uses several open libraries, which turned out to be necessary to speed up the creation of the page. Those are:
* Jquery
* Moment.js
* FeedToJson
* ICal parser
Moment.js allows you to conveniently work with dates and times, which makes it much easier to create an application with a clock with a calendar. FeedToJson and the iCal parser can import data from RSS feeds and the iCal calendar, respectively. The data is imported in JSON format, which makes it extremely easy to process it via HTML and Javascript responsible for the website.
[u] Project
A magic mirror must be pretty. The author - Apple fanboy - decided to use the company's style with an apple in the logo in this matter and used Apple's Design Guidelines.
As the mirror is to allow viewing, the background must be black; therefore the letters are displayed in white and shades of gray. Of course, you could add colorful elements, but the author decided to stay true to the minimalist style.
API
The data to be displayed on the mirror is taken from a number of streams and via an API. The author uses, inter alia:
* Openweathermap.org for downloading weather data and meteorological forecasts. The API of this system allows you to download weather for a specific location and date.
* ICal calendar; iCloud allows you to share your calendar in the iCal format. However, it cannot be downloaded directly with Javascript (for security reasons) data is downloaded through a proxy written in PHP:
[syntax=php]
Cool? Ranking DIY


