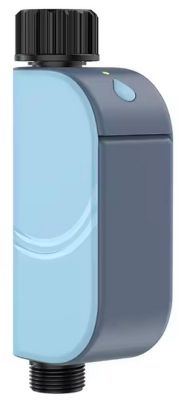
It has a screen, lots of measurements, relay, earth leakage detection.
It feels substantial and well made, much better than other similar AliExpress products.
The case is secured with 2 screws, no clips and no rivets. Comes apart very easily.
It opens to reveal a device with a pin-mounted daughterboard that easily lifts off, no solder.
Removing the daughterboard reveals the CPU; another CB3S, it's a BK7231N?
The back side of the daughterboard reveals what looks similar to another TuyaMCU I saw in another device, but not the same... so I'm not yet sure exactly what it is.
The only pins connected are VCC/GND, P6, P9, and RX/TX, and looking at the PCB, I it appears P6/P9 do not go anywhere; I think they're just soldered to increase strength.
So, VCC, GND, RX, TX... must be TuyaMCU? Just different looking/different version chips?
I'll break out the uart and take some captures of the comms to see how they communicate later on.
Thank you for showing us this interesting device. I would like to get it supported, we will most likely take the approach similar to here:
https://www.elektroda.com/rtvforum/topic3928897.html This device is also using TuyaMCU, most likely.
Here is CB3S pinout:
Pin number
Symbol
I/O type
Function
1
RST
I
Low-level reset, high level active (the pin has been pulled high internally), correspond to CEN of the IC
2
ADC3
AI
ADC pin, which corresponds to P23 of the IC
3
CEN
I
Enabling pin, which is pulled high internally to be compatible with other modules
4
P14
I/O
A common GPIO interface, which corresponds to P14 of the IC
5
P26
I/O
GPIOP_26, which corresponds to P26 of the IC, PWM 5
6
P24
I/O
GPIOP_24, which corresponds to P24 of the IC, PWM 4
7
P6
I/O
GPIOP_6, which corresponds to P6 of the IC, PWM 0
8
VCC
P
Power supply pin (3.3V)
9
GND
P
Power supply reference ground
10
P9
I/O
GPIOP_9, which corresponds to P9 of the IC, PWM 3
11
TXD2
I/O
UART2_TXD (used to display the module internal information), which corresponds to P0 of the IC
12
CSN
I/O
Production test control pin. If it is used as a common I/O pin, it must be connected to the VCC externally. Do not connect it to the ground before the module is powered on.
13
P8
I/O
GPIOP_8, which corresponds to P8 of the IC, PWM 2
14
P7
I/O
GPIOP_7, which corresponds to P7 of the IC, PWM 1
15
RXD1
I/O
UART1_RXD (user serial interface), which corresponds to P10 of the IC. Do not connect it to the VCC. By default, the MCU serial port should be in low-level or high-impedance state.
16
TXD1
I/O
UART1_TXD (user serial interface), which corresponds to P11 of the IC. Do not connect it to the VCC. By default, the MCU serial port should be in low-level or high-impedance state.
17
ADC3
AI
(Not recommended. If needed, please use Pin 2) ADC port, which corresponds to P23 of the IC. Programmed SPI
18
P22
I/O
(Not recommended ) GPIOP_22, which corresponds to P22 of the IC. Programmed SPI
19
CSN
I/O
The pull-up resistor is needed during usage of customers. Do not connect it to the ground before the module is powered on. Correspond to P21 of the IC.
20
P20
I/O
(Not recommended. ) GPIOP_20, which corresponds to P20 of the IC. Programmed SPI
21
NC
-
-
22
NC
-
-
For a start, let's capture some TuyaMCU data. Do not flash OBK yet.
All you need to do is:
1. 3.3V LDO power supply (connect GND and 3.3V)
If you don't want to use 3.3V, it is possible to connect 5V if you have located the 3.3V LDO on the board of device. Connect 5V to input of the LDO and you will get 3.3V output for the board. Direct connection of 5V to CB3S will destroy CB3S
2. USB to UART converter in 3.3V levels mode
3. connect RX of UART converter to RX pin of CB3S
4. keep UART converter connected to PC
5. start RealTerm, baud 9600 most likely
6. power on device by that 5V or 3.3V (do not power from mains, because it is dangerous)
7. You should see packets in realterm
8. then do again but in capture mode:
9. You should create capture showing device usage, something like:
above sample is from dimmer 10. Repeat the same for TX pin of CB3S (because you can separately capture what CB3S sends to TuyaMCU, and what TuyaMCU sends to CB3S)
11. Then I will be able to use my TuyaMCU analyzer tool to determine dpIDs and config:
NOTE: it is also possible to skip packets capture on UART and straight up check them in OBK, but it's not always a very reliable way Another option would be to find some docs for an ESP8266 version of this device and use them, maybe Tuya didn't change DPid while migrating to BK....
NOTE2: The TuyaMCU is using the same TX/RX as a flashing interface. You might have problems with flashing with TuyaMCU connected due to the interference (TuyaMCU interferes with flashing). You can disconnect TuyaMCU for the time of flashing OpenBeken to the device.
Yes I'll take a dump when I can work out how to access the TX/RX pins while it's powered on... the circuit is hard to follow, and I couldn't find an obvious place where the TX/RX lines shunt from the main board to the daughterboard... there must be pins to relay the RS232 comms, but I can't measure them with a continuity meter... maybe there's some resistors or buffering hardware or something in between?
Also, the VCC seems complicated, like you said above; I can't find 3.3V continuity from the main power hardware to the chip. I can solder 3.3V to the chip directly, but I suspect that TuyaMCU and screen may not get their power if I do that, and the test will be useless!
Do you have something more firm to help me work out what I'm looking for with the 5V line?
Added after 12 [minutes]:
p.kaczmarek2 wrote:
You can disconnect TuyaMCU for the time of flashing OpenBeken to the device.
Yes, fortunately the daughterboard just sits on pins; simply lift it off, no problem!
I think this is one of the best DIN rail meters I've ever found in terms of features, build quality, and ease of liberating... assuming we can make it work!
Through all this though, the screen shows "0V", and "OFF" on it... my guess is that it doesn't actually work properly when the mains isn't connected.
I'll have to do these captures on 240V power O_O
Added after 13 [minutes]:
Okay, I took readings when powered from the mains, and it all looks much more sensible.
There was nothing on the load side, so the voltage should read ~247V, but ~0A... I saw the thing show a couple milli-Amps on the screen occasionally, maybe it's power used to power the device itself, so you might notice a very small Amp reading...?
It's very important to determine if the device accumulates and reports kWh internally, or if it just reports discreet readings every few moments and expects external software to accumulate? I would expect it to internally maintain and report a kWh counter, otherwise it would be quite imprecise over a long time; short spikes or noise between samples may go un-noticed.
Somewhere there in the last block is the power-off sequence, but I didn't note the offset when I powered the device off... I guess it's after the last 55AA sequence. Not sure if legit comms, or just noise that happens while the unit is powering down.
Somewhere there in the last block is the power-off sequence, but I didn't note the offset when I powered the device off... I guess it's after the last 55AA sequence. Not sure if legit comms, or just noise that happens while the unit is powering down.
I could try to decrypt more and then add support to OpenBeken, but I would need, for instance, a sample with 60W bulb load and then a sample with 10W bulb load so I can compare the data
Yes I need to get a bulb fixture to wire in for load testing.
I need some kind of device with a very precise and stable AMP draw (ideally PF1); some devices require calibration..
Added after 6 [hours] 13 [minutes]:
Here's another one, this time with my ~20W soldering iron.
Voltage tonight is 239 - 240V
I saw a bunch of 50's above, that's probably the 50hZ AC frequency?
The soldering iron read 0.2A for a short while after turning on, then settled on 0.1A (probably when it warmed up).
.... and there goes that one!
I was doing another capture with a higher power device (my phone's fast-charger) as another voltage reference, and when it turned the relay on it tripped the house circuit breaker.
Now when I try and power the device, it powers on for a few moments, then loses power for a moment, comes back, and repeats... it gets stuck in a sort of boot loop.
I guess the device is electrically damaged. I have no idea what I did, but I guess I blew it up!
I hope there's plenty of data there...
Added after 12 [minutes]:
One thing I noted is the CB3S gets very hot very fast. It's such a low power chip, and it's not doing a whole lot of work... should it get hot?
I think the TuyaMCU is waiting for the CB3S to boot, notes that it's not responsive or crashed, and then reboots the whole system and starts over, gets stuck in a reboot cycle driven by TuyaMCU failing to communicate with the CB3S?
I think the wifi module is the dead part.
The Tuya seems to work on bootup for a while, screen displays, it shows correct voltage and current readings at power-on, then it enters a 30s bootup countdown sequence which I think is waiting for the wifi module to come online... then shortly after that 30s count finishes, the device appears to go into a hard reset cycle.
In addition to that, the screen seems to have been damaged. At power-on, the screen is not as bright as it was before, and over the 30s countdown, the screen slowly fades away until it's not visible.
I don't have the electronics skills to fix this
The only theory I have, is when I was trying to work out how to power the wifi+tuya to take the first round of readings, I couldn't find a 3.3V source... there didn't seem to be one. You suggested I look for a 5V source, so I did... I powered it on from the mains and measured the voltage on the pins next to the GND pins that looked in the appropriate area for power delivery, and I did find a pin that was 5V to GND, so I guessed that was the power source.
I wired up a 5V power supply and turned it on and everything seemed to boot up fine so I could do my tests... but then I realised that without the mains power connected, the device just reported "OFF", and so I couldn't capture any measurement comms... so I had to do the captured with mains power.
I suspect maybe I damaged it while powering from external 5V, even though it seemed to be working fine... maybe something burned? (even though I measure 5V when it's on and operating normally on that line.
How else to capture UART readings?
3.3V is available on the module, but powering the wifi module with 3.3V didn't also power the Tuya MCU circuit... so I can flash the wifi module, but I couldn't take any communication readings because the Tuya wasn't live.
Another problem was with no mains connected; when powering the whole thing with 5V which included the Tuya and screen, the device just said "OFF" and there was basically no relevant communication.
I couldn't capture anything useful without the power supply available. I mean, I'll try not to kill myself!
I bought another one of these... I'd like to get it working; where were we at with this? Do you have the data you need? Should I capture more?
These TuyaMCU devices are a hassle; how to we package the comms data into a config that can be shared?
✨ The discussion revolves around the teardown and analysis of the BK7231N Tuya Smart DIN-Rail Relay and Energy Meter purchased from AliExpress. The device features a display, multiple measurement capabilities, a relay, and earth leakage detection. Users noted its solid build quality compared to other similar products. The teardown revealed a pin-mounted daughterboard with a CB3S CPU, suspected to be a BK7231N. Participants discussed accessing TX/RX pins for UART communication, the complexity of the power supply, and the need for load testing to capture accurate data. There were attempts to analyze communication packets and explore firmware flashing options, with suggestions for tools to facilitate this process. Issues with the WiFi module and device functionality were also highlighted, indicating potential repair challenges. Generated by the language model.
TL;DR: BK7231N/CB3S DIN‑rail meter uses 9600 baud and 3.3V; "Do not flash OBK yet," advises the maintainer. This FAQ helps makers safely capture TuyaMCU frames, map DPIDs, and avoid 5V damage. [Elektroda, p.kaczmarek2, post #20283934]
Why it matters: Makers and OpenBeken users can integrate this AliExpress DIN‑rail meter without bricking hardware or probing live mains.
Which MCU and radio module are inside this DIN‑rail meter?
The teardown reveals a Tuya CB3S Wi‑Fi module with a BK7231N SoC. It sits on a pin-mounted daughterboard for easy removal. Functional connections are VCC, GND, RX, and TX used for TuyaMCU. P6 and P9 appear unconnected and likely add mechanical strength. [Elektroda, TurkeyMan, post #20283689]
How do I safely capture TuyaMCU UART packets without mains?
Use low-voltage bench power and a 3.3V USB‑UART. How‑To:
Power the board at 3.3V, or feed 5V into the LDO input.
Connect the USB‑UART (3.3V levels) to CB3S and monitor RX and TX separately.
Capture at 9600 baud. On CB3S, use UART1: pin 15 is RXD1, and pin 16 is TXD1. TXD2 on pin 11 outputs internal module information. These are 3.3V logic lines, so match levels on your USB‑UART adapter. [Elektroda, p.kaczmarek2, post #20283934]
Should I flash OpenBeken right away?
No. “Do not flash OBK yet.” First, capture TuyaMCU packets to identify DPIDs and behavior. Flashing later avoids interference and preserves reference data. This approach speeds support and reduces risk. Use UART captures to inform your OpenBeken template. [Elektroda, p.kaczmarek2, post #20283934]
Is it safe to capture or flash while the device is on mains?
Work off mains. “I don’t recommend doing flashing/ UART readings from device that is connected to mains.” Use isolated bench power for the logic section. This minimizes shock risk and prevents ground-related damage during probing or flashing. [Elektroda, p.kaczmarek2, post #20323322]
How do I power the board on the bench without frying CB3S?
Feed the module with 3.3V. If you must use 5V, only inject it at the input of the onboard 3.3V LDO. “Direct connection of 5V to CB3S will destroy CB3S.” Verify the LDO path before applying 5V. This prevents irreversible module damage. [Elektroda, p.kaczmarek2, post #20283934]
Can the TuyaMCU interfere with flashing BK7231N?
Yes. TuyaMCU shares the same RX/TX lines used for flashing the CB3S, which can corrupt the process. Disconnect the TuyaMCU daughterboard during flashing. Reconnect it after you complete the firmware operation. This avoids serial bus contention. [Elektroda, p.kaczmarek2, post #20283934]
How do I back up or flash firmware on CB3S/BK7231N?
Use BK7231GUIFlashTool or hid_download_py over UART. Run a read operation to back up firmware first. Select the “N” platform for BK7231N in the tool. This preserves a recovery path if you need to restore the stock image later. [Elektroda, p.kaczmarek2, post #20365102]
How do I decode the 55AA frames and map DPIDs?
Capture both RX and TX lines, then feed logs to the OpenBeken TuyaMCU analyzer. The analyzer highlights DPIDs, including observed string (fnId=19) and raw fields like fnId=6. Provide captures under known loads to confirm voltage/current/energy mappings. [Elektroda, p.kaczmarek2, post #20285624]
Which loads should I test to map power and energy DPIDs?
Use stable resistive loads. “I could try to decrypt more and then add support... I would need... a sample with 60W bulb load and then a sample with 10W bulb load.” Capture steady states and transitions for clear comparisons. [Elektroda, p.kaczmarek2, post #20285624]
What did sample captures show under a small load?
A ~20W soldering iron showed 239–240V. Current started around 0.2A and settled near 0.1A as it warmed. Frequency frames around “50” likely represent 50Hz grid frequency. These patterns help correlate DPIDs to real measurements. [Elektroda, TurkeyMan, post #20285642]
My unit tripped a breaker and now it reboot‑loops. What failed?
After a fast‑charger test, one unit entered a boot loop. The CB3S ran hot and the LCD faded over about 30 seconds. That behavior suggests a damaged Wi‑Fi module or power rail. External 5V injection may have contributed. Replacement of CB3S may be required. [Elektroda, TurkeyMan, post #20295896]
What is the 'FSE‑F723C558128885' string in the packets?
It appears as a TuyaMCU string datapoint (fnId=19) in RX frames. It likely identifies model or device parameters. Include it in your logs when mapping DPIDs. The analyzer flags it for review during template creation. [Elektroda, p.kaczmarek2, post #20285624]
Where should I hook into TX/RX on this board?
Use CB3S pins directly if the header is unclear. Pin 15 is RXD1, pin 16 is TXD1, and pin 11 is TXD2 for internal messages. Solder thin wires to the module pads if needed. Keep leads short to reduce noise. [Elektroda, p.kaczmarek2, post #20283934]
Does this meter keep a kWh counter internally?
The thread does not confirm a dedicated kWh DP. Capture under steady loads and use the analyzer to detect cumulative energy fields. “Another option would be to find docs for an ESP8266 version... maybe Tuya didn’t change DPid.” Validate before deployment. [Elektroda, p.kaczmarek2, post #20283934]
How do I share a reusable config/template for others?
Back up the stock firmware and share RX/TX UART logs with noted loads. The maintainer can simulate and derive an OpenBeken template. A reference example of TuyaMCU device support is provided for guidance. [Elektroda, p.kaczmarek2, post #20365102]