Hello!
First time posting here and just getting into OpenBK so forgive me if something is in the wrong section or not correct.
I have a Treatlife DP10 Outdoor smart dimmer that i have successfully flashed OTA with OpenBK firmware using Tuya-CloudCutter.
I have figured out most of the OpenBK config to the TuyaMCU and the autoexec.bat but wondering if anyone has any ideas about some other dpIDs i discovered or how to change the lower dimming range so i can dim it even more. Currently anything below about 10 on the OpenBK side does not change the brightness of the bulb.
Here is the steps i followed to get it going:
Step 1 - Using Tuya-CloudCutter these were the options:
- run:
You should see this if cloudcutter loads successfully, select the following options:
Successfully built docker image
1) Detach from the cloud and run Tuya firmware locally
2) Flash 3rd Party Firmware
[?] Select your desired operation [1/2]: 2
Loading options, please wait...
[?] How do you want to choose the device?: By firmware version and name
> By firmware version and name
[?] Select the firmware version and name: 1.1.71 - BK7231T / bk7231t_common_user_config_ty_config_ty
[?] Select your custom firmware file for BK7231T chip: OpenBeken-v1.17.130_bk7231t.ug.bin
> OpenBeken-v1.17.130_bk7231t.ug.bin
- Put your device in AP mode (3 quick clicks of the button, light should flash every 2 secs.)
- It should find the AP and do its thing and load the OpenBK firmware, i didnt document this part very well, sorry.
- You may have to put it in AP mode again for CloudCuttter to connect to it during this process, follow the prompts it gives you.
Step 2: Once it has successfully flashed OpenBK:
- You should now get a OpenBK SSID from the unit.
- Connect to its Wifi AP. Browse to 192.168.4.1.
Step 3: Load or create autoexec.bat file:
- Click on "Launch Web Application".
- Go to the "Filesystem" tab.
- Drag and drop the autoexec.bat file attached here or create your own containing this info:
Step 4: Reboot it and reconnect to it and test the configuration:
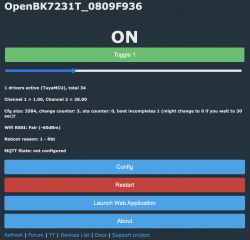
- Your webpage should look like this now

- You should now be able to control the dimmer!
Step 5: Continue and setup the device how you would like on your Wifi or MQTT, etc:
Here are some of my notes for anyone wanting to tinker some more or has any ideas what the additional dpID's are?
Use these commands to get communication with the TuyaMCU working and query it.
This is the query i got with the most information in it:
I then used these commands to create the channels for the toggle button and dimmer slider, then linked them to the TuyaMCU:
I created these additional channels to play with the values of the unknown dpID's and here is my notes on them, i'm not sure if any of them are correct and it is purely experimental.
Hope this helps someone else out or if anyone knows how to change the min dim level i can test!
First time posting here and just getting into OpenBK so forgive me if something is in the wrong section or not correct.
I have a Treatlife DP10 Outdoor smart dimmer that i have successfully flashed OTA with OpenBK firmware using Tuya-CloudCutter.
I have figured out most of the OpenBK config to the TuyaMCU and the autoexec.bat but wondering if anyone has any ideas about some other dpIDs i discovered or how to change the lower dimming range so i can dim it even more. Currently anything below about 10 on the OpenBK side does not change the brightness of the bulb.
Here is the steps i followed to get it going:
Step 1 - Using Tuya-CloudCutter these were the options:
- run:
sudo ./tuya-cloudcutter.shYou should see this if cloudcutter loads successfully, select the following options:
Successfully built docker image
1) Detach from the cloud and run Tuya firmware locally
2) Flash 3rd Party Firmware
[?] Select your desired operation [1/2]: 2
Loading options, please wait...
[?] How do you want to choose the device?: By firmware version and name
> By firmware version and name
[?] Select the firmware version and name: 1.1.71 - BK7231T / bk7231t_common_user_config_ty_config_ty
[?] Select your custom firmware file for BK7231T chip: OpenBeken-v1.17.130_bk7231t.ug.bin
> OpenBeken-v1.17.130_bk7231t.ug.bin
- Put your device in AP mode (3 quick clicks of the button, light should flash every 2 secs.)
- It should find the AP and do its thing and load the OpenBK firmware, i didnt document this part very well, sorry.
- You may have to put it in AP mode again for CloudCuttter to connect to it during this process, follow the prompts it gives you.
Step 2: Once it has successfully flashed OpenBK:
- You should now get a OpenBK SSID from the unit.
- Connect to its Wifi AP. Browse to 192.168.4.1.
Step 3: Load or create autoexec.bat file:
- Click on "Launch Web Application".
- Go to the "Filesystem" tab.
- Drag and drop the autoexec.bat file attached here or create your own containing this info:
startDriver TuyaMCU
tuyaMcu_setBaudRate 115200
tuyaMcu_defWiFiState 4
setChannelType 1 toggle
setChannelType 2 dimmer
tuyaMcu_SetDimmerrange 0 1000
linkTuyaMCUOutputToChannel 1 1 1
linkTuyaMCUOutputToChannel 2 2 2
Step 4: Reboot it and reconnect to it and test the configuration:
- Your webpage should look like this now

- You should now be able to control the dimmer!
Step 5: Continue and setup the device how you would like on your Wifi or MQTT, etc:
Here are some of my notes for anyone wanting to tinker some more or has any ideas what the additional dpID's are?
Use these commands to get communication with the TuyaMCU working and query it.
startDriver TuyaMCU
tuyaMcu_setBaudRate 115200
tuyaMcu_sendQueryState
This is the query i got with the most information in it:
Debug:CMD:cmd [tuyaMcu_sendQueryState]
Info:CMD:[WebApp Cmd 'tuyaMcu_sendQueryState' Result] OK
Info:TuyaMCU:TUYAMCU received: 55 AA 03 07 00 05 01 01 00 01 01 12
Info:TuyaMCU:TuyaMCU_ProcessIncoming[ver=3]: processing command 7 (State) with 12 bytes
Info:TuyaMCU:TuyaMCU_ParseStateMessage: processing dpId 1, dataType 1-DP_TYPE_BOOL and 1 data bytes
Info:TuyaMCU:TuyaMCU_ParseStateMessage: raw data 1 byte:
Info:TuyaMCU:TUYAMCU received: 55 AA 03 07 00 08 02 02 00 04 00 00 00 64 7D
Info:TuyaMCU:TuyaMCU_ProcessIncoming[ver=3]: processing command 7 (State) with 15 bytes
Info:TuyaMCU:TuyaMCU_ParseStateMessage: processing dpId 2, dataType 2-DP_TYPE_VALUE and 4 data bytes
Info:TuyaMCU:TuyaMCU_ParseStateMessage: raw data 4 int: 100
Debug:TuyaMCU:TuyaMCU_ApplyMapping: mapped value 100 (TuyaMCU range) to 10 (OpenBK7321T_App range)
Info:TuyaMCU:TUYAMCU received: 55 AA 03 07 00 08 03 02 00 04 00 00 00 64 7E
Info:TuyaMCU:TuyaMCU_ProcessIncoming[ver=3]: processing command 7 (State) with 15 bytes
Info:TuyaMCU:TuyaMCU_ParseStateMessage: processing dpId 3, dataType 2-DP_TYPE_VALUE and 4 data bytes
Info:TuyaMCU:TuyaMCU_ParseStateMessage: raw data 4 int: 100
Info:TuyaMCU:TUYAMCU received: 55 AA 03 07 00 05 04 04 00 01 00 17
Info:TuyaMCU:TuyaMCU_ProcessIncoming[ver=3]: processing command 7 (State) with 12 bytes
Info:TuyaMCU:TuyaMCU_ParseStateMessage: processing dpId 4, dataType 4-DP_TYPE_ENUM and 1 data bytes
Info:TuyaMCU:TuyaMCU_ParseStateMessage: raw data 1 byte:
Debug:TuyaMCU:TuyaMCU_ApplyMapping: id 4 with value 0 is not mapped
Info:TuyaMCU:TUYAMCU received: 55 AA 03 07 00 08 66 02 00 04 00 00 00 00 7D
Info:TuyaMCU:TuyaMCU_ProcessIncoming[ver=3]: processing command 7 (State) with 15 bytes
Info:TuyaMCU:TuyaMCU_ParseStateMessage: processing dpId 102, dataType 2-DP_TYPE_VALUE and 4 data bytes
Info:TuyaMCU:TuyaMCU_ParseStateMessage: raw data 4 int: 0
Info:TuyaMCU:TUYAMCU received: 55 AA 03 07 00 08 68 02 00 04 00 00 00 01 80
Info:TuyaMCU:TuyaMCU_ProcessIncoming[ver=3]: processing command 7 (State) with 15 bytes
Info:TuyaMCU:TuyaMCU_ParseStateMessage: processing dpId 104, dataType 2-DP_TYPE_VALUE and 4 data bytes
Info:TuyaMCU:TuyaMCU_ParseStateMessage: raw data 4 int: 1
Info:TuyaMCU:TUYAMCU received: 55 AA 03 07 00 07 65 00 00 03 00 00 00 78
Info:TuyaMCU:TuyaMCU_ProcessIncoming[ver=3]: processing command 7 (State) with 14 bytes
Info:TuyaMCU:TuyaMCU_ParseStateMessage: processing dpId 101, dataType 0-DP_TYPE_RAW and 3 data bytes
Info:TuyaMCU:TUYAMCU received: 55 AA 03 07 00 07 69 00 00 03 06 00 00 82
Info:TuyaMCU:TuyaMCU_ProcessIncoming[ver=3]: processing command 7 (State) with 14 bytes
Info:TuyaMCU:TuyaMCU_ParseStateMessage: processing dpId 105, dataType 0-DP_TYPE_RAW and 3 data bytes
Info:TuyaMCU:TUYAMCU received: 55 AA 03 07 00 08 68 02 00 04 00 00 00 00 7F
Info:TuyaMCU:TuyaMCU_ProcessIncoming[ver=3]: processing command 7 (State) with 15 bytes
Info:TuyaMCU:TuyaMCU_ParseStateMessage: processing dpId 104, dataType 2-DP_TYPE_VALUE and 4 data bytes
Info:TuyaMCU:TuyaMCU_ParseStateMessage: raw data 4 int: 0
I then used these commands to create the channels for the toggle button and dimmer slider, then linked them to the TuyaMCU:
setChannelType 1 toggle
setChannelType 2 dimmer
tuyaMcu_SetDimmerrange 0 1000
linkTuyaMCUOutputToChannel 1 1 1
linkTuyaMCUOutputToChannel 2 2 2
I created these additional channels to play with the values of the unknown dpID's and here is my notes on them, i'm not sure if any of them are correct and it is purely experimental.
dpId 3 - 2, VALUE - This seems to be the Tuya Min dim level? Default was 100.
setChannelType 3 TextField
linkTuyaMCUOutputToChannel 3 2 3


dpId 102 - 2, VALUE - Not sure what this is for. Default was 0
setChannelType 4 TextField
linkTuyaMCUOutputToChannel 102 2 4

dpId 104 - 2, VALUE - This seems to be the LED on the device, if this value is not 1 then the light is white and inverted to the dimmer state. Default was 1
1) Dimmer on = LED on, Dimmer Off = LED off
Anything other than 1 = Dimmer on = LED off, Dimmer Off = LED on
setChannelType 5 TextField
linkTuyaMCUOutputToChannel 104 2 5

dpId 4 - 4, ENUM - Not sure what this is for. Only saw it at 0
setChannelType 6 TextField
linkTuyaMCUOutputToChannel 4 4 6

dpId 105 - 0, RAW - Not sure what this is for. Only saw it at 0
setChannelType 7 TextField
linkTuyaMCUOutputToChannel 105 0 7
Hope this helps someone else out or if anyone knows how to change the min dim level i can test!


