logo elektroda
logo elektroda
X
logo elektroda

Teardown and Flashing Guide for Treatlife DP10 Smart Dimmer Plug with BK7231N

rronnander 1491 5
ADVERTISEMENT
  • Helpful post
    #1 20950756
    rronnander
    Level 5  

    I only opened this up as I wanted to read the firmware to add support for this device in tuya-cloudcutter. I have successfully flashed the Treatlife DP10 using the cloudcutter method, so there's really no need to open these up after everything gets merged on Github.

    Note: To enter AP mode (slow LED flashing) when the device is fast LED flashing: press the main button three times in quick succession.

    Product overview:
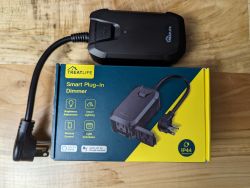
    Black Treatlife Smart Plug-in Dimmer device on a colorful cardboard box.

    Remove the 4 screws under the rubber pads and pull the device apart:
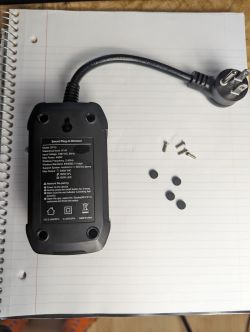
    Treatlife DP10 smart plug on a notebook with unscrewed screws and rubber pads.

    This exposes the CB3S chip. There are three additional screws holding in the circuit board:
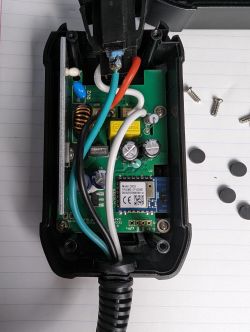
    Disassembled Treatlife DP10 device showing the CB3S chip on the circuit board.

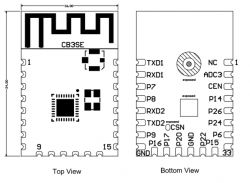
    CB3S pin layout:

    Top and bottom view of CB3SE chip with pin layout.


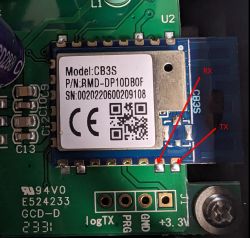
    Close-up of a circuit board with mounted CB3S module and labeled TX/RX pins.


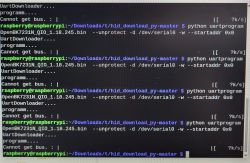
    Ground and 3.3V are easily accessible on the board. Jumper wires can be clamped under tension to both ground and 3.3V. Jumper wires can then be held against the chip to dump the firmware. No soldering is required unless you really feel like it.

    autoexec.bat taken from this post:
    
    startDriver TuyaMCU
    tuyaMcu_setBaudRate 115200
    tuyaMcu_defWiFiState 4
    setChannelType 1 toggle
    setChannelType 2 dimmer
    tuyaMcu_SetDimmerrange 0 1000
    linkTuyaMCUOutputToChannel 1 1 1
    linkTuyaMCUOutputToChannel 2 2 2


    According to the post I obtained the autoexec.bat from, there are at least two variations of this device in the wild, one using the BK7231N, one using the BK7231T (mine, purchased from Amazon on 2/5/2024).

    Template:
    
    {
      "vendor": "Tuya",
      "bDetailed": "0",
      "name": "Treatlife DP10 smart dimmer plug",
      "model": "DP10",
      "chip": "BK7231N",
      "board": "CB3S",
      "flags": "1024",
      "keywords": [
        "smart socket",
        "smart dimmer"
      ],
      "pins": {},
      "command": "",
      "image": "https://obrazki.elektroda.pl/2112688900_1707364259.jpg",
      "wiki": "https://www.elektroda.com/rtvforum/viewtopic.php?p=20950756#20950756"
    }
    

  • ADVERTISEMENT
  • #2 20950931
    p.kaczmarek2
    Moderator Smart Home
    That's a very interesting dimmer, I haven't seen one in such an outdoor extension coord form yet. Is it IP44? That's nice
    Helpful post? Buy me a coffee.
  • ADVERTISEMENT
  • #3 20951921
    rronnander
    Level 5  

    Yeah, I just ordered a second one to use for an indoor lamp. It's a nice little form factor for a plug-and-play dimmer to use as an alternative to something like the Shelly dimmer.

    I do have a question as I'm kind of new to OpenBeken and everything. Is there a way to make these autoexec.bat files part of a profile others can easily use after flashing? As I understand it, this is a TuyaMCU device that doesn't have an extractable pin layout.
  • ADVERTISEMENT
  • #4 20952108
    divadiow
    Level 34  
    Please post firmware backup if you took one
  • ADVERTISEMENT
  • #6 20952154
    divadiow
    Level 34  
    rronnander wrote:
    I do have a question as I'm kind of new to OpenBeken and everything. Is there a way to make these autoexec.bat files part of a profile others can easily use after flashing? As I understand it this is a TinyMCU device that doesn't have an extractible pin layout.


    I've wondered that too. Otherwise the user has to find the correct autoexec content somewhere in the linked device thread.

    rronnander wrote:
    Sure thing, here it is:


    thanks
ADVERTISEMENT