logo elektroda
logo elektroda
X
logo elektroda

Tuya Smart Wi-Fi Smoke Detector: Exploring WiFi Module CB3S & MCU CX32L003F8

arhismece 5268 28
ADVERTISEMENT
  • #1 20690604
    arhismece
    Level 2  

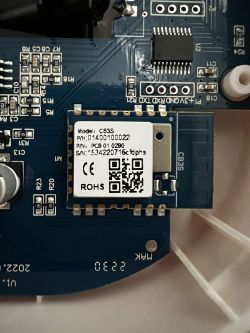
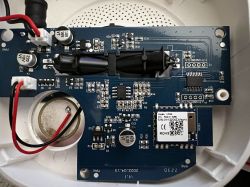
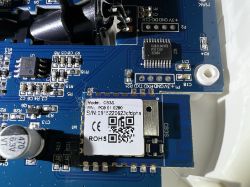
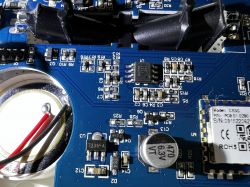
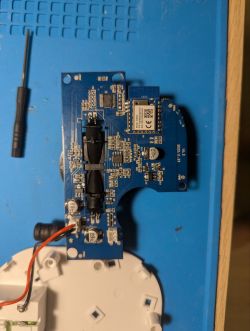
    WiFi module: CB3S
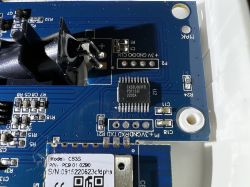
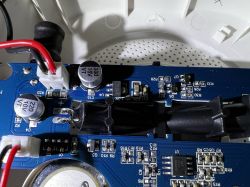
    Additional MCU: CX32L003F8
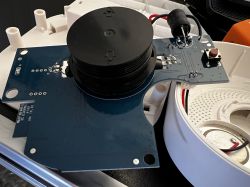
    Sensor type: optical smoke detector
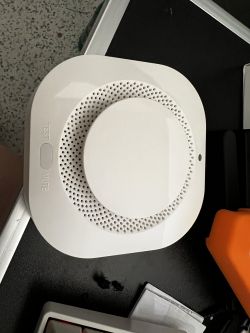
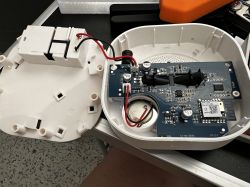
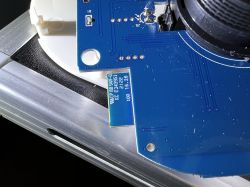
    Optical smoke detector on a desk with TEST and MUTE buttons. Close-up image of a PCB module with visible electronic components, including a CB3S module. Opened optical smoke detector with visible internal electronic components. Electronic circuit with CB3S Wi-Fi module on a smoke detector PCB. Close-up of a PCB with CB3S and CX32L003F8 microcontrollers. Close-up of a PCB with a Wi-Fi module CB3S and a CX32L003F8 microcontroller. Close-up of a PCB with visible chips and CB3S module Close-up of a blue PCB with electronic components in an optical smoke detector. Printed circuit board with a smoke detector on a blue PCB. Close-up of a PCB with blue laminate and an optical smoke detector attached.

    Added after 2 [minutes]:

    same chips as on https://www.elektroda.com/rtvforum/topic3978070.html but PCB layout and maybe sensor look different
  • ADVERTISEMENT
  • #2 20691279
    p.kaczmarek2
    Moderator Smart Home
    Thanks, it looks like a TuyaMCU device. Have you tried to capture the TuyaMCU packets?
    https://github.com/openshwprojects/TuyaMCUAnalyzer
    Helpful post? Buy me a coffee.
  • #3 20691301
    arhismece
    Level 2  

    p.kaczmarek2 wrote:
    Thanks, it looks like a TuyaMCU device.

    Yes, looks pretty similar to topic3978070 but with slightly different PCB and sensor

    p.kaczmarek2 wrote:
    Have you tried to capture the TuyaMCU packets?

    No :(
    I'm in the middle of the move and setting up a new lab, so all my equipment is in boxes + I need to go on vacation in a few days, so total clusterfsck here. Need to find some PSU and some LA and some UART2USB adapter, and I'll sniff the communication and update the topic.

    If I understood properly, openBK only replaces the CB3S part of the code, so the 32-bit ARM on board will run the original firmware and turn CB3S on/off as originally designed? I'll try to get this data sniffed before I leave for vacation. I have a whole bunch of switches and sockets too (total clusterf too, I purchased one to test 3 years ago when I purchased this house, it was ESP8266 / ESP8265 based ecosystem, when I was ready to install as the renovation was ending I ordered over 100 devices assuming they are ESP, what came is Tuya system :( with WB3S )
  • #4 20691641
    p.kaczmarek2
    Moderator Smart Home
    It's the same with Tasmota. Tasmota also replaces only WiFi module firmare, and the MCU runs original one. We have TuyaMCU support so we just need packet captures to figure out dpIDs and types of the variables.

    By the way, it also looks like your device is battery-powered. It means that the MCU controls the power of WiFI module via transistor. It only powers on the WiFI module to report the state to the cloud. It may be problematic to flash such devices, but I've managed to get them working with OBK as well. We have some threads on that topic here on the forum.
    Helpful post? Buy me a coffee.
  • #5 20715490
    aleshinalekseya
    Level 5  
    I have this device. How can I help? I want an alternative firmware. Do I need to flash OpenBK7231T first?

    Added after 3 [minutes]:

    The original firmware shows nonsense
    TuyaMCU Explorer/Analyzer interface displaying WiFi packet data.
  • #6 20715494
    p.kaczmarek2
    Moderator Smart Home
    It can't show nonsense, unless it's broken. Doing a full UART capture from both RX->TX and TX->RX lines certainly can help and should be done before flashing new firmware.

    We need to know dpIDs of variables, etc, which dpID is which variable, etc

    Try doing capture from the second UART lane.
    Helpful post? Buy me a coffee.
  • #7 20715500
    aleshinalekseya
    Level 5  

    This device is powered by 9V Wonder Silver battery standing next to a matchstick.

    Added after 11 [minutes]:

    Do I need device power or just 3V UART power?
    How to connect correctly?
    UART RX-TX only
    Main device power

    Added after 4 [minutes]:

    Close-up of a circuit board with connected wires, showing electronic components. USB to UART adapter with connected wires
  • ADVERTISEMENT
  • #8 20716538
    p.kaczmarek2
    Moderator Smart Home
    In order to get a proper transaction capture, you need to power the device from the battery in a way that is powered during usage.

    Do not power WiFi module externally. Just connect GND and RX to get UART capture.

    First capture from RX, then from TX, I assume you know how UART works, if not, ask here and I will give more details.

    Powering WiFi module makes no sense here because MCU would be sleeping anyway so the transaction still won't happen.

    We need to know which dpIDs are present and what are their meaning. We are looking some data points like:
    - alarm state - 1 or 0?
    - tamper state - 1 or 0?
    - battery state - maybe enum with 3 values, maybe something else
    - maybe something more as well...

    We need to know dpIDs before flashing OBK.
    Helpful post? Buy me a coffee.
  • #10 20718791
    aleshinalekseya
    Level 5  

    1. Power on
    2. Tamper push
    3. Smoke alarm
    4. Tamper push stop alarm
    It seems to be something like this
  • #11 20719397
    p.kaczmarek2
    Moderator Smart Home
    Well, this capture is good, and we can see dpIDs and their types and values, but do you know the meaning of each dpID?

    Usually I connect UART to do realtime capture, then start capture, press (for example) the tamper sensor, stop capture, and see which exact dpID changed.

    And then repeat the same process for each variable... for each possible option. So we can map dpIDs to their meaning.
    Helpful post? Buy me a coffee.
  • #13 20719757
    aleshinalekseya
    Level 5  

    Battery state:
    fnId=15 Val V=100 - 100%
    fnId=15 Val V=67 - 72%
    fnId=15 Val V=33 - 36%
    fnId=15 Val V=4 - 4%

    Smoke Detect:
    fnId=2 Val V=0
    fnId=2 Val V=99
  • #14 20719769
    p.kaczmarek2
    Moderator Smart Home
    So smoke detection is dpID 2, which is a value, and can have values between 0 and 100?

    That's nice, i was rather expecting just a boolean.
    Helpful post? Buy me a coffee.
  • #15 20719812
    aleshinalekseya
    Level 5  

    The value changes depending on the level of smoke. More likely. So, when trying to turn off the siren with a tamper, the smoke level was lower and the value was 18.
  • ADVERTISEMENT
  • #17 20723099
    moustic999
    Level 1  

    It looks like there are similar smoke sensors for many DptIds:

    At least for these 4 Dpts:
        {
            "code": "smoke_sensor_status",
            "dp_id": 1,
            "type": "Enum",
            "values": "{"range":["alarm","normal"]}"
          },
          {
            "code": "smoke_sensor_value",
            "dp_id": 2,
            "type": "Integer",
            "values": "{"unit":"","min":0,"max":100,"scale":1,"step":1}"
          },
          {
            "code": "battery_state",
            "dp_id": 14,
            "type": "Enum",
            "values": "{"range":["low","middle","high"]}"
          },
          {
            "code": "battery_percentage",
            "dp_id": 15,
            "type": "Integer",
            "values": "{"unit":"%","min":0,"max":100,"scale":0,"step":1}"
          },


    Dpt 1 is 0 when alarm, 1 when normal
  • #18 20723112
    p.kaczmarek2
    Moderator Smart Home
    Now you need to write autoexec.bat with TuyaMCU and tmSensor drivers, use linkTuyaMCUOutputToChannel to link dpIDs to channels.

    For now, you may keep powering WiFi module from external 3.3V, so you can operate easily, but for the testing, you will need to disconnect 3.3V and allow the TuyaMCU to control power of the WiFi.

    I think we can look here on forum for some autoexec.bat for other device which we can modify to suit our needs here.

    There were already topics about TuyaMCU humidity+temperature sensor (@dedamraz had one?), and a TuyaMCU PIR sensor (@spin55 was working on one)
    Helpful post? Buy me a coffee.
  • #19 20771495
    wtv
    Level 3  

    Is there a config I could simply import? The device is listed but not functional right now.
  • #20 20771565
    p.kaczmarek2
    Moderator Smart Home
    Hello @wtv , judging from the previous posts, it seems we still need to write autoexec.bat for this device, but most of the work is done.

    When writing autoexec.bat, you can refer to a related TuyaMCU sensor to https://www.elektroda.com/rtvforum/topic3975583.html
    Helpful post? Buy me a coffee.
  • #21 20771598
    wtv
    Level 3  
    >>20723099
    Thank you for your quick response. If I try to import this, it will give me a syntax error. Right now I'm using it just as a Home Assistant ping binary sensor so no battery level or smoke amount. It will connect to network when something happens but it's rudimentary
    The device is the same, looks the same at least. This is some uart logs I managed to get with esphome:
    Code: Text
    Log in, to see the code

    It was powered externally.
    https://www.aliexpress.com/item/1005005834819095.html
  • #22 20771716
    p.kaczmarek2
    Moderator Smart Home
    The content in post 17 is not importable conifg, you need to write autoexec.bat for that device, I don't have this device but I can write a draft for you, if you need help.

    If you have the same device as in the topic, namely the TuyaMCU version of smoke detector, it will not work unless powered through batteries (or their contacts). This is because TuyaMCU on the board is controlling power of WiFi module, and WiFI module starts the transaction with TuyaMCU when it's powered on (by the MCU), so if you manually solder wire to keep WiFI module powered on forever, it will not know when to start the transaction.
    Helpful post? Buy me a coffee.
  • #23 20772053
    wtv
    Level 3  
    @p.kaczmarek2 Help would be greatly appreciated!
  • ADVERTISEMENT
  • #24 20803700
    edwardpoll
    Level 1  

    Anyone get any further with this? I have the same device, but am at a dead end.

    I've got a YAML file that, in English at least, should provide the same configuration for ESPHome, though I'm struggling to get it to work effectively with HA. Maybe it's the WiFi being forced into low power mode, maybe it's me...

    Thoughts on the attached?
  • #25 20803879
    p.kaczmarek2
    Moderator Smart Home
    I would not recommend this approach. You should use our OBK automatic HASS Discovery in conjunction with a proper autoexec.bat config.

    @wtv you should start with this, however I don't know if baud rate setting is correct, maybe you need to comment it out:
    
    
    startDriver TuyaMCU
    startDriver tmSensor
    
    // may be needed, depends on device, some also use 9600
    tuyaMCU_setBaudRate 115200
    
    
    // smoke detect, 0-100 value, dpID 2
    setChannelLabel 2 Smoke
    setChannelType 2 ReadOnly
    linkTuyaMCUOutputToChannel 2 val 2
    
    // Battery state enumeration, dpID 14
    setChannelLabel 14 Battery
    setChannelType 14 LowMidHigh
    linkTuyaMCUOutputToChannel 14 enum 14
    
    // Battery state, 1-100 % value, dpID 15
    setChannelLabel 15 BatteryPercent
    setChannelType 15 ReadOnly
    linkTuyaMCUOutputToChannel 15 val 15


    You can modify this config to include more dpIDs, please look up channel types on our docs.
    See more at:
    https://github.com/openshwprojects/OpenBK7231T_App/blob/main/docs/autoexecExamples.md
    Helpful post? Buy me a coffee.
  • #26 20807426
    wtv
    Level 3  

    p.kaczmarek2 wrote:
    I would not recommend this approach. You should use our OBK automatic HASS Discovery in conjunction with a proper autoexec.bat config.

    @wtv you should start with this, however I don't know if baud rate setting is correct, maybe you need to comment it out:
    
    startDriver TuyaMCU
    startDriver tmSensor
    // may be needed, depends on device, some also use 9600
    tuyaMCU_setBaudRate 115200
    // smoke detect, 0-100 value, dpID 2
    setChannelLabel 2 Smoke
    setChannelType 2 ReadOnly
    linkTuyaMCUOutputToChannel 2 val 2
    // Battery state enumeration, dpID 14
    setChannelLabel 14 Battery
    setChannelType 14 LowMidHigh
    linkTuyaMCUOutputToChannel 14 enum 14
    // Battery state, 1-100 % value, dpID 15
    setChannelLabel 15 BatteryPercent
    setChannelType 15 ReadOnly
    linkTuyaMCUOutputToChannel 15 val 15
    

    You can modify this config to include more dpIDs, please look up channel types on our docs.
    See more at:
    https://github.com/openshwprojects/OpenBK7231T_App/blob/main/docs/autoexecExamples.md

    Created autoexec.bat, used baud rate 9600 which had some incoming communication on esphome. No luck, all configured sensors report 0.0 .. Tried to revert to original fw but failed writing with obk flasher. This is a huge problem right now, multiple devices fail to write and when/if revived, they get mac C8:47:8C:00:00:00 and need RF rewrite which I presume breaks tuya cloud because app didn't respond when pressing test and re-pairing fails too.
    I'm thinking of using the adc to read the speaker output as a confirmation for smoke because simply pinging caused false alarms. Might work with original power source if I enable fast connect.
    Tested with real smoke when I originally received it, and the official HA integration failed to update the smoke alarm entity so pretty much I'm not at a loss flashing it.
  • #27 20807459
    p.kaczmarek2
    Moderator Smart Home
    Can you try to capture TX2 log so we know what's happening?

    RF can be easily restored if you have 2MB backup.
    Helpful post? Buy me a coffee.
  • #28 21431147
    groove6j
    Level 8  
    >>20807426
    @wtv Did you ever get some communication working?

    p.kaczmarek2 wrote:
    Can you try to capture TX2 log so we know what's happening?

    I could try to do that.
  • #29 21436840
    groove6j
    Level 8  
    I was prepared for logging and debugging, but surprisingly everything worked at first go. @wtv should have worked for you too. Maybe you had a different board version or bad module?

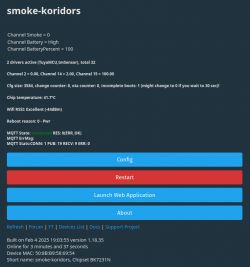
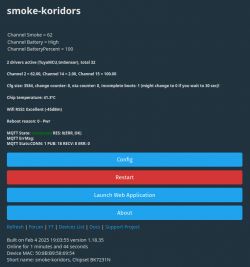
    I used 9600 baud and BK7231 did receive all the data. dpIDs are similar to other TuyaMCU smoke detectors seen on this forum. Smoke is a percentage on dpID2 exactly as you found out. There seems to be something on dpID1 (and perhaps other dpIDs), but it reports 1 all the time. Anyway it's not needed as Smoke % and battery status are present and shown in HA. There might be a siren silencer toggle on dpID16, should we maybe use it as a switch?

    My board:
    Circuit board with BK7231 module and electronic components.

    High amounts of smoke:
    Screenshot of control panel for smoke-koridors showing smoke data

    No smoke:
    Web application interface of a smoke detection device displaying metrics and configuration options.

    The autoexec is pretty much the exact same, I only added the channel types:
    
    startDriver TuyaMCU
    startDriver tmSensor
    
    tuyaMCU_setBaudRate 9600
    
    // smoke sensor value, Int value, dpID 2
    setChannelLabel 2 Smoke
    setChannelType 2 SmokePercent
    linkTuyaMCUOutputToChannel 2 val 2
    
    // Battery state lo-mid-hi, dpID 14
    setChannelLabel 14 Battery
    setChannelType 14 ReadOnlyLowMidHigh
    linkTuyaMCUOutputToChannel 14 enum 14
    
    // Battery state, 0-100 % value, dpID 15
    setChannelLabel 15 BatteryPercent
    setChannelType 15 BatteryPercent
    linkTuyaMCUOutputToChannel 15 val 15


    Additional info:
    When test button is pressed, the device connects to WiFi and stays for around 15-20s. There is enough time to launch the web application create the autoexec.bat quickly (or make some additional changes to the config). How often it broadcasts its status, I don't know yet.

    Also fully de-soldering CB3S can be avoided by removing R20 and R23 resistors when writing, which are on the TX and RX line.

    I bought a few of these devices quite a while ago, the 9V battery works for a long time and they are pretty cheap as well. Nice devices, smoke is also detected very quickly when compared to the round Tuya detector with 2xAAA batteries and no MCU.

    I saw the detector beeping at 20% of smoke. It then turned on and remained until the smoke cleared out. I also set the quick connect flag. I think this device can be marked as working.

Topic summary

The discussion centers on the Tuya Smart Wi-Fi Smoke Detector featuring the WiFi module CB3S and MCU CX32L003F8, an optical smoke sensor device. Users compare it to a similar device from topic3978070 but note differences in PCB layout and sensor design. The device uses a TuyaMCU architecture where the 32-bit ARM MCU runs original firmware controlling the CB3S WiFi module, which is powered on/off by the MCU via a transistor to conserve battery. Capturing UART communication is essential to identify dpIDs (data points) and their meanings, such as smoke detection (dpID 2, integer 0-100%), battery state (dpID 14 enum, dpID 15 integer percentage), tamper state, and alarm state. Packet captures and UART logs are used to map dpIDs to sensor functions. Flashing alternative firmware like OpenBK7231T requires careful UART data capture and understanding of power control, as the WiFi module is not always powered. Autoexec.bat scripts with TuyaMCU and tmSensor drivers are needed to link dpIDs to channels for integration with Home Assistant. Challenges include failed reflashing attempts, MAC address resets, and ensuring proper power supply during UART capture. Some users report success with 9600 baud rate and partial functionality in Home Assistant, including smoke percentage and battery status. The community suggests referencing existing TuyaMCU sensor configurations and adapting autoexec.bat scripts for this device. Overall, the device requires detailed UART analysis and custom firmware configuration to achieve reliable alternative firmware operation and full sensor integration.
Summary generated by the language model.
ADVERTISEMENT