logo elektroda
logo elektroda
X
logo elektroda

Exploring the Features and Specifications of Tuya WiFi Energy Meter PJ-1103a [BK7231N][CB2S]

taktlos 7572 49
ADVERTISEMENT
  • #31 21377004
    alexan_e
    Level 10  
    >>21374393 My device is a two clamp energy meter, model number PJ-1103A and uses a HLW8112 IC for measurement. It is identical to the device photos posted in the first post of this thread. The code I have posted is for this model
  • ADVERTISEMENT
  • #32 21377652
    exotsk
    Level 7  
    Are you sure this code isn't for BL0492 and that your chip is different? On my device, all my attempts only result in zeros.

    Screenshot of OpenBK7231N device configuration menu.

    Application interface with energy calibration and reporting rate settings.
    Screenshot of a text editor with the file autoexec.bat open, containing configuration commands for a device.
  • #33 21377741
    p.kaczmarek2
    Moderator Smart Home
    If the power metering chip is connected via TuyaMCU (external MCU), then you don't need BL0942/BL0937 driver, you need TuyaMCU driver and mapped dpIDs. dpIDs must match the ones used by Tuya in your device. If you try to run BL0942 driver on TuyaMCU device, or set wrong dpIDs on TuyaMCU device, it will not work. You can't just copy around configs blindly.

    @exotsk , in your case, you need to do two things.
    First. config extraction, maybe it will tell us if your baud is correct:
    https://www.youtube.com/watch?v=WunlqIMAdgw
    Second, open web App Log, and check what are TuyaMCU messages saying, are there at least heartbeats received? Is there any communication at all?

    You should also show us inside of your device, so at least we can tell whether your device is using TuyaMCU or not...

    You may have incorrect baud setting.
    Helpful post? Buy me a coffee.
  • ADVERTISEMENT
  • #34 21377847
    alexan_e
    Level 10  
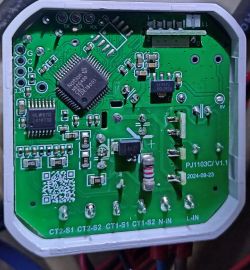
    >>21377652 yes my device uses HLW8112 but internally I see printed PJ1103C/v1.1 2024-09-23

    Close-up of a device's printed circuit board with visible electronic components and markings PJ1103C/v1.1 and date 2024-09-23.

    Looking again at the images of the device posted in the first post of the thread I see that the carton box says PJ1103A and then the internal images have PJ1203 v8 printed.
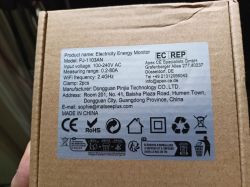
    In comparison mine has PJ1103AN on the box and PJ1103C/v1.1 on the PCB.

    here is my box (I got it from aliexpress about a month ago)

    Label on a box with information about the electricity energy monitor model PJ-1103AN.

    The PCBs look almost identical with some minor differences in a couple of wire pads. Not sure why this isn't working for you, what does your PCB have as a model?

    Added after 21 [minutes]:

    exotsk, I looked back and found your post here, you have a different device from the one I have. It used HLW8112 but everything else is different so it probably uses different ids and maybe even different baud rate.
  • #35 21377891
    divadiow
    Level 34  
    @exotsk if you have a firmware backup from this device we can probably get the TuyaMCU dpIDs
  • ADVERTISEMENT
  • #37 21378125
    divadiow
    Level 34  
    >>21378054

    please extract the 72kb tuya config file and post here


    Web page of OpenBK7231N device showing USB plug status information.
  • #39 21378170
    divadiow
    Level 34  
    OK. those 2 72kb files have no material difference between them, which is fine.

    Not immediately sure how this helps, but this was extracted from them

    Code: JSON
    Log in, to see the code


    which does make it the same as the extract from the previous full firmware posted here https://www.elektroda.com/rtvforum/topic4016609.html#21213563 but there I posted less information- I probably didn't pair it with Tuya before extraction.

    Not sure if this helps though. It's a pain this thread is a mix of TuyaMCU and non-TuyaMCU devices.
  • #40 21378215
    exotsk
    Level 7  
    >>21378170
    So, I understand that it won't be possible to launch my board?
  • ADVERTISEMENT
  • #41 21378232
    divadiow
    Level 34  
    I do not know enough about this type of device or the HLW8112 chip/driver to answer that with any authority.
  • #42 21378269
    p.kaczmarek2
    Moderator Smart Home
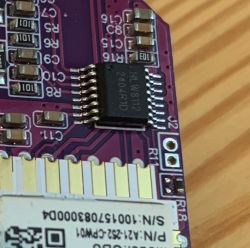
    If this is your device:
    exotsk wrote:

    A blue circuit board with green terminals and capacitors on a wooden table. Circuit board with a purple circuit and electronic module on a wooden surface.

    Then I would probably need to get one on site to develop a driver. It don't seem to be TuyaMCU. Is it HLW8112 ? Then HLW8112 driver is needed.
    Helpful post? Buy me a coffee.
  • #44 21381228
    exotsk
    Level 7  
    If there are no prospects with this firmware, is it possible to restore the Tuya firmware without a lost backup?
  • #45 21381257
    alexan_e
    Level 10  
    >>21381228 you said you had two of those, have you replaced the firmware of the second one too? Maybe you can get the firmware from there
  • #47 21381785
    exotsk
    Level 7  
    >>21381257
    Yes, there is a second board, but I have already installed it in another apartment 3000 km away from me. Now access to it is only through the SmartHome app, which means I won't be able to create a dump.

    divadiow wrote:
    is this not the full backup already posted for this specific device? https://www.elektroda.com/rtvforum/topic4016609.html#21212779

    I don't know if I can use a non-native Tuya dump, and whether the one available in this thread, which is not from my board, will work.
  • #48 21390310
    paulkayBlack6spdZ
    Level 1  
    also have the purple PCB meter board.. what else is needed besides using "startDriver HLW8112SPI" in startup?
  • #49 21400668
    alexan_e
    Level 10  
    >>21373100

    After further investigation, it appears that Tuya channels 1 and 2 are not in use.

    I was able to extract this information from LocalTuya, indicating that forward_energy_total is 130 and reverse_energy_total is 131.
    101        (code: power.a, value: 0)
    102        (code: direction.a , value: FORWARD, cloud pull)
    103        (code: tbd , value: False, cloud pull)
    104        (code: directions, value: FORWARD, cloud pull)
    105        (code: power_b, value: 0)
    106        (code: energy_forword_a , value: 0)
    107        (code: energy_reverse_a , value: 1665)
    108        (code: energy_forword_b, value: 0)
    109        (code: energy_reserse_b, value: 0)
    110        (code: power_factor, value: 100)
    111        (code: freq, value: 4997)
    112        (code: voltage.a, value: 2319)
    113        (code: current_a , value: 0)
    114        (code: current_b, value: 0)
    115        (code: totaLpower, value: 0)
    116        (code: voltage.coef, value: 996)
    117        (code: current_a_calibration, value: 1000)
    118        (code: power_a_calibration, value: 1000 )
    119        (code: energy_a_calibration_fwd, value: 1000)
    120        (code: coef_a_reset, value: False, cloud pull)
    121        (code: power_factor_b, value: 100)
    122        (code: freq.calibration, value: 1020 )
    123        (code: current_b_calibration, value: 1000)
    124        (code: power_b_calibration, value: 1000)
    125        (code: energy_b_calibration_fwd , value: 1000)
    126        (code: coef_b_reset, value: False, cloud pull)
    127        (code: energy_a_calibration_rev, value: 1000)
    128        (code: energy_b_calibration_rev, value: 1000)
    129        (code: report_rate_control, value: 10)
    130        (code: forward_energy_total, value: 0)
    131        (code: reverse_energy_total, value: 1665)


    I have updated the configuration file (autoexec.bat) for PJ-1103A (CB2S+HLW8112)
    startDriver TuyaMCU
    tuyaMcu_setBaudRate 9600
    tuyaMcu_defWiFiState 4
    
    startDriver NTP
    ntp_setServer 129.250.35.251
    
    // set for your timezone
    ntp_timeZoneOfs +2
    
    setChannelType 2  EnergyTotal_kWh_div100
    setChannelType 3  EnergyTotal_kWh_div100
    setChannelType 4  Power_div10
    setChannelType 5  ReadOnly
    setChannelType 6  ReadOnly
    setChannelType 7  Power_div10
    setChannelType 8  EnergyTotal_kWh_div100
    setChannelType 9  EnergyTotal_kWh_div100
    setChannelType 10 EnergyTotal_kWh_div100
    setChannelType 11 EnergyTotal_kWh_div100
    setChannelType 12 PowerFactor_div100
    setChannelType 13 Frequency_div100
    setChannelType 14 Voltage_div10
    setChannelType 15 Current_div1000
    setChannelType 16 Current_div1000
    setChannelType 17 Power_div10
    setChannelType 18 PowerFactor_div100
    setChannelType 19 TextField
    setChannelType 20 TextField
    setChannelType 21 TextField
    setChannelType 22 TextField
    setChannelType 23 TextField
    setChannelType 24 TextField
    setChannelType 25 TextField
    setChannelType 26 TextField
    setChannelType 27 TextField
    setChannelType 28 TextField
    setChannelType 29 TextField
    
    SetChannelLabel  2   "Total Forward energy"
    SetChannelLabel  3   "Total Reverse energy"
    SetChannelLabel  4   "Power A"
    SetChannelLabel  5   "Direction A (0=forward - 1=reverse)"
    SetChannelLabel  6   "Direction B (0=forward - 1=reverse)"
    SetChannelLabel  7   "Power B"
    SetChannelLabel  8   "Forward Energy A"
    SetChannelLabel  9   "Reverse Energy A"
    SetChannelLabel  10  "Forward Energy B"
    SetChannelLabel  11  "Reverse Energy B"
    SetChannelLabel  12  "Power Factor A"
    SetChannelLabel  13  "AC Frequency"
    SetChannelLabel  14  "Voltage"
    SetChannelLabel  15  "Current A"
    SetChannelLabel  16  "Current B"
    SetChannelLabel  17  "Total Power"
    SetChannelLabel  18  "Power Factor B"
    SetChannelLabel  19  "Voltage Calibration (800-1200)"
    SetChannelLabel  20  "Current A Calibration (800-1200)"
    SetChannelLabel  21  "Power A Calibration (800-1200)"
    SetChannelLabel  22  "Energy A Calibration Forward (800-1200)"
    SetChannelLabel  23  "Frequency Calibration (800-1200)"
    SetChannelLabel  24  "Current B Calibration (800-1200)"
    SetChannelLabel  25  "Power B Calibration (800-1200)"
    SetChannelLabel  26  "Energy B Calibration Forward (800-1200)"
    SetChannelLabel  27  "Energy A Calibration Reverse (800-1200)"
    SetChannelLabel  28  "Energy B Calibration Reverse (800-1200)"
    SetChannelLabel  29  "Adjust Reporting Rate (3-60)"
    
    linkTuyaMCUOutputToChannel 130 2 2
    linkTuyaMCUOutputToChannel 131 2 3
    linkTuyaMCUOutputToChannel 101 2 4
    linkTuyaMCUOutputToChannel 102 2 5
    linkTuyaMCUOutputToChannel 104 2 6
    linkTuyaMCUOutputToChannel 105 2 7
    linkTuyaMCUOutputToChannel 106 2 8
    linkTuyaMCUOutputToChannel 107 2 9
    linkTuyaMCUOutputToChannel 108 2 10
    linkTuyaMCUOutputToChannel 109 2 11
    linkTuyaMCUOutputToChannel 110 2 12
    linkTuyaMCUOutputToChannel 111 2 13
    linkTuyaMCUOutputToChannel 112 2 14
    linkTuyaMCUOutputToChannel 113 2 15
    linkTuyaMCUOutputToChannel 114 2 16
    linkTuyaMCUOutputToChannel 115 2 17
    linkTuyaMCUOutputToChannel 121 2 18
    linkTuyaMCUOutputToChannel 116 2 19
    linkTuyaMCUOutputToChannel 117 2 20
    linkTuyaMCUOutputToChannel 118 2 21
    linkTuyaMCUOutputToChannel 119 2 22
    linkTuyaMCUOutputToChannel 122 2 23
    linkTuyaMCUOutputToChannel 123 2 24
    linkTuyaMCUOutputToChannel 124 2 25
    linkTuyaMCUOutputToChannel 125 2 26
    linkTuyaMCUOutputToChannel 127 2 27
    linkTuyaMCUOutputToChannel 128 2 28
    linkTuyaMCUOutputToChannel 129 2 29
    
    // do not send to MQTT the following channels
    SetChannelPrivate 19 true
    SetChannelPrivate 20 true
    SetChannelPrivate 21 true
    SetChannelPrivate 22 true
    SetChannelPrivate 23 true
    SetChannelPrivate 24 true
    SetChannelPrivate 25 true
    SetChannelPrivate 26 true
    SetChannelPrivate 27 true
    SetChannelPrivate 28 true
    SetChannelPrivate 29 true
    
    // you can use these to force initial configuration values
    //SetChannel 19 1000
    //SetChannel 20 1000
    //SetChannel 21 1000
    //SetChannel 22 1000
    //SetChannel 23 1000
    //SetChannel 24 1000
    //SetChannel 25 1000
    //SetChannel 26 1000
    //SetChannel 27 1000
    //SetChannel 28 1000
    //SetChannel 29 10
    
    PowerSave 1


    I'm still not sure about the following channels and how we can use them
    103        (code: tbd , value: False, cloud pull)
    120        (code: coef_a_reset, value: False, cloud pull)
    126        (code: coef_b_reset, value: False, cloud pull)


    I’m encountering another issue: the only input type I found that works for setting the calibration values is the TextField type, but it only functions on the web interface page. The TextField type is not published to MQTT, even after removing the SetChannelPrivate setting.

    I’m trying to publish the calibration values so they can be adjusted in Home Assistant. Any ideas on how to resolve this issue? We need an input type that can handle values up to 1200, so a dimmer type won’t work.
  • #50 21488650
    fcol95
    Level 1  
    >>21221637 hello dicamarques! any progress on the hlw8112 driver? i've got a PC311-W-TY energy meter that also has it, but connected to a WBR3 chip on my side.

    Circuit diagram with HLW8112 and WBR3 components.

Topic summary

The discussion revolves around the Tuya WiFi Energy Meter PJ-1103A, focusing on its features, specifications, and integration challenges with the TuyaMCU platform. Users share their experiences with the device, including setup configurations, communication protocols, and potential issues with data updates. Some participants explore the possibility of bypassing the TuyaMCU to connect directly to the CB2S chip, while others discuss the HLW8112 chip's compatibility and the need for a dedicated driver. The conversation highlights the popularity of the PJ-1103A model and the community's efforts to develop firmware solutions for better functionality.
Summary generated by the language model.
ADVERTISEMENT