logo elektroda
logo elektroda
X
logo elektroda

Exploring the Features and Specifications of Tuya WiFi Energy Meter PJ-1103a [BK7231N][CB2S]

taktlos 7569 49
ADVERTISEMENT
  • Helpful post
    #1 20828178
    taktlos
    Level 11  
    Energy meter ordered from Aliexpress


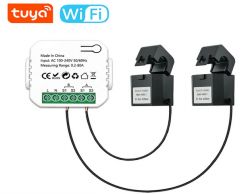
    Tuya WiFi energy meter with two inductive coils.


    Specifications:
    Name: Tuya WiFi Energy Meter
    Material: PC
    Type: 1CT, 2CT (optional)
    Current: 0.2-80A
    Input voltage: 110-240 V, 50/60Hz
    Accuracy grade: 1.0
    Working current: -10℃ to 55℃
    Wireless type: 2.4GHz
    Item size: 47 * 47 * 18mm / 1.85 * 1.85 * 0.71in
    Package size:
    1CT: 100 * 100 * 30mm / 3.94 * 3.94 * 1.18in
    2CT: 115 * 115 * 40mm / 4.53 * 4.53 * 1.57in
    Package weight:
    1CT: 150g / 5.29ounce
    2CT: 200g / 7.05ounce

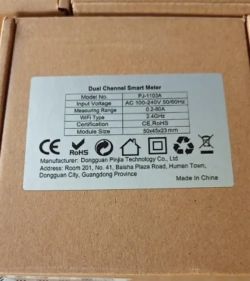
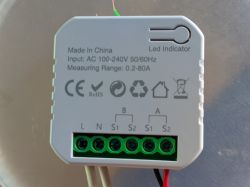
    Nameplate of energy meter PJ-1103A


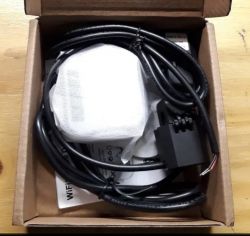
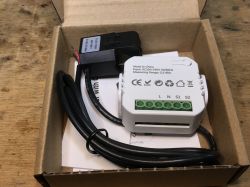
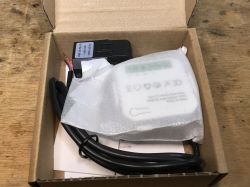
    Tuya WiFi energy meter set in a box.


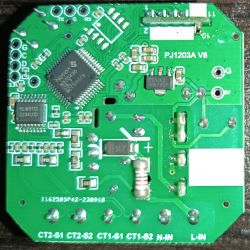
    EB2S:
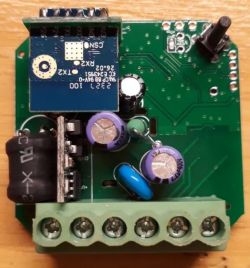
    View of a circuit board with electronic components.


    Mainboard:
    Main board of the Tuya WiFi energy meter with BK7231N chip.


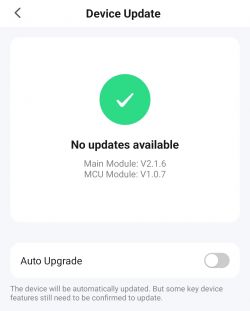
    Smart Life application / Tuya platform version check:
    Device update screen indicating no updates available.


    JSON Template:
    Code: JSON
    Log in, to see the code


    Jailbreaking procedure:

    1. Easy as can be done with OTA method so follow instructions from tuya-cloudcutter project and flash OpenBeken-v1.17.262_bk7231n.ug.bin firmware with profile tuya-generic-pj-1103a-energy-meter.

    2. After successful upload create autoexec.bat for TuyaMCU handling. Howto here: guide

    Example of autoexec.bat required to configure TuyaMCU for channel A:
    Code: Dos
    Log in, to see the code


    3. Can be configured more parameters and additional channel B as per:

    Extracted dpIDs:
    Configuration parameters table for the Tuya energy meter
  • ADVERTISEMENT
  • #2 20837185
    p.kaczmarek2
    Moderator Smart Home
    Thanks for the info. I will only that it may be possible to get quicker updates from this meter by using:
    
    tuyaMcu_sendQueryState
    

    in a repeating event or in a loop. See our docs for more details:
    https://github.com/openshwprojects/OpenBK7231T_App/blob/main/docs/README.md
    Helpful post? Buy me a coffee.
  • #3 20837502
    taktlos
    Level 11  

    Thank you for the hint, but sadly the command:

    Code: Dos
    Log in, to see the code


    or with a 5-second interval gives the same quantity (or pretty much the same) of dpIDs readouts in the output. :(
  • #4 20837538
    p.kaczmarek2
    Moderator Smart Home
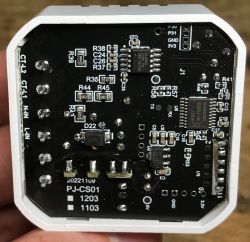
    That's strange... I seem to remember playing with a very similiar device and it seemed to work on my side:
    Electrical device in a cardboard box. Printed circuit board with electronic components and markings PJ-CS01, including resistors and capacitors. Measuring device in a box.
    Hm mine was PJ-MGW1103 meter with CT CB2S...
    Helpful post? Buy me a coffee.
  • #5 21157458
    rohanb
    Level 2  
    Hi

    I have one of these same units PJ-1103A and have set it up using the supplied config and what is found in other forums.
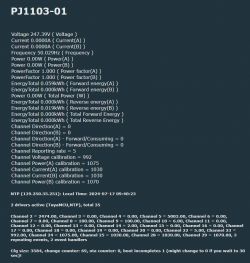
    Below is what the GUI looks like

    Graphical user interface for the PJ-1103A unit showing various statistics.

    and Below is my config
    
    [startDriver TuyaMCU
    tuyaMcu_setBaudRate 9600
    tuyaMcu_defWiFiState 4
    
    startDriver NTP
    ntp_setServer 129.250.35.251
    ntp_timeZoneOfs +10
    
    //voltage
    setChannelType 2 Voltage_div10
    SetChannelLabel 2 " Voltage "
    linkTuyaMCUOutputToChannel  112 val 2
    
    //current A
    setChannelType 3 Current_div1000
    SetChannelLabel 3 " Current(A) "
    linkTuyaMCUOutputToChannel 113 val 3
    
    //current B
    setChannelType 4 Current_div1000
    SetChannelLabel 4 " Current(B) "
    linkTuyaMCUOutputToChannel 114 val 4
    
    //frequency
    //calibration is 1017
    setChannelType 5 Frequency_div100
    SetChannelLabel 5 " Frequency "
    linkTuyaMCUOutputToChannel  111 val 5 
    
    //power A
    setChannelType 6 Power_div10
    SetChannelLabel 6 " Power(A) "
    linkTuyaMCUOutputToChannel  101 val 6 
    
    //power B
    setChannelType 7 Power_div10
    SetChannelLabel 7 " Power(B) "
    linkTuyaMCUOutputToChannel  105 val 7 
    
    //power factor A
    setChannelType 8 PowerFactor_div100
    SetChannelLabel 8 " Power factor(A) "
    linkTuyaMCUOutputToChannel  110 val 8
    
    //power factor B
    setChannelType 9 PowerFactor_div100
    SetChannelLabel 9 " Power factor(B) "
    linkTuyaMCUOutputToChannel  121 val 9 
    
    //forward energy A
    setChannelType 10 EnergyTotal_kWh_div100
    SetChannelLabel 10 " Forward energy(A) "
    linkTuyaMCUOutputToChannel  106 val 10
    
    //forward energy B
    setChannelType 11 EnergyTotal_kWh_div100
    SetChannelLabel 11 " Forward energy(B) "
    linkTuyaMCUOutputToChannel  108 val 11 
    
    //Total Power W
    setChannelType 12 Power_div10
    SetChannelLabel 12 " Total Power (W) "
    linkTuyaMCUOutputToChannel  115 val 12
    
    //reverse energy A
    setChannelType 13 EnergyTotal_kWh_div100
    SetChannelLabel 13 " Reverse energy(A) "
    linkTuyaMCUOutputToChannel  107 val 13
    
    //reverse energy B
    setChannelType 14 EnergyTotal_kWh_div100
    SetChannelLabel 14 " Reverse energy(B) "
    linkTuyaMCUOutputToChannel  109 val 14 
    
    //Total energy forward
    setChannelType 15 EnergyTotal_kWh_div100
    SetChannelLabel 15 " Total Forward Energy "
    linkTuyaMCUOutputToChannel  1 val 15
    
    //Total energy reverse
    setChannelType 16 EnergyTotal_kWh_div100
    SetChannelLabel 16 " Total Reverse Energy "
    linkTuyaMCUOutputToChannel  2 val 16
    
    //Direction A
    setChannelType 17 ReadOnly
    SetChannelLabel 17 " Direction(A) "
    linkTuyaMCUOutputToChannel  102 bool 17
    
    //Direction B
    setChannelType 18 ReadOnly
    SetChannelLabel 18 " Direction(B) "
    linkTuyaMCUOutputToChannel  104 bool 18
    
    setChannelType 19 ReadOnly
    linkTuyaMCUOutputToChannel  102 bool 19
    alias positive SetChannelLabel 19 " Direction(A)  - Forward/Consuming "
    alias negative SetChannelLabel 19 " Direction(A)  - Reverse/Exporting "
    alias myset if $CH19==0 then positive else negative
    addEventHandler OnChannelChange 19 myset 
    
    
    setChannelType 20 ReadOnly
    linkTuyaMCUOutputToChannel  104 bool 20
    alias positive1 SetChannelLabel 20 " Direction(B)  - Forward/Consuming "
    alias negative1 SetChannelLabel 20 " Direction(B)  - Reverse/Exporting "
    alias myset1 if $CH20==0 then positive1 else negative1
    addEventHandler OnChannelChange 20 myset1 
    
    //reporting rate
    setChannelType 22 ReadOnly
    SetChannelPrivate 22 true
    SetChannelLabel 22 "Reporting rate"
    linkTuyaMCUOutputToChannel  129 val 22
    SetChannel 22 5
    
    
    //voltage calibration
    //990 is config for this 
    setChannelType 23 ReadOnly
    SetChannelPrivate 23 true
    SetChannelLabel 23 "Voltage calibration"
    linkTuyaMCUOutputToChannel  116 val 23
    SetChannel 23 992
    
    //power A calibration
    //1070 is config for this 
    setChannelType 24 ReadOnly
    SetChannelPrivate 24 true
    SetChannelLabel 24 "Power(A) calibration"
    linkTuyaMCUOutputToChannel  118 val 24
    SetChannel 24 1075
    
    //current B calibration
    setChannelType 28 TextField
    setChannelType 28 ReadOnly
    SetChannelPrivate 28 true
    SetChannelLabel 28 "Current(B) calibration"
    linkTuyaMCUOutputToChannel  123 val 28
    SetChannel 28 1030
    
    //power B calibration
    setChannelType 29 ReadOnly
    SetChannelPrivate 29 true
    SetChannelLabel 29 "Power(B) calibration"
    linkTuyaMCUOutputToChannel 124 val 29
    SetChannel 29 1070
    
    //current A calibration
    setChannelType 25 ReadOnly
    SetChannelPrivate 25 true
    SetChannelLabel 25 "Current(A) calibration"
    linkTuyaMCUOutputToChannel  117 val 25
    SetChannel 25 1030
    
    addRepeatingEvent 5 -1 myset1 
    addRepeatingEvent 5 -1 myset 
    addRepeatingEvent 5 -1 tuyaMcu_sendQueryState
    PowerSave 1


    The energy stats seem either not to work or to be wildly inaccurate and some of them are lost of you power cycle the unit.

    My 2 questions to @p.kaczmarek2   are

    1/ Can we get energy stats to work like the BL0492 driver rather than this way
    2/ How can I use Enums for channel 19 and 20 rather than rewriting just the channel labels

    Thanks in advance.
  • #6 21164859
    p.kaczmarek2
    Moderator Smart Home
    It should be possible to link old BL0942 energy stats to TuyaMCU, but TuyaMCU may not provide frequent enough updates for it to work good. It is currently not implemented.

    dpIDs 20 and 19 are current direction? We can create channel type for that.
    Helpful post? Buy me a coffee.
  • #7 21165200
    rohanb
    Level 2  
    >>21164859
    Thanks but this is not a BL0942 it's a HLW8112
    I am unsure but maybe we can bypass Tuya MCU and connect straight to CB2S but this would require a driver and from what I can find there is not a lot of data around for it.
    (Data sheet attached)

    Maybe I just purchase a new unit that's based on the BL0942 chips ??

    DPid 102 and 104 are the clamp A and B directions .

    Thanks again
  • ADVERTISEMENT
  • #8 21176513
    p.kaczmarek2
    Moderator Smart Home
    You could bypass TuyaMCU and connect HLW8112 to BK7231 but, as you said, it would require writing a driver. You could just try to port existing BL0942 driver, as the packets may be similiar, be we would need to analyze the datasheet more.

    My PJ-MGW1103 , on the other hand, was using BL0942. No strange chips there. BL0942, TuyaMCU and BK7231. Here are details:
    https://www.elektroda.com/rtvforum/topic4053493.html
    Helpful post? Buy me a coffee.
  • ADVERTISEMENT
  • #10 21212834
    p.kaczmarek2
    Moderator Smart Home
    Most likely, yes, it may be a version without TuyaMCU. You can also check the flash dump. By the way, why do you charge 1 point for downloading your binary file? Usually points are used when you are posting something helpful for other users, and not requesting for help yourself :D Still, flash this device with OBK and give it a go. We'll try to help
    Helpful post? Buy me a coffee.
  • ADVERTISEMENT
  • #11 21212837
    dicamarques
    Level 5  
    >>21212834
    Ah so that's what that's for😅 sorry my mistake, I just disabled that
    I'm slowly converting my tuya devices
  • #12 21212842
    p.kaczmarek2
    Moderator Smart Home
    Ok, I haven't found much in that binary backup, so I'd say just flash OBK and we will see. In worst case you can always restore factory firmware.

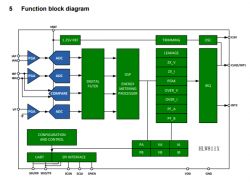
    The another question is how the HLW8112 protocol looks like. It may be not supported yet. Is it using UART or SPI?
    Function block diagram of the HLW811X chip showing connections and components.
    Maybe it would be helpful to check and sketch the connections of HLW8112 pins to the WiFi module?
    Helpful post? Buy me a coffee.
  • #13 21213489
    dicamarques
    Level 5  
    >>21212842
    I'm trying to make a diagram, but from the datasheet of the HLW8112, the PIN SPIEN is High, so I'm assuming its SPI
  • #14 21213563
    divadiow
    Level 34  
    >>21212779

    interesting all this is in that bin

    Code: JSON
    Log in, to see the code


    the boot log is equally as interesting

    Code: Text
    Log in, to see the code
  • #15 21213598
    dicamarques
    Level 5  
    >>21213563
    I should add that I did this dump before I configured the device with the smartlife app
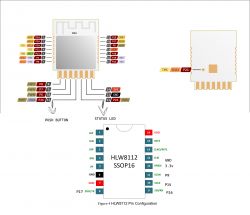
    Here's the pinout I managed to find
    Pin diagram of an electronic module with labels.
  • #16 21214642
    p.kaczmarek2
    Moderator Smart Home
    Hmm, we have BL0942 SPI mode supported, how is HLW SPI different from that?
    Helpful post? Buy me a coffee.
  • #19 21221825
    p.kaczmarek2
    Moderator Smart Home
    Very good, let me know if you need any specific guidance, I will do my best to help. Keep it on!
    Helpful post? Buy me a coffee.
  • #20 21224768
    exotsk
    Level 7  
    Very popular model, I currently have two of them. I flashed one before I realized that there are no drivers for this type of energy monitor chip. CBU/HLW8112.
    Flashing is very easy and convenient. I'm waiting for an update to use this with OpenBekken. I made a dump; if you need any data, I can provide it.

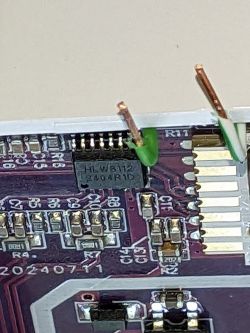
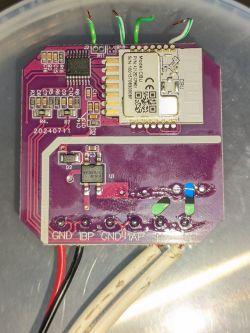
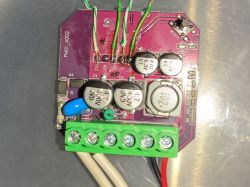
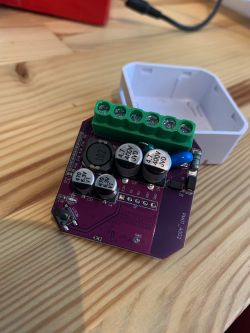
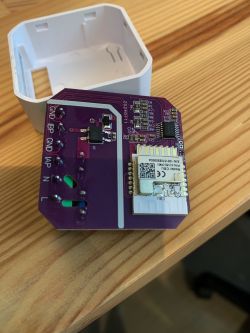
    A blue circuit board with green terminals and capacitors on a wooden table. Circuit board with a purple circuit and electronic module on a wooden surface.
  • #21 21237860
    davidjaka
    Level 2  
    exotsk wrote:
    I currently have two of them. I flashed one before I realized that there are no drivers for this type of energy monitor chip

    Same situation here. Waiting for a working OpenBeken firmware for the device. Flashed it back to the Tuya firmware, but now it's incorrectly showing power.
  • #22 21237861
    dicamarques
    Level 5  
    The code I have on my repo has an initial communication with the chip, but I still hadn't had time to implement all the features and see if it's really working
  • #23 21238065
    davidjaka
    Level 2  
    dicamarques wrote:
    The code I have on my repo has an initial communication with the chip, but I still hadn't had time to implement all the features and see if it's really working

    Maybe I can help with some testing? It would be great to have working firmware for this device because it is easy to flash and looks like it’s popular on Aliexpress.
  • #24 21241320
    jacquesjacobus
    Level 1  
    Got the same model here also. Has anyone made any progress?
  • #25 21333707
    nhsqr
    Level 2  
    dicamarques wrote:
    The code I have on my repo has an initial communication with the chip, but I still hadn't had time to implement all the features and see if it's really working


    I have compiled your repo branch: drv_hlw8112
    I can see that the driver is compiling successfully but after flashing it does not show up in module configuration drop down menu (on both web and app).
    Am I missing something?
    This is an interesting project that I think I can help with in the next few weeks.
    Also I have found a very well written driver in a Chinese repo: https://github.com/notrynohigh/BabyOS
    But the development of this driver was: https://github.com/Hossein-M98

    Added after 2 [minutes]:

    Mine is exactly the same as https://www.elektroda.com/rtvforum/topic4016609.html#21212779
  • #26 21333858
    dicamarques
    Level 5  
    >>21333707
    I think you first need to send the command startDriver HLW8112SPI if I'm not mistaken

    I was looking at that babyOs, maybe we can have a look at this file https://github.com/notrynohigh/BabyOS/blob/master/bos/drivers/b_drv_hlw811x.c
    I haven't had the time to continue debugging my development but maybe this can speed up the process

    Or maybe: https://github.com/MahdaSystem/HLW811x/blob/master/src/HLW811x.c it's easier
  • #27 21333875
    nhsqr
    Level 2  
    dicamarques wrote:
    >>21333707
    I think you first need to send the command startDriver HLW8112SPI if i'm not mistaken

    I was looking at that babyOs, maybe we can have a look at this file https://github.com/notrynohigh/BabyOS/blob/master/bos/drivers/b_drv_hlw811x.c
    I haven't had the time to continue debugging my development but maybe this can speed up the process

    Or maybe: https://github.com/MahdaSystem/HLW811x/blob/master/src/HLW811x.c its easier


    Yes, you are right about the command. I took a look at the code and saw it. Unfortunately it gets me:
    Warn:EnergyMeter:HLW8112_SPI_Init
    Error:EnergyMeter:Failed to write reg 80 val A04: read 410000
    Error:EnergyMeter:Failed to write reg 81 val 00: read 60000
    Warn:EnergyMeter:HLW8112_SPI_Init_OUT
    Info:MAIN:Started HLW8112SPI.


    So now I am not sure if the HLW8112 chip is not working properly or is there something wrong in the code because before I flushed it, the original firmware was freezing for some unknown reason. And now I am thinking of buying another one but it will take at least a couple of weeks to arrive.
  • #28 21337073
    laszlokondas
    Level 1  
    Hello all! I'm using this meter with, using the TuyaMCU driver with the configuration from @rohanb. I can also confirm that the instant measurements are OK, but from the historical ones only the energyTotal is reliable.

    I did not use calibration values in the config, and my sensor measurements are off by 5% approx. Is there a way I can access the calibration values from the original firmware? Unfortunately I did not make a dump before flashing openBeken...
  • #29 21373100
    alexan_e
    Level 10  
    >>21337073

    Hi, I've made this one and I can access all the configuration settings and change them.

    autoexec.bat for PJ-1103A dual clamp energy meter (Tuya)

    
    startDriver TuyaMCU
    tuyaMcu_setBaudRate 9600
    tuyaMcu_defWiFiState 4
    
    startDriver NTP
    ntp_setServer 129.250.35.251
    
    // set for your timezone
    ntp_timeZoneOfs +2
    
    setChannelType 2  EnergyTotal_kWh_div100
    setChannelType 3  EnergyTotal_kWh_div100
    setChannelType 4  Power_div10
    setChannelType 5  ReadOnly
    setChannelType 6  ReadOnly
    setChannelType 7  Power_div10
    setChannelType 8  EnergyTotal_kWh_div100
    setChannelType 9  EnergyTotal_kWh_div100
    setChannelType 10 EnergyTotal_kWh_div100
    setChannelType 11 EnergyTotal_kWh_div100
    setChannelType 12 PowerFactor_div100
    setChannelType 13 Frequency_div100
    setChannelType 14 Voltage_div10
    setChannelType 15 Current_div1000
    setChannelType 16 Current_div1000
    setChannelType 17 Power_div10
    setChannelType 18 PowerFactor_div100
    setChannelType 19 TextField
    setChannelType 20 TextField
    setChannelType 21 TextField
    setChannelType 22 TextField
    setChannelType 23 TextField
    setChannelType 24 TextField
    setChannelType 25 TextField
    setChannelType 26 TextField
    setChannelType 27 TextField
    setChannelType 28 TextField
    setChannelType 29 TextField
    
    SetChannelLabel  2   "Total Forward energy"
    SetChannelLabel  3   "Total Reverse energy"
    SetChannelLabel  4   "Power A"
    SetChannelLabel  5   "Direction A (0=forward - 1=reverse)"
    SetChannelLabel  6   "Direction B (0=forward - 1=reverse)"
    SetChannelLabel  7   "Power B"
    SetChannelLabel  8   "Forward Energy A"
    SetChannelLabel  9   "Reverse Energy A"
    SetChannelLabel  10  "Forward Energy B"
    SetChannelLabel  11  "Reverse Energy B"
    SetChannelLabel  12  "Power Factor A"
    SetChannelLabel  13  "AC Frequency"
    SetChannelLabel  14  "Voltage"
    SetChannelLabel  15  "Current A"
    SetChannelLabel  16  "Current B"
    SetChannelLabel  17  "Total Power"
    SetChannelLabel  18  "Power Factor B"
    SetChannelLabel  19  "Voltage Calibration (800-1200)"
    SetChannelLabel  20  "Current A Calibration (800-1200)"
    SetChannelLabel  21  "Power A Calibration (800-1200)"
    SetChannelLabel  22  "Energy A Calibration Forward (800-1200)"
    SetChannelLabel  23  "Frequency Calibration (800-1200)"
    SetChannelLabel  24  "Current B Calibration (800-1200)"
    SetChannelLabel  25  "Power B Calibration (800-1200)"
    SetChannelLabel  26  "Energy B Calibration Forward (800-1200)"
    SetChannelLabel  27  "Energy A Calibration Reverse (800-1200)"
    SetChannelLabel  28  "Energy B Calibration Reverse (800-1200)"
    SetChannelLabel  29  "Adjust Reporting Rate (3-60)"
    
    linkTuyaMCUOutputToChannel 1   1 2 
    linkTuyaMCUOutputToChannel 2   1 3 
    linkTuyaMCUOutputToChannel 101 2 4 
    linkTuyaMCUOutputToChannel 102 2 5 
    linkTuyaMCUOutputToChannel 104 1 6 
    linkTuyaMCUOutputToChannel 105 1 7 
    linkTuyaMCUOutputToChannel 106 1 8 
    linkTuyaMCUOutputToChannel 107 1 9 
    linkTuyaMCUOutputToChannel 108 1 10
    linkTuyaMCUOutputToChannel 109 1 11
    linkTuyaMCUOutputToChannel 110 1 12
    linkTuyaMCUOutputToChannel 111 1 13
    linkTuyaMCUOutputToChannel 112 1 14
    linkTuyaMCUOutputToChannel 113 1 15
    linkTuyaMCUOutputToChannel 114 1 16
    linkTuyaMCUOutputToChannel 115 1 17
    linkTuyaMCUOutputToChannel 121 1 18
    linkTuyaMCUOutputToChannel 116 2 19
    linkTuyaMCUOutputToChannel 117 2 20
    linkTuyaMCUOutputToChannel 118 2 21
    linkTuyaMCUOutputToChannel 119 2 22
    linkTuyaMCUOutputToChannel 122 2 23
    linkTuyaMCUOutputToChannel 123 2 24
    linkTuyaMCUOutputToChannel 124 2 25
    linkTuyaMCUOutputToChannel 125 2 26
    linkTuyaMCUOutputToChannel 127 2 27
    linkTuyaMCUOutputToChannel 128 2 28
    linkTuyaMCUOutputToChannel 129 2 29
    
    // do not send to MQTT the following channels
    SetChannelPrivate 19 true
    SetChannelPrivate 20 true
    SetChannelPrivate 21 true
    SetChannelPrivate 22 true
    SetChannelPrivate 23 true
    SetChannelPrivate 24 true
    SetChannelPrivate 25 true
    SetChannelPrivate 26 true
    SetChannelPrivate 27 true
    SetChannelPrivate 28 true
    SetChannelPrivate 29 true
    
    // you can use these to force initial calibration values 
    //SetChannel 19 1000
    //SetChannel 20 1000
    //SetChannel 21 1000
    //SetChannel 22 1000
    //SetChannel 23 1000
    //SetChannel 24 1000
    //SetChannel 25 1000
    //SetChannel 26 1000
    //SetChannel 27 1000
    //SetChannel 28 1000
    //SetChannel 29 10
    
    PowerSave 1


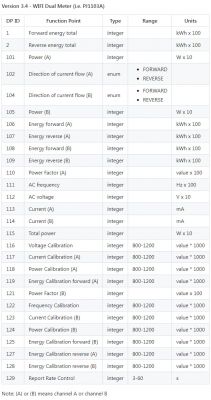
    It's based on this table which can be found image source

    Configuration table for the PJ-1103A WiFi Dual Meter.
  • #30 21374393
    exotsk
    Level 7  
    >>21373100
    this solution not usable for hlw811 model?

Topic summary

The discussion revolves around the Tuya WiFi Energy Meter PJ-1103A, focusing on its features, specifications, and integration challenges with the TuyaMCU platform. Users share their experiences with the device, including setup configurations, communication protocols, and potential issues with data updates. Some participants explore the possibility of bypassing the TuyaMCU to connect directly to the CB2S chip, while others discuss the HLW8112 chip's compatibility and the need for a dedicated driver. The conversation highlights the popularity of the PJ-1103A model and the community's efforts to develop firmware solutions for better functionality.
Summary generated by the language model.
ADVERTISEMENT