logo elektroda
logo elektroda
X
logo elektroda

Flashing Beca BAC-002 Thermostat with OpenBK and Adding Sensor

shakin89 2406 25
ADVERTISEMENT
  • Hi all, i would like to flash my thermostat with openbk.
    There are several version of this thermostat.
    The oldest has a WB3S chipset inside.
    The newest has a CB3S chipset.
    I would also like to add a temperature/humidity sensor to the wifi chip soldering it directly on the board and i'd like to know the state of the relay (on or off) with this little mod (Link)
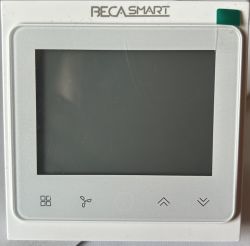
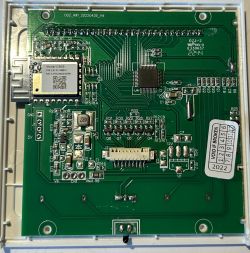
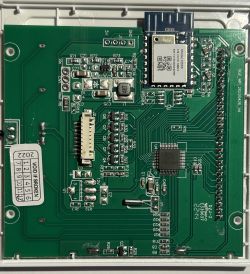
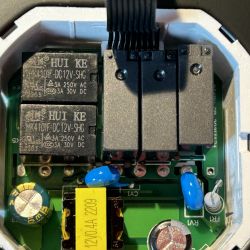
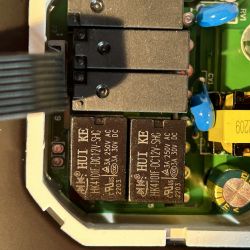
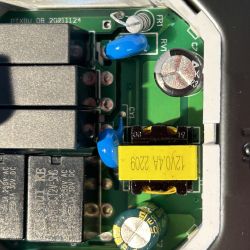
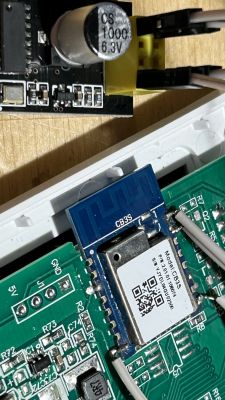
    Control panel of a Beca Smart thermostat with LCD screen and touch buttons. Thermostat circuit board with CB3S chip. Thermostat circuit board with visible CB3S chipset.
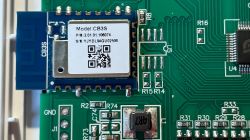
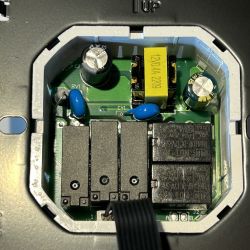
    Close-up of CB3S module on a circuit board. View of an open thermostat with visible electronic components on a circuit board. Close-up of the inside of a thermostat with visible relays and other electronic components. Close-up of the internal components of a thermostat with three HUI KE relays mounted on a circuit board. Close-up of the internal electronic circuit of a thermostat with visible components on a green board.

    I've already the thermostat working with local-tuya, an integration for home assistant that doesn't rely on tuya cloud but thermostats aren't disconnected from the cloud.
    So these are dpID the thermostat is using.

    Spoiler:
    name: BAC-002 Thermostat (C) - WB3S chip
    primary_entity:
    entity: climate
    dps:
    - id: 1
    type: boolean
    name: power
    mapping:
    - dps_val: false
    value: "off"
    hidden: true
    - id: 2
    type: integer
    name: temperature
    unit: C
    range:
    min: 10
    max: 70
    mapping:
    - scale: 2
    - id: 3
    type: integer
    name: current_temperature
    unit: C
    mapping:
    - scale: 2
    - id: 4
    type: string
    name: operation_mode
    mapping:
    - dps_val: "0"
    value: program
    icon: mdi:calendar
    - dps_val: "1"
    value: manual
    icon: mdi:hand-pointing-up
    hidden: true
    - id: 5
    type: boolean
    name: preset_mode
    mapping:
    - dps_val: true
    value: eco
    - dps_val: false
    value: comfort
    - id: 102
    type: string
    name: hvac_mode
    mapping:
    - dps_val: "0"
    value: cool
    icon: mdi:snowflake
    - dps_val: "1"
    value: heat
    icon: mdi:wheather-sunny
    - dps_val: "2"
    value: fan_only
    icon: mdi:fan
    - id: 103
    type: string
    name: fan_mode
    mapping:
    - dps_val: "0"
    value: auto
    icon: mdi:fan-auto
    - dps_val: "1"
    value: high
    icon: mdi:fan-speed-3
    - dps_val: "2"
    value: medium
    icon: mdi:fan-speed-2
    - dps_val: "3"
    value: low
    icon: mdi:fan-speed-1
    secondary_entities:
    - entity: light
    name: Display
    category: config
    deprecated: climate hvac_mode
    dps:
    - id: 1
    type: boolean
    name: switch
    mapping:
    - dps_val: true
    icon: "mdi:led-on"
    - dps_val: false
    icon: "mdi:led-off"
    - entity: lock
    name: Child Lock
    category: config
    dps:
    - id: 6
    type: boolean
    name: lock
    mapping:
    - dps_val: true
    icon: "mdi:hand-back-right-off"
    - dps_val: false
    icon: "mdi:hand-back-right"
    - entity: select
    name: Operation Mode
    dps:
    - id: 4
    type: string
    name: option
    mapping:
    - dps_val: "0"
    value: Program
    - dps_val: "1"
    value: Manual

    Cool? Ranking DIY
    About Author
    shakin89
    Level 3  
    Offline 
    shakin89 wrote 6 posts with. Been with us since 2024 year.
  • ADVERTISEMENT
  • #2 20896307
    p.kaczmarek2
    Moderator Smart Home
    Hello, this should be easily doable, we actually already had a similiar topic here:
    https://www.elektroda.com/rtvforum/topic4003974.html
    Have you seen that?

    The topic above even includes the relay status read mod, I think.

    Still, I can guide you step by step through the procedure, if you want. So, let's start by making 2MB flash backup of the device. Do you know how to do that? Here are some resources:
    https://github.com/openshwprojects/BK7231GUIFlashTool
    https://www.youtube.com/@elektrodacom
    Keep in mind that with TuyaMCU you may need to temporary cut the UART connection from the MCU for the time of the flashing.
    Helpful post? Buy me a coffee.
  • #3 20897613
    shakin89
    Level 3  

    First of all, thank you for all your effort on this project and thank you for your reply.
    I'm aware of the other thread, I've already studied it. I will try to backup the device and to flash the new firmware.
    I'm waiting for the pogo pin cable adapter to arrive, I have to flash a bunch of devices (7 devices) and I think it will be simpler to use pogo pin with a 3D printed adapter to keep them in place, instead of soldering all cables to every chip.

    I will update this thread during this week, after I receive all the components.
    Thanks in advance
    Have a nice day.
  • #4 20897615
    p.kaczmarek2
    Moderator Smart Home
    Let's start with flashing and configuring one device, we need to test the whole setup first. I am not sure if just having pogo pins solves all problems, because you still may need to cut the connection to the MCU. Alternatively, you can find MCU datasheet and try to put it in the RESET state.
    Helpful post? Buy me a coffee.
  • #5 20908394
    shakin89
    Level 3  
    Sorry for late reply, very busy week.
    Yesterday i had some spare time. I've desoldered two resistor which communicate with MCU.
    No luck with pogo pins, so i've soldered four wires to wifi chip.
    At first attempt i've backed up the memory of the original wifi chip and flashed OpenBK7231N_QIO_1.17.406.bin.
    Everything was successful.
    It was late so i didn't go on, and shut down everything.
    This morning i've tried to read obk config, buth with no success.

    I've tried to desolder wires and connect everything up to the mains, but still no wifi hotspot comes up.
    So soldered again wires to 3.3V, GND RX1 and TX1.
    Trying to backup again but everytimes the backup starts, fails at somepoing
    Reading 0x10000... CheckRespond_FlashRead4K: ERROR
    Failed! There was no result to save.

    I've already tried to desolder wires and resolder them a few times, with no luck.
    Any help would be appreciated.
  • #6 20908698
    p.kaczmarek2
    Moderator Smart Home
    OBK config will not help for TuyaMCU device. What does the TX2 log output say?
    Helpful post? Buy me a coffee.
  • ADVERTISEMENT
  • #7 20909063
    shakin89
    Level 3  
    Well, i don't see any output connecting on tx2.
    I'm using putty in serial mode to see if there is an output, am i doing wrong?
    i'm using this as usb-uart adapter. Hope it is good.

    p.s. sorry for my noob question, it's my first time.
  • #8 20909105
    p.kaczmarek2
    Moderator Smart Home
    how do you power your device, can you make a photo of connections?"
    Helpful post? Buy me a coffee.
  • #9 20909148
    shakin89
    Level 3  
    Close-up of an electronic module labeled CB3S on a circuit board.
    This is how i am powering the device. Now i'm trying to use a usb-esp01 adapter, to see if it helps. Now the led screen of the thermostat powers up. but still not getting the hotspot or web interface.
    cannot see it pop up in the router asking for an ip.


    this is what i've used til now.
    TX to RX1
    RX to TX1
    3V3 to pin 8
    GND to pin 9
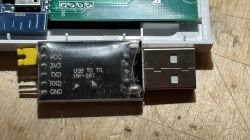
    USB to TTL adapter with pin labels.

    P.S. i am trying even with an external power supply, but with no luck. I've attempted to reflash the firmware but at the end it gave me CRC error.

    is the chip still good? or i've messed it up?
  • ADVERTISEMENT
  • #10 20909568
    p.kaczmarek2
    Moderator Smart Home
    You are using your USB to UART converter incorrectly. You should use jumper to connect 3.3V to VCC on USB to UART converter to select 3.3V voltage levels and power the device externally from a reliable 3.3V source. This USB to UART converter will not provide enough current for flashing. Alternatively, you can get 5V from USB and connect it to the input of AMS1117-3.3V LDO regulator on the device board (if present) to get a stable 3.3V for WiFi module.

    Have you watched any of our BK7231 flashing tutorials on Youtube?
    https://www.youtube.com/@elektrodacom
    We just have a lot of them.
    This playlist (look for BK7231):
    https://www.youtube.com/watch?v=L6d42IMGhHw&list=PLzbXEc2ebpH0CZDbczAXT94BuSGrd_GoM
    Helpful post? Buy me a coffee.
  • #11 20915193
    shakin89
    Level 3  
    Hi,
    sorry for late reply. I haven't been able to flash new firmware. i will try to do it in a few days.
    During the first attempt, I have been able to backup the original flash. if you want it i can attach it.

    Meanwhile i've been able to flash another thermostat using tuyacloudcutter. It is functioning and now i have to configure pins on the esp web interface.

    i've been able to dissect the dump obtaining the storage json.
    I posted it to github tuyacloudcutter to make a new profile
  • #12 21391966
    potl12
    Level 3  
    Hi all, i want to "hi-jack" this post to post my first response on the forum. I just finished flashing 11 of these units with a simple pogo-pin set-up so if anyone needs some easy solution to flash these units let me know.

    The problem I'd like to ask advice on here is if anybody knows how to connect an external sensor. My thermostats are mounted fairly close to the fan-coils and the blowing of hot air affects the sensor (which is directly on the touch panel). It would be much better to have an external sensor somewhere else. I was wondering if I could swap out the sensor in the bottom with another one. Please see the image of the most recent bht-002 pcb here:

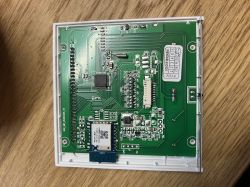
    Image of bht-002 circuit board.

    thanks!
  • #13 21391977
    p.kaczmarek2
    Moderator Smart Home
    Some Tuya thermostats support connecting external sensor out of the box, is it the case here? Do you have a manual?

    If not, then we will have to try more DIY approach, but there is one problem - sensor is connected to the MCU and not to WiFi module, so we don't have control over the reading process..

    Added after 33 [seconds]:

    Or maybe the MCU has a dpID for calibration? I saw it available once or twice.
    Helpful post? Buy me a coffee.
  • #14 21391982
    potl12
    Level 3  
    yeah this one does not support an external sensor out of the box so i'll probably have to go for the DIY approach. Please see the manual attached.
    I'm also posting the firmware backup for the other user who messaged me so we have a future reference for all.

    Edit: There is a dpID but it would be a guess as to what value I would need to set that?
  • #15 21391983
    p.kaczmarek2
    Moderator Smart Home
    Do you have it still paired with App? Does it have a calibration option there?

    Added after 43 [seconds]:

    EDIT: There is calibration mentioned in manual.
    Helpful post? Buy me a coffee.
  • #16 21391984
    potl12
    Level 3  
    >>21391983 No i never paired it with the app to begin with unfortuantely, but there is a menu setting. It's also visible in the manual
  • #17 21392001
    p.kaczmarek2
    Moderator Smart Home
    Hm ok, we have a backup so we also can do dpID extraction, maybe @divadiow can also help. There are also some dpIDs in the first post.
    Helpful post? Buy me a coffee.
  • #18 21392023
    divadiow
    Level 34  
    Code: Text
    Log in, to see the code


    Code: JSON
    Log in, to see the code


    Code: Text
    Log in, to see the code


    combined:

    Code: JSON
    Log in, to see the code
  • ADVERTISEMENT
  • #20 21392026
    potl12
    Level 3  
    So what are you saying is to try to use the temperature compensation dpID to "mimic" an external sensor by modifying what the internal sensor read? I've not seen this value being exposed by the tuya mcu.

    See here what the MCU reports through the HomeAssistant <-> ESPHome/Libretiny firmware I installed:
    
    [C][tuya.climate:336]: Tuya Climate 'Thermostat'
    [09:34:57][C][tuya.climate:338]:   Switch has datapoint ID 1
    [09:34:57][C][tuya.climate:341]:   Active state has datapoint ID 102
    [09:34:57][C][tuya.climate:344]:   Target Temperature has datapoint ID 2
    [09:34:57][C][tuya.climate:347]:   Current Temperature has datapoint ID 3
    [09:34:57][C][tuya.climate:352]:   Eco has datapoint ID 5
    [09:34:57][C][tuya.sensor:029]: Tuya Sensor 'Temperature'
    [09:34:57][C][tuya.sensor:029]:   Device Class: 'temperature'
    [09:34:57][C][tuya.sensor:029]:   State Class: ''
    [09:34:57][C][tuya.sensor:029]:   Unit of Measurement: '°C'
    [09:34:57][C][tuya.sensor:029]:   Accuracy Decimals: 1
    [09:34:57][C][tuya.sensor:030]:   Sensor has datapoint ID 3
    [09:34:57][C][tuya.sensor:029]: Tuya Sensor 'Temperature (external)'
    [09:34:57][C][tuya.sensor:029]:   Device Class: 'temperature'
    [09:34:57][C][tuya.sensor:029]:   State Class: ''
    [09:34:57][C][tuya.sensor:029]:   Unit of Measurement: '°C'
    [09:34:57][C][tuya.sensor:029]:   Accuracy Decimals: 1
    [09:34:57][C][tuya.sensor:030]:   Sensor has datapoint ID 102
    [09:34:57][C][tuya.sensor:029]: Tuya Sensor 'Valve'
    [09:34:57][C][tuya.sensor:029]:   State Class: ''
    [09:34:57][C][tuya.sensor:029]:   Unit of Measurement: ''
    [09:34:57][C][tuya.sensor:029]:   Accuracy Decimals: 0
    [09:34:57][C][tuya.sensor:030]:   Sensor has datapoint ID 104
    [09:34:57][C][tuya.switch:068]: Tuya Switch 'Lock'
    [09:34:57][C][tuya.switch:070]:   Icon: 'mdi:lock'
    [09:34:57][C][tuya.switch:090]:   Restore Mode: always OFF
    [09:34:57][C][tuya.switch:024]:   Switch has datapoint ID 6
    [09:34:57][C][tuya.select:042]: Tuya Select 'Scheduled programming'
    [09:34:57][C][tuya.select:042]:   Icon: 'mdi:calendar'
    [09:34:57][C][tuya.select:043]:   Select has datapoint ID 4
    [09:34:57][C][tuya.select:044]:   Options are:
    [09:34:57][C][tuya.select:047]:     0: Use scheduled programs
    [09:34:57][C][tuya.select:047]:     1: Manual control
    ...
    [09:34:57][C][tuya:041]: Tuya:
    [09:34:57][C][tuya:056]:   Datapoint 1: switch (value: OFF)
    [09:34:57][C][tuya:058]:   Datapoint 2: int value (value: 39)
    [09:34:57][C][tuya:058]:   Datapoint 3: int value (value: 36)
    [09:34:57][C][tuya:062]:   Datapoint 4: enum (value: 1)
    [09:34:57][C][tuya:056]:   Datapoint 5: switch (value: OFF)
    [09:34:57][C][tuya:056]:   Datapoint 6: switch (value: OFF)
    [09:34:57][C][tuya:062]:   Datapoint 102: enum (value: 1)
    [09:34:57][C][tuya:062]:   Datapoint 103: enum (value: 0)
    [09:34:57][C][tuya:074]:   Product: 'N8bUqOZ8HBQjU0K04.0.1'
    ...
    [09:34:59][D][tuya:343]: Datapoint 3 update to 36
    [09:34:59][D][climate:396]: 'Thermostat' - Sending state:
    [09:35:00][D][climate:399]:   Mode: OFF
    [09:35:00][D][climate:401]:   Action: OFF
    [09:35:00][D][climate:404]:   Fan Mode: AUTO
    [09:35:00][D][climate:410]:   Preset: NONE
    [09:35:00][D][climate:419]:   Current Temperature: 18.00°C
    [09:35:00][D][climate:425]:   Target Temperature: 19.50°C
    ```
    
  • #21 21392029
    divadiow
    Level 34  
    >>21392025
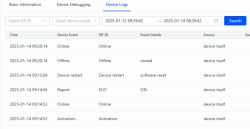
    Screenshot of a device log showing various events without visible DP ID.

    not seeing dpID for that
  • #22 21392038
    insmod
    Level 24  
    Maybe dpId will show if manually calibrated on device itself?
    Such was the case on my WT-100 thermostats.
  • #23 21392046
    p.kaczmarek2
    Moderator Smart Home
    Well, if there is no calibration available, the best you can do is to use existing sensor with some extra wires and hope that they will not introduce too much interference and resistance... you can give it a go on the table... depends on how far you need to move the sensor.

    Added after 3 [minutes]:

    Here is temperature calibration packet for WT200-16A-W:
    
    Temp calibration to 0.3:
    
    Sent by WiFi module:
    55 AA	00	06		00 08	1302000400000003	29	
    HEADER	VER=00	SetDP		LEN	dpId=19 Val V=3		CHK	
    

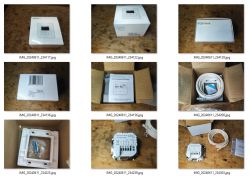
    Temperature sensor calibration kits with packaging and cables.
    and for WT50-WH-3A and WT100-WH-3A dpID seems the same.
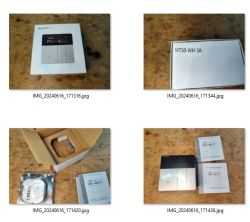
    Four images showing different temperature calibration devices, including AVATTO models WT200-16A-W and WT50-WH-3A with instructions.
    Helpful post? Buy me a coffee.
  • #24 21392061
    potl12
    Level 3  
    thanks for your extensive reply but I'm unsure if I understand what you mean. Would you mean resolder a wired sensor in place of the existing one?
    Another thought I had but this goes probably outside of the scope of this discussion is make a custom climate component in home assistant that would just use another sensor as input instead of the bht one.
  • #25 21395148
    potl12
    Level 3  
    >>21392046 Hey, i was womdering if you maybe have some more info on this. I'm not really sure what you mean with the info you posted. thanks :-)
  • #26 21398125
    tomik67
    Level 12  
    >>20896307 I see that the thermostats have shown up again, the BHT-002 equivalents with a 3.3V MCU which means that deriving the relay switching signal/information is easier, no need to lower the voltage for the CB3S pin.
    These resistors are just jumpers (0)

Topic summary

The discussion revolves around flashing the Beca BAC-002 thermostat with OpenBK firmware and integrating a temperature/humidity sensor. The user identifies two versions of the thermostat, one with a WB3S chipset and the other with a CB3S chipset. Initial attempts to flash the device using a pogo pin adapter were unsuccessful, leading to soldering wires directly to the WiFi chip. The user successfully backed up the original firmware but encountered issues when trying to read the configuration and establish a WiFi hotspot. Various troubleshooting steps were suggested, including ensuring proper power supply connections and using a reliable USB to UART converter. The user also mentioned successfully flashing another thermostat using Tuyacloudcutter and shared insights on extracting configuration data for further use.
Summary generated by the language model.
ADVERTISEMENT