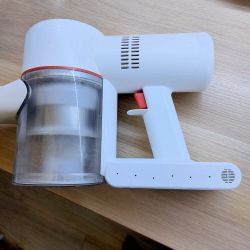
Dreame V9 cordless hoover as pictured.
 .
.
After a couple of years of brave work, the operating time was significantly reduced. The conclusion was obvious, the battery is coming to the end of its life, you have to think about buying a new one (a considerable expense) or buying a used one, and this is what I did to start with, possibly replacing the cells in the battery with new ones.
 .
.
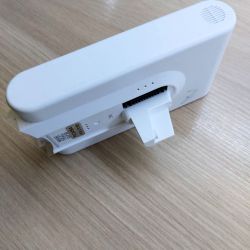
Having a spare battery almost as good as new in working order, I decided to replace the cells in the original one.
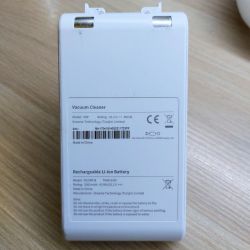
I bought bargain Samsung 18650 25S (2500 mah 25A) batteries, the original ones are 18650 25R (2500 mah 20A).
I bought 10 pcs and from these I selected 7 pcs almost identical.
Before I started taking anything apart, I decided to check the condition of the cells in the original battery without taking them apart.
I drilled small holes more or less opposite the cells, you can see this in the photo of the hoover.
I thought it might be enough to align the batteries, but no. The batteries, when charged and discharged, hold the voltage to within 0.01V so this is not a problem.
The obvious conclusion - the batteries are slowly reaching the end of their life and need to be replaced.
I searched the internet on the subject, Dreame V9 battery replacement and repair. It turned out that the matter is not so simple. If the red LED comes on, it's over the battery (no one has overcome this yet or I haven't found it) - in my case it hasn't been that bad yet. But disconnecting the cells causes the BMS to lock up and the red diode comes on.
It's like replacing the batteries - fooling the BMS.
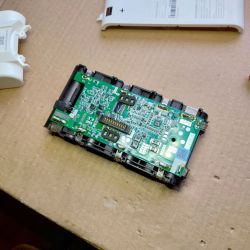
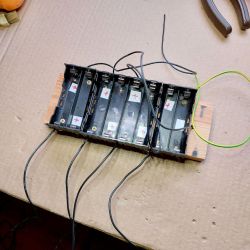
I connected for the time of replacing the original cells with new, replacement cells just to fool the BMS and keep the voltage state as if no one had interfered with the batteries.
 .
.
This solution has a small disadvantage - another set of cells is needed, the voltages of which must be aligned with the voltages of the original cells in the battery, so as not to induce the spread of large currents during parallel connection.
It is important that the new and reserve batteries have the same voltages as the old batteries. This seems difficult to implement, nothing could be further from the truth. Charge all batteries to 100%, leave for 24 hours and measure the voltages.
The cells should be 4.10 - 4.15V, if this is the case you can connect in parallel, nothing will happen. If not, then you need to work on them by discharging the ones with too high a voltage a little at a time, to a maximum difference of 0.05V
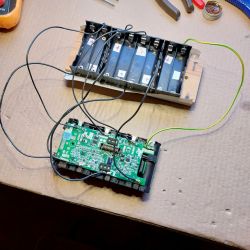
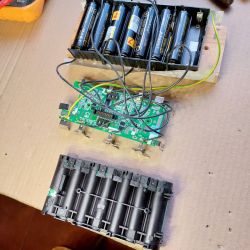
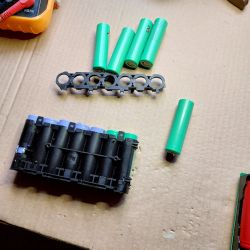
As you connect the reserve cells in parallel as shown in the photo, you can disconnect the original cells from the BMS - any method you like, I stripped the plates from the cells. Disassemble the basket, there are small latches but easy to unlock, replace the cells - don't confuse the +/- poles.
 .
.
Once replaced, simply connect the new put together kit to the BMS (any method you like), weld, solder.
Of course then remove all unnecessary wires and cells, put the whole thing back together and check if it works (CAUTION - do not make a short circuit when disassembling).
.
Mine works as you can see in the video.
 .
.
After a couple of years of brave work, the operating time was significantly reduced. The conclusion was obvious, the battery is coming to the end of its life, you have to think about buying a new one (a considerable expense) or buying a used one, and this is what I did to start with, possibly replacing the cells in the battery with new ones.
 .
.
Having a spare battery almost as good as new in working order, I decided to replace the cells in the original one.
I bought bargain Samsung 18650 25S (2500 mah 25A) batteries, the original ones are 18650 25R (2500 mah 20A).
I bought 10 pcs and from these I selected 7 pcs almost identical.
Before I started taking anything apart, I decided to check the condition of the cells in the original battery without taking them apart.
I drilled small holes more or less opposite the cells, you can see this in the photo of the hoover.
I thought it might be enough to align the batteries, but no. The batteries, when charged and discharged, hold the voltage to within 0.01V so this is not a problem.
The obvious conclusion - the batteries are slowly reaching the end of their life and need to be replaced.
I searched the internet on the subject, Dreame V9 battery replacement and repair. It turned out that the matter is not so simple. If the red LED comes on, it's over the battery (no one has overcome this yet or I haven't found it) - in my case it hasn't been that bad yet. But disconnecting the cells causes the BMS to lock up and the red diode comes on.
It's like replacing the batteries - fooling the BMS.
I connected for the time of replacing the original cells with new, replacement cells just to fool the BMS and keep the voltage state as if no one had interfered with the batteries.


 .
.
This solution has a small disadvantage - another set of cells is needed, the voltages of which must be aligned with the voltages of the original cells in the battery, so as not to induce the spread of large currents during parallel connection.
It is important that the new and reserve batteries have the same voltages as the old batteries. This seems difficult to implement, nothing could be further from the truth. Charge all batteries to 100%, leave for 24 hours and measure the voltages.
The cells should be 4.10 - 4.15V, if this is the case you can connect in parallel, nothing will happen. If not, then you need to work on them by discharging the ones with too high a voltage a little at a time, to a maximum difference of 0.05V


As you connect the reserve cells in parallel as shown in the photo, you can disconnect the original cells from the BMS - any method you like, I stripped the plates from the cells. Disassemble the basket, there are small latches but easy to unlock, replace the cells - don't confuse the +/- poles.
 .
.
Once replaced, simply connect the new put together kit to the BMS (any method you like), weld, solder.
Of course then remove all unnecessary wires and cells, put the whole thing back together and check if it works (CAUTION - do not make a short circuit when disassembling).
Mine works as you can see in the video.
Cool? Ranking DIY


