logo elektroda
logo elektroda
X
logo elektroda

Integrating Atorch DT20HBW with Home Assistant - advice needed.

pexicele 1788 7
ADVERTISEMENT
  • #1 21438964
    pexicele
    Level 2  
    Hello
    (my first topic- don't throw rocks)

    I need to integrate one device in Home Assistant, the device name is Atorch DT20HBW:
    https://www.youtube.com/watch?v=VEQWkEoxd1M
    https://www.aliexpress.com/item/1005007168934...ml?spm=a2g0o.cart.0.0.378f4ae4TWJZOA&mp=1

    I was able to identify some of its chips:
    -CB2S
    -RN8209C
    -CH582M

    I see also some available solder connections on the PCB: V / G / D- / D and PB22(?)
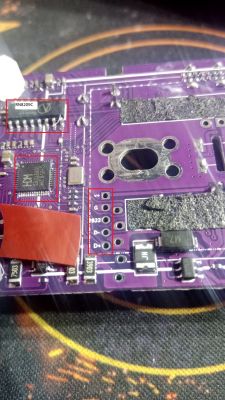
    Image of a PCB with visible RN8209C and CH582M chips and solder points.

    Can someone please advise what the best approach will be for a beginner?
    I'm asking since I could not find info for CH582M chip so far...
    (sorry for my English)
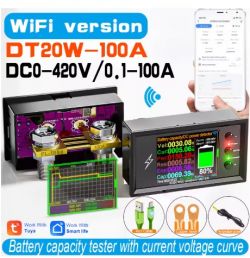
    Atorch DT20HBW device displaying battery capacity test with smartphone app.
    AI: Can you provide more details about your current Home Assistant setup, such as the version you are using and any existing integrations?
    I'm using Home Assistant mainly for monitoring my off-grid solar system (4 x growatt 6000es inverters, 75kwh Lifepo4 15s battery (diy), 15kwp solar panels) already integrated in HA: LK3 tinycontroller, 5 x TOMZN 63W AC energy meters, Hyundai heat pump, DIY wireless BMS homemade, etc.
    AI: What specific functionality or outcome are you hoping to achieve by integrating the Atorch DT20HBW with Home Assistant?
    I need to monitor the energy on the DC side (solar panels, battery, Home lights (all of my home lights work on 48V DC).
  • ADVERTISEMENT
  • ADVERTISEMENT
  • #3 21440310
    pexicele
    Level 2  
    Thanks, in fact I just started reading those, I never flashed a tuya chip till now, luckily I have two of these DT20HBW devices.
    At this moment one of them has a new isolated dc-dc attached (18-75v to 5v) and monitors the solar battery using tuya integration, refresh rate makes this solution almost unusable since I had to calculate SOC based on current sensor value.
    From what I see in those tutorials is not that simple for me to identify all sensor data but someone has to do that so wish me luck.
  • Helpful post
    #4 21440325
    divadiow
    Level 35  
    good luck. don't forget to take full backup before flashing :)
  • Helpful post
    #5 21495594
    f3nix
    Level 11  
    Hi.
    I have converted 3 pieces to esphome.

    
    substitutions:
      name: dt20hbw-1
      friendly_name: dt20hbw-1
      device_description: "Monitor and control Atorch DT20HBW"
    
    esphome:
      name: ${name}
      friendly_name: ${friendly_name}
      comment: ${device_description}
      project:
        name: "f3nix.esphome-dt20hbw"
        version: 0.9.2
      platformio_options:
          platform_packages:
          - framework-arduino-api @ https://github.com/f3nix/ArduinoCore-API#ringbuffer-buffer
      build_path: "../config/esphome/${name}_build"
     
    bk72xx:
      board: cb2s
      framework:
        version: latest
        loglevel: debug
    
    # Enable logging
    logger:
      baud_rate: 0
      # level: VERY_VERBOSE
    
    # Enable Home Assistant API
    api:
    
    ota:
      - platform: esphome
    
    wifi:
      ssid: !secret wifi_ssid
      password: !secret wifi_password
    
      # Enable fallback hotspot (captive portal) in case wifi connection fails
      ap:
        ssid: "dt20hbw-1 Fallback Hotspot"
        password: !secret wifi_ap_password
    
    captive_portal:
    
    web_server:
      port: 80
      version: 3
    
    time:
      - platform: homeassistant
        id: homeassistant_time
    
    uart:
      tx_pin: TX1
      rx_pin: RX1
      baud_rate: 115200
      debug:
        direction: BOTH
        dummy_receiver: false
    
    debug:
      update_interval: 30s
    
    # Register the Tuya MCU connection
    tuya:
      id: "tuyadevice"
      time_id: homeassistant_time
    
    text_sensor:
      - platform: debug
        reset_reason:
          name: "Reset Reason"
    
      - platform: libretiny
        version:
          name: "LibreTiny Version"
    
    sensor:
      - platform: uptime
        name: "Uptime"
    
      - platform: wifi_signal # Reports the WiFi signal strength/RSSI in dB
        name: "WiFi Signal dB"
        id: wifi_signal_db
        update_interval: 60s
        entity_category: "diagnostic"
    
      - platform: "tuya"
        name: "Current"
        sensor_datapoint: 18
        unit_of_measurement: "A"
        device_class: current
        state_class: measurement
        accuracy_decimals: 3
        filters:
          - multiply: 0.001
    
      - platform: "tuya"
        name: "Power"
        sensor_datapoint: 19
        unit_of_measurement: "W"
        device_class: power
        state_class: measurement
        accuracy_decimals: 2
        filters:
          - multiply: 0.01
    
      - platform: "tuya"
        name: "Voltage"
        sensor_datapoint: 20
        unit_of_measurement: "V"
        device_class: voltage
        state_class: measurement
        accuracy_decimals: 2
        filters:
          - multiply: 0.01
    
      - platform: "tuya"
        name: "Battery percentage"
        sensor_datapoint: 103
        unit_of_measurement: "%"
        device_class: battery
        state_class: measurement
        accuracy_decimals: 1
        filters:
          - multiply: 0.1
    
      - platform: "tuya"
        name: "NTC temperature"
        sensor_datapoint: 122
        unit_of_measurement: "°C"
        device_class: temperature
        state_class: measurement
        accuracy_decimals: 1
        filters:
          - multiply: 0.1
    
      - platform: "tuya"
        name: "CPU temperature"
        sensor_datapoint: 135
        unit_of_measurement: "°C"
        device_class: temperature
        state_class: measurement
        accuracy_decimals: 0
    
      - platform: "tuya"
        name: "Discharge current"
        sensor_datapoint: 111
        unit_of_measurement: "A"
        device_class: current
        state_class: measurement
        accuracy_decimals: 3
        filters:
          - multiply: 0.001
    
      - platform: "tuya"
        name: "Discharge power"
        sensor_datapoint: 112
        unit_of_measurement: "W"
        device_class: power
        state_class: measurement
        accuracy_decimals: 3
        filters:
          - multiply: 0.001
    
      - platform: "tuya"
        name: "Total electricity"
        sensor_datapoint: 123
        unit_of_measurement: "kWh"
        device_class: energy
        state_class: measurement
        accuracy_decimals: 3
        filters:
          - multiply: 0.001
    
      - platform: "tuya"
        name: "Total capacity"
        sensor_datapoint: 133
        unit_of_measurement: "Ah"
        device_class: energy
        state_class: measurement
        accuracy_decimals: 3
        filters:
          - multiply: 0.001
    
      - platform: "tuya"
        name: "Resistance"
        sensor_datapoint: 134
        unit_of_measurement: "Ω"
        state_class: measurement
        accuracy_decimals: 2
        filters:
          - multiply: 0.01
    
    switch:
      - platform: "tuya"
        name: "Real time data refresh switch"
        switch_datapoint: 101
    
      - platform: "tuya"
        name: "Relay switch"
        switch_datapoint: 102
    
      - platform: "tuya"
        name: "Data zero"
        switch_datapoint: 113
        id: data_zero
        on_turn_on:
          - delay: 100ms
          - switch.turn_off: data_zero
    
      - platform: "tuya"
        name: "Wi-Fi device reset"
        switch_datapoint: 114
        id: wifi_reset
        on_turn_on:
          - delay: 100ms
          - switch.turn_off: wifi_reset
    
      - platform: "tuya"
        name: "Factory reset"
        switch_datapoint: 115
        id: factory_reset
        on_turn_on:
          - delay: 100ms
          - switch.turn_off: factory_reset
    
      - platform: "tuya"
        name: "Exit device backend"
        switch_datapoint: 116
        id: backend
        on_turn_on:
          - delay: 100ms
          - switch.turn_off: backend
    
    # button:
    #   - platform: template
    #     name: "Data zero"
    #     on_press:
    #       - lambda: |-
    #           id(tuyadevice).set_boolean_datapoint_value(113, true);
    #           id(tuyadevice).set_boolean_datapoint_value(113, false);
    
    #   - platform: template
    #     name: "Wi-Fi device reset"
    #     on_press:
    #       - lambda: |-
    #           id(tuyadevice).set_boolean_datapoint_value(114, true);
    #           id(tuyadevice).set_boolean_datapoint_value(114, false);
    
    #   - platform: template
    #     name: "Factory reset"
    #     on_press:
    #       - lambda: |-
    #           id(tuyadevice).set_boolean_datapoint_value(115, true);
    #           id(tuyadevice).set_boolean_datapoint_value(115, false);
    
    #   - platform: template
    #     name: "Exit device backend"
    #     on_press:
    #       - lambda: |-
    #           id(tuyadevice).set_boolean_datapoint_value(116, true);
    #           id(tuyadevice).set_boolean_datapoint_value(116, false);
    
    number:
      - platform: tuya
        name: "Display brightness"
        number_datapoint: 108
        min_value: 1
        max_value: 9
        step: 1
        entity_category: config
    
      - platform: tuya
        name: "Standby brightness"
        number_datapoint: 109
        min_value: 0
        max_value: 9
        step: 1
        entity_category: config
    
      - platform: tuya
        number_datapoint: 110
        name: "Standby time"
        unit_of_measurement: "s"
        min_value: 3
        max_value: 99
        step: 1
        mode: box
        entity_category: config
     
      - platform: tuya
        name: "Over voltage protection"
        number_datapoint: 104
        unit_of_measurement: "V"
        min_value: 0.00
        max_value: 420.00
        multiply: 100
        step: 1
        mode: box
        entity_category: config
    
      - platform: tuya
        name: "Over temperature protection"
        number_datapoint: 105
        unit_of_measurement: "°C"
        min_value: 0.1
        max_value: 150.0
        multiply: 10
        step: 1
        mode: box
        entity_category: config
    
      - platform: tuya
        name: "Over power protection"
        number_datapoint: 106
        unit_of_measurement: "W"
        min_value: 1
        max_value: 252000
        step: 1
        mode: box
        entity_category: config
    
      - platform: tuya
        name: "Low voltage protection"
        number_datapoint: 119
        unit_of_measurement: "V"
        min_value: 0.00
        max_value: 420.00
        multiply: 100
        step: 1
        mode: box
        entity_category: config
    
      - platform: tuya
        name: "100% battery voltage"
        number_datapoint: 117
        unit_of_measurement: "V"
        min_value: 0.00
        max_value: 450.00
        multiply: 100
        step: 1
        mode: box
        entity_category: config
    
      - platform: tuya
        name: "0% battery voltage"
        number_datapoint: 120
        unit_of_measurement: "V"
        min_value: 0.00
        max_value: 450.00
        multiply: 100
        step: 1
        mode: box
        entity_category: config
    
      - platform: tuya
        name: "Data refresh interval time"
        number_datapoint: 125
        unit_of_measurement: "s"
        min_value: 1
        max_value: 90
        step: 1
        mode: box
        entity_category: config
    
      - platform: tuya
        name: "Mini measure Amp"
        number_datapoint: 121
        unit_of_measurement: "mA"
        min_value: 2
        max_value: 99
        step: 1
        mode: box
        entity_category: config
    
    select:
      - platform: tuya
        name: "Device language"
        enum_datapoint: 107
        optimistic: true
        options:
          0: "Chinese"
          1: "English"
        entity_category: config
    
      - platform: tuya
        name: "Device interface"
        enum_datapoint: 118
        optimistic: true
        options:
          0: "Front measurement interface"
          1: "Background setting interface"
          2: "Large font interface"
        entity_category: config
    
      - platform: tuya
        name: "Alarm sign"
        enum_datapoint: 132
        optimistic: true
        options:
          0: "off"
          1: "ovp"
          2: "lvp"
          3: "opp"
          4: "otp"
        entity_category: diagnostic
    
      - platform: tuya
        name: "Diverter size"
        enum_datapoint: 136
        optimistic: true
        options:
          0: "30A"
          1: "100A"
          2: "200A"
          3: "300A"
          4: "400A"
          5: "500A"
          6: "600A"
          7: "1000A"
        entity_category: config
    
    .
    Greetings,
    Matthew
  • ADVERTISEMENT
  • #6 21504915
    pexicele
    Level 2  
    trillions of thanks Matthew, it is working on my devices !
  • ADVERTISEMENT
  • #7 21628994
    markinNZ
    Level 1  
    Hi,

    I am new to flashing devices and so sorry if my question is simple. But can you please explain a basic overview of how I can flash ESPHome-dt20hbw to use ESPHome on this device? I have tried connecting the USB port on the device to both my HA server and Windows PC, but it seems to only see a HID device. Is there a way I can get it to load as a COM or ttyUSB port or I am doing it completely wrong and need to get a USB to TTL UART and solder it to the board? Perhaps I'm missing a step to put the board into download mode as using the factory method of holding down "-" button while powering on doesn't change anything.

    Thank you!

    Mark
  • #8 21629925
    pexicele
    Level 2  
    Hi Mark

    I had extracted the mini Wi-Fi Tuya module (located in a corner of the motherboard) and I programmed this module via serial-USB adapter (in my case an ESP01 USB programmer -modified)


    Good luck
    Viorel

Topic summary

The discussion focuses on integrating the Atorch DT20HBW device with Home Assistant for monitoring purposes. The device contains chips CB2S, RN8209C, and CH582M, with particular attention on the CB2S chip for integration. The user seeks beginner-friendly guidance due to limited information on the CH582M chip. Recommendations include referencing similar Atorch TuyaMCU devices and exploring the OpenBK7231T firmware project. The user has experience with solar system monitoring and is attempting to flash the Tuya chip to improve data refresh rates and state of charge calculations. A contributor shared an ESPHome configuration for the DT20HBW using the CB2S board, enabling logging, OTA updates, and Home Assistant API integration. The user confirmed successful implementation of this ESPHome solution on their devices.
Summary generated by the language model.
ADVERTISEMENT