logo elektroda
logo elektroda
X
logo elektroda

Tuya ATORCH S1-B/W/T/H Smart Socket Energy Monitor (BK7231N) (C3BS) (CH573F) (BL0942)

maximesharp 11553 50
ADVERTISEMENT
  • #1 20743339
    maximesharp
    Level 6  
    Hi everyone,
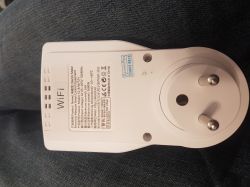
    I just received my new ATORCH Smart Socket Energy Monitor from AliExpress (https://www.aliexpress.com/item/1005005210540660.html).
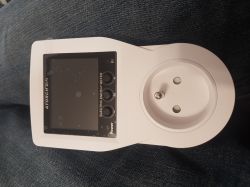
    White smart energy socket with display and three buttons on a dark background.
    ATorch Smart Socket Energy Monitor with visible labels and European plug.
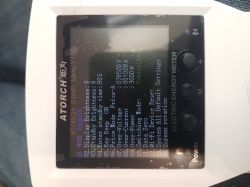
    Close-up view of the ATORCH Smart Socket Energy Monitor screen displaying the menu.

    The UI does look like almost similar to the ATORCH AT4P (https://www.elektroda.com/rtvforum/topic3941692.html)

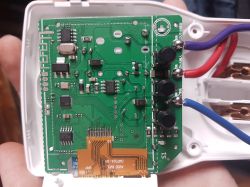
    I took it apart and the inside looks like this
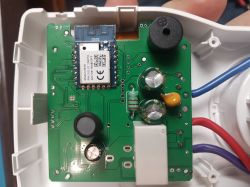
    Interior of ATORCH Smart Socket Energy Monitor showing C3BS and CH573F chips.
    Interior of the ATORCH Smart Socket energy monitor with visible electronic components.

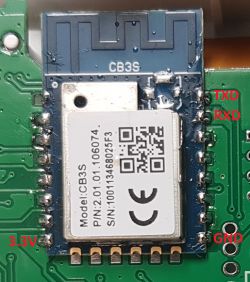
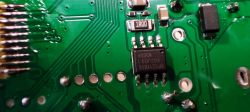
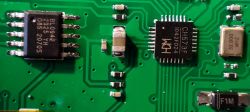
    The smart chip is a C3BS (BK7231N), the main logic chip is a CH573F, and the metering chip is a BL0942.

    The C3BS can be flashed with OpenBeken. I wasn't able to flash it when it was soldered on the board, but once I desoldered it, it was fine. However, beware of the pads not connected to anything, they do rip apart very easily (but since they're useless, who cares)
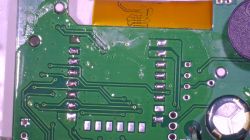
    Close-up of a circuit board with visible traces and soldered components. Circuit board with mounted CB3S module and labeled pins.

    I've reused the openbk autoexec.bat from the AT4P (since the modules are from the same manufacturer and they're very similar) and it kind of works, but there are only two small issues:
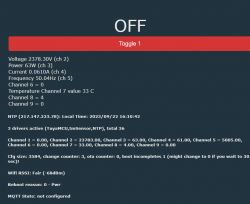
    Display screen of the ATORCH energy monitor with incorrect voltage readings.

    The voltage is a bit broken, it reads 10x higher (2378.80v instead of 237.83v), and the relay button doesn't work.

    I don't have the time to look further now, but I will provide updates when I find the time to do it.
    If you have any ideas or tips to fix it, feel free to write a comment!
  • ADVERTISEMENT
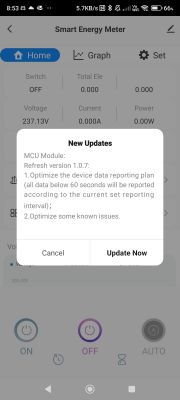
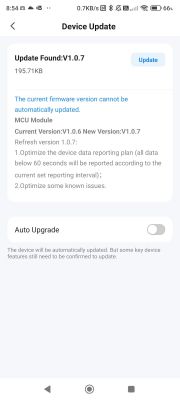
  • #2 20743378
    p.kaczmarek2
    Moderator Smart Home
    Hello, can you post the current autoexec.bat so we can work from there?
    Helpful post? Buy me a coffee.
  • #3 20743460
    maximesharp
    Level 6  

    Like I said in my original post, I've reused the autoexec.bat from the AT4P, so here it is :

    startDriver TuyaMCU
    startDriver tmSensor
    startDriver NTP
    tuyaMcu_setBaudRate 115200
    setChannelType 1 toggle
    setChannelType 2 Voltage_div10
    setChannelType 3 Power
    setChannelType 4 Current_div1000
    setChannelType 5 Frequency_div100
    setChannelType 6 ReadOnly
    setChannelType 7 Temperature
    setChannelType 8 ReadOnly
    setChannelType 9 ReadOnly
    //ch 1 (dpid 1) power relay control
    linkTuyaMCUOutputToChannel 1 bool 1
    //ch 2(dpid 20) voltage
    linkTuyaMCUOutputToChannel  20 1 2
    //ch 3(dpid 19) power watts
    linkTuyaMCUOutputToChannel 19 1 3
    //ch 4 (dpid 18)current Amps
    linkTuyaMCUOutputToChannel 18 1 4
    //ch 5 (dpid 133) frequency 
    linkTuyaMCUOutputToChannel 133 1 5
    //ch 6 (dpid 102) energy cost used
    linkTuyaMCUOutputToChannel 102 1 6
    // ch 7 (dpid 135) temp
    linkTuyaMCUOutputToChannel 135 1 7
    //ch 8 (dpid 134) power factor 
    linkTuyaMCUOutputToChannel 134 raw 8
    //ch 9 (dpid 123) energy consumed
    linkTuyaMCUOutputToChannel 123 1 9

  • #4 20743537
    p.kaczmarek2
    Moderator Smart Home
    tmSensor is most likely not needed, who put that here? Please link to original post, I will edit that as well.

    If voltage is ten times too high, change:
    
    Voltage_div10
    

    to
    
    Voltage_div100
    
    Helpful post? Buy me a coffee.
  • #5 20743620
    maximesharp
    Level 6  

    "startDriver tmSensor" was present on this post: https://www.elektroda.com/rtvforum/topic3941692.html#20335741

    I already tried to change "setChannelType 2 Voltage_div10" to "setChannelType 2 Voltage_div100" but it doesn't work and when I try to apply it manually, it gave me this error:
    FAILED! Invalid command "setChannelType 2 Voltage_div100

  • #6 20743631
    p.kaczmarek2
    Moderator Smart Home
    Ah, I see, we don't have Voltage_div100 yet! I will add this for you tomorrow in the morning.
    Helpful post? Buy me a coffee.
  • ADVERTISEMENT
  • #7 20743695
    tecnolobo
    Level 3  

    >>20743620

    You can try using one dummy channel to receive the values and one "RepeatingEvent" every second or one "ChangeHandler" to transfer the values to the correct channel.

    I can't test it because I don't have any device like yours.

    I use a similar solution to be able to store one counter values without ruining the flash memory. So I only transfer to channel 1 (with option -1, saving to the flash in case of change in configure startup) every 120 seconds.
  • #8 20743838
    p.kaczmarek2
    Moderator Smart Home
    I have added now Voltage_div100 to the firmware, it should be live within 15 minutes or so.

    @tecnolobo I will publish an interesting article of using flash save in a moment, but in general, you also keep in mind that we have a system that reduces a number of flash erases (we write data to the same flash page many times and erase it once when needed), so the flash situation is not as bad as it seems
    Helpful post? Buy me a coffee.
  • #9 20744591
    maximesharp
    Level 6  

    I've upgraded OpenBeken to version 1.17.251 but I don't think the Voltage_div100 was merged in this build.

    Also, I've got some news:

    On Channel 1, the toggle button doesn't act on the relay when pressed, but the state of the button does change when I toggle the relay on the device itself.

    On Channel 3, the power (watts) is also reading 10x too high with Power_div10, and Power_div100 doesn't exist.

    On Channel 6, I can't find any field for energy cost, if in the future such a field exists, it should be EnergyCost_div1000 for this device.

    On Channel 8, The PowerFactor is reading 10x too low with PowerFactor_div1000, and PowerFactor_div100 doesn't exist.

    Here my current autoexec.bat file :
    startDriver TuyaMCU
    startDriver NTP
    tuyaMcu_setBaudRate 115200
    setChannelType 1 toggle
    setChannelType 2 Voltage_div10
    setChannelType 3 Power_div10
    setChannelType 4 Current_div1000
    setChannelType 5 Frequency_div100
    setChannelType 6 ReadOnly
    setChannelType 7 Temperature
    setChannelType 8 PowerFactor_div1000
    setChannelType 9 EnergyTotal_kWh_div1000
    //ch 1 (dpid 1) power relay control
    linkTuyaMCUOutputToChannel 1 bool 1
    //ch 2(dpid 20) voltage
    linkTuyaMCUOutputToChannel  20 1 2
    //ch 3(dpid 19) power watts
    linkTuyaMCUOutputToChannel 19 1 3
    //ch 4 (dpid 18)current Amps
    linkTuyaMCUOutputToChannel 18 1 4
    //ch 5 (dpid (133) frequency 
    linkTuyaMCUOutputToChannel 133 1 5
    //ch 6 (dpid  102) energy cost used
    linkTuyaMCUOutputToChannel 102 1 6
    // ch 7 (dpid 135) temp
    linkTuyaMCUOutputToChannel 135 1 7
    //ch 8 (dpid  134) power factor 
    linkTuyaMCUOutputToChannel 134 raw 8
    //ch 9 (dpid  123) energy consumed
    linkTuyaMCUOutputToChannel 123 1 9


    And here the autoexec.bat file that should perfectly fit this device once all the features listed above will be implemented:

    startDriver TuyaMCU
    startDriver NTP
    tuyaMcu_setBaudRate 115200
    setChannelType 1 toggle
    setChannelType 2 Voltage_div100
    setChannelType 3 Power_div100
    setChannelType 4 Current_div1000
    setChannelType 5 Frequency_div100
    setChannelType 6 EnergyCost_div1000
    setChannelType 7 Temperature
    setChannelType 8 PowerFactor_div100
    setChannelType 9 EnergyTotal_kWh_div1000
    //ch 1 (dpid 1) power relay control
    linkTuyaMCUOutputToChannel 1 bool 1
    //ch 2(dpid 20) voltage
    linkTuyaMCUOutputToChannel  20 1 2
    //ch 3(dpid 19) power watts
    linkTuyaMCUOutputToChannel 19 1 3
    //ch 4 (dpid 18)current Amps
    linkTuyaMCUOutputToChannel 18 1 4
    //ch 5 (dpid (133) frequency 
    linkTuyaMCUOutputToChannel 133 1 5
    //ch 6 (dpid  102) energy cost used
    linkTuyaMCUOutputToChannel 102 1 6
    // ch 7 (dpid 135) temp
    linkTuyaMCUOutputToChannel 135 1 7
    //ch 8 (dpid  134) power factor 
    linkTuyaMCUOutputToChannel 134 raw 8
    //ch 9 (dpid  123) energy consumed
    linkTuyaMCUOutputToChannel 123 1 9

  • #10 20744690
    p.kaczmarek2
    Moderator Smart Home
    I must have forgotten to push. I've added Voltage_div100 and I will add remaining types tomorrow.
    Helpful post? Buy me a coffee.
  • #11 20744877
    maximesharp
    Level 6  
    Thanks a lot for your work.
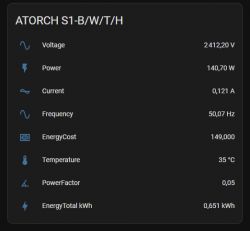
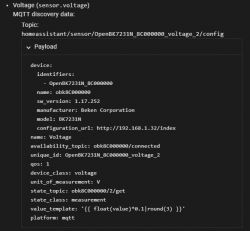
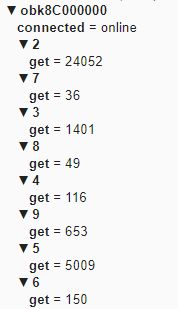
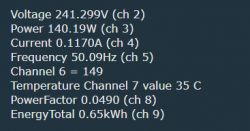
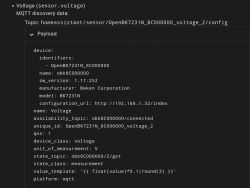
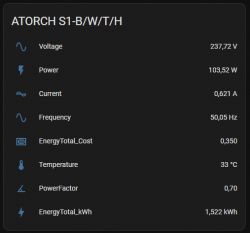
    I've flashed version 1.17.252, it does fix the issue on the device itself but the HASS template is still broken

    Screenshot of the ATORCH S1-B/W/T/H device measurement interface. MQTT configuration interface for OpenBK7231N voltage sensor, showing configuration details. Screenshot with parameter values of device obk8C000000 when connected.Screenshot displaying electrical parameters of a device.
  • #12 20744901
    p.kaczmarek2
    Moderator Smart Home
    I think that you just need to redo the HASS discovery so the new change is send correctly to HA. Please try and confirm
    Helpful post? Buy me a coffee.
  • ADVERTISEMENT
  • #13 20745050
    maximesharp
    Level 6  

    I've already tried it, but it does not send the correct configuration payload.
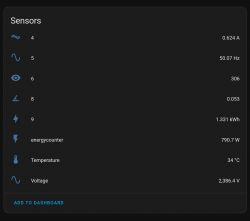
    Screenshot of a sensor panel with various readings. Screenshot of MQTT configuration for the OpenBK7231N device, showing voltage data.
  • #14 20745067
    p.kaczmarek2
    Moderator Smart Home
    Sorry, I must have confused number of dec places with dec offset, I will push a fix now.\
    Screenshot of programming code with a highlighted segment and tooltip.
    Helpful post? Buy me a coffee.
  • #15 20745201
    maximesharp
    Level 6  

    It's working fine now, yesterday I tried to edit the HASS Payload part but I wasn't able to find which one of the two values was the dec offset or dec places (and Visual Studio wasn't giving me the hint).

    I've modified the fw to display the value correctly on HASS, so if it can help you, here's the code:
    case ChType_Power_div100: 
    {
    	dev_info = hass_init_sensor_device_info(POWER_SENSOR, i, 2, 2);
    	MQTT_QueuePublish(topic, dev_info->channel, hass_build_discovery_json(dev_info), OBK_PUBLISH_FLAG_RETAIN);
    	hass_free_device_info(dev_info);
    	discoveryQueued = true;
    }
    break;
    case ChType_PowerFactor_div100:
    {
    	dev_info = hass_init_sensor_device_info(POWERFACTOR_SENSOR, i, 4, 2);
    	MQTT_QueuePublish(topic, dev_info->channel, hass_build_discovery_json(dev_info), OBK_PUBLISH_FLAG_RETAIN);
    	hass_free_device_info(dev_info);
    	discoveryQueued = true;
    }
    break;
    case ChType_EnergyTotal_Cost_div1000: 
    {
    	dev_info = hass_init_sensor_device_info(ENERGYCOST_SENSOR, i, 3, 3);
    	MQTT_QueuePublish(topic, dev_info->channel, hass_build_discovery_json(dev_info), OBK_PUBLISH_FLAG_RETAIN);
    	hass_free_device_info(dev_info);
    	discoveryQueued = true;
    }
    break;


    Note: I've renamed EnergyCost_div1000 to EnergyTotal_Cost_div1000, just to follow the naming convention.

    Panel displaying electrical parameters of the ATORCH S1-B/W/T/H device.
  • #16 20910128
    maximesharp
    Level 6  

    Hello,

    Big thanks for your work.
    Just seen that Power_div100 has been added yesterday with OpenBK 1.17.406 (and PowerFactor_div100 back in December 16).

    I've updated my device to the latest release, everything works fine.
    Still missing a channel type for energy total cost, but using EnergyTotal_kWh_div1000 will work for now.

    Also, is there a setting for NTP daylight saving?

    Here's my current working autoexec.bat for the device:
    startDriver TuyaMCU
    startDriver NTP
    ntp_setServer 216.239.35.0
    ntp_timeZoneOfs +01:00
    tuyaMcu_setBaudRate 115200
    setChannelType 1 toggle
    setChannelType 2 Voltage_div100
    setChannelType 3 Power_div100
    setChannelType 4 Current_div1000
    setChannelType 5 Frequency_div100
    setChannelType 6 EnergyTotal_kWh_div1000
    setChannelType 7 Temperature
    setChannelType 8 PowerFactor_div100
    setChannelType 9 EnergyTotal_kWh_div1000
    //ch 1 (dpid 1) power relay control
    linkTuyaMCUOutputToChannel 1 bool 1
    //ch 2(dpid 20) voltage
    linkTuyaMCUOutputToChannel 20 1 2
    //ch 3(dpid 19) power watts
    linkTuyaMCUOutputToChannel 19 1 3
    //ch 4 (dpid 18)current Amps
    linkTuyaMCUOutputToChannel 18 1 4
    //ch 5 (dpid (133) frequency 
    linkTuyaMCUOutputToChannel 133 1 5
    //ch 6 (dpid 102) energy cost used
    linkTuyaMCUOutputToChannel 102 1 6
    // ch 7 (dpid 135) temp
    linkTuyaMCUOutputToChannel 135 1 7
    //ch 8 (dpid 134) power factor 
    linkTuyaMCUOutputToChannel 134 raw 8
    //ch 9 (dpid 123) energy consumed
    linkTuyaMCUOutputToChannel 123 1 9
    

  • #17 20919583
    Ggaljoen
    Level 6  
    Thank you for this device integration, I love IT.

    Took my time to figure out the rest of the dpId meaning; main goal was to switch on/off, managed to get this done with dpId 131 enum(4) 0 = ON, 1 = off, 2 = auto
    dpId 1 is more like a STATUS display ("wake" function I wrongly thought) <= corrected on previous comment

    How can this be configured right the "Enum(4)" entity? Got now a dirty work around going.

    List of discovered dpIds:
      1 bool(1)	power relay indicator 	0 = off, 1 = ON
      9 val(2)	mode AUTO ?		0 = active ?
    101 val(2)	factor ?		100 _div100 factor ???
    102 val(2)	???
    104 val(2)	OVP 			xxxx V _div10
    105 val(2)	OCP			xxxx A _div100
    106 val(2)	OPP			xxxx W
    107 Enum(4)	set language		0 = Chinese, 1 = English
    108 val(2)	set Brightness		1 - 9, dark - bright
    109 val(2)	set Brightn standby	1 - 9, dark - bright
    110 val(2)	Standby time		3 - 99, seconds
    111 bool(1)	key beep		0 = off, 1 = ON
    112 Enum(4)	Switch Mode		0 = Controlled, 1 Normally Open
    113 bool(1)	Data Zero		1 = reset
    114 bool(1)	Wifi Reset		1 = active (not tested)
    115 bool(1)	System All Defaults 	1 = active
    116 bool(1)	Screen Rotate		1 = active
    117 Enum(4)	Standby screen		0 = Original, 1 = Measurement
    118 Enum(4)	Device Interface	0 - 7, Security Protect, Electricity price, Smart Power Off /B, Timing CutOff/On/Cycle/CountDown
    119 val(2)	Power low A		xxxx W
    120 val(2)	Time to Last A		xxxx minutes
    121 val(2)	Power over		xxxx W
    122 val(2)	Time to Last B		xxxx Hour
    124 val(2)	Timer value ?		xxxxx Seconds
    125 val(2)	CountDownTime(Coff)	xxxxx Seconds
    126 val(2)	Timer Set (ON)		xxxxx Seconds
    127 val(2)	Cycle - ON		xxxx Seconds
    128 val(2)	Cycle - off		xxxx Seconds
    129 val(2)	CountDown - ON		xxxx Seconds
    130 val(2)	???	
    131 Enum(4)	relay			0 = ON, 1 = off, 2 = auto
    132 Enum(4)	???
    136 Enum(4)	Price Mode		0 = A, 1 = B, 3 = C
    137 val(2)	OV recovery delay	0 - 119 minutes
    138 Enum(4)	Power-up status		0 = ON, 1 = off, 2 = Memory
    139 Refresh	?home screen APP?	1 - 90 S  (If set to<1S,<5 minutes)
  • #18 20919588
    p.kaczmarek2
    Moderator Smart Home
    For enum, I usually recommend to select the proper channel type, and if that's not present, you can always use "TextBox". Alternatively, you can write your own little page with REST interface and host it in LittleFS:
    OpenBeken as a mini HTTP hosting - writing pages in Javascript, Tasmota REST
    Helpful post? Buy me a coffee.
  • #19 20919646
    maximesharp
    Level 6  

    Ggaljoen wrote:
    dpId 1 is more like a display "wake" function I believe.


    dpid 1 is marked as "power relay control" but it should be called "power relay indicator" (0=off/1=on) since it doesn't control the relay and only shows if the relay is on or off.
    I didn't notice this before since I use this device as a power monitor (and not as a smart switch).

    Here is a working autoexec.bat that fixes this error and adds the correct dpid to control the relay:
    startDriver TuyaMCU
    startDriver NTP
    ntp_setServer 216.239.35.0
    ntp_timeZoneOfs +01:00
    tuyaMcu_setBaudRate 115200
    setChannelType 0 Toggle_Inv
    setChannelType 1 ReadOnly
    setChannelType 2 Voltage_div100
    setChannelType 3 Power_div100
    setChannelType 4 Current_div1000
    setChannelType 5 Frequency_div100
    setChannelType 6 EnergyTotal_kWh_div1000
    setChannelType 7 Temperature
    setChannelType 8 PowerFactor_div100
    setChannelType 9 EnergyTotal_kWh_div1000
    linkTuyaMCUOutputToChannel 131 enum 0
    linkTuyaMCUOutputToChannel 1 bool 1
    linkTuyaMCUOutputToChannel 20 1 2
    linkTuyaMCUOutputToChannel 19 1 3
    linkTuyaMCUOutputToChannel 18 1 4
    linkTuyaMCUOutputToChannel 133 1 5
    linkTuyaMCUOutputToChannel 102 1 6
    linkTuyaMCUOutputToChannel 135 1 7
    linkTuyaMCUOutputToChannel 134 raw 8
    linkTuyaMCUOutputToChannel 123 1 9

  • #20 20919649
    Ggaljoen
    Level 6  

    That was a fast reply.

    How do I manage to have a selection between 0 / 1 / 2 for the 131 Enum?
    Can you point me to an example?

    Goal is to have this changeable in Home Assistant (over MQTT).
  • #21 20919663
    p.kaczmarek2
    Moderator Smart Home
    @maximesharp isn't there already a channel type for that? If not, I can add one, it seems like a very common requirement

    @Ggaljoen you can even just set TextField channel type and then manually script your Home Assistant in YAML to have a nice gui and everything. Are you planning to control this device mainly from Home Assistant or from OBK Web Panel?
    Helpful post? Buy me a coffee.
  • #22 20919694
    maximesharp
    Level 6  

    Ggaljoen wrote:
    How do I manage to have a selection between 0 / 1 / 2 for the 131 Enum?


    I'm just using the Toggle_Inv channel since "0 = ON, 1 = off, 2 = auto", by sending 0 or 1 we can close or open the relay.
    I don't know what "Auto" should do, but I've tried with the "OffDimBright" (send 0, 1 or 2), 0 and 1 does switch the relay but 2 doesn't do anything.

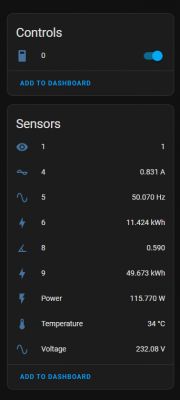
    For HA, you may need to delete the device and use the "Start Home Assistant Discovery" button on the webui of the device, but it does work.
    User interface with a control panel and sensors displaying electrical parameters.

    p.kaczmarek2 wrote:
    isn't there already a channel type for that? If not, I can add one, it seems like a very common requirement

    They're a few that send the required 0,1,2 like "OffDimBright' or "LowMidHigh", but nothing for "OnOffAuto".
    As I wrote, Auto (2) didn't do anything here.
  • #23 20919708
    Ggaljoen
    Level 6  

    Auto "mode" only works in specific modes like Timing_CountDown, for example.

    118 Enum(4)	Device Interface	0 - 7, Security Protect, Electricity price, Smart Power Off /B, Timing CutOff/On/Cycle/CountDown

    This device has many more capabilities than just reporting numbers of usage.
    Not sure how, but I am more in favor of Home Assist over the OBK interface (other users' protection on exposed control/usage).

    The option for 0/1/2 will work fine; the textual meaning can be added otherwise.
  • #24 20919727
    maximesharp
    Level 6  

    Well, while waiting for the "OnOffAuto" channel type to be implemented, you can set channel 0 type to "LowMidHigh" or "OffDimBright" and it should work as expected (but with the wrong option name)
  • #25 20919807
    Ggaljoen
    Level 6  

    For those who fear removing the CB3S module, a small suggestion: you don't need to desolder the WiFi module.
    Instead, I used a USB to serial that is capable of powering the 3V3 line with enough current (to start up the unit completely), and then you can program the CB3S without removing it.
    Just be sure NOT to plug it into a wall socket at the same time while programming.
  • ADVERTISEMENT
  • #26 20945220
    hwti
    Level 2  

    Ggaljoen wrote:
    For those who fear removing the CB3S module, a small suggestion: you don't need to desolder the WiFi module. Instead, I used a USB to serial that is capable of powering the 3V3 line with enough current (to start up the unit completely), and then you can program the CB3S without removing it.

    For me, even with a dedicated 3.3V supply, it didn't work with a CH343P USB-serial (firmware backup was always interrupted), but it worked with a CP2102 one.
    Maybe it also needs the ability to drive the UART pin with enough current to avoid issues with the MCU trying to send data to the CB3S module.

    I added the "tuyaMcu_defWiFiState 4" to bypass the Tuya pairing screen, else I had to press the + key on each boot.

    The device shows the energy values with 0.01Wh resolution, but only 1Wh is reported.
    I suppose the only way to get the full resolution would be to modify the CH573F firmware (not sure if possible).
  • #27 20945539
    p.kaczmarek2
    Moderator Smart Home
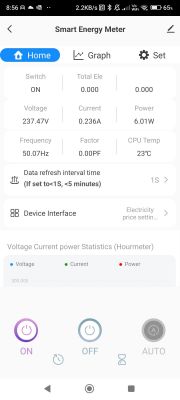
    What was the resolution shown in Tuya app?
    Helpful post? Buy me a coffee.
  • #28 20945733
    divadiow
    Level 34  
    p.kaczmarek2 wrote:
    What was the resolution shown in Tuya app?


    Screenshot of the Smart Energy Meter app showing voltage, current, power, frequency, and CPU temperature data.

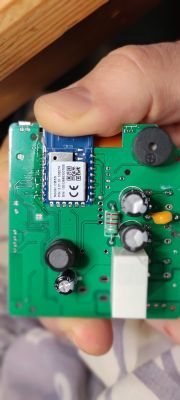
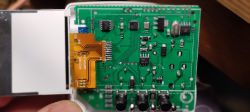
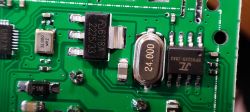
    by coincidence my S1 arrived last week. I've only just opened it up.

    Printed circuit board with visible components and CB3S module. Close-up of a green circuit board with several electronic components and a connected ribbon cable. Close-up of a circuit board with various electronic components. Close-up image of an electronic circuit board with visible components. Close-up of a circuit board with visible SMD components, including integrated circuits and a quartz crystal resonator. Close-up of an electronic component S1 with manufacturing markings. Smart Energy Meter app screen with a notification about a new update version 1.0.7. Screenshot of device firmware update. Smart Energy Meter app screen displaying voltage, current, power, and CPU temperature data.

    cool device. initially quite impressed.

    Added after 9 [minutes]:

    also, the app shows a CPU temperature. Is this something that could be added to OBK for all Beken devices, like the LN temp?
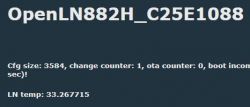
    Screenshot with technical information about the OpenLN882H_C25E1088 device.
  • #29 20945750
    p.kaczmarek2
    Moderator Smart Home
    The autoexec.bat posted earlier also contains 0.01W resolution setup;
    
    setChannelType 3 Power_div100
    

    So, @hwti , can you elaborate what do you mean here?
    hwti wrote:

    The device shows the energy values with 0.01Wh resolution, but only 1Wh is reported.
    I suppose the only way to get the full resolution would be to modify the CH573F firmware (not sure if possible).

    Are you saying that the values from the screen display are not sent to OBK?
    Helpful post? Buy me a coffee.
  • #30 20946427
    maximesharp
    Level 6  

    I can't relate to what he said about both the power resolution and the additional line to bypass the pairing screen.

    Using the latest firmware (1.17.450) and my latest autoexec.bat, I don't have any issue with the power resolution and the pairing screen disappears once the device is connected to the Wi-Fi network.

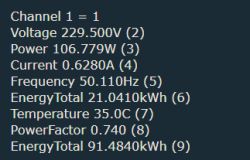
    Data displayed on a screen with values for voltage, power, current, frequency, energy, temperature, power factor, and total energy.

    (Note that channel 6 is set on kWh but should be in currency)

    Added after 5 [minutes]:

    divadiow wrote:
    also, the app shows a CPU temperature. Is this something that could be added to OBK for all Beken devices, like the LN temp?

    As you can see in my post above, on this device, the CPU temp is sent on dpid 135 from tuyamcu and set on channel 7 on OBK

Topic summary

The discussion revolves around the Tuya ATORCH S1-B/W/T/H Smart Socket Energy Monitor, focusing on its internal components, firmware flashing, and configuration using OpenBeken. Users share experiences with the device's autoexec.bat file, addressing issues such as incorrect voltage and power readings, and the need for specific channel types for accurate data reporting. The conversation includes troubleshooting steps, firmware updates, and the integration of the device with Home Assistant (HASS). Key components mentioned include the C3BS (BK7231N) chip, CH573F logic chip, and BL0942 metering chip. Users also discuss the importance of proper channel configuration for energy monitoring and relay control.
Summary generated by the language model.
ADVERTISEMENT