logo elektroda
logo elektroda
X
logo elektroda

Flashing Girier DS12D-WF CB2S WiFi Curtain Module: Pinout, Tuya Info, Integration

io2345 369 5
ADVERTISEMENT
  • #1 21544218
    io2345
    Level 7  
    I have now here a Girier Curtain Module, 1CH in Wifi Version, the Model number is DS12D-WF
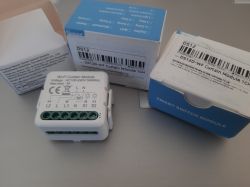

    Wi-Fi curtain control module and three boxes labeled Smart Switch Module.

    It can be easily flashed by only connecting RX1, TX1 and Ground.
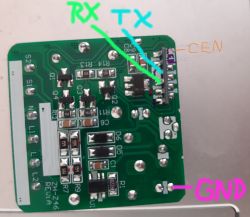

    A printed circuit board with RX, TX, CEN, and GND pins labeled in color markers.

    In Tuya Developer Center we get additional info on this CB2S based device:


    "modelId":"000004j39f",
    "services":[
    {
    "actions":[],
    "code":"",
    "description":"",
    "events":[],
    "name":"默认服务",
    "properties":[
    {
    "abilityId":1,
    "accessMode":"rw",
    "code":"control",
    "description":"",
    "extensions":{
    "iconName":"icon-a_power",
    "attribute":"1796"},
    "name":"窗帘控制",
    "typeSpec":{
    "type":"enum",
    "range":["open",
    "stop",
    "close",
    "continue"]
    }},{
    "abilityId":2,
    "accessMode":"rw",
    "code":"percent_control",
    "description":"",
    "extensions":{
    "iconName":"icon-icon-percent",
    "attribute":"4"},
    "name":"百分比",
    "typeSpec":{
    "type":"value",
    "max":100,
    "min":0,
    "scale":0,
    "step":1,
    "unit":"%"}},{
    "abilityId":3,
    "accessMode":"rw",
    "code":"cur_calibration",
    "description":"",
    "extensions":{
    "iconName":"icon-dp_loop",
    "attribute":"1120"},
    "name":"精准行程校准",
    "typeSpec":{
    "type":"enum",
    "range":["start",
    "end"]
    }},{
    "abilityId":8,
    "accessMode":"rw",
    "code":"control_back",
    "description":"",
    "extensions":{
    "iconName":"icon-dp_loop",
    "attribute":"1120"},
    "name":"电机反转",
    "typeSpec":{
    "type":"enum",
    "range":["forward",
    "back"]
    }},{
    "abilityId":10,
    "accessMode":"rw",
    "code":"quick_calibration_1",
    "description":"",
    "extensions":{
    "iconName":"icon-dp_loop",
    "attribute":"96"},
    "name":"快捷校准",
    "typeSpec":{
    "type":"value",
    "max":900,
    "min":0,
    "scale":0,
    "step":1,
    "unit":"s"}},{
    "abilityId":12,
    "accessMode":"rw",
    "code":"elec_machinery_mode",
    "description":"",
    "extensions":{
    "iconName":"icon-dp_time2",
    "attribute":"1120"},
    "name":"开关类型",
    "typeSpec":{
    "type":"enum",
    "range":["push",
    "rock"]
    }}
    ]
    }
    ]
    }"
      },
      "success": true,
      "t": 1746793747375,
      "tid": "338ca1042cd111f0a5b45285f2aacdc1"
    }


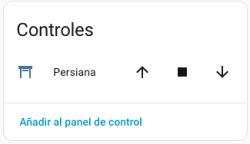
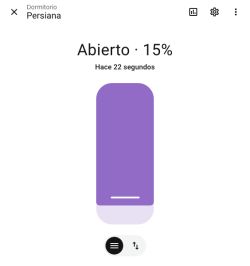
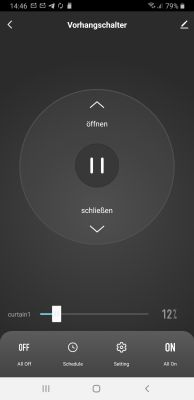
    It looks similiar from outside to the Shutter Controller FS-03W already in this forum, but it is even simpler. The Tuya menu offers settings for motor type (standard or reverse), calibration of run times and switch type (rocker or switch-back). That's all.
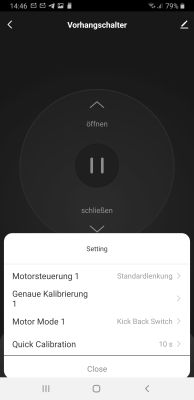
    App screen for controlling a curtain switch with visible settings options.
    App screen for curtain control with open, close, and pause options.

    Sadly, it gives no tuya-settings set when doing a read-back of the original firmware, so I'll have to find the settings on my own. Or is there another way to do that?

    Hinzugefügt nach 6 [Stunden] 33 [Minuten]:

    OK, I found by try and error that P7 is the CLOSE-relay and P23 the OPEN-relay. P6 is the LED.
    Still 3 Pins left: P8, 24, 26 for the functions: Input UP, Input DOWN, HW-Button Case.
    How can I find out which is which without destroying anything?

    Hinzugefügt nach 9 [Minuten]:

    P8 is the hardware button in the relays case. P11 ist Stop

    Hinzugefügt nach 11 [Minuten]:

    Done:

    {
      "vendor": "Tuya",
      "bDetailed": "000004j39f",
      "name": "Girier_Curtain_Module",
      "model": "DS12D-WF",
      "chip": "BK7231N",
      "board": "ZH-Z46",
      "flags": "1024",
      "keywords": [
        "TODO",
        "TODO",
        "TODO"
      ],
      "pins": {
        "6": "LED;3;0",
        "7": "Rel;1;0",
        "8": "Btn;6;0",
        "11": "Btn;0;0",
        "23": "Rel;6;0",
        "24": "TglChanOnTgl;1;1",
        "26": "TglChanOnTgl;6;1"
      },
      "command": "PowerSave 1",
      "image": "https://obrazki.elektroda.pl/YOUR_IMAGE.jpg",
      "wiki": "https://www.elektroda.com/rtvforum/topic_YOUR_TOPIC.html"
    }


    Hinzugefügt nach 2 [Stunden] 6 [Minuten]:

    >>21544218 I assume that it would not be too difficult to implement a small script on the device itself, that will set a user-definable runtime of the blinds, when you press a button to open or close them? Or, maybe even better: Short press let's the blinds move and stop when releasing the button, longer press makes them move for a certain time (like 30 sec.) in this direction before stopping.
    @p.kaczmarek2 : You certainly have an idea how to do that?
  • ADVERTISEMENT
  • #2 21545725
    p.kaczmarek2
    Moderator Smart Home
    I think it's a known problem. We have some autoexec.bat scripts for curtains on forum. I also wanted to create a driver for that in C code, but I don't have any shutters to test it myself.
    Helpful post? Buy me a coffee.
  • ADVERTISEMENT
  • #3 21547853
    io2345
    Level 7  
    >>21545725 I guess you are talking about this autoexec.bat:


    clearIO
    // ====== CONFIG ======
    // Used to hold the delay value in millis for sleeping during closing or opening loop
    // Play with your curtain and find the right value for this delay
    
    SetChannel 8 100
    
    // Delay to wait (millis) before starting to move the curtain after we close both relays
    // maybe it is not necessary, but I prefer it to be to ensure we do not have
    // both open and close relays powered simultaneously:
    SetChannel 7 500
    
    // MQTT stuff
    MqttClient lr_curtain_2
    MqttHost <YOUR_HA_MQTT_HOST>
    MqttUser <YOUR_HA_MQTT_USER>
    MqttPassword <YOUR_HA_MQTT_PASSWORD>
    
    // ====== END OF CONFIG ======
    
    // set channels 7, 8 and 9 to be private, so that we do not spend resources to publish their values:
    SetChannelPrivate 7 1
    SetChannelPrivate 8 1
    SetChannelPrivate 9 1
    
    // HIde relays from GUI
    setChannelVisible 1 0
    setChannelVisible 3 0
    
    // We start the main opening/closing loop with a delay
    // and than immediately have a calibration delay
    // so, let's decrement the calibration delay to not have them both
    // at the beginning of the loop:
    
    addChannel 7 -$CH8 0 5000
    
    PowerSave 1
    //startDriver ntp
    
    // set pins and channels
    
    // Pin 7 is connected to opening relay
    SetPinRole 7 Rel
    // we also connect it to channel 1
    SetPinChannel 7 1
    SetChannelLabel 1 "Up"
    
    // Pin 6 is connected to closing relay
    SetPinRole 6 Rel
    // we also connect it to channel 3
    SetPinChannel 6 3
    SetChannelLabel 3 "Down"
    // crea los botones
    setChannelType 20 Toggle
    SetChannelLabel 20 "Down"
    setChannelType 21 Toggle
    SetChannelLabel 21 "Stop"
    SetChannel 21 1
    setChannelType 22 Toggle
    SetChannelLabel 22 "Up"
    // 23 - stop button 
    SetPinRole 26 Btn
    // 24 - opening button
    SetPinRole 9 Btn
    // 26 - closing button
    SetPinRole 24 Btn
    
    // CH9 - saved position for reboot
    // CH10 - current position
    // CH11 - target position
    
    SetChannelLabel 9 "Saved Position"
    setChannelType 9 Dimmer
    SetChannelLabel 10 "Current Position"
    setChannelType 10 Dimmer
    SetChannelLabel 11 "Target Position"
    setChannelType 11 Dimmer
    
    SetStartValue 9 -1
    
    // read position saved before reboot:
    SetChannel 10 $CH9
    SetChannel 11 $CH9
    
    // Setup LED:
    //SetPinRole 10 LED
    //SetPinChannel 10 4
    
    // ============= MQTT ============
    
    // Let it shine when MQTT connection is established:
    addEventHandler MQTTState 1 SetChannel 4 1
    addEventHandler MQTTState 0 SetChannel 4 0
    
    // [2] Always set MQTT Retain flag to all published values;
    // [7] Broadcast self state every N seconds:
    // [10] Broadcast self state on MQTT connect
    flags 1156
    
    // Inform HA about our values every 30 seconds, publish 2 values per second
    mqtt_broadcastInterval 30
    mqtt_broadcastItemsPerSec 2
    
    alias Set_Stop backlog setChannel 3 0; setChannel 1 0
    alias Start_Opening backlog SetChannel 22 1; stopAllScripts; startScript autoexec.bat openSkylight
    alias Start_Closing backlog SetChannel 20 1; stopAllScripts; startScript autoexec.bat closeSkylight
    alias Stop_All backlog stopAllScripts; startScript autoexec.bat stopSkylight
    alias Open_To_Target backlog stopAllScripts; startScript autoexec.bat openSkylightToTarget
    
    alias Stop_Clicked backlog Set_Stop; Stop_All; SetChannel 21 1
    
    // Click and fast release will effect in fully closing or opening.
    // If during this process we click on the same button again, it stops 
    // EDIT PINS..............................................................................................................................................
    addEventHandler OnClick 24 if $CH03==1 then Stop_Clicked else Start_Closing
    addChangeHandler Channel20 == 1 if $CH03==1 then Stop_Clicked else Start_Closing
    addEventHandler OnClick 9 if $CH01==1 then Stop_Clicked else Start_Opening
    addChangeHandler Channel22 == 1 if $CH01==1 then Stop_Clicked else Start_Opening
    addEventHandler OnClick 26 Stop_Clicked
    addChangeHandler Channel21 == 1 if $CH02==1 then Stop_Clicked else Stop_Clicked
    //..............................................................................................................................................................................
    
    addChangeHandler Channel20 == 1 backlog SetChannel 21 0; SetChannel 22 0
    addChangeHandler Channel21 == 1 backlog SetChannel 20 0; SetChannel 22 0
    addChangeHandler Channel22 == 1 backlog SetChannel 20 0; SetChannel 21 0
    return
    
    // === OPEN TO GIVEN PERCENTAGE ===
    openSkylightToTarget:
       Set_Stop
       delay_ms $CH7
    openSkylightToTarget_again:
       delay_ms $CH8
            if $CH10<$CH11 then goto continue_opening
            if $CH10>$CH11 then goto continue_closing
    
       // we are done, we reached our target
       // If we were opening or closing fully, we let the motor
       // run for 3 seconds for the case we are uncalibrated:
       if $CH10==0 then goto calibrate
       if $CH10==100 then goto calibrate
       goto openSkylightFinished
    continue_opening:
            // Unset_Close
       setChannel 3 0
            // Set_Open
       setChannel 1 1
       // increment:
            addChannel 10 1 0 100
       goto openSkylightToTarget_again
    
    continue_closing:
            // Unset_Open
       setChannel 1 0
            // Set_Close
       setChannel 3 1
       // decrement:
            addChannel 10 -1 0 100
       goto openSkylightToTarget_again
    
    calibrate:
       delay_ms 3000
       Set_Stop
       SetChannel 9 $CH10
       return
    openSkylightFinished:
       Set_Stop
       SetChannel 9 $CH10
       return
    
    // === CLOSE ===
    closeSkylight:
       SetChannel 11 0
       goto openSkylightToTarget
    return
    
    // === OPEN ===
    openSkylight:
       SetChannel 11 100
       goto openSkylightToTarget
    return
    
    // === STOP ===
    stopSkylight:
       Set_Stop
       SetChannel 11 $CH10
       SetChannel 9 $CH10
    return


    I found it in this thread: Link

    It seems to me, that all the config is done there in the autoexec.bat - am I right? So nothing is entered on the device's basic config page itself (?)
  • ADVERTISEMENT
  • #4 21554359
    p.kaczmarek2
    Moderator Smart Home
    This config indeed has some GPIO set via commands, as seen here:
    
    
    // Pin 7 is connected to opening relay
    SetPinRole 7 Rel
    // we also connect it to channel 1
    SetPinChannel 7 1
    SetChannelLabel 1 "Up"
    
    // Pin 6 is connected to closing relay
    SetPinRole 6 Rel
    // we also connect it to channel 3
    SetPinChannel 6 3
    

    but you can edit this out and it should work with any other pins as long as you use the same channels which are used in the script.
    Helpful post? Buy me a coffee.
  • ADVERTISEMENT
  • #5 21555882
    io2345
    Level 7  
    >>21554359 What is the meaning of the second value (number 2) here in the config field?: "Btn;6;2"
    I tried to find the answer here
    https://github.com/openshwprojects/OpenBK7231T_App/blob/main/docs/ioRoles.md
    but is is not mentioned.

    EDIT: Found it on the GUI's config page: "Only for button roles another field will be provided to enter channel to toggle when doing double click"
    So in our case the Button will toggle between channel 6 and 2, right?
  • #6 21558523
    io2345
    Level 7  
    I need some help with my autoexec.bat. Maybe @p.kaczmarek2 can help?
    This is my current file:
    // P7 - Relay 1 Close
    // P23 - Relay 3 Open
    
    // Beschreibung
    SetChannelLabel 1 Close
    SetChannelLabel 6 Open
    
    // Logik
    addChangeHandler Channel1 == 1 backlog SetChannel 6 0; startScript autoexec.bat resetCloseAfterMinute
    addChangeHandler Channel6 == 1 backlog SetChannel 1 0; startScript autoexec.bat resetOpenAfterMinute
    
    // Nicht fortfahren
    return
    
    // Scripts
    
    resetCloseAfterMinute:
    // warte 31 Sekunden
    delay_s 31
    // Close abschalten
    SetChannel 1 0
    return
    
    resetOpenAfterMinute:
    // warte 34 Sekunden
    delay_s 34
    // Open abschalten
    SetChannel 6 0
    return


    It just keeps the blinds running to the opposite end, unless you push the direction button a second time. This will cause the blinds to stop. The pin/channel configuration is
    "pins": {
        "7": "Rel;1;0",
        "23": "Rel;6",
        "24": "Btn;1",
        "26": "Btn;6"
      },


    Now I would like to have a possibility to have a home automation software (ioBroker) check, if a direction button was pressed. I will have to use different channels for the buttons and the relays. How can I transfer the change of the state of the button channel to the relais channel, to start blinds motion?
ADVERTISEMENT