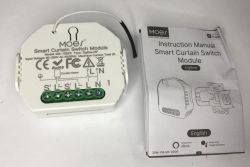
https://www.elektroda.com/rtvforum/posting.php?mode=editpost&p=20547099#I bought this Skylight opener and switch from AliExpress Link
with the EU Wifi Switch. My skylight is out of reach and I have to get a ladder from that garage to open it! My original intention was to use it with Local Tuya (this would have been my first) within Home Assistant (HA) as I'd read manufacturers had moved away from ESP8266 boards; I'd flashed plenty of those with Tasmota. But then I came across OpenBeken so thought I'd give it a go.
First off, the opener itself is a 4 wire mains device.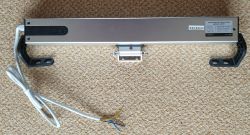
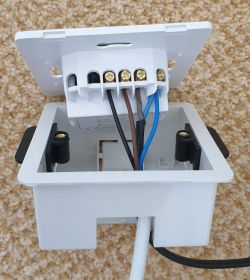
Green/Yellow - Earth, Blue - Neutral, Brown - Live Open and Black - Live Close.
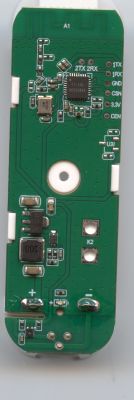
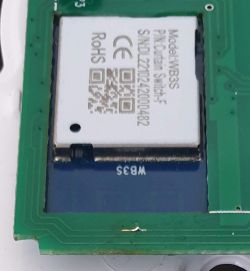
The controller is a Smart Life DS-151 N+L, WiFi+BLE Curtain Switch (as labelled on the box) and fits into a standard UK single wall box. The pic shows it with the front panel already removed (flat screwdriver at the base). The board is a WB3S with the BK7231T processor.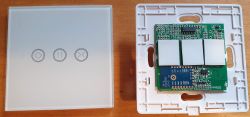 . Three buttons for Open, Stop and Close. The terminal block has Live and Neutral in and the Live/Open and Live/Close outputs.
Flashing
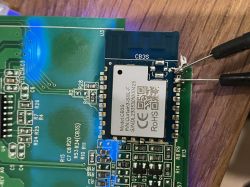
I soldered wires onto the TXD1, RXD1, GND and VCC pads of the WB3S and connected it up my USB/UART converter set to 3V3, Got the appropriate file to flash it with by this method ( OpenBK7231T_UA_1.15.700.bin), downloaded and 'installed' BK_WriterV1.60.exe, and tried to flash. No joy - got a Failed message!
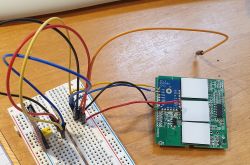
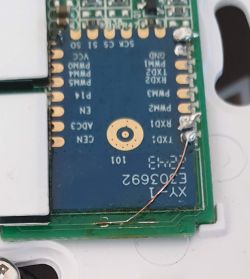
After some advice from the ever so helpful p.kaczmarek2 I had the solution. The Tx and Rx pins are both used by the device as Button input and LED output respectively and the circuitry interfered with the flashing signalling. So I cut the Tracks leading away from those pins in the positions shown.
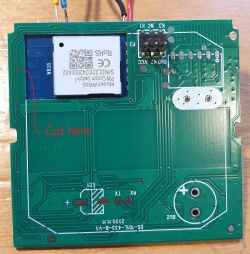
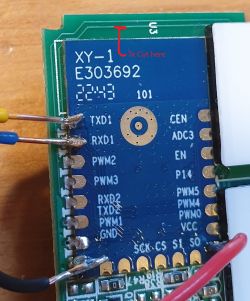
Tried to flash again using BK_Writer at the default settings but still no joy. Tried again at 115200 baud and this time it started to erase but then failed. I found then that i could read and save the whole of the preloaded firmware so that was progress.
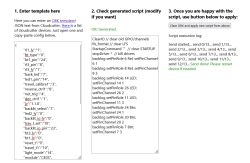
I then turned to another method of flashing using a python program. This was successful so I'll just give the details.
I opened a command window on my PC and created and moved to a directory called 'OpenBKT', then I got the program using the command
I already had Python installed from years back but you might need that too. When I tried to use the flashing program I found I needed something called 'tqdm' so I got that with the command
I then successfully flashed the device with the command
You will need to change the path and com port as appropriate.
I then repaired the cut tracks. One was easily bridged with a blob of solder but the other just wouldn't so in the end I used a very fine wire.
Connecting
Power up the device and use your phone to find and connect to its WiFi - the SSID is pretty obvious. Having done that, open a browser on the phone and go to 192.168.4.1, this should get you into the GUI where you should now enter your own WiFi's credentials. Reboot the device and try and find it through your own router. On my router when I looked at WiFi devices it was actually named so was pretty obvious. You will want to set a reserved IP I guess.
Configuration
The Tuya controller has 3 buttons, 3 LEDs which illuminate the buttons and 2 relays. I set them up thus:
"pin":"function":"channel"
"6": "Rel;1",
"8": "Btn;3",
"9": "Rel;3",
"10": "Btn;2",
"11": "LED_n;3",
"14": "LED_n;1",
"24": "Btn;1",
"26": "LED_n;2"
Everything worked as expected but not how it needed to function so don't connect the actuator at this point!!!!!
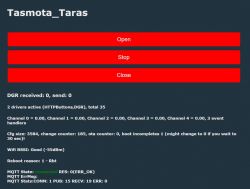
With more help from p.kaczmarek2 I wrote an autoexec.bat file to emulate the way the Tuya firmware operated. eg pressing the Open button would turn everything off then turn on the Open relay and LED for 10 seconds. It would then turn all off before turning the Stop LED on for just 3 seconds. I think just to confirm all was off and to not leave power going to the actuator when not necessary. As it turns out 10s is not long enough to open the skylight fully so I increased it to 15s. Here's the autoexec.bat file.
I hid the default buttons since they could be used to turn both relays on at the same time and I don't know how the actuator would cope with that! After lots of testing, pressing buttons at random, I was satisfied the code worked ok so connected the actuator.
And it works
Home Assistant
I then configured the MQTT section of the device (IP, Port, User and Password) and gave the Client Topic as 'skylight'. I then copied the YAML code from the HA configuration section and pasted it, as appropriate, into my configuration.yaml file in HA.
This gave me 3 new buttons as entities, but they all operated individually and cannot be used that way. So I created a card for my dashboard with the following code.
That works properly by calling the MQTT publish service with commands that trigger the event handlers in the autoexec.bat file
And that's it, I just need to fit it to my skylight now and wire it in! If I've missed anything just post a comment and I'll sort it.
Finally, a big shout out to all the characters that develop all this open software; you are amazing.
Edit: All installed now and working.
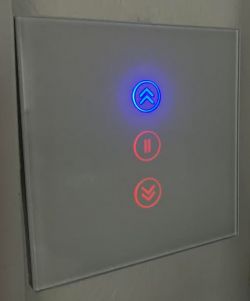
I put the switch panel in the airing cupboard as I intend to automate the window from HA rather than operate it manually, and it keeps those pesky grand children from playing with it!
with the EU Wifi Switch. My skylight is out of reach and I have to get a ladder from that garage to open it! My original intention was to use it with Local Tuya (this would have been my first) within Home Assistant (HA) as I'd read manufacturers had moved away from ESP8266 boards; I'd flashed plenty of those with Tasmota. But then I came across OpenBeken so thought I'd give it a go.
First off, the opener itself is a 4 wire mains device.

Green/Yellow - Earth, Blue - Neutral, Brown - Live Open and Black - Live Close.
The controller is a Smart Life DS-151 N+L, WiFi+BLE Curtain Switch (as labelled on the box) and fits into a standard UK single wall box. The pic shows it with the front panel already removed (flat screwdriver at the base). The board is a WB3S with the BK7231T processor.
 . Three buttons for Open, Stop and Close. The terminal block has Live and Neutral in and the Live/Open and Live/Close outputs.
Flashing
I soldered wires onto the TXD1, RXD1, GND and VCC pads of the WB3S and connected it up my USB/UART converter set to 3V3, Got the appropriate file to flash it with by this method ( OpenBK7231T_UA_1.15.700.bin), downloaded and 'installed' BK_WriterV1.60.exe, and tried to flash. No joy - got a Failed message!

After some advice from the ever so helpful p.kaczmarek2 I had the solution. The Tx and Rx pins are both used by the device as Button input and LED output respectively and the circuitry interfered with the flashing signalling. So I cut the Tracks leading away from those pins in the positions shown.


Tried to flash again using BK_Writer at the default settings but still no joy. Tried again at 115200 baud and this time it started to erase but then failed. I found then that i could read and save the whole of the preloaded firmware so that was progress.
I then turned to another method of flashing using a python program. This was successful so I'll just give the details.
I opened a command window on my PC and created and moved to a directory called 'OpenBKT', then I got the program using the command
git clone https://github.com/OpenBekenIOT/hid_download_pyI already had Python installed from years back but you might need that too. When I tried to use the flashing program I found I needed something called 'tqdm' so I got that with the command
pip install tqdmI then successfully flashed the device with the command
python uartprogram C:\Users\Grumps\Openbkt\OpenBK7231T_UA_1.15.700.bin -d com3 -w -b 115200You will need to change the path and com port as appropriate.
I then repaired the cut tracks. One was easily bridged with a blob of solder but the other just wouldn't so in the end I used a very fine wire.


Connecting
Power up the device and use your phone to find and connect to its WiFi - the SSID is pretty obvious. Having done that, open a browser on the phone and go to 192.168.4.1, this should get you into the GUI where you should now enter your own WiFi's credentials. Reboot the device and try and find it through your own router. On my router when I looked at WiFi devices it was actually named so was pretty obvious. You will want to set a reserved IP I guess.
Configuration
The Tuya controller has 3 buttons, 3 LEDs which illuminate the buttons and 2 relays. I set them up thus:
"pin":"function":"channel"
"6": "Rel;1",
"8": "Btn;3",
"9": "Rel;3",
"10": "Btn;2",
"11": "LED_n;3",
"14": "LED_n;1",
"24": "Btn;1",
"26": "LED_n;2"
Everything worked as expected but not how it needed to function so don't connect the actuator at this point!!!!!
With more help from p.kaczmarek2 I wrote an autoexec.bat file to emulate the way the Tuya firmware operated. eg pressing the Open button would turn everything off then turn on the Open relay and LED for 10 seconds. It would then turn all off before turning the Stop LED on for just 3 seconds. I think just to confirm all was off and to not leave power going to the actuator when not necessary. As it turns out 10s is not long enough to open the skylight fully so I increased it to 15s. Here's the autoexec.bat file.
// Set up Aliases
alias Set_Stop backlog setChannel 3 0; setChannel 2 0; setChannel 1 0; setButtonColor 3 red; setButtonColor 2 red; setButtonColor 1 red
alias Set_Open backlog setChannel 1 1; setButtonColor 1 blue
alias Set_Close backlog setChannel 3 1; setButtonColor 3 blue
alias Set_Finish backlog setChannel 2 1; setButtonColor 2 blue
alias Start_Opening backlog stopAllScripts; startScript autoexec.bat openSkylight
alias Start_Closing backlog stopAllScripts; startScript autoexec.bat closeSkylight
alias Stop_All backlog stopAllScripts; startScript autoexec.bat stopSkylight

// Channel 60 is seconds for power to be applied
setChannel 60 15

// create GUI buttons for HTTP panel
startDriver httpButtons

setButtonEnabled 1 1
setButtonLabel 1 "Open"
setButtonCommand 1 Start_Opening
setButtonColor 1 red

setButtonEnabled 3 1
setButtonLabel 3 "Close"
setButtonCommand 3 Start_Closing
setButtonColor 3 red

setButtonEnabled 2 1
setButtonLabel 2 "Stop"
setButtonCommand 2 Stop_All
setButtonColor 2 red

// Hide the default GUI buttons
setChannelVisible 1 0
setChannelVisible 2 0
setChannelVisible 3 0

// Loading Event Handlers
addEventHandler OnClick 8 Start_Closing
addEventHandler OnClick 24 Start_Opening
addEventHandler OnClick 10 Stop_All

// Close Skylight on power up
goto closeSkylight

// do not proceed
return

openSkylight:
Set_Stop
delay_s 0.1
Set_Open
delay_s $CH60
Set_Stop
Set_Finish
delay_s 3
Set_Stop
return

closeSkylight:
Set_Stop
delay_s 0.1
Set_Close
delay_s $CH60
Set_Stop
Set_Finish
delay_s 3
Set_Stop
return

stopSkylight:
Set_Stop
Set_Finish
delay_s 3
Set_Stop
return
I hid the default buttons since they could be used to turn both relays on at the same time and I don't know how the actuator would cope with that! After lots of testing, pressing buttons at random, I was satisfied the code worked ok so connected the actuator.

And it works
Home Assistant
I then configured the MQTT section of the device (IP, Port, User and Password) and gave the Client Topic as 'skylight'. I then copied the YAML code from the HA configuration section and pasted it, as appropriate, into my configuration.yaml file in HA.
mqtt:
  switch:
  - unique_id: "OpenBK_Skylight_Control_relay_1"
    name: "SkyLight 1"
    state_topic: "skylight/1/get"
    command_topic: "skylight/1/set"
    qos: 1
    payload_on: 1
    payload_off: 0
    retain: true
    availability:
      - topic: "skylight/connected"
  - unique_id: "OpenBK_Skylight_Control_relay_2"
    name: "SkyLight 2"
    state_topic: "skylight/2/get"
    command_topic: "skylight/2/set"
    qos: 1
    payload_on: 1
    payload_off: 0
    retain: true
    availability:
      - topic: "skylight/connected"
  - unique_id: "OpenBK_Skylight_Control_relay_3"
    name: "SkyLight 3"
    state_topic: "skylight/3/get"
    command_topic: "skylight/3/set"
    qos: 1
    payload_on: 1
    payload_off: 0
    retain: true
    availability:
      - topic: "skylight/connected"
This gave me 3 new buttons as entities, but they all operated individually and cannot be used that way. So I created a card for my dashboard with the following code.
type: vertical-stack
cards:
  - type: custom:mushroom-title-card
    title: Skylight Control
    alignment: center
  - type: horizontal-stack
    cards:
      - show_name: true
        show_icon: true
        type: button
        tap_action:
          action: call-service
          service: mqtt.publish
          data:
            qos: 0
            retain: false
            topic: cmnd/skylight/Start_Opening
          target: {}
        entity: switch.skylight_1
        name: Open
        icon: mdi:unfold-more-vertical
      - show_name: true
        show_icon: true
        type: button
        tap_action:
          action: call-service
          service: mqtt.publish
          data:
            qos: 0
            retain: false
            topic: cmnd/skylight/Stop_All
          target: {}
        entity: switch.skylight_2
        icon: mdi:pause
        name: Stop
      - show_name: true
        show_icon: true
        type: button
        tap_action:
          action: call-service
          service: mqtt.publish
          data:
            qos: 0
            retain: false
            topic: cmnd/skylight/Start_Closing
          target: {}
        entity: switch.skylight_3
        name: Close
        icon: mdi:unfold-less-vertical
That works properly by calling the MQTT publish service with commands that trigger the event handlers in the autoexec.bat file
And that's it, I just need to fit it to my skylight now and wire it in! If I've missed anything just post a comment and I'll sort it.
Finally, a big shout out to all the characters that develop all this open software; you are amazing.
Edit: All installed now and working.
I put the switch panel in the airing cupboard as I intend to automate the window from HA rather than operate it manually, and it keeps those pesky grand children from playing with it!
Cool? Ranking DIY


