Wi-Fi Display for Home Assistant ESPHOME GEEKMAGIC Smart Weather Clock
I ordered from a popular Chinese portal Small portable smart weather station Wi-Fi Display Weather temperature Humidity Time Alarm clock Desktop decoration
https://pl.aliexpress.com/item/10050064369569...EO&gatewayAdapt=glo2pol#nav-specification
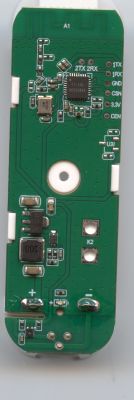
This is the WI-FI display esp8266: board: esp12e
There are different GEEKMAGIC models on esp8266 and ESP32
I changed the software to ESPHome which allows the display of entities from HA
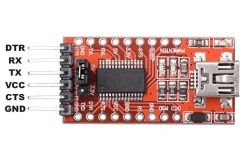
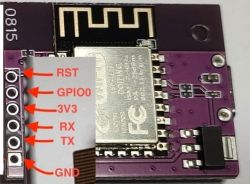
I have connected the ESP board using the FT232 - FTDI USB converter
 .
.
 .
.
and I programmed
.
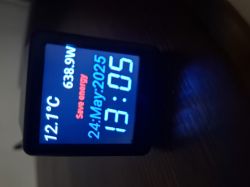
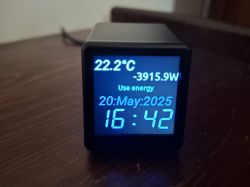
Here is the result on the display you can publish the content of each entity from the HA in this case instantaneous power , date , time , outdoor temperature and use energy is the result of the hourly interphase balancing.
I ordered from a popular Chinese portal Small portable smart weather station Wi-Fi Display Weather temperature Humidity Time Alarm clock Desktop decoration
https://pl.aliexpress.com/item/10050064369569...EO&gatewayAdapt=glo2pol#nav-specification
This is the WI-FI display esp8266: board: esp12e
There are different GEEKMAGIC models on esp8266 and ESP32
I changed the software to ESPHome which allows the display of entities from HA
I have connected the ESP board using the FT232 - FTDI USB converter
 .
.
 .
.
and I programmed
esphome:
  name: smalltv
  friendly_name: SmallTV
esp8266:
  board: esp12e
  framework:
    version: recommended

external_components:
  - source:
      type: git
      url: https://github.com/rletendu/esphome.git
      ref: st7789_nobuffer_202312
    # refresh: 0s
    components: [st7789v]

# Enable logging
logger:

ota:
  platform: esphome

# Enable Home Assistant API
api:
  encryption:
    key: "pihTkDrpuE3BSqFHagILJHX+1ZBQxh97jMuZq3JO6gw="

wifi:
  ssid: !secret wifi_ssid
  password: !secret wifi_password
  fast_connect: true

  # Enable fallback hotspot (captive portal) in case wifi connection fails
  ap:
    ssid: "Cash From Cahos"
    password: "CFC_Rules_Since_69"

# Ici, on active le serveur WEB du ESP8266, en allant sur l'IP du ESP8266, on tombe sur une interface pour piloter les relais

captive_portal:

spi:
  clk_pin: GPIO14
  mosi_pin: GPIO13
  interface: hardware
  id: spihwd

# status_led:
#   pin: GPIO2


output:
  - platform: esp8266_pwm
    pin: GPIO05
    frequency: 40 Hz
    id: pwm_output

light:
  - platform: monochromatic
    output: pwm_output
    name: "Backlight"

font:
  - file: 'Roboto-Italic.ttf'
    id: font1
    size: 38
  - file: 'Ubuntu-Regular.ttf'
    id: font2
    size: 30
  - file: 'Ubuntu-Regular.ttf'
    id: font3
    size: 20
  - file: 'led.ttf'
    id: font4
    size: 85

time:
  - platform: homeassistant
    id: esptime


sensor:
  - platform: homeassistant
    entity_id: sensor.moc_l1_l2_l3
    id: Mocl13
    internal: true
    accuracy_decimals: 1
    unit_of_measurement: "W"
    device_class: "power"
    state_class: "measurement"

  - platform: homeassistant
    entity_id: sensor.sonoffbasic_ds_multi_out
    id: tempzew
    internal: true
    accuracy_decimals: 2
    unit_of_measurement: "°C"
    device_class: "temperature"
    state_class: "measurement"

  - platform: homeassistant
    entity_id: sensor.temp_dom
    id: poktv
    internal: true
    accuracy_decimals: 2
    unit_of_measurement: "°C"
    device_class: "temperature"
    state_class: "measurement"

  - platform: homeassistant
    entity_id: sensor.temperature_max
    id: maxout
    internal: true
    accuracy_decimals: 2
    unit_of_measurement: "°C"
    device_class: "temperature"
    state_class: "measurement"

text_sensor:
  - platform: homeassistant
    name: "Energy 0/1"
    entity_id: input_select.energy_0_1
    id: energy

color:
  - id: color_w
    red: 90%
    green: 90%
    blue: 90%
  - id: color_green
    red: 10%
    green: 60%
    blue: 40%
  - id: color_red
    red: 100%
    green: 0%
    blue: 0%
  - id: color_blue
    red: 10%
    green: 40%
    blue: 60%
  - id: color_blue2
    red: 70%
    green: 70%
    blue: 100%
display:
  - platform: st7789v
    model: "Custom"
    spi_id: spihwd
    height: 240
    width: 240
    offset_height: 0
    offset_width: 0
    # dc_pin: GPIO02
    # reset_pin: GPIO04
    dc_pin: GPIO00
    reset_pin: GPIO02
    #backlight_pin: GPIO25
    eightbitcolor: True
    #update_interval: never
    update_interval: 30s
    id: disp
    spi_mode: mode3
    lambda: |-
      const auto RED     = Color(255, 0,   0,   0);
      // Calculate the center positions
      int center_x = it.get_width() / 2;
      int center_y = it.get_height() / 2;

      // Print "Hello World" centered
      // it.printf(center_x, center_y - 20, id(font2), TextAlign::CENTER, "Hello World");


      // Display the date in abbreviated weekday, MM/DD/YY format
      it.strftime(center_x, 130, id(font1), id(color_blue), TextAlign::CENTER, "%d:%b:%Y", id(esptime).now());
      it.strftime(center_x, 190, id(font4), id(color_blue2), TextAlign::CENTER, "%H:%M", id(esptime).now());

      // it.print(0, 0, id(font1), RED, "Hello World in RED!");

      // it.printf(0, 200, id(font1),"Test1");
      // it.print(130, 5, id(font3), id(color_w), "Grid Power:");
      it.printf(240,40, id(font2), id(color_w), TextAlign::RIGHT, "%.1fW",id(Mocl13).state);
      it.printf(center_x, 90, id(font3), id(color_green), TextAlign::CENTER, "%s", to_string(id(energy).state).c_str());
it.printf(4, 4, id(font1),TextAlign::LEFT, "%.1f°C", id(tempzew).state);Here is the result on the display you can publish the content of each entity from the HA in this case instantaneous power , date , time , outdoor temperature and use energy is the result of the hourly interphase balancing.


