logo elektroda
logo elektroda
X
logo elektroda

[Solved] Dewin RMDT-1PNL 63 Smart Circuit Breaker OpenBK7231 MQTT Setup

lubopetrov 882 66
ADVERTISEMENT
  • #31 21578698
    p.kaczmarek2
    Moderator Smart Home
    So it's a different model? Or how do you configure it? Do you set Toggle and map dpID in the autoexec.bat?
    Helpful post? Buy me a coffee.
  • ADVERTISEMENT
  • #32 21578970
    lubopetrov
    Level 2  
    It is exactly the same model. I flashed and copied the latest version of autoexec.bat. I also checked flags 46 and 47. Maybe I missed something else, but I think I followed and checked your instructions.
  • #33 21578982
    divadiow
    Level 35  
    lubopetrov wrote:
    Here is my device id: bfe887d3d3b94ffed6snhu

    This is a unique device ID linked to your account so cannot be used by others to check Tuya dev. If there's any detail you still don't have feel free to post or DM me factory firmware backup and I can check
  • ADVERTISEMENT
  • #35 21579294
    p.kaczmarek2
    Moderator Smart Home
    lubopetrov wrote:
    the toggle is not functional.

    Do you still have button on the main device page? Or did it diseappear totally?
    Helpful post? Buy me a coffee.
  • #36 21579333
    lubopetrov
    Level 2  
    No, the button is there, but it doesn't do anything.
  • #37 21580035
    lubopetrov
    Level 2  
    How is this possible? I flashed the device, loaded the same autoexec that is working on the other device, but this time the toggle button is not working. Did I miss something?
  • #38 21580134
    p.kaczmarek2
    Moderator Smart Home
    Are you 100% sure it's the same device model?

    Maybe it has different dpIDs - do dpID extraction, maybe?

    Or flash back Tuya and check with TuyaMCU analyzer (as long as you can do it in safe manner)?

    What is your current autoexec.bat of the problematic device?

    Everything else works correctly?
    Helpful post? Buy me a coffee.
  • ADVERTISEMENT
  • #39 21580392
    divadiow
    Level 35  
    Code: JSON
    Log in, to see the code
  • ADVERTISEMENT
  • #40 21580427
    p.kaczmarek2
    Moderator Smart Home
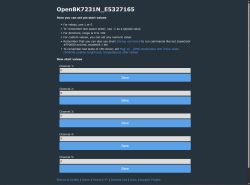
    According to @divadiow post the switch has dpID 16:
    
    
        {
          "id": 16,
          "mode": "rw",
          "name": "断路器开关 (Breaker Switch)",
          "desc": "",
          "desc_en": "",
          "property": { "type": "bool" }
        },
    

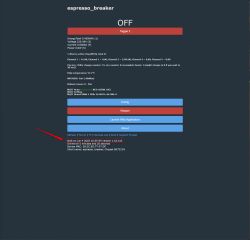
    What do you have in autoexec.bat?
    Helpful post? Buy me a coffee.
  • #41 21580602
    lubopetrov
    Level 2  
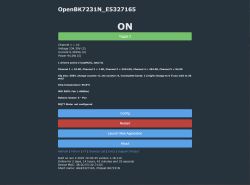
    Yes, everything else is working as on the other device. The device is exactly the same as the other. In fact I bought them together from amazon.de. I copied the autoexec.bat from the other breaker. Even when I press the physical button on the device the UI button "Toggle" switches colors red/green. Maybe I'm missing flags ore something else?
    Dewin RMDT-1PNL 63 Smart Circuit Breaker OpenBK7231 MQTT Setup
    
    // Start TuyaMCU driver
    startDriver TuyaMCU
    // set TuyaMCU baud rate
    //tuyaMcu_setBaudRate 115200
    // set TuyaMCU default wifi state 0x04, which means "paired",
    // because some TuyaMCU MCUs will not report all data
    // unless they think they are connected to cloud
    tuyaMcu_defWiFiState 4
    
    setChannelType 1 ReadOnly
    setChannelType 2 toggle
    // linkTuyaMCUOutputToChannel dpId verType tgChannel
    linkTuyaMCUOutputToChannel 16 bool  2
    // set voltage, current ,power channel types
    setChannelType 3 Voltage_div10
    setChannelType 4 Current_div1000
    setChannelType 5 Power
    // map dpID 6, which is VCP format, to first voltage, then current, then power (3, 4, 5)
    linkTuyaMCUOutputToChannel 6 RAW_V2C3P3  3
    
    // map dpID 1, which is energy, to channel 1
    linkTuyaMCUOutputToChannel 1 val 1
    

    Dewin RMDT-1PNL 63 Smart Circuit Breaker OpenBK7231 MQTT Setup
    Dewin RMDT-1PNL 63 Smart Circuit Breaker OpenBK7231 MQTT Setup
    Dewin RMDT-1PNL 63 Smart Circuit Breaker OpenBK7231 MQTT Setup
  • #42 21580813
    p.kaczmarek2
    Moderator Smart Home
    lubopetrov wrote:
    Even when I press the physical button on the device the UI button "Toggle" switches colors red/green.

    Wait, what? This is very important information. Which physical button? Can you make a photo?
    Helpful post? Buy me a coffee.
  • #43 21580815
    lubopetrov
    Level 2  
    Button on the device
    Dewin RMDT-1PNL 63 Smart Circuit Breaker OpenBK7231 MQTT Setup
  • #44 21580818
    p.kaczmarek2
    Moderator Smart Home
    This is crucial information and this means that communication with TuyaMCU works. So there are three options now:
    - maybe wrong physical connection?
    - maybe relay inside is broken?
    - maybe device has some kind of extra setting within Tuya app or TuyaMCU that disables dpID 16 switch?
    Helpful post? Buy me a coffee.
  • #45 21580826
    lubopetrov
    Level 2  
    1. Wrong physical connection - very unlikely. The light is turning on/off
    2. Broken relay - again unlikely because of the reason above.
    3. Maybe ??? How to check? Can I reflash it back to the original and how?
  • #46 21580833
    p.kaczmarek2
    Moderator Smart Home
    Hm ok, so reflash Tuya 2MB backup and check if it works in Tuya. Maybe some other dpID must be changed for it to work?

    So it's permantently shorted? I mean, is relay always open now or always closed?
    Helpful post? Buy me a coffee.
  • #47 21580835
    lubopetrov
    Level 2  
    The relay works as long as I use the physical button. It turns the light on/off. Btw, I haven't created a project or anything like this on Tuya dev site with this relay. How do I flash the backup fw?

    Added after 1 [hours] 43 [minutes]:

    I found out why this board was acting. When I soldered the wires accidently I damaged one line on the board.
  • #48 21581048
    p.kaczmarek2
    Moderator Smart Home
    I see, so now, once you fix the physical connection, is everything ok?
    Helpful post? Buy me a coffee.
  • #49 21581142
    lubopetrov
    Level 2  
    Yes, thank you. This has been resolved. I still need help with following:
    1. Channel 1= 22 / I believe this is total consumption in kWh. How to change the name from "Channel 1" to "Total Power Consumption" and divide by not sure 100 or 1000
    2. Fine tune the value of power. I have but rated at 100w but is showing like 95W
    Dewin RMDT-1PNL 63 Smart Circuit Breaker OpenBK7231 MQTT Setup
    3. What is the current refresh rate for reporting values and can this be altered to report more often?
    4. How to present all the values above as MQTT data to Home Assistant?
    Can you please help me?
    Here is the current json output:
    
    [
      {
        "id": 109,
        "type": 3,
        "data": "AAAA"
      },
      {
        "id": 106,
        "type": 3,
        "data": "EwAAAAAAAAAAAA=="
      },
      {
        "id": 105,
        "type": 2,
        "data": 0
      },
      {
        "id": 12,
        "type": 1,
        "data": 0
      },
      {
        "id": 13,
        "type": 2,
        "data": 0
      },
      {
        "id": 11,
        "type": 1,
        "data": 0
      },
      {
        "id": 9,
        "type": 5,
        "data": "00"
      },
      {
        "id": 111,
        "type": 4,
        "data": 1
      },
      {
        "id": 104,
        "type": 1,
        "data": 1
      },
      {
        "id": 102,
        "type": 2,
        "data": 5
      },
      {
        "id": 107,
        "type": 2,
        "data": 10
      },
      {
        "id": 18,
        "type": 0,
        "data": "01010276"
      },
      {
        "id": 1,
        "type": 2,
        "data": 25
      },
      {
        "id": 6,
        "type": 206,
        "data": "092C00018A00005E"
      },
      {
        "id": 16,
        "type": 1,
        "data": 1
      }
    ]
    
  • #50 21589240
    lubopetrov
    Level 2  
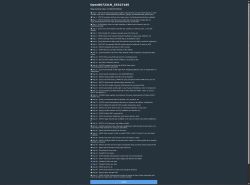
    Why when I try to fine tune the voltage I'm getting error Last status: ERROR: Unknown command (undefined)

    Dewin RMDT-1PNL 63 Smart Circuit Breaker OpenBK7231 MQTT Setup
  • #51 21589431
    p.kaczmarek2
    Moderator Smart Home
    1. Try EnergyTotal_kWh_div1000 channel type, maybe?
    2. You can specify offset while mapping dpIDs.
    https://github.com/openshwprojects/OpenBK7231T_App/blob/main/docs/commands.md
    Dewin RMDT-1PNL 63 Smart Circuit Breaker OpenBK7231 MQTT Setup
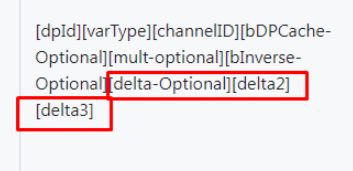
    Use 0 for dpCache, 1 for mult, 0 for bInverse, then specify deltas.
    3. If possible, then repeatedly request update from MCU:
    
    addRepeatingEvent 10 -1 tuyaMcu_sendQueryState
    

    Every 10 seconds.
    https://github.com/openshwprojects/OpenBK7231T_App/blob/main/docs/autoexecExamples.md
    4. Use HASS discovery:


    Regarding last question: Voltageset is not TuyaMCU, just for BL0942/BL0937
    Helpful post? Buy me a coffee.
  • #52 21589447
    lubopetrov
    Level 2  
    The power consumption is not correct. I have a bulb that is 100 watts, but it is showing like 95. How do I fix this?
  • #53 21589452
    p.kaczmarek2
    Moderator Smart Home
    You can specify offset for the mapped value in autoexec.bat:
    p.kaczmarek2 wrote:

    2. You can specify offset while mapping dpIDs.
    https://github.com/openshwprojects/OpenBK7231T_App/blob/main/docs/commands.md
    Dewin RMDT-1PNL 63 Smart Circuit Breaker OpenBK7231 MQTT Setup
    Use 0 for dpCache, 1 for mult, 0 for bInverse, then specify deltas.

    Find the line where you are mapping the VCP packet (Voltage/Current/Power), fill the missing fields with default values, and use delta values to adjust Voltage/Current/Power.
    Helpful post? Buy me a coffee.
  • #54 21589826
    lubopetrov
    Level 2  
    The device measures 228v but I measure with multimeter 222v. My control bulb is rated at 100 watts but it is showing as 96w. How can I adjust delta for voltage if in my autoexec I have the following:
    
    linkTuyaMCUOutputToChannel 6 RAW_V2C3P3  3
    
  • #55 21589836
    p.kaczmarek2
    Moderator Smart Home
    This is incorrect. You have:
    
    setChannelType 3 Voltage_div10
    setChannelType 4 Current_div1000
    setChannelType 5 Power
    

    And:
    
    linkTuyaMCUOutputToChannel 6 RAW_V2C3P3 3
    

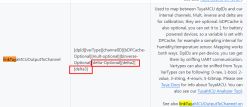
    And arguments are:
    Screenshot showing TuyaMCU channel configuration and commands for linking and setting deltas for voltage, current, and power.
    So you stub dpCache, mult and inversion:
    
    linkTuyaMCUOutputToChannel 6 RAW_V2C3P3 3 0 1 0
    

    and then add deltas for Voltage, Current, Power
    
    linkTuyaMCUOutputToChannel 6 RAW_V2C3P3 3 0 1 0 50 100 150
    

    In sample above, voltage raw value delta is 50 (5V), current delta is 100, and so on.
    Deltas are not scaled (in TuyaMCU values). You need to save and restart to see result I guess.
    Helpful post? Buy me a coffee.
  • #56 21589857
    lubopetrov
    Level 2  
    Per instructions I changed to:
    linkTuyaMCUOutputToChannel 6 RAW_V2C3P3 3 0 1 0 50

    but it didn't affect the value for the voltage.
  • #57 21589859
    p.kaczmarek2
    Moderator Smart Home
    Save config and reboot. Also make sure that you have latest OBK release, and not some old version. You may have OBK from before we added calibration.
    Helpful post? Buy me a coffee.
  • #58 21589864
    lubopetrov
    Level 2  
    I believe my OBK is fairly recent.

    Screenshot of an autoexec configuration file for TuyaMCU driver, displaying commands and English comments.

    And yes. I did reboot the device.

    Added after 2 [minutes]:

    For your review I'm posting my current autoexec
    
    // Start TuyaMCU driver
    startDriver TuyaMCU
    // set TuyaMCU baud rate
    //tuyaMcu_setBaudRate 115200
    // set TuyaMCU default wifi state 0x04, which means "paired",
    // because some TuyaMCU MCUs will not report all data
    // unless they think they are connected to cloud
    tuyaMcu_defWiFiState 4
    setChannelType 1 EnergyTotal_kWh_div100
    setChannelType 2 toggle
    // linkTuyaMCUOutputToChannel dpId verType tgChannel
    linkTuyaMCUOutputToChannel 16 bool  2
    // set voltage, current ,power channel types
    setChannelType 3 Voltage_div10
    setChannelType 4 Current_div1000
    setChannelType 5 Power
    // map dpID 6, which is VCP format, to first voltage, then current, then power (3, 4, 5)
    linkTuyaMCUOutputToChannel 6 RAW_V2C3P3 3 0 1 0 50
     
    // map dpID 1, which is energy, to channel 1
    linkTuyaMCUOutputToChannel 1 val 1
    
  • #59 21589871
    p.kaczmarek2
    Moderator Smart Home
    Calibration for VCP was added on Jun 17, so you don't have it yet.
    File Explorer window with the autoexec.bat file selected for backup.
    Make autoexec.bat backup first.


    Helpful post? Buy me a coffee.
  • #60 21589887
    lubopetrov
    Level 2  
    Thanks. It worked!
    But now there is another issue. When the bulb is off the device reports consumption of the delta value.

    Dewin RMDT-1PNL 63 Smart Circuit Breaker OpenBK7231 MQTT Setup

Topic summary

The discussion focuses on integrating the Dewin RMDT-1PNL 63 Smart Circuit Breaker with Home Assistant using the OpenBK7231IN firmware without relying on the Tuya cloud. After flashing the device with OpenBK7231IN_QIO_1.18.102.bin, the user could add the breaker to Home Assistant but initially lacked power consumption data and ON/OFF control. It was identified as a TuyaMCU-based device requiring specific configuration, including enabling flags 46 or 47 and running the TuyaMCU driver with proper dpID mappings in autoexec.bat. Key dpIDs include 1 (total forward energy in kWh with scaling), 6 (Phase A voltage, current, and power in a raw 8-byte format), and 16 (breaker switch toggle). The user was guided to disconnect the programmer and power the device from the grid to obtain valid measurements. Configuration steps involved setting channel types for toggle, voltage, current, and power, and linking TuyaMCU outputs to channels with appropriate scaling and offsets to fine-tune readings. The toggle control was functional on one unit but not on the other due to a damaged board trace, which was resolved after repair. The user also inquired about renaming channels, adjusting measurement precision, refresh rates (suggested via addRepeatingEvent for periodic state queries), and MQTT integration with Home Assistant using HASS discovery. The discussion included troubleshooting logs, dpID data extraction, and firmware backup restoration. The final setup allowed accurate voltage, current, power, and total energy monitoring with toggle control via Home Assistant, fully independent of the Tuya cloud.
Summary generated by the language model.
ADVERTISEMENT