logo elektroda
logo elektroda
X
logo elektroda

[Solved] Integrating SMTONOFF Tuya 3-Phase 100A Protector with Home Assistant via MQTT

thermiq 477 10
ADVERTISEMENT
  • Helpful post
    #1 21536157
    thermiq
    Level 3  
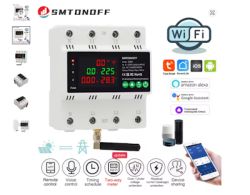
    I've recently bought a 3-phase energy monitor labeled SMTONOFF Smart auto reclosing protector, marketed as Tuya WiFi Three Phase 4P 100A Auto-Reclosing Over Under Voltage Protector Prepaid Meter Timer Switch Voice Remote Control from aliexpress. I would like to connect this meter locally to Home Assistant through mqtt.

    SMTONOFF three-phase energy meter with WiFi module, LED display, and antenna, shown with feature icons and supported app logos.


    From what I can see this device is not yet broken apart and I cannot resist the challenge :-)
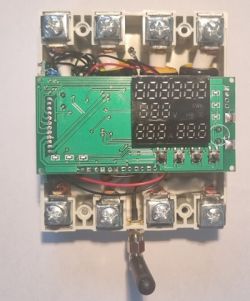
    Disassembled SMTONOFF energy monitor showing main circuit board, screw terminals, and attached antenna.
    First step, removing top enclosure.The keen observer will note that the antenna cable was not connected from factory. What happened to quality control?
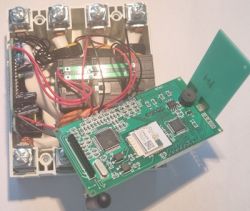
    Opened three-phase energy meter with the main circuit board extended and visible wiring and electronics.
    Second step, pulling the main board up. Nicely connected with the power board by pin-connectors, the angled pcb is a "foot". Transformers soldered directly to main board. Overall good quality and workmanship.
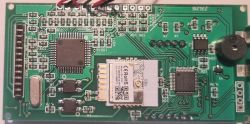
    SMTONOFF device mainboard with integrated CBU-IPEX module, BK7231N chip, and various electronic components.

    Third step, the main board. Uses a CBU-IPEX module with a BK7231N chip, an STC8H3K64S2 MCU in a 48 pin package, and a V9203 3-phase energy monitoring chip.
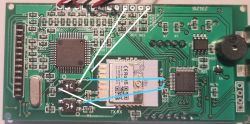
    Close-up of SMTONOFF mainboard with highlighted TX and RX UART communication traces.

    Fourth step, some brief analysis shows that serial RX1/TX1 of the CBU module is connected to the STC8H RXD2/TXD2 through opto-couplers. There are different power domains, no shared ground or VCC. It seems probable that hooking up the CBU module with external power and RX/TX would work without any modifications to the board. Verified to work. Remove the board and connect power and RX/TX to the CBU, and then flash

    What are the next steps?
    AI: Have you been able to identify what firmware is currently running on the CBU-IPEX module, or whether the device is compatible with Tuya-convert or any other known flashing methods?

    This device is now verified to be a TuyaMCU device that works with OpenBK.

    AI: What’s your experience level with flashing firmware via UART/serial and setting up MQTT integrations in Home Assistant?
    Experienced hardware and software hacker, new to OpenBK

    Added after 1 [hours] 21 [minutes]:

    Hooked it up and used BK7231 Easy UART Flasher to read out flash. Partly successful. See log below:
    Code: Dos
    Log in, to see the code
    [/code]

    Added after 7 [minutes]:

    Some more output from the beginning og the log:

    Getting bus success!
    Going to set baud rate setting (921600)!
    Will try to read device flash MID (for unprotect N):
    Flash MID loaded: 1560EB
    Will now search for Flash def in out database...
    Flash def found! For: 1560EB
    Flash information: mid: 1560EB, icName: TH25Q16HB, manufacturer: TH, szMem: 1000000, szSR: 2, cwUnp: 0, cwEnp: 7, cwMsk: 407C, sb: 2, lb: 5, cwdRd: 05-35-FF-FF, cwdWr: 01-FF-FF-FF
    Entering SetProtectState(True)...
    sr: 7c
    sr: 7c
    final sr: 7c
    msk: 407c
    cw: 0, sb: 2, lb: 5
    bfd: 0
    sr: 0
    sr: 0
    final sr: 0
    msk: 407c
    cw: 0, sb: 2, lb: 5
    bfd: 0
    SetProtectState(True) success!
    Going to read encryption key...
    Encryption key read done!
    
    [/code]
  • ADVERTISEMENT
  • #2 21536693
    p.kaczmarek2
    Moderator Smart Home
    Classic TuyaMCU device, let's support it.
    First check out this topic, for generic TuyaMCU info:
    TuyaMCU flashing, setup and configuration guide - configure dpIDs for Home Assistant
    Extracting DpIDs for TUYA MCU devices

    Then you can also check out this - we have new Berry integration, which can be now used for more advanced TuyaMCU support, if needed
    Berry scripting for various IoT platforms - tutorial for OBK new script integration part 1

    You can also look up related topic, where I had similar device, but without display:
    Tuya 63A 3-phase electricity meter - test, interior, firmware change
    It is very likely that your device even might have matching datapoints identifiers, but it's still better to check it/
    Helpful post? Buy me a coffee.
  • #3 21536904
    thermiq
    Level 3  
    I installed openBK7231N with the EASY UART Flasher and got the "webserver" up and running. Good.

    After that I did some logic capturing with a saleae device in hope of figuring out the baud parameters, but it did not make sense. Looks like a serial stream clocked at 1MHz with an active high start bit. But most data is low, no parity or stop bit. In other words, I get a 1MHz pulse high followed by lows until next 1MHz pulse.

    I did this on the RX/TX of the CBU assuming a "floating ground" wrt the saleae and my PC's ground. This might be wrong of course.
  • ADVERTISEMENT
  • #4 21536920
    p.kaczmarek2
    Moderator Smart Home
    I don't think you really need to capture the packets to guess the baud rate. There are basically just two options that were so far observed in TuyaMCU devices. And if you have correct baud, you will see heartbeat packets sent and tuyaMCU_sendQueryState (see https://github.com/openshwprojects/OpenBK7231T_App/blob/main/docs/commands.md ) will work. You can set baud with tuyaMcu_setBaudRate .

    Just make sure to do a full power off/on between testing baud settings, or at least restart.

    Added after 37 [seconds]:

    Search for tuyaMcu_setBaudRate in this readme: https://github.com/openshwprojects/OpenBK7231T_App/blob/main/docs/autoexecExamples.md
    Helpful post? Buy me a coffee.
  • #5 21536936
    thermiq
    Level 3  
    The TUYA device you mentioned looks quite different from the one I have (both physical and pcb and schematic), but the last picture in that thread is the same device as I have. I don't see why that device is brought up in the thread but it might be lost in translation to Swedish.

    Analyzing the fw does not reveal any TUYA Config or OBK

    What would be a good starting config in the web-interface?
  • ADVERTISEMENT
  • Helpful post
    #6 21536980
    p.kaczmarek2
    Moderator Smart Home
    Here is a good starting config, search for "Here is a starting config:" in the text. It has line to choose baud rate, if required:
    p.kaczmarek2 wrote:
    Helpful post? Buy me a coffee.
  • #7 21538571
    thermiq
    Level 3  
    It turns out to be the exact same as the 63A version linked above:

    
    startDriver TuyaMCU
    startDriver NTP
    //tuyaMcu_setBaudRate 115200
    // not really needed here
    tuyaMcu_defWiFiState 4
    setChannelType 1 Toggle
    linkTuyaMCUOutputToChannel 16 bool 1
    // phase A
    setChannelType 2 Voltage_div10
    setChannelType 3 Current_div1000
    setChannelType 4 Power
    linkTuyaMCUOutputToChannel 6 RAW_TAC2121C_VCP 2 3 4
    // phase B
    setChannelType 5 Voltage_div10
    setChannelType 6 Current_div1000
    setChannelType 7 Power
    linkTuyaMCUOutputToChannel 7 RAW_TAC2121C_VCP 5 6 7
    // phase C
    setChannelType 8 Voltage_div10
    setChannelType 9 Current_div1000
    setChannelType 10 Power
    linkTuyaMCUOutputToChannel 8 RAW_TAC2121C_VCP 8 9 10
    // temperature
    setChannelType 11 Temperature_div10
    linkTuyaMCUOutputToChannel 102 val 11
    // balance (increases)
    linkTuyaMCUOutputToChannel 1 val 12
    setChannelType 12 EnergyTotal_kWh_div100
    .


    Thanks a lot for your help
    /&&
  • Helpful post
    #8 21538854
    p.kaczmarek2
    Moderator Smart Home
    That one?
    p.kaczmarek2 wrote:

    You can also look up related topic, where I had similar device, but without display:
    Tuya 63A 3-phase electricity meter - test, interior, firmware change
    It is very likely that your device even might have matching datapoints identifiers, but it's still better to check it/

    Well, that's certainly a good news. Let me know if you need any futher help with configuration. We also have Berry support now, which can make it much more customizable.
    Helpful post? Buy me a coffee.
  • #9 21538899
    thermiq
    Level 3  
    Yes, that's the one.

    The base features work, power, voltages and currents. Not sure about the temperature which looks a bit odd but I will log it and see if it makes sense.

    The missing features are voltage alarm levels, behaviour at single phase loss and likely also earth fault protection which maybe could be set to different levels.

    Not sure what more can be done with berry compared to this base config but will read up a little...
  • Helpful post
    #10 21540500
    p.kaczmarek2
    Moderator Smart Home
    Alarms are stored in those large "raw" type packets in format, as far as i remember, byte 1 or 0 (enabled or disabled) and then 16 bit value. I've already spoke about it a bit more in a previous topic related to this device. I've been planning to add some kind of configurable support of them in OBK, but didn't have time yet.

    Berry can now access raw TuyaMCU data and you can parse it in Berry as bytes, so virtually anything is possible with Berry. It's just that Berry TuyaMCU tutorial is not ready, I havent managed to publish it yet, but the functionality is already in the OBK code.

    Added after 9 [hours] 8 [minutes]:

    I looked at it again. See here: https://www.elektroda.com/rtvforum/topic4101799.html
    Screenshot showing the byte layout for dpID 17 and 18 alarms, explaining the meaning of each byte in the packet.
    Screenshot showing raw TuyaMCU packet data received by a WiFi module, displayed in hexadecimal with highlighted field names and values.

    Two examples of raw data packets from WiFi showing structure with alarmID, on/off (byte), and value (2 bytes).
    Helpful post? Buy me a coffee.
  • ADVERTISEMENT

Topic summary

The discussion focuses on integrating the SMTONOFF Tuya WiFi Three Phase 4P 100A Auto-Reclosing Over Under Voltage Protector with Home Assistant via MQTT. The device is identified as a classic TuyaMCU-based product, and users explore firmware analysis, baud rate configuration, and data point (DpID) extraction for local control. The OpenBK7231N firmware with EASY UART Flasher was successfully installed to enable a webserver interface. Baud rate options typical for TuyaMCU devices were tested, with 115200 baud commonly used. A starting configuration script for Home Assistant was shared, mapping voltage, current, power, temperature, and energy channels to TuyaMCU datapoints. Advanced features like voltage alarm levels, phase loss behavior, and earth fault protection are not yet fully supported but can potentially be implemented using Berry scripting, which allows parsing raw TuyaMCU data bytes for custom logic. Alarms are encoded in large raw packets with enable flags and 16-bit values. The integration is functional for basic monitoring, with ongoing development for extended features and customizable automation via Berry scripts.
Summary generated by the language model.
ADVERTISEMENT