IN
Elektroda.pl gadgets a communication module will appear soon
Wi-Fi and
Bluetooth based on
ESP32 . Compared to previously available modules
ESP8266 The ESP32 has two 32b cores, one dedicated to supporting wireless communication. The comparison of ESP8266 with ESP32 shows new functionalities and greater possibilities at a similar price and power consumption.
Characteristics of ESP32 compared to ESP8266: -number of cores: 2 (ESP8266: 1)
-WiFi + Bluetooth / BLE (ESP8266: WiFi)
-RAM: 512kB (ESP8266: 160kB - 96 + 64)
- number of GPIO pins depending on the version: ~ 32 (ESP8266: ~ 16)
- ADC channels quantity: 18 12b channels (ESP8266: 1 10b channel)
-Number of DAC channels: 2 8b channels (ESP8266: 0)
- the number of channels of the touch interface: 10 (ESP8266: 0)
- SPI, I2C, UART, I2S, CAN, IR, Ethernet MAC buses (ESP8266: SPI, I2C, UART, I2S)
-supporting cryptographic functions: SHA, AES, ECC / RSA, RNG
-16x PWM
Interfaces for the card
SD and
MAC Fast Ethernet allow for easy building of universal modules such as:
WiFi / BLE / Ethernet / microSD The module is equipped with a system
CP2102 being a USB UART converter, which allows, among others for programming the module from the Arduino level. There is a stabilizer on the module's board, which enables power supply with 5V, e.g. from a USB port.
Integration with the Arduino environment under Win10 control: -we install the latest version of Arduino
https://www.arduino.cc/ currently 1.8.3
-we install python 2.7
https://www.python.org/ selecting "Add python.exe to Path" during installation - we install the Git client
https://git-scm.com/downloads - run Git GUI as administrator (right mouse button)
-select "clone existing repository"
- we give the source:
https://github.com/espressif/arduino-esp32.git -select the target as the path that you will find in Arduino-> File-> Preferences-> Sketchbook Location, at the end of the path add \ hardware \ espressif \ esp32, then click Clone
-We go to the created directories \ hardware \ espressif \ esp32 then \ tools and run get.exe
we observe the process of downloading and unpacking
- run the Arduino environment, select tools -> board and the option to select ESP32 Dev Module should appear, select the serial port that appeared in the system after connecting the board.
We can start working with ESP32!
The update consists in starting the Git GUI, selecting the created repository and selecting Remote-> Fetch from-> orgin and then restarting get.exe in \ hardware \ espressif \ esp32 \ tools \
Preparing to work with ESP32 is more complex than in the case of ESP8266, if you notice errors in the description or encounter problems with launching, let us know in this topic, together we should be able to overcome any obstacles.
DS18B20 Blynk Wi-Fi Thermometer - code redemption for ESP8266. As in the previous material, we will try to send data from the temperature sensor to the blynk application on a smartphone. Unfortunately, the arduino thingspeak library does not currently support ESP32, but you can send thingspeak data with regular GET requests.
When you are adjusting your programs on ESP8266 to ESP32, you should, among others change:
#include to #include
Another change is the names of the pins, we change the naming convention:
D2, D3, D4, D5 etc. replace with ordinary 2,3,4,5 etc.
We change the program code for blynk from the previous example and we can receive data from the temperature sensor sent via WiFi on the application on our smartphone.
More information about blynk in the previous material:
ESP8261 D1 mini .
Sample program code:
Main line
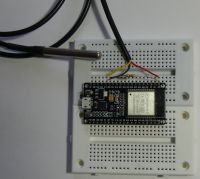
1-wire has been configured on the G13 pin, which we connect with the yellow wire of the DS18B20 sensor, the G13 pin is connected with the 4.7kom resistor with + 3.3V, the red sensor wire with 3.3V, and the black with GND.
After configuring the WiFi access program and the blynk token in the code, after compiling and running on ESP32 in the blynk application on the smartphone, the current temperature readings should appear. We managed to use the code described in the two previous materials:
D1 mini module - ESP8266 and
ESP8266-12E NodeMCU Amica + DS18B20 Internet radio on ESP32: Let's try to leave Arduino for a moment and go a bit beyond the IoT application scheme in the form of a temperature sensor.
We will launch an internet radio player project on ESP32:
https://github.com/MrBuddyCasino/ESP32_MP3_Decoder The project is based on an earlier one that cooperated with ESP8266:
https://github.com/espressif/ESP8266_MP3_DECODER You can find projects extended with an external DAC and OLED display:
https://www.youtube.com/watch?v=aSnZo7Biu5E https://github.com/kodera2t/ESP32_OLED_webradioAccording to the description on the website:
http://esp-idf.readthedocs.io/en/latest/get-started/windows-setup.html, download the MSYS2 toolkit, unpack the downloaded archive e.g. to C: \ msys32 and run C: \ msys32 \ mingw32.exe
We can close the environment window, in the location C: \ msys32 \ home \ username \ create a folder with the name e.g. esp
According to the description
http://esp-idf.readthedocs.io/en/latest/get-started/index.html#get-started-get-esp-idf, run cmd and go to the esp directory in the console
cd C: \ msys32 \ home \ username \ esp
We run the git tool installed during the integration with Arduino by issuing the command:
git clone --recursive
https://github.com/espressif/esp-idf.git then we enter the esp-idf directory:
cd esp-idf
and give the command
git submodule update --init
It remains to configure the paths as described:
http://esp-idf.readthedocs.io/en/latest/get-s...-profile.html#add-idf-path-to-profile-windows So in the C: /msys32/etc/profile.d/ directory we create a file, e.g. export_idf_path.sh
enter in the file:
export IDF_PATH = "C: / msys32 / home / username / esp / esp-idf"
Run C: \ msys32 \ mingw32.exe again and enter:
printenv IDF_PATH
The path should point to the location of esp-idf in the esp directory
For a change, let's use the GIT GUI and choose the option of cloning an existing repository:
source:
https://github.com/MrBuddyCasino/ESP32_MP3_Decoder.git destination: C: \ msys32 \ home \ username \ esp \ web_radio
choose remote-> fetch from-> orgin
Run C: \ msys32 \ mingw32.exe and go to the C: \ msys32 \ home \ username \ esp \ web_radio directory
We make the configuration:
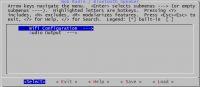
make menuconfig

In the serial flasher config section, we provide the COM port number on which the ESP32 connected is available (to be checked in the device manager or Arduino environment):

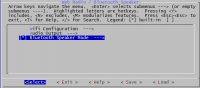
In the Web Radio / BT Speaker section, set the WiFi access parameters and the type of audio output:
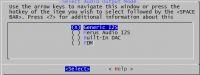
I chose the built-in 8bit DACs which will give quite poor sound quality, but you can use an external I2S DAC which should significantly improve the quality of the sound played.
We save the settings and exit the configuration tool, then issue the command:
make flash
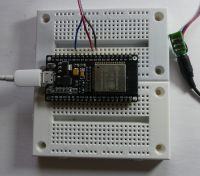
After compilation, the result will be sent to ESP32 and run, the audio signal will appear on DAC pins G25, G26:
The boot button switches the stream sources defined in:
C: \ msys32 \ home \ username \ esp \ web_radio \ main \ playlist.pls
Bluetooth speaker on ESP32: By doing again:
make menuconfig
we can change the configuration so that the
https://github.com/MrBuddyCasino/ESP32_MP3_Decoder project works as a bluetooth speaker.
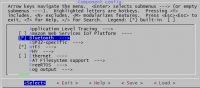
In the component config section, select Bluetooth:
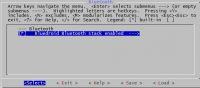
In Bluetooth we choose Bluedroid Bluetooth stack enabled:
Then the Bluetooth clasics:
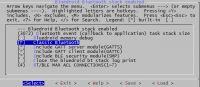
In the web radio section, select BT speaker mode, here we can change the name of the BT device:
After compiling and loading the code into ESP32:
make flash
e.g. in the smartphone we can search and connect to the ESP_SPEAKER device or with a different name, if you changed it during configuration.
Compared to the previous material about ESP8266, the launch of ESP32 may seem more complex, but it is worth learning new things and trying out the new functionalities offered by ESP32.
What ideas do you have for using your ESP32? 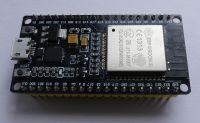


Comments
Well, you can go crazy with this module. Interestingly, 20 items can be ordered for points soon :) [Read more]
I regret that I did not wait, but on the other hand, I think it is a bit too heavy to start from scratch ... Although incomparably better for my target plans, if only because of the large number of ADC... [Read more]
Well, finally something stronger, I am asking where are any gadgets? :D Recently I took ESP8266 from gadgets, I got a screwdriver with the electrode logo for free which was nice ;) Such a cool ruler would... [Read more]
This is a bit more powerful device, it is important that your own soft will not interfere with WiFi support as it could have been in ESP8266, ADC is clearly more useful, and the number of hardware interfaces... [Read more]
The module is a bit complicated and there is a lot less documentation and examples. Probably a matter of time. The module actually went on sale half a year ago. He may also have childhood problems. Therefore,... [Read more]
It is a pity that it was not immediately - if someone wants to put together many projects together, these 12 MB of memory more than NodeMCU may be useful ... [Read more]
In the case of ESP32, the word "soon" has become obsolete as the modules are already available in the elektroda.pl gadgets :) It's Monday, observing the previous actions Tuesday / Wednesday it... [Read more]
Well, I miss some points ... :D Maybe in some time there will be a cheaper gadget with this ruler :D [Read more]
As I already wrote, there are sections (Articles / DIY) that allow you to quickly get points thanks to the publication of interesting materials, but in fact it is worth waiting for the next edition because... [Read more]
I mostly care about the ruler ;) A caliper pen can be bought aledrogly, but not such a ruler. [Read more]
Yes you can. Type in the PCB line in Google and it will turn out that you can buy at many electronics stores and on all-markets too. I saw the 20cm version for 15 PLN and 30 for probably 20-25 PLN. [Read more]
In fact, in China, less than PLN 8 :) The order will come soon :) [Read more]
Hello. I wanted to order for points, but "my points stink to you" ... :-? [Read more]
Why? Any overdue probably? They stink :) [Read more]
For a long time worked out :) and points earned since 2015 count: / [Read more]
Well, from the last 2 years, so I also do not have them for gadgets as much as in total points, but much less and I do not complain ... [Read more]
You copied one command on one side and the other on the other. The second is needed when the first is not there --recursive . Save as UTF-8 without BOM. ;) @TechEkspert Was this radio working... [Read more]
@ LED5W radio and BT speaker worked properly, I didn't notice internet radio interrupting but I didn't listen to it for too long, I tested the BT speaker longer and there was no problem with... [Read more]
I am using ESP8266. I had a lot of compatibility issues with Arduino. A few handy functions didn't work and I had to avoid such surprises. It cost me a lot of time, especially since my designs were... [Read more]